If you’ve ever created reports or printed Excel sheets, you know how important headers are for organizing information. Headers can display titles, page numbers, or even the date of creation, which is especially useful when sharing or archiving documents. While you can manually insert the date in a header, doing this repeatedly for multiple worksheets or workbooks can become tedious. That’s where Excel Macros come in. Did you know you can add the current date in an Excel header with just a single click using Macros? Yes, a simple Macro can automate this process for you and save hours of repetitive work.
In this article, we’ll guide you through the process step by step, provide the source code, and explain how it works. By the end of this tutorial, adding the current date in your headers will feel like a one-click magic trick.
Key Takeaways:
- You can automatically add the current date to Excel headers using a simple Macro.
- Macros save time and eliminate repetitive manual work, especially for multiple worksheets.
- Adding the date improves report tracking, professionalism, and documentation accuracy.
- The Macro can be customized to include text, time, or position the date on left, center, or right headers.
- Once set up, running the Macro is a one-click process, making it easy for anyone to maintain consistent headers.
Exercise Workbook:

Table of Contents
Automate Your Excel Headers
Why Add the Date in Excel Headers?
- Track Report Dates: If you generate weekly or monthly reports, having the date in the header tells readers immediately which version of the report they’re looking at. No more guessing if the file is from last week or last month.
- Professional Presentation: A date in the header gives printed sheets a polished, organized look. It’s a small touch that makes reports look official and easy to reference.
- Audit and Documentation: In business or academic settings, keeping track of when a report was created or printed is important for record-keeping. The header acts as a built-in timestamp.
- Consistency Across Sheets: When you have multiple worksheets or workbooks, manually adding dates can lead to errors or inconsistencies. Adding it in the header ensures uniformity everywhere.
- Ease of Printing: When you print reports, the date appears automatically in the header of every page, so each sheet is properly dated without extra effort.
How the Macro Helps
- Automates the Process: Instead of manually going into Page Setup for each worksheet, the Macro adds the date automatically with a single click.
- Dynamic Updates: Every time you run the Macro, it pulls the current system date, so you always get an up-to-date header.
- Works Across Multiple Sheets: With a small adjustment, the Macro can loop through all worksheets in a workbook and add the date to each one automatically.
- Saves Time: Especially for large workbooks, manually inserting the date on each sheet is tedious. A Macro completes this task in seconds.
- Customizable: You can modify the Macro to change the header’s position (left, center, right), include text alongside the date, or even add time.
How to Add Date in Header Using Macros
Enable the Developer Tab
To use macros in Excel, you must have the Developer tab enabled. If you haven’t done this yet, follow these simple steps:
STEP 1: Click on File > Options > Customize Ribbon.
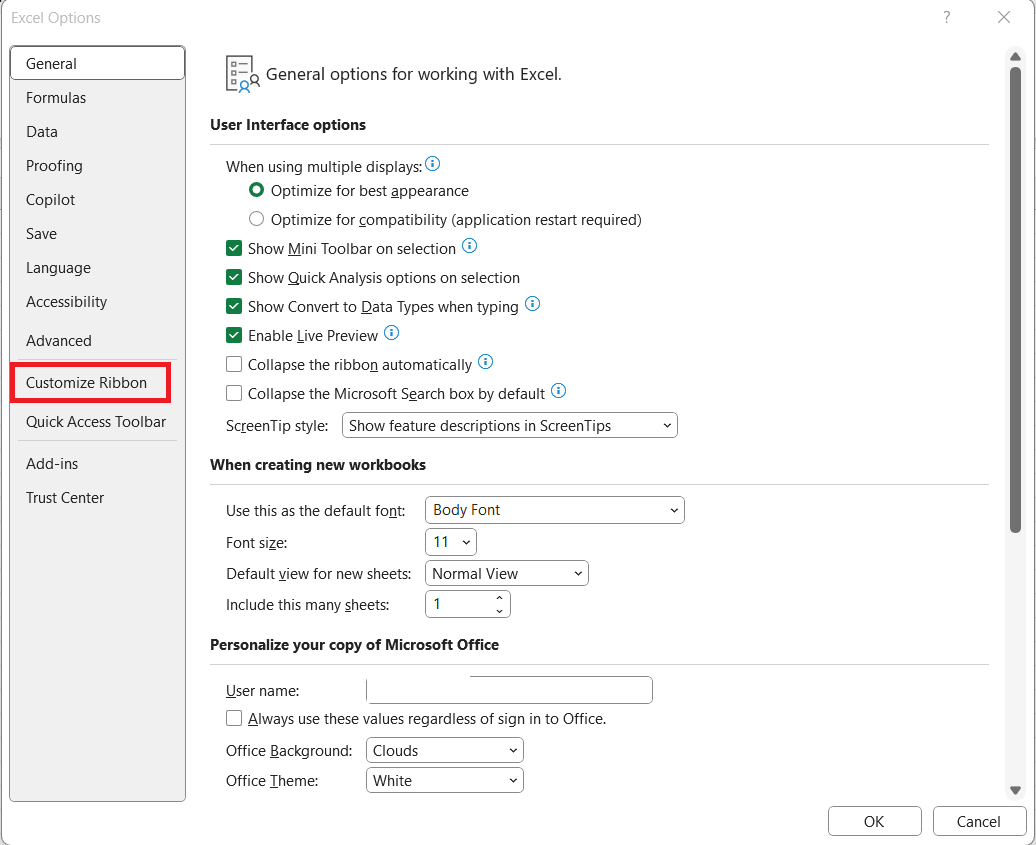
STEP 2: On the right side under “Main Tabs,” check the Developer box. Click OK.
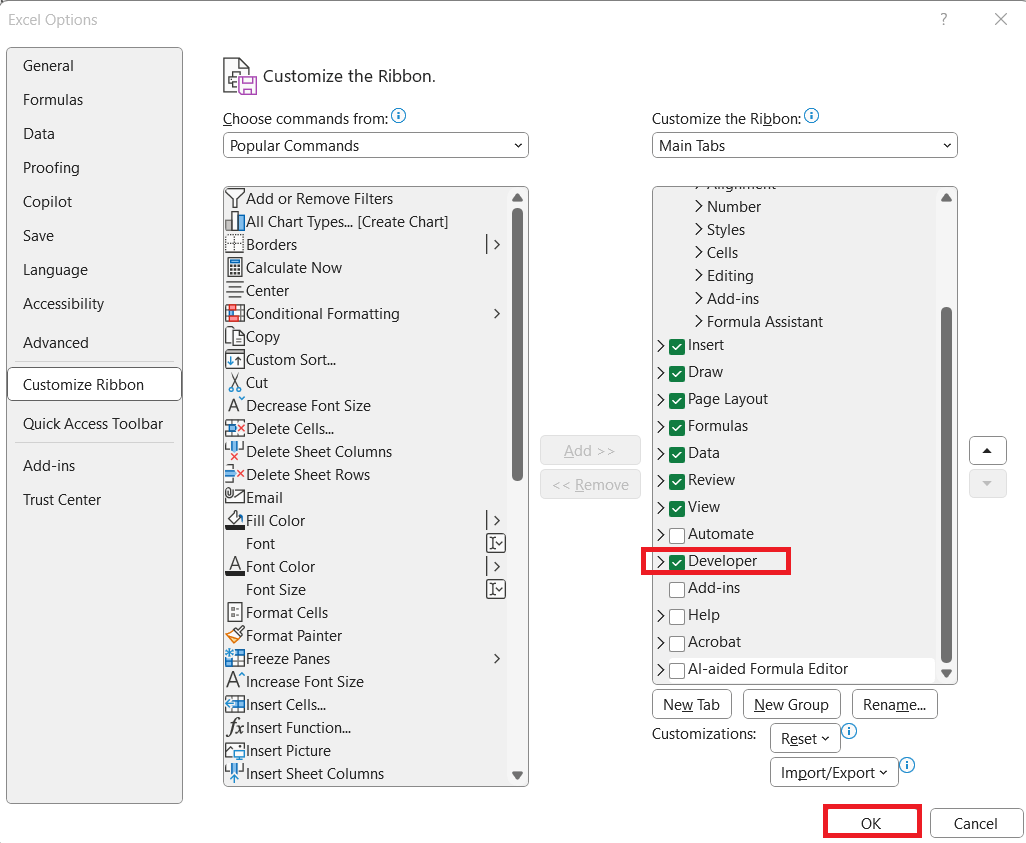
Now, the Developer tab will appear in your Excel ribbon, giving you access to VBA (Visual Basic for Applications) tools, including macros.

Step-by-Step Guide
STEP 1: Go to Developer > Code > Visual Basic

STEP 2: Paste in your code and Select Save. Close the window afterwards.
Sub AddDateInHeader()

'For this example, we are using the center header to show the date
With ActiveSheet.PageSetup
.LeftHeader = ""
.CenterHeader = "&D"
.RightHeader = ""
End With
ActiveWindow.View = xlNormalView

End Sub

STEP 3: Let us test it out!
Go to Developer > Code > Macros

Make sure your macro is selected. Click Run.

To check if the header did get added, go to File > Print:

Now you should be able to see the current date on your header!

Tips and Tricks
- Custom Date Format: You can customize the date format in Excel. For example, use Format(Now(), “dd-mmm-yyyy”) inside a VBA string to display the date as 25-Oct-2025.
- Right or Left Header: Instead of the center, you can place the date in the left or right header by changing .CenterHeader to .LeftHeader or .RightHeader.
- Combine Text and Date: You can include text along with the date. For example: .CenterHeader = “Report Date: &D”.
- Add Time Too: For timestamped reports, include the time by using .CenterHeader = “&D &T” (&T adds the current time).
- Keyboard Shortcut: Assign a shortcut to your Macro via Developer > Macros > Options, so running the Macro is as easy as pressing a key combination.
FAQs
1. Why should I add the date in Excel headers?
Adding the date helps track when reports or worksheets were created, making it easier to reference versions over time. It gives printed reports a professional and polished look. In business and academic settings, it also helps maintain proper documentation. Without a date, sheets may be misinterpreted or become confusing over time. Using headers ensures this information appears automatically on every printed page.
2. What does the Macro actually do?
Excel Macro inserts the current system date into the header of the active worksheet. By default, it places the date in the center header but can be customized. It automates what would otherwise be a repetitive manual task. Each time the Macro is run, it pulls the current date, ensuring the header is always up to date. It can also be modified to work across multiple sheets in a workbook.
3. Can I add both date and time using a Macro?
Yes! By modifying the Macro, you can include time along with the date. For example, using &D &T in the header will show both the current date and time. This is useful for timestamping reports or worksheets that are frequently updated. The process is still fully automated and requires just one click to run. It ensures accurate and consistent date-time stamps on your sheets.
4. How do I run the Macro after pasting the code?
Once you’ve pasted and saved the Macro in the VBA editor, go to Developer > Code > Macros. Select the Macro you want to run (e.g., AddDateInHeader) and click Run. The current date will automatically appear in the header. For convenience, you can also assign a keyboard shortcut through Macros > Options, making it faster to run the Macro anytime.
5. Can I customize where the date appears in the header?
Absolutely! By changing the code in the Macro, you can place the date in the left, center, or right header. For instance, .LeftHeader = “&D” moves it to the left, while .RightHeader = “&D” places it on the right. You can also combine text, like .CenterHeader = “Report Date: &D”. This allows you to format headers exactly how you need for your reports or printed sheets.

Bryan
Bryan Hong is an IT Software Developer for more than 10 years and has the following certifications: Microsoft Certified Professional Developer (MCPD): Web Developer, Microsoft Certified Technology Specialist (MCTS): Windows Applications, Microsoft Certified Systems Engineer (MCSE) and Microsoft Certified Systems Administrator (MCSA).
He is also an Amazon #1 bestselling author of 4 Microsoft Excel books and a teacher of Microsoft Excel & Office at the MyExecelOnline Academy Online Course.


