Power Query in Excel offers a robust set of tools for transforming and formatting data, making complex data tasks more manageable. I’ve found that it particularly excels in text formatting, allowing for high levels of customization and precision tailored to your data’s needs. This guide takes a deep dive into leveraging these capabilities to streamline and enhance tasks like to format text using Power Query, ultimately saving time and reducing errors.
Key Takeaways:
- Power Query simplifies and automates text formatting.
- You can apply formatting without altering your original dataset.
- It allows consistent formatting across multiple sources.
- It supports custom workflows with advanced scripting.
- Clean data leads to better, faster, and more reliable analysis.

Table of Contents
Unlocking the Power of Text Formatting
Transforming Data Streams
In my experience, one of the key advantages of Power Query is its ability to transform data streams effectively. By importing data from various sources like databases, spreadsheets, or web pages, I can clean, shape, and format it directly within Excel. This process allows for the automation of recurring tasks, reducing the manual effort needed for data preparation. Power Query’s intuitive interface lets me apply transformations such as splitting columns, merging datasets, and removing duplicates effortlessly. This saves time and ensures consistency, which is crucial for maintaining data integrity.
Creating Consistency with Formats
Creating consistency with formats in Excel is crucial for accurate data analysis and reporting. In Power Query, I can standardize data appearances by applying uniform text formats. By setting up these formatting protocols, I ensure that my datasets are easier to read and compatible with other data processing tasks. Additionally, Power Query enables the replication of these formats across multiple datasets, ensuring that consistency is maintained throughout my projects. This not only helps in better data comprehension but also simplifies subsequent data analyses.
Step by Step Guide to Format Text using Power Query
STEP 1: Select your data and turn it into an Excel Table by pressing the shortcut Ctrl + T or by going to Insert > Table

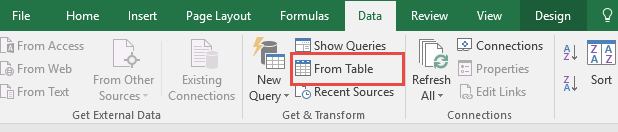
STEP 2: Go to Data > Get & Transform > From Table (Excel 2016) or Power Query > Excel Data > From Table (Excel 2013 & 2010)
Excel 2016:
Excel 2013 & 2010:

STEP 3: This will open up the Power Query Editor. Let us try to convert to lowercase.
Make sure the Full Name column is selected. Go to Add Column > From Text> Format > lowercase


STEP 4: Let us try to convert to uppercase.
Make sure the Full Name column is selected. Go to Add Column > From Text> Format > UPPERCASE


STEP 5: Let us now capitalize each word.
Make sure the UPPERCASE column is selected. Go to Add Column > From Text> Format > Capitalize each word


STEP 6: Let us now try out trimming the text to rid of the extra spaces.
Make sure the Full Name column is selected. Go to Add Column > From Text> Format > Trim

We have now formatted our text in Power Query in multiple ways!

Practical Applications
Cleaning Imported CRM Data: Standardize Customer Names and Emails
Customer data exported from CRMs like Salesforce or HubSpot often contains inconsistencies in text formatting. Names may appear in all caps, lowercase, or a mix of both, while email addresses might have unnecessary spaces or uppercase characters. Using Power Query, you can automatically convert names to proper case and ensure all email addresses are trimmed and formatted in lowercase, maintaining consistency across records and ensuring compatibility with email systems.
HR Reporting: Format Employee Full Names Consistently
In HR reports, it’s common to find employee names entered in varying formats — such as all uppercase, all lowercase, or with extra spaces. This lack of consistency can make reports look unprofessional and harder to read. With Power Query, you can clean these entries by trimming unnecessary spaces, capitalizing each word, and standardizing the format of full names throughout the dataset, resulting in cleaner and more presentable HR documentation.
Financial Data: Clean Messy Exported Transaction Descriptions
Exported financial data often includes transaction descriptions that are cluttered with unnecessary characters, inconsistent naming, or embedded codes. For example, a transaction may read “PAYMENT__RCVD-2024” or “payment rcvd 2024.” Using Power Query, you can remove unwanted characters, replace abbreviations, and apply uniform text casing to create a standardized and readable format for all transaction entries, which is essential for accurate reporting and reconciliation.
Survey Results: Normalize Free-Text Responses
Open-ended survey responses are prone to spelling errors, inconsistent capitalization, and irregular phrasing. An entry like “good service” might appear as “Good service”, “GOOD SERVICE”, or “gud service”. Power Query allows you to apply transformations such as converting text to lowercase, trimming, and replacing commonly misspelled words, helping you group similar responses together and perform more accurate sentiment analysis or reporting.
Vendor Lists: Remove Extra Spaces and Capitalize Names Correctly
Vendor lists are frequently compiled from multiple sources, leading to discrepancies in formatting. Names might contain leading or trailing spaces, or use inconsistent casing. Power Query can quickly clean up these issues by trimming all text fields and applying proper capitalization to each vendor’s name. This not only improves readability but also avoids duplicate entries caused by hidden space or casing differences.
FAQs
1. Can I undo a formatting step in Power Query?
Yes, Power Query automatically records each transformation you apply in the Applied Steps pane. You can easily undo a step by clicking the “X” next to it or right-clicking and choosing to edit or remove it. This step-by-step history makes it simple to backtrack or modify actions without affecting the rest of your work. Since Power Query is non-destructive, changes are reversible at any time before loading the data back into Excel. This makes experimentation and fine-tuning safe and stress-free.
2. Will these changes affect my original Excel data?
No, your original Excel data remains untouched. Power Query creates a separate query layer where all transformations are applied, so your raw dataset stays intact. Only when you choose to load the transformed data back into Excel do you generate a new table — the original stays where it is. This separation provides a secure way to test, clean, and reshape data without risking damage to source information. It also encourages cleaner data workflows and version control.
3. Is Power Query available in all Excel versions?
Power Query is natively integrated into Excel 2016 and later versions under the “Data” tab. For Excel 2010 and 2013, it’s available as a free add-in that can be downloaded from Microsoft’s official website. Once installed, it appears as a separate “Power Query” tab. Though functionality may vary slightly between versions, most core features — including text formatting — are accessible across all supported versions. This makes Power Query a powerful tool even for users with older Excel installations.
4. Can I combine multiple formatting transformations in one step?
Yes, although the graphical interface typically applies one transformation per step, you can combine multiple actions using M Code in the Advanced Editor. This allows you to chain transformations like trimming, changing case, and replacing text within a single command. Combining steps is especially useful when working with large datasets or when trying to reduce the number of applied steps for performance reasons. It also gives advanced users more control and flexibility over the transformation process.
5. What if I need to format text based on a condition?
You can use Power Query’s “Conditional Column” feature to format text based on specific rules or criteria. For example, you could create a rule to capitalize names only if a certain column equals “active”. For more complex logic, you can write custom M Code using if…then…else statements. This approach allows for dynamic formatting based on values, text length, patterns, or even other columns. Conditional formatting ensures your transformations are context-aware and tailored to business rules.

Bryan
Bryan Hong is an IT Software Developer for more than 10 years and has the following certifications: Microsoft Certified Professional Developer (MCPD): Web Developer, Microsoft Certified Technology Specialist (MCTS): Windows Applications, Microsoft Certified Systems Engineer (MCSE) and Microsoft Certified Systems Administrator (MCSA).
He is also an Amazon #1 bestselling author of 4 Microsoft Excel books and a teacher of Microsoft Excel & Office at the MyExecelOnline Academy Online Course.


