Excel is one of the most versatile tools for data management, analysis, and reporting. Often, while working with datasets, you may encounter negative values that need special attention—such as losses, deficits, or other figures that can impact decision-making. Highlighting these negative values can make your spreadsheet more intuitive and visually clear.
While Excel offers conditional formatting as a quick solution, Macros give you an automated and reusable way to highlight negative numbers across multiple datasets with just a click. If you frequently work with large spreadsheets, using a Macro can save you significant time and effort.
In this article, we’ll guide you through the process of highlighting negative values using Excel Macros, step by step.
Key Takeaways:
- Automation Saves Time – Using a Macro to highlight negative values eliminates the need to manually check each cell.
- Visual Clarity – Negative numbers are immediately noticeable in red, improving the readability of data.
- Reusable Tool – Once the Macro is written, it can be applied to multiple worksheets or workbooks.
- Customizable – You can modify the Macro to change font color, background color, or apply additional formatting.
- Beginner-Friendly – Even users with basic VBA knowledge can implement this Macro with simple copy-paste steps.
Exercise Workbook:

Table of Contents
Understanding Macros and Highlighting Negative Values
What is a Macro in Excel?
A Macro is basically a small program or script inside Excel that automates repetitive tasks. Instead of doing the same steps over and over manually, you can record a Macro or write it in VBA (Visual Basic for Applications), and then run it with a single click.
Think of it like a “robot” inside Excel: you tell it what to do once, and it can repeat that task for you instantly.
Examples of things a Macro can do:
- Format cells automatically
- Highlight negative values
- Copy data between sheets
- Create reports automatically
Why do we need to highlight negative values?
1. Instant Visual Recognition – Negative numbers often indicate losses, deficits, or errors. By highlighting them (e.g., in red), your eyes immediately spot problem areas without scanning every cell. Example: In a profit and loss report, losses stand out instantly.
2. Reduces Mistakes – When working with large datasets, it’s easy to miss negative values if they blend in with other numbers. Highlighting ensures you don’t overlook them, preventing calculation or reporting errors.
3. Better Decision-Making – Seeing negative values clearly helps in financial analysis, budgeting, and reporting. You can quickly decide where action is needed, such as cutting costs or investigating unusual results.
4. Saves Time – Instead of manually scanning rows and columns for numbers below zero, highlighting does it automatically. Combined with a Macro, this process can be done in one click, even for huge spreadsheets.
5. Professional Presentation – Reports with highlighted negative values look more polished and understandable. Stakeholders, managers, or clients can immediately see critical data points without confusion.
How to Highlight Negative Values Using a Macro
Enable Developer Tab
Before you can write or run a Macro, you need the Developer Tab:
STEP 1: Go to File > Options > Customize Ribbon.
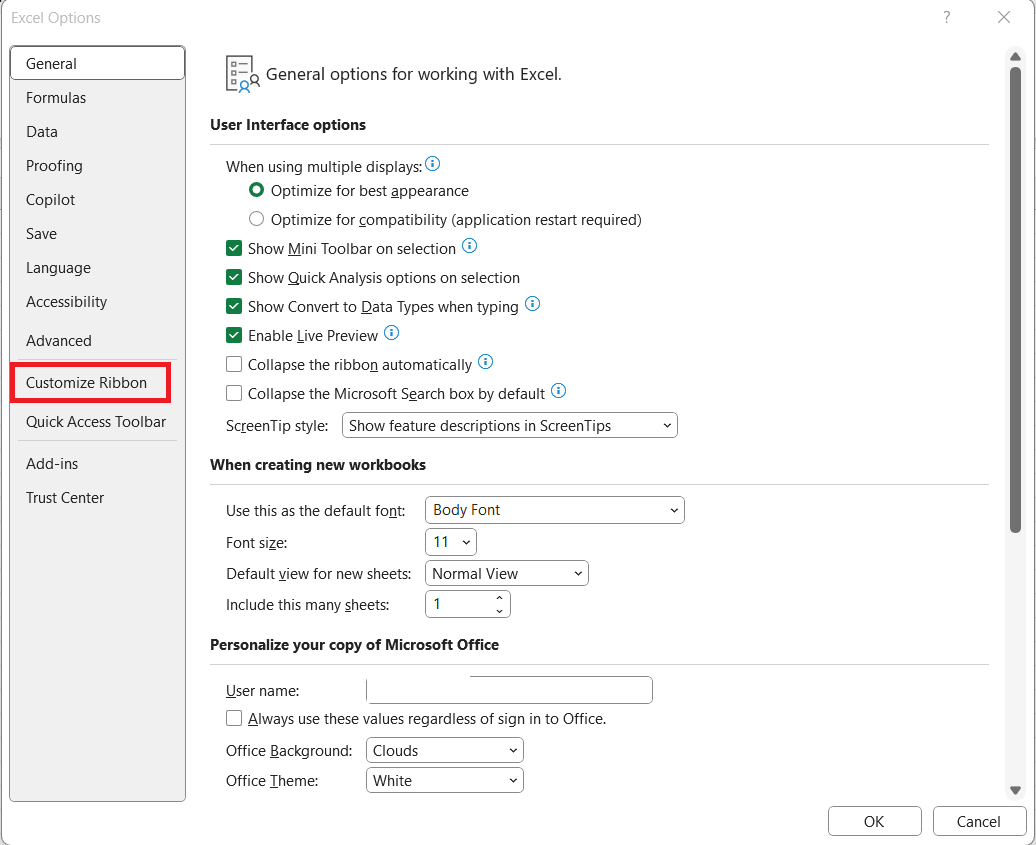
STEP 2: Check the box next to Developer on the right side. Click OK.
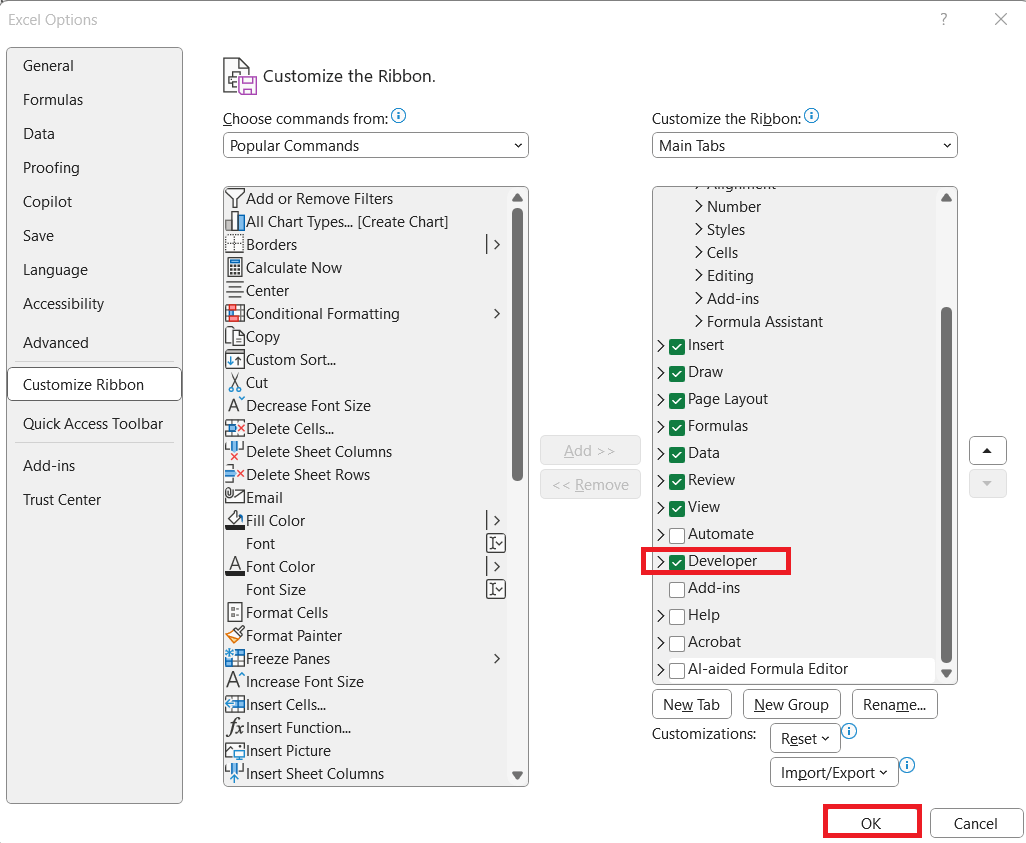
Now you’ll see the Developer Tab in your Excel ribbon.

Write VBA Code
STEP 1: Go to Developer > Code > Visual Basic

STEP 2: Paste in your code and Select Save. Close the window afterwards.
Sub HighlightNegativeValues()
Dim NumberToCheck As Range
'Loop through all numbers in the selection
For Each NumberToCheck In Selection
If WorksheetFunction.IsNumber(NumberToCheck) Then
'If it's lesser than 0, then set the font color to red
If NumberToCheck.Value < 0 Then
NumberToCheck.Font.Color= RGB(255, 0, 0)
End If
End If
Next
End Sub

STEP 3: Let us test it out!
Open the sheet containing the data. Go to Developer > Code > Macros

Make sure your data is selected and that your correct macro is selected. Click Run.

With just one click, all of the negative values are now marked as color red!

Tips & Tricks
Understanding the Macro Code
Let’s break down what’s happening in this Macro:
1. Looping Through Selection
For Each NumberToCheck In Selection
This line iterates over each cell in your selected range. It ensures every cell gets checked without manually specifying ranges.
2. Checking for Numeric Values
If WorksheetFunction.IsNumber(NumberToCheck) Then
This avoids errors from cells containing text or blanks. Only numbers are processed, making the Macro robust for mixed data types.
3. Highlighting Negative Values
If NumberToCheck.Value < 0 Then
NumberToCheck.Font.Color = RGB(255, 0, 0)
End If
If the value is less than 0, it changes the font color to red (RGB 255,0,0). You can easily modify the RGB values to change the highlight color.
Advanced Customization
While this Macro is simple and effective, you can extend it further:
1. Change Background Color Instead of Font
Replace:
NumberToCheck.Font.Color = RGB(255, 0, 0)
with:
NumberToCheck.Interior.Color = RGB(255, 200, 200)
This will give the cell a red background instead of red text.
2. Highlight Multiple Conditions
You can add extra conditions, such as highlighting positive numbers differently:
If NumberToCheck.Value < 0 Then
NumberToCheck.Font.Color = RGB(255, 0, 0)
ElseIf NumberToCheck.Value > 0 Then
NumberToCheck.Font.Color = RGB(0, 128, 0)
End If
Negative values are highlighted in red and positive values in green, making financial reporting visually intuitive and easier to interpret.
FAQs
1. What is a Macro in Excel, and why should I use it?
A Macro in Excel is a small program or script that automates repetitive tasks, saving time and reducing manual effort. Instead of performing the same actions repeatedly, you can record a Macro or write one in VBA (Visual Basic for Applications) and execute it with a single click. Macros are especially useful for tasks like formatting, data cleanup, or highlighting specific values such as negative numbers. They can be customized to suit your workflow and applied across multiple sheets or workbooks. By using Macros, even complex Excel tasks become faster, more accurate, and more efficient.
2. Why do we need to highlight negative values in Excel?
Highlighting negative values helps users quickly identify losses, deficits, or errors in their datasets. When numbers below zero are clearly marked, it reduces the chances of overlooking important data points. This visual clarity also supports better decision-making, allowing users to spot issues and take corrective action promptly. Moreover, it saves time compared to manually scanning large tables for negative numbers. Overall, highlighting negative values improves accuracy, readability, and professional presentation of your data.
3. Can I customize the color used to highlight negative values?
Yes, the color used to highlight negative values in a Macro can be fully customized. In the Macro code, the line NumberToCheck.Font.Color = RGB(255, 0, 0) sets the font color to red. You can change the RGB values to any color you prefer, such as blue, purple, or green. Additionally, you can modify the code to change the cell’s background color instead of the font color using NumberToCheck.Interior.Color. This flexibility allows you to match your spreadsheet’s design or emphasize negative numbers according to your preference.
4. Will the Macro work if my data contains text or blank cells?
Yes, the Macro is designed to work only on numeric values, so text and blank cells are ignored. The line If WorksheetFunction.IsNumber(NumberToCheck) Then ensures that the Macro processes only numbers. This prevents errors that could occur if the Macro tried to highlight non-numeric cells. As a result, you can safely run the Macro on datasets with mixed data types. It is robust and reliable even when working with large and complex spreadsheets.
5. Can I use this Macro to highlight positive numbers or other conditions?
Absolutely. The Macro can be modified to highlight positive numbers, numbers below a custom threshold, or even multiple conditions at once. For example, you can add an ElseIf statement to color positive numbers green while keeping negative numbers red. You can also set thresholds such as highlighting all values below -100 in red for financial reporting purposes. This makes the Macro highly adaptable for various scenarios, including profit-loss analysis, budgeting, and performance tracking. Using such customization, your spreadsheet can visually convey insights instantly.

Bryan
Bryan Hong is an IT Software Developer for more than 10 years and has the following certifications: Microsoft Certified Professional Developer (MCPD): Web Developer, Microsoft Certified Technology Specialist (MCTS): Windows Applications, Microsoft Certified Systems Engineer (MCSE) and Microsoft Certified Systems Administrator (MCSA).
He is also an Amazon #1 bestselling author of 4 Microsoft Excel books and a teacher of Microsoft Excel & Office at the MyExecelOnline Academy Online Course.


