Excel is more than just a spreadsheet tool—it’s a dynamic platform for analyzing, visualizing, and managing data. One of the most powerful features it offers is the ability to automate repetitive tasks with macros. Imagine a situation where you want to highlight values greater than a certain number across thousands of cells. Doing this manually or even with conditional formatting rules can be limiting, but with a simple macro, you can make Excel do the heavy lifting for you.
In this article, we’ll explore how to highlight values greater than a specified number using macros in Excel.
Key Takeaways:
- Macros in Excel automate repetitive tasks and save time.
- Highlighting values greater than a threshold is easier with VBA macros.
- The macro uses an input box so you can set different thresholds each time.
- Macros provide more flexibility than standard Conditional Formatting.
- Practical uses include sales tracking, budgeting, grading, and inventory management.
Exercise Workbook:

Table of Contents
Understanding the Power of Macros in Excel
Before diving into the actual code, it’s important to understand why macros exist and how they can make your work in Excel faster and smarter.
What is a Macro?
A macro in Excel is essentially a set of instructions written in Visual Basic for Applications (VBA) that automates tasks. Instead of repeating the same steps manually, you record or write a macro that performs them in one click. In the case of highlighting values greater than a certain threshold, a macro saves you from repeatedly applying conditional formatting or manually searching through your sheet.
For example, imagine managing a sales report where you need to highlight sales figures greater than $10,000 every month. Rather than applying the rule each time, a macro can scan the entire sheet and instantly highlight those cells for you.
Why Use Macros Instead of Conditional Formatting?
At first glance, Conditional Formatting in Excel seems like an easy solution—it highlights values greater than a number with just a few clicks. However, macros step in when:
- You need to apply the rule across multiple sheets or workbooks.
- You want more customization, like highlighting only certain columns, rows, or ranges.
- You want reusable automation instead of reapplying conditional formatting manually every time.
- You need more complex rules beyond the limits of conditional formatting.
Macros give you both speed and flexibility.
Highlight Values Greater Than Threshold using Macro
Setting Up the Developer Tab
Before writing a macro, you need access to the Developer Tab in Excel:
STEP 1: Go to File → Options → Customize Ribbon.
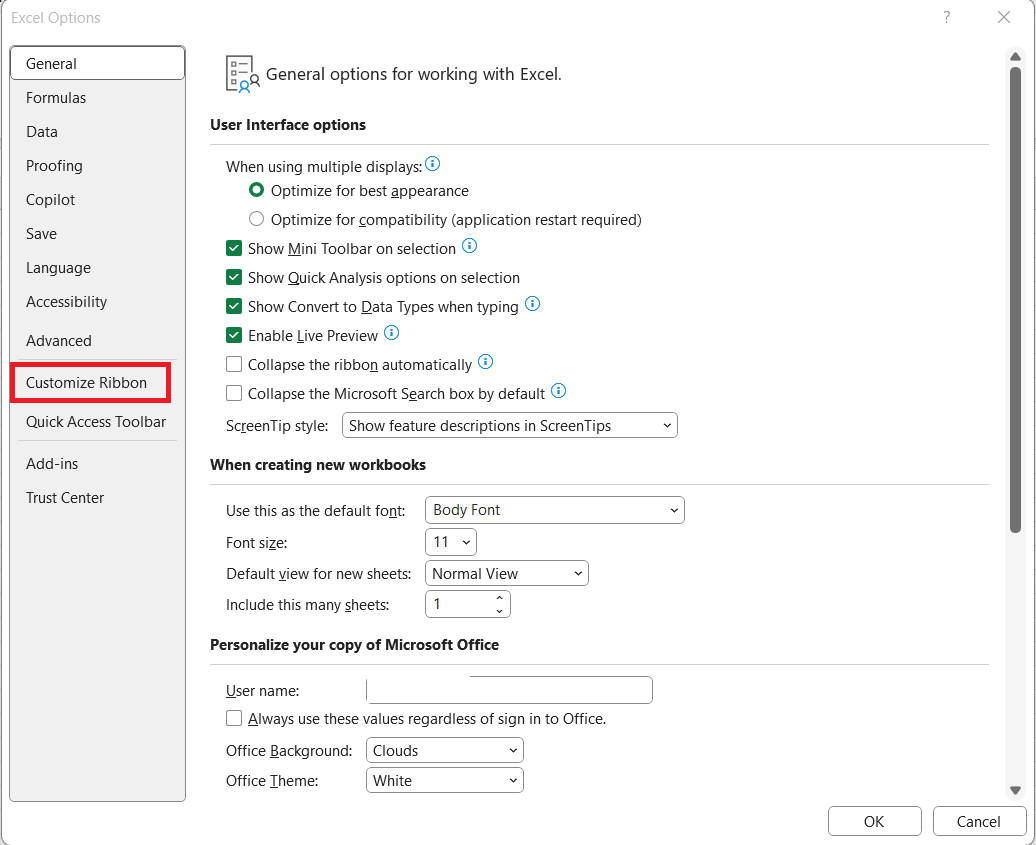
STEP 2: Under “Main Tabs,” check the Developer option. Click OK.
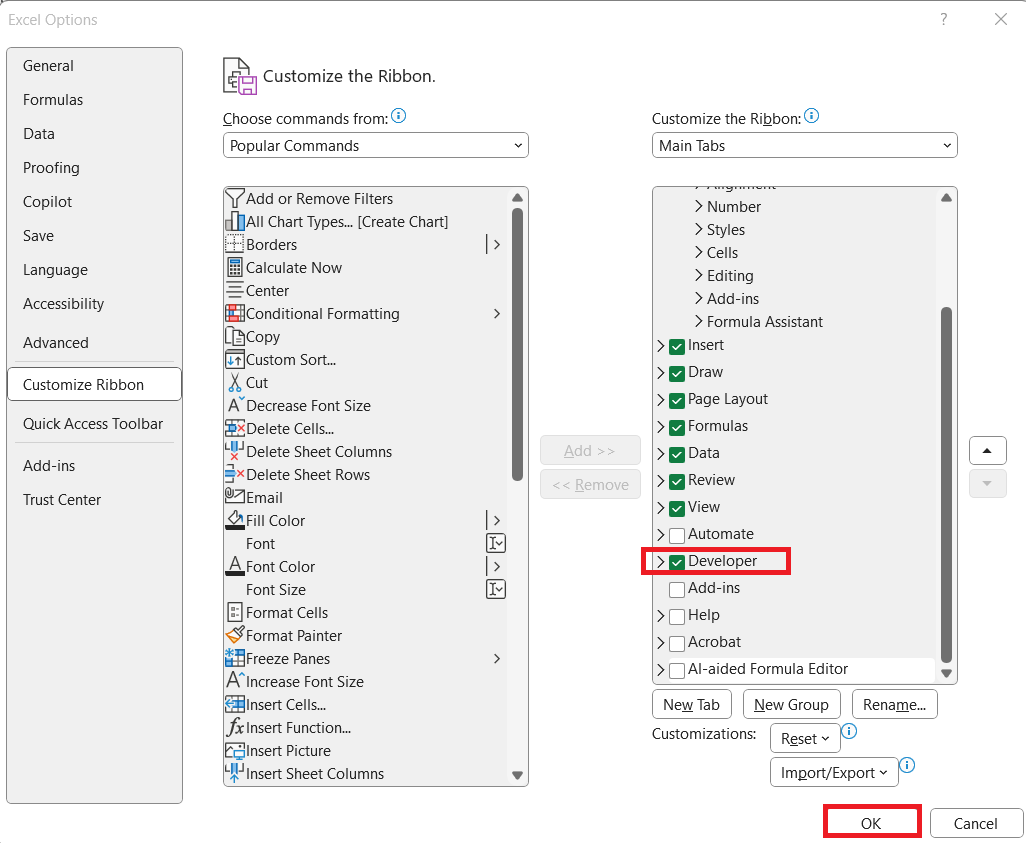
This tab will now appear in your ribbon, giving you access to the Visual Basic Editor (VBE) where macros are written.

VBA Code to Highlight Values Greater Than
STEP 1: Go to Developer > Code > Visual Basic

STEP 2: Paste in your code and Select Save. Close the window afterwards.
Sub HighlightValuesGreaterThan()
'Get the Greater Than Value
Dim value As Long
value = InputBox("Enter Greater Than Value", "Enter Greater Than Value")
Selection.FormatConditions.Delete
Selection.FormatConditions.Add Type:=xlCellValue, Operator:=xlGreater, Formula1:=value
Selection.FormatConditions(Selection.FormatConditions.Count).SetFirstPriority
'Set the font to black and highlighting color as yellow
With Selection.FormatConditions(1)
.Font.Color = RGB(0, 0, 0)
.Interior.Color = RGB(255, 255, 0)
End With
End Sub

STEP 3: Let us test it out!
Open the sheet containing the data. Go to Developer > Code > Macros

Make sure your data is selected and that your correct macro is selected. Click Run.

Enter the greater than value, we will enter 50000. Click OK.

With just one click, all of the values greater than 50000 are now highlighted!

Practical Applications of Highlighting with Macros
Macros aren’t just for fun—they’re meant to solve real-world problems. Let’s look at scenarios where this approach shines.
Business Use Cases
- Sales Analysis: Highlight all sales figures greater than the target quota.
- Finance: Spot transactions above a risk threshold (e.g., expenses above $5,000).
- Inventory Management: Identify stock levels above storage capacity.
These applications help managers make faster, data-driven decisions without scanning manually.
Academic and Personal Use Cases
- Student Grades: Highlight scores above passing marks or distinctions.
- Budget Tracking: Identify months where expenses crossed a certain limit.
- Fitness Tracking: Highlight workouts where performance exceeded personal bests.
Macros transform repetitive tasks into one-click actions, making your life easier whether you’re in business, academics, or personal data tracking.
FAQs
1. What is the main advantage of using a macro over conditional formatting?
While conditional formatting works well for one-off tasks, it is limited to specific ranges and must be reapplied each time. A macro, however, can be reused in multiple worksheets and workbooks without redoing the setup. It also allows you to dynamically enter the threshold value, making it flexible for different situations. In addition, macros let you customize formatting beyond just highlighting colors. This means you gain both automation and control in your workflow.
2. How do I enable the Developer tab to start writing macros?
By default, the Developer tab is hidden in Excel. To enable it, go to File → Options → Customize Ribbon, and under “Main Tabs,” check the box for Developer. Once enabled, you’ll see the Developer tab on your ribbon. This tab gives you access to the Visual Basic Editor (VBE) and macro recording tools. Without it, you won’t be able to create or run custom macros.
3. Can I customize the macro to use different colors or formatting styles?
Yes, the macro is highly customizable. You can change the .Interior.Color property to use any RGB color combination, such as green, blue, or red. You can also modify the macro to bold the text, change the font size, or even add comments to highlighted cells. For example, .Font.Bold = True makes the highlighted values stand out more. These changes let you tailor the macro to match your reporting or presentation needs.
4. What happens if I run the macro on non-numeric cells?
The macro is designed to check for numeric values, so text or blank cells will not be affected. If you select a mixed range, only numbers greater than your entered threshold will be highlighted. Non-numeric cells remain untouched, which ensures your formatting doesn’t get messy. This makes the macro safe to use across large datasets that may contain labels, headers, or other non-numeric entries. It ensures accuracy without requiring manual cleanup.
5. Where can this macro be practically applied in everyday work?
This macro is extremely versatile and works across many fields. In business, it helps highlight sales figures above target or expenses exceeding budgets. In education, teachers can use it to identify student scores above or below thresholds. For personal use, it’s helpful in budgeting or tracking fitness progress. Essentially, any dataset where “greater than” comparisons matter can benefit from this automation.

Bryan
Bryan Hong is an IT Software Developer for more than 10 years and has the following certifications: Microsoft Certified Professional Developer (MCPD): Web Developer, Microsoft Certified Technology Specialist (MCTS): Windows Applications, Microsoft Certified Systems Engineer (MCSE) and Microsoft Certified Systems Administrator (MCSA).
He is also an Amazon #1 bestselling author of 4 Microsoft Excel books and a teacher of Microsoft Excel & Office at the MyExecelOnline Academy Online Course.


