Ever wanted to insert multiple columns in Excel just by typing in a number—without manually clicking and dragging? Good news: you can! And you don’t need to be a hardcore programmer to pull it off. With the help of Excel Macros (VBA), you can automate this task in just a few clicks.
In this article, we’ll walk you through everything step by step on how to insert multiple columns using macros in Excel. By the end, you’ll be able to create your own custom tool that lets you insert as many columns as you want in seconds.
Key Takeaways:
- Macros let you insert multiple columns in Excel with just one input.
- Enabling the Developer tab is the first step to using VBA.
- A simple VBA script can save time and reduce repetitive clicks.
- You can enhance the macro with buttons, defaults, and error handling.
- This automation is especially useful for financial models, datasets, and templates.

Table of Contents
Getting Started with Macros in Excel
Why Use Macros for Repetitive Tasks
Normally, inserting several columns in Excel requires multiple clicks: select, right-click, insert, and repeat. With a macro, you can automate this process. Simply enter how many columns you want, and Excel does the rest instantly. This saves time, reduces human error, and improves efficiency, especially when handling large datasets.
Automation also helps maintain consistency. When you rely on macros, the process is executed the exact same way every time, ensuring your spreadsheets stay clean and structured. For professionals working with large datasets, reports, or financial models, this efficiency boost is invaluable. Another benefit is scalability. Once you’ve written the macro, you can use it in any workbook, on any dataset, without rewriting or redoing your work. That’s the power of automation—it takes a repetitive, boring task and turns it into a one-click solution.
Enabling the Developer Tab
Macros live in the Developer tab, which isn’t enabled by default. To turn it on:
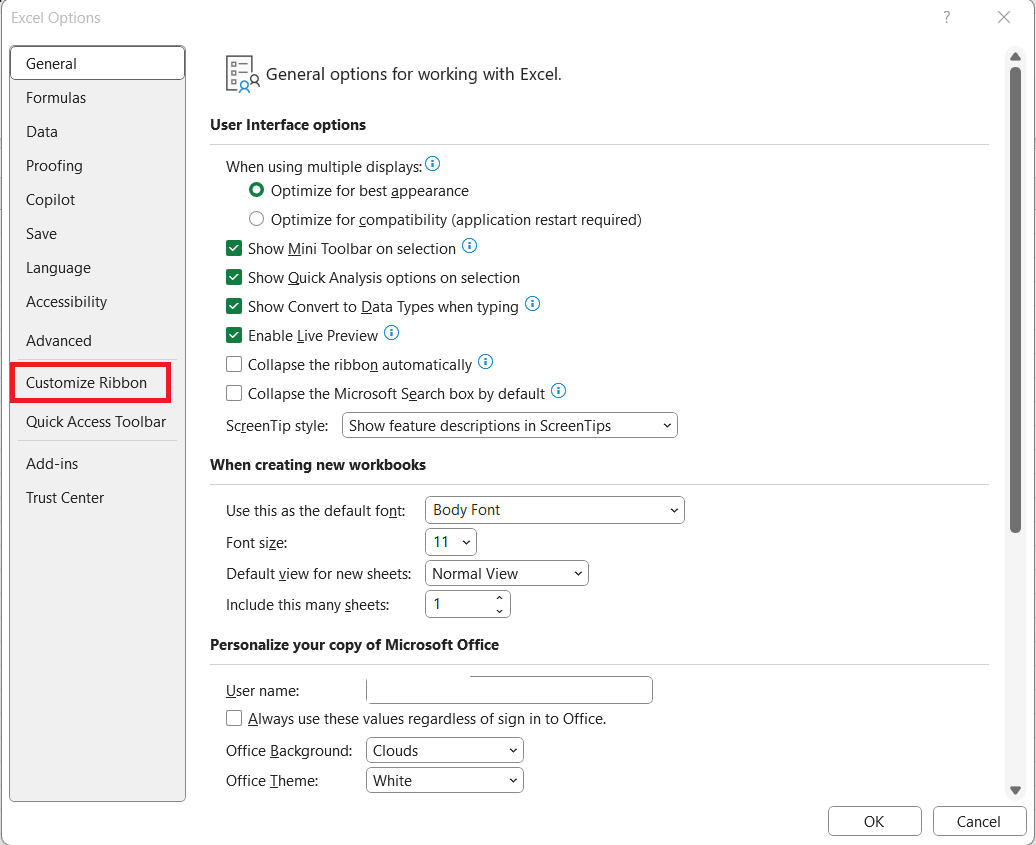
STEP 1: Go to File > Options > Customize Ribbon.
STEP 2: Check the box for Developer. Click OK.
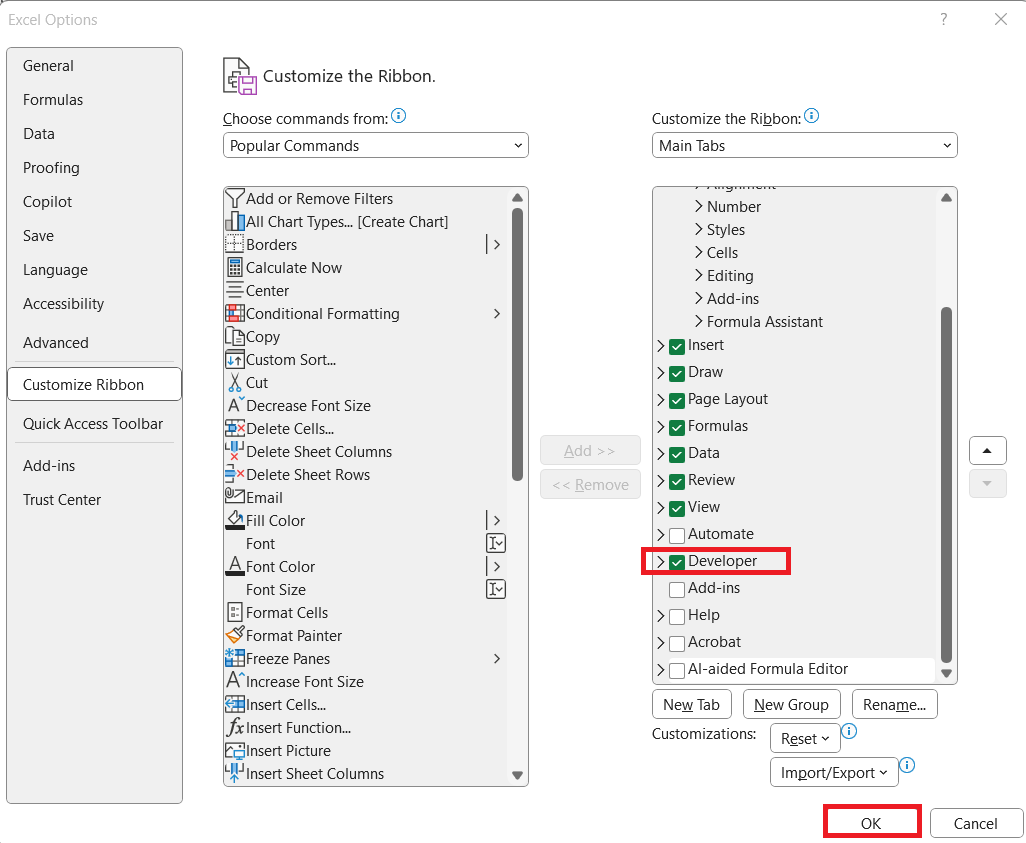
Now, the Developer tab appears in your Ribbon, giving you access to Visual Basic and Macros.

How to Insert Multiple Columns Using Macros
STEP 1: Go to Developer > Code > Visual Basic

STEP 2: Paste in your code and Select Save. Close the window afterwards.
Sub InsertMultipleColumns()
Dim numColumns As Integer
Dim counter As Integer
'Select the current column
ActiveCell.EntireColumn.Select
On Error GoTo Last
numColumns = InputBox("Enter number of columns to insert", "Insert Columns")
'Keep on insert columns until we reach the desired number
For counter = 1 To numColumns
Selection.Insert Shift:=xlToRight, CopyOrigin:=xlFormatFromRightorAbove
Next counter
Last: Exit Sub
End Sub

STEP 3: Let us test it out!
Select any cell that you want to insert columns on. Go to Developer > Code > Macros

STEP 4: Make sure your macro is selected. Click Run.

STEP 5: We want to insert 3 columns. Type in 3.

With that, you are now able to insert multiple columns using macros!

Enhancing the Macro
Adding a Button for Easy Access
Instead of running the macro from the menu each time, add a button:
STEP 1: Go to Developer > Controls > Insert > Button (Form Control).
STEP 2: Draw the button on your sheet.
STEP 3: Assign the macro InsertMultipleColumns.
Now, one click runs your macro.
Making the Macro Smarter
You can enhance the macro by:
- Adding a default value in the InputBox.
- Allowing insertion of rows instead of columns by changing EntireColumn to EntireRow.
- Adding error handling so it only accepts valid numbers.
Real-Life Use Cases
Financial Modeling and Reports
When building financial models or reports, you often need to insert additional periods, categories, or accounts as the model evolves. Doing this manually can be slow and prone to errors, especially in large spreadsheets with interconnected formulas. A macro speeds this up dramatically, ensuring columns are added consistently without breaking existing structures. This is particularly helpful when deadlines are tight, and accuracy is critical.
Data Preparation and Templates
If you’re preparing raw datasets for analysis or updating report templates for repeated use, you may need to create extra room for future inputs. Instead of manually inserting new columns and adjusting formatting each time, a macro handles it instantly. This keeps your templates clean, professional, and ready for reuse—saving you both effort and frustration. It’s a small automation that makes a big difference in day-to-day productivity.
FAQs
1. What is a macro in Excel?
A macro in Excel is a small program written in VBA (Visual Basic for Applications) that automates repetitive tasks. Instead of doing the same clicks or steps over and over, a macro performs them in one go. For example, inserting multiple columns manually can take time, but with a macro, you just run it once and get instant results. Macros can be simple, like this example, or very complex, handling calculations and formatting. They are powerful tools for boosting productivity.
2. Do I need programming knowledge to use this macro?
No, you don’t need to be a programmer to use this macro. All you need to do is copy the VBA code, paste it into Excel’s Visual Basic Editor, and save it. The code is already written for you, so you’re just using it as a tool. However, learning the basics of VBA can help you customize the macro further. Think of it as plug-and-play, with room to grow if you want to explore.
3. Where will the new columns be inserted?
The new columns will be inserted based on the location of your active cell. The macro selects the entire column of the cell you’re currently clicked in and inserts the new columns right there. If you want columns in a specific location, simply click a cell inside that column before running the macro. This gives you control over where the new space is added. Always double-check your selection to avoid inserting in the wrong spot.
4. Can I modify the macro to insert rows instead of columns?
Yes, with a tiny tweak you can insert rows instead of columns. In the code, replace EntireColumn with EntireRow. This way, when you run the macro, it will insert multiple rows instead of columns. The logic stays the same—you’ll still type the number you want into the InputBox. This makes the macro flexible for different needs.
5. Is using macros safe in Excel?
Macros are safe when you create or use them from trusted sources, like this tutorial. The risk usually comes from opening workbooks with unknown or suspicious macros, which may contain harmful code. To stay safe, always enable macros only in files you trust. You can also adjust your security settings in Excel’s Trust Center for better control. In short: your own macros are safe, but be cautious with files from others.

Bryan
Bryan Hong is an IT Software Developer for more than 10 years and has the following certifications: Microsoft Certified Professional Developer (MCPD): Web Developer, Microsoft Certified Technology Specialist (MCTS): Windows Applications, Microsoft Certified Systems Engineer (MCSE) and Microsoft Certified Systems Administrator (MCSA).
He is also an Amazon #1 bestselling author of 4 Microsoft Excel books and a teacher of Microsoft Excel & Office at the MyExecelOnline Academy Online Course.


