As someone who spends countless hours working in Excel, I’ve learned that formatting can make or break the readability of a spreadsheet. One of my recurring challenges is dealing with text wrap—those line breaks that sneak into cells and disrupt the neatness of my data. Fortunately, I’ve discovered that using macros is a game-changer for removing text wrap quickly and efficiently. This article shares my step-by-step process on how to remove text wrap using macros, whether you’re targeting a single cell, a range, or an entire worksheet.
Key Takeaways:
- Macros in Excel offer a fast and repeatable method for removing text wrap from cells, saving valuable time on formatting.
- You can tailor your macro to target a specific range, selected cells, or your entire worksheet for maximum flexibility and control.
- Recording a macro is a great starting point, but editing the VBA code can make your solution more robust and adaptable to different scenarios.
- Always save your work as a macro-enabled (.xlsm) file and keep backups to prevent accidental data loss or overwriting.
- Running your macro is as simple as selecting your cells and choosing your macro from the Developer tab, making the process accessible to all Excel users.

Download excel workbookHow-to-Remove-Text-Wrap.xlsm
Table of Contents
Understanding Text Wrap in Excel
What Is Text Wrap?
Text wrap in Excel is a formatting feature that makes the contents of a cell display on multiple lines if the text is too long to fit in the cell’s width. While sometimes useful, it can clutter your layout and make large datasets hard to scan. When text wrap is enabled, Excel automatically adjusts the row height to accommodate all the lines, which can cause your rows to become uneven and harder to navigate.
Although it helps preserve all the data within a visible cell, it can also obscure overall trends and make it difficult to compare values at a glance. In reports or dashboards where clarity and consistency are essential, excessive text wrapping can disrupt the visual flow and result in a less professional appearance.
When Does Text Wrap Become a Problem?
I’ve found text wrap to be especially problematic when importing data from external sources or sharing files with colleagues. Suddenly, columns expand, rows grow taller, and the uniform appearance I strive for is lost. It’s also common for wrapped text to hide important information in a sea of misaligned rows, making it tricky to quickly spot errors or outliers. Additionally, when printing or exporting spreadsheets, wrapped text can force content onto additional pages or mess with the layout, leading to frustration and wasted paper. That’s when automation comes to the rescue.
How to Wrap Text using Macros in Excel
Enabling the Developer Tab
Before you can record or run macros, you need to make sure the Developer tab is visible in your Excel ribbon. Here’s how I enable it:
STEP 1: Open Excel and click on the File menu.
STEP 2: Select Options at the bottom of the menu.
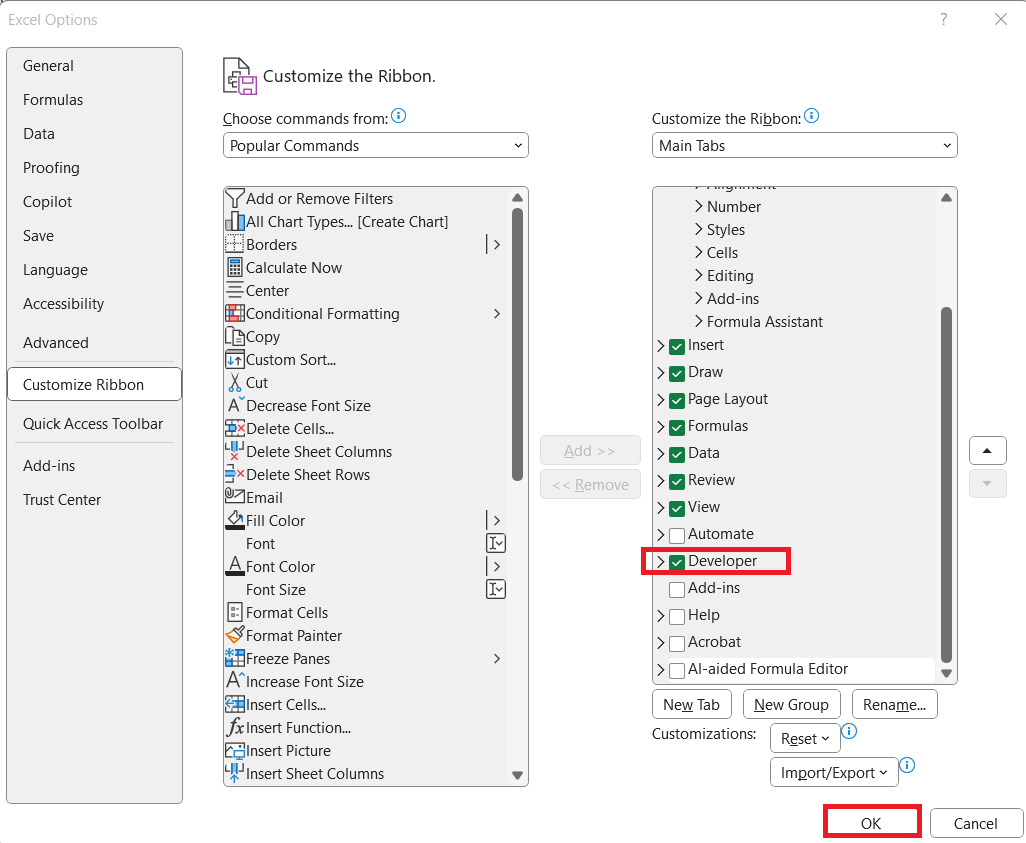
STEP 3: In the Excel Options window, choose Customize Ribbon from the left pane. On the right side, find the list of main tabs, then check the box for Developer. Click OK.
The Developer tab should now appear in your Excel ribbon.
Using a VBA Code to Remove Text Wrap
STEP 1: Go to Developer > Code > Visual Basic
STEP 2: Paste in your code and Select Save. Close the window afterwards.
Sub RemoveWrapAndAutofitCells()
Activate
Cells.Select
'Remove the Text Wrap
Selection.WrapText = False
'Autofit all of the cells afterwards
Cells.EntireRow.AutoFit
Cells.EntireColumn.AutoFit
End Sub
STEP 3: Let us test it out!
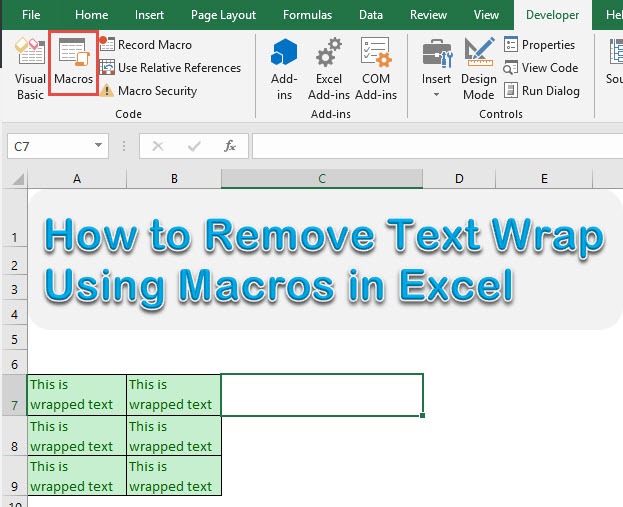
Open the sheet containing the data. Go to Developer > Code > Macros
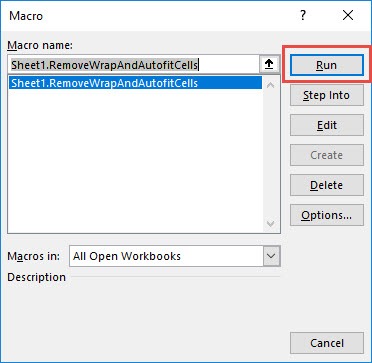
Make sure your macro is selected. Click Run.
With just one click, all of the cells now have text wrap removed!
Saving and Running My Macro
Saving the Macro-Enabled Workbook
After writing or editing my macro, I always save my file as a macro-enabled workbook (.xlsm).
This ensures my VBA code is preserved and ready for future use. I never save over the original file without making a backup, just in case something goes wrong. Saving it in the right format is crucial—regular .xlsx files will strip away all your VBA work. I also name the file clearly so I can easily distinguish it from other versions.
Running the Macro in Excel
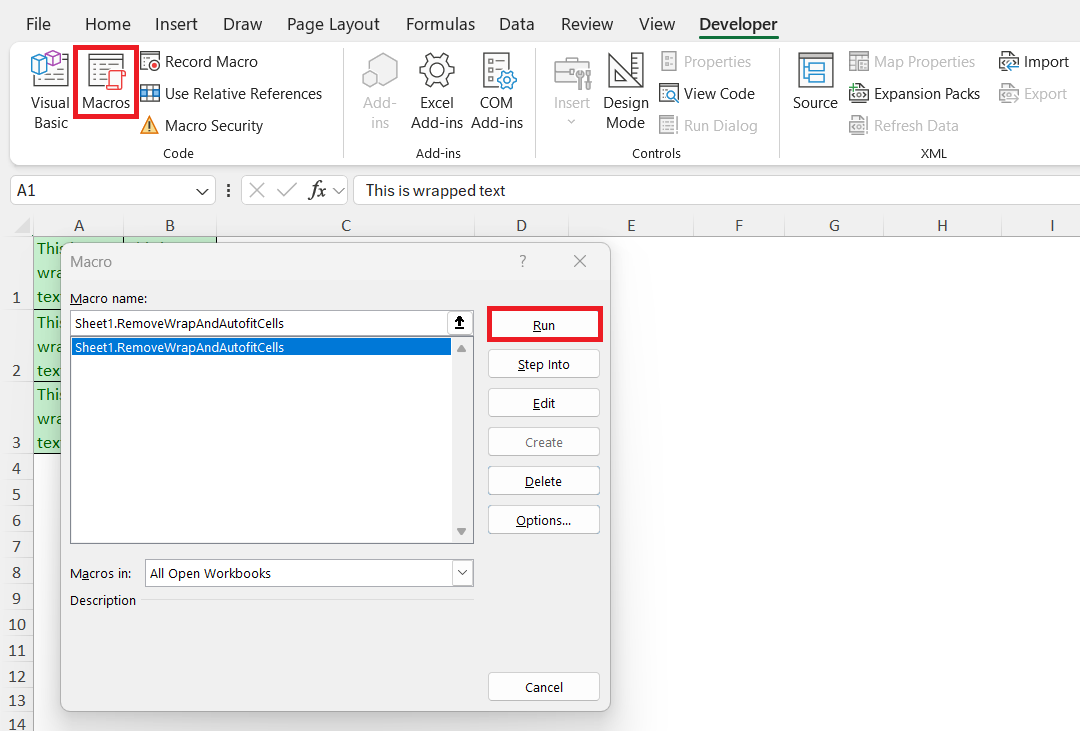
To run my macro, I return to Excel, open the Developer tab, and click “Macros.” I pick the macro I want and press “Run.”
Instantly, text wrap disappears from the targeted cells, leaving my data neat and organized. If I know I’ll be using it frequently, I assign a keyboard shortcut or even add a button to my Quick Access Toolbar for one-click access. This saves time and ensures I maintain consistency across my reports.
FAQs
Can I undo the effects of a macro that removes text wrap?
Yes, you can usually undo a macro’s actions by pressing Ctrl+Z immediately after it runs. However, if you perform other actions or save the workbook before undoing, the changes might become permanent. Excel’s undo stack gets cleared after saving or running some macros, so it’s not always reliable. That’s why it’s wise to save a backup copy of your file before running any macro. This gives you a safety net in case something goes wrong.
Do I need to know VBA to use macros for removing text wrap?
No, you don’t need to know VBA to start using macros in Excel. You can use the built-in Macro Recorder to record your actions and let Excel write the VBA code for you. This is great for simple, repetitive tasks like removing text wrap. However, learning a bit of VBA opens the door to customizing and enhancing your macros. It allows for more flexibility, control, and automation of complex tasks.
Will my macro work on Mac as well as Windows?
Most simple macros, like those that remove text wrap, will work on both Mac and Windows versions of Excel. However, there are differences in how the Developer tab and VBA Editor are accessed between the two platforms. Some keyboard shortcuts and object models may also behave slightly differently. It’s a good idea to test your macro on both systems if you plan to share the workbook. This ensures it performs consistently across environments.
How do I make sure my macro doesn’t affect hidden or filtered rows?
By default, macros apply changes to all cells in a selected range, including hidden or filtered-out rows. If you want to apply changes only to visible cells, you’ll need to write VBA code that checks each row’s visibility before making changes. This involves using the SpecialCells(xlCellTypeVisible) method or looping through rows with visibility checks. It requires intermediate VBA knowledge, but it’s manageable with practice. Doing this makes your macro more precise and user-friendly in filtered datasets.
Can I assign my macro to a button for easier access?
Absolutely! You can insert a Form Control button from the Developer tab and assign your macro to it. This lets anyone run the macro with a single click—no need to open the Macros window. You can even customize the button label for clarity, like “Remove Wrap.” Adding a button makes your worksheet more interactive and accessible, especially for users unfamiliar with the Developer tab.

Bryan
Bryan Hong is an IT Software Developer for more than 10 years and has the following certifications: Microsoft Certified Professional Developer (MCPD): Web Developer, Microsoft Certified Technology Specialist (MCTS): Windows Applications, Microsoft Certified Systems Engineer (MCSE) and Microsoft Certified Systems Administrator (MCSA).
He is also an Amazon #1 bestselling author of 4 Microsoft Excel books and a teacher of Microsoft Excel & Office at the MyExecelOnline Academy Online Course.


