To be able to use Power Pivot, you need to have data imported into the Power Pivot Window first. If your data is in the normal Excel worksheets, then you will not be able to use this data in Power Pivot.
Key Takeaways
-
Create Structured Data Models – Excel Tables act as a clean and dynamic data source when imported into Power Pivot.
-
Enable Automatic Range Expansion – Power Pivot recognizes added rows in Excel Tables automatically, reducing manual updates.
-
Improve Relationship Building – Using tables with named ranges helps establish clear and reliable relationships between datasets.
-
Support for DAX Calculations – Power Pivot works seamlessly with Excel Tables to build DAX measures and KPIs for deep analysis.
-
Refresh with One Click – Once linked, Excel Tables can be refreshed easily within Power Pivot to reflect the latest data.
Fortunately there are a lot of possible ways Power Pivot can retrieve data, from:
– Excel Tables
– Text files (Tab-delimited, CSV files)
– Clipboard
– Databases (SQL Server, Access, Oracle, MySQL to name a few)
– MS SQL Server Reporting Services (SSRS)
– Online sources (Azure)
What we will focus on is how we can import data from the Excel Table into our Power Pivot Window.
Table of Contents
Using Excel Tables in Power Pivot
STEP 1: Select your data. Go to Insert > Table. Click OK.
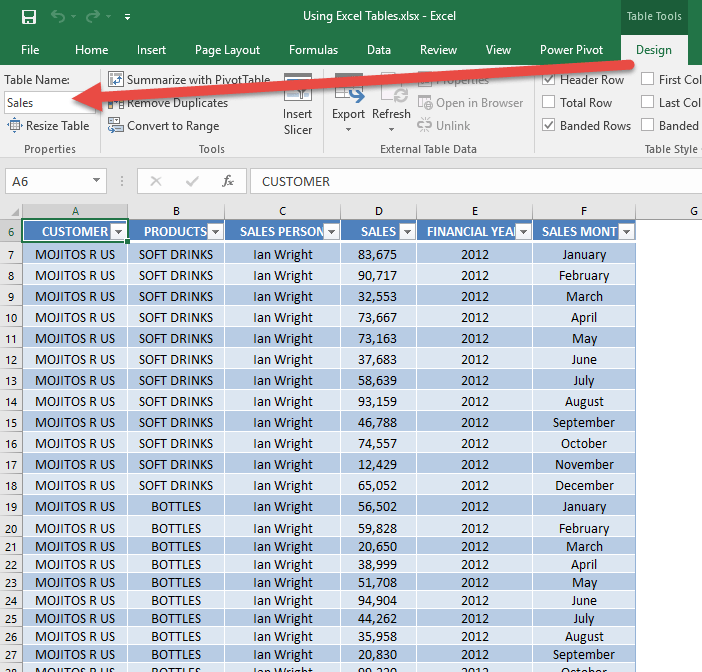
STEP 2: Go to Design > Table Name and give your new table a descriptive name. In our example, we give it the name of Sales.
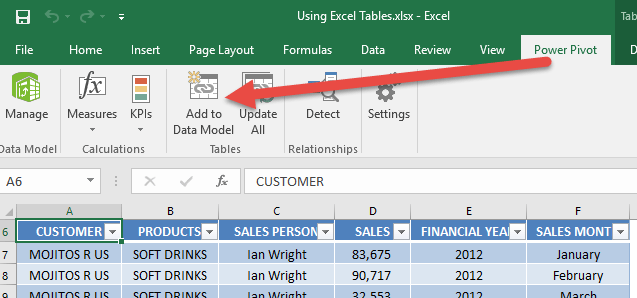
STEP 3: Go to Power Pivot > Add to Data Model. This will import your new table into the Power Pivot Window.
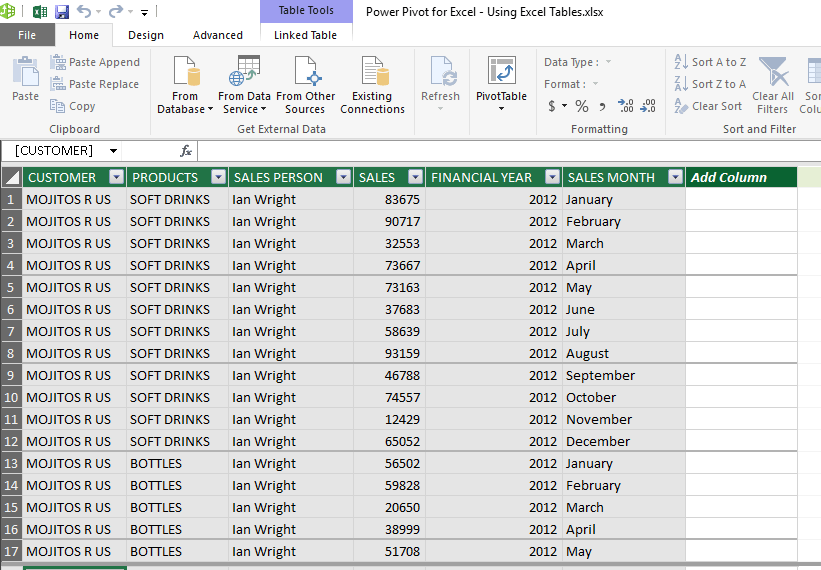
STEP 4: This will open Power Pivot Window. Your data is now ready.
If you want to learn more about inserting Excel tables, click here.
To have a better understanding on the power of pivot tables, click here.
Frequently Asked Questions
Why should I use Excel Tables instead of normal ranges in Power Pivot?
Excel Tables automatically expand with new data and maintain their structure, which makes them more efficient and dynamic for data modeling.
How do I add an Excel Table to Power Pivot?
Select your table, then go to the Power Pivot tab and choose “Add to Data Model.”
Will changes in the Excel Table reflect in Power Pivot automatically?
Yes, any changes in the table will be reflected in Power Pivot after refreshing the data model.
Can I build relationships between multiple Excel Tables in Power Pivot?
Absolutely! Once added to the data model, you can use the Diagram View in Power Pivot to create relationships between different tables.
Are there limitations to using Excel Tables in Power Pivot?
Power Pivot handles Excel Tables well, but very large tables can impact performance, especially if you’re performing complex DAX calculations.

Bryan
Bryan Hong is an IT Software Developer for more than 10 years and has the following certifications: Microsoft Certified Professional Developer (MCPD): Web Developer, Microsoft Certified Technology Specialist (MCTS): Windows Applications, Microsoft Certified Systems Engineer (MCSE) and Microsoft Certified Systems Administrator (MCSA).
He is also an Amazon #1 bestselling author of 4 Microsoft Excel books and a teacher of Microsoft Excel & Office at the MyExecelOnline Academy Online Course.


