When working with international data, the timestamps are usually in UTC format. You may need to convert them to Pacific Time for users in California or the West Coast of the U.S. In this article, you will learn how to convert UTC to Pacific Time in Excel.
Key Takeaways:
- Pacific Time shifts between UTC-8 and UTC-7.
- UTC time does not have any shift. It remains the same.
- Subtract 7 or 8 hours from UTC time to get Pacific Time.
- Use IF and AND logic to dynamically adjust for Daylight Saving Time.
- VBA macros or Excel Tables help automate conversions for large datasets.
Table of Contents
Understand UTC and Pacific Time
UTC is a standard time reference that is used worldwide. It does not change because of time zone or daylight saving. Whereas, Pacific Time changes based on season.
- Standard Time PT is UTC – 8
- Daylight Saving PT is UTC – 7
How to Convert UTC to Pacific Time
Set Up Spreadsheet
First, you should organize your data correctly. Enter the time in UTC in one column.

Create a new column for Pacific Time.

Right-click on the cell and select Format Cells.
Choose Custom and select a format.

This setup will allow for efficient and accurate time zone conversion.
Convert UTC to Pacific
For a quick conversion that ignores DST:
=A2 – TIME(8,0,0)

Account for Daylight Saving
To create a formula that accounts for Daylight Saving Time (DST) when converting UTC to Pacific Time, you must determine the correct offset. Pacific Time shifts between UTC-8 during Standard Time and UTC-7 during DST. You can create an IF formula to check if the date is during daylight saving or not and subtract hours accordingly.

This formula checks if the date falls in the DST period:
- It checks if the date is between the second Sunday of March and the first Sunday of November.
- If yes, it subtracts 7 hours (DST).
- If no, it subtracts 8 hours (Standard Time).
Automate Time Conversion
Fill Handle
To automate the time conversion, you can use the fill handle.
- Apply the daylight saving formula to the first row
- Use the fill handle
- Drag it down the entire column
Excel Table
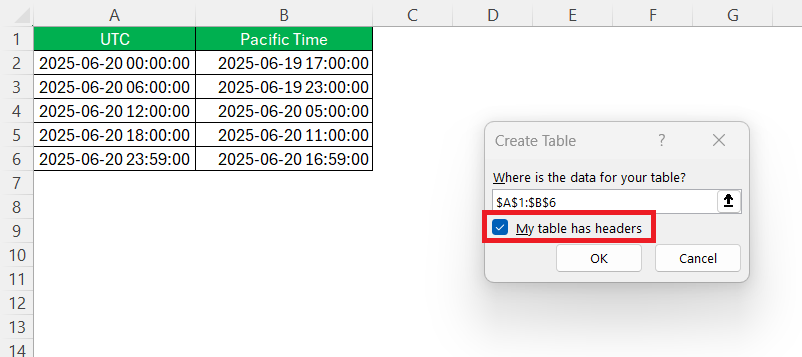
For even more efficiency, you can use the Table feature. Converting your data range into a table will allow you to apply the same formula to new rows.
- Simply select your range.
- Go to the Insert tab
- Click on Table.

- Check the box for “My table has headers”
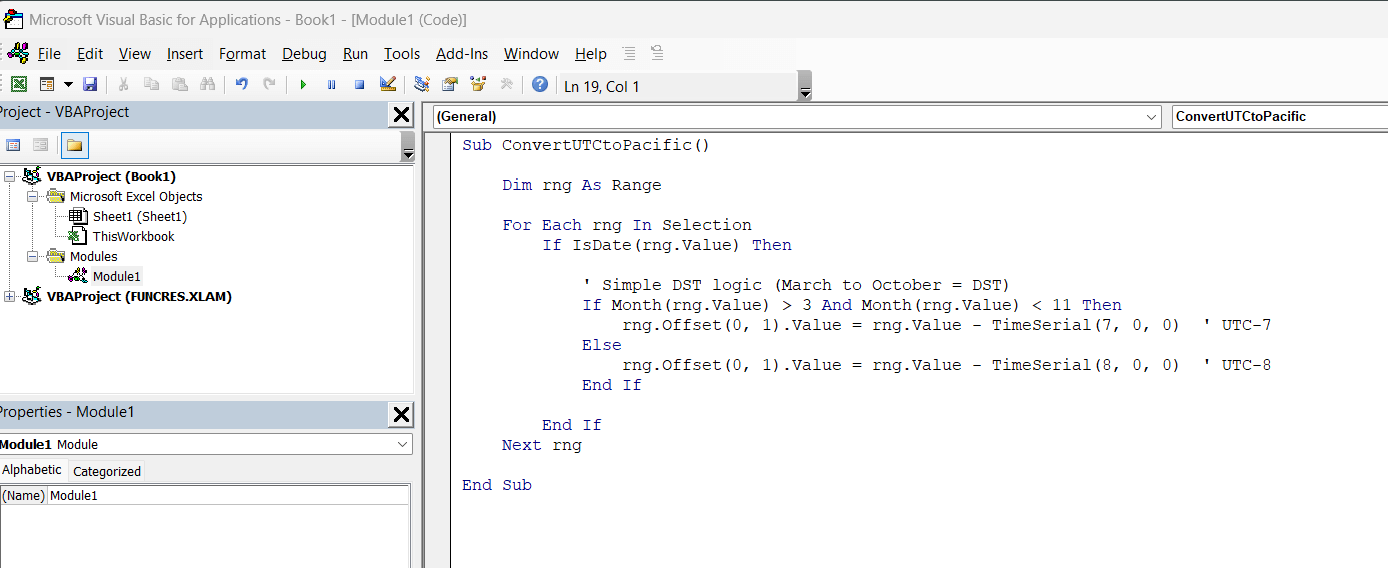
Using VBA Macros
VBA macros offer a powerful way to automate time zone conversions in Excel. By writing a VBA script, you can encode the conversion rules, adjust for Daylight Saving Time, and apply them to your data.
- Press Alt + F11 to access the VBA editor.
- Right-click on the project pane and click on Insert > Module.

- Insert the VBA code.

- You can access the Developer tab and click the Macros button.
- In the dialog box, select the macro and click Run.

This macro will run through each value in the range. If the value is a date, it will subtract either 7 or 8 hours based on DST.
This method is beneficial when dealing with large datasets.
FAQs
How to convert UTC to Pacific Time?
The easiest method is to subtract 8 hours from the UTC datetime.
=A2 – TIME(8,0,0)
If you need to factor in daylight saving, you can change the formula to:
=A2 – TIME(7,0,0)
What formula should I use to convert UTC to Pacific Time in Excel?
You can use the TIME formula and subtraction operator to convert UTC to Pacific Time. You can subtract 8 hours from the UTC time to get PST.
A2 – TIME(8,0,0)
How to automate time zone conversions?
Follow the steps below to automate time conversion:
- Apply your formula to the first row
- Drag it down using Excel’s fill handle.
You can also convert your data into an Excel Table so formulas auto-apply to new rows.
Does UTC change for Daylight Saving Time?
UTC stays constant all year. It does not change with time.

John Michaloudis is a former accountant and finance analyst at General Electric, a Microsoft MVP since 2020, an Amazon #1 bestselling author of 4 Microsoft Excel books and teacher of Microsoft Excel & Office over at his flagship MyExcelOnline Academy Online Course.


