Personalizing the Microsoft Excel ribbon can significantly enhance productivity by streamlining access to frequently used tools and commands tailored to your specific workflow. This guide provides a simple approach to customize ribbon in Excel, allowing you to create a more efficient and user-centric interface starting from the Excel Options menu.
Key Takeaways
- Customize the Excel ribbon by adding tabs with personally tailored commands for quicker access.
- Rearrange, rename, or remove existing tabs and groups to fit your workflow preferences.
- Use the “Customize the Ribbon” option to add frequently used functions like “AutoSum” to your ribbon for easy access.
- Save time by exporting your personalized ribbon setup for use on other devices or sharing with colleagues.
Table of Contents
Introduction to Excel Ribbon Customization
The Power of Personalization in Excel
Personalizing your Excel experience unleashes a higher level of productivity and efficiency. With customization, you tailor the interface to your workflow, ensuring you have quick access to the tools you use most. Excel’s ribbon customization capabilities offer a wide array of potential improvements to your daily tasks.
Why Customize Your Ribbon?
Customizing your Excel ribbon serves multiple purposes beyond mere aesthetics. It allows you to streamline your workflow by placing frequently used commands at your fingertips, significantly reducing the time you spend searching for functions amid the standard tabs. This can improve efficiency and reduce distractions, particularly on complex projects.
In essence, the ability to customize the ribbon list is about optimizing the user interface to serve you better, in turn making your time with Excel more productive and enjoyable.
Getting Started with Customize Ribbon
Accessing Ribbon Customization Options
To efficiently tailor the Excel ribbon to your specific needs, you must first know how to access the customization options. Here’s how you can open the Excel ribbon customization menu:
Method 1:
STEP 1: Navigate to the File menu, typically located in the top-left corner of Excel.
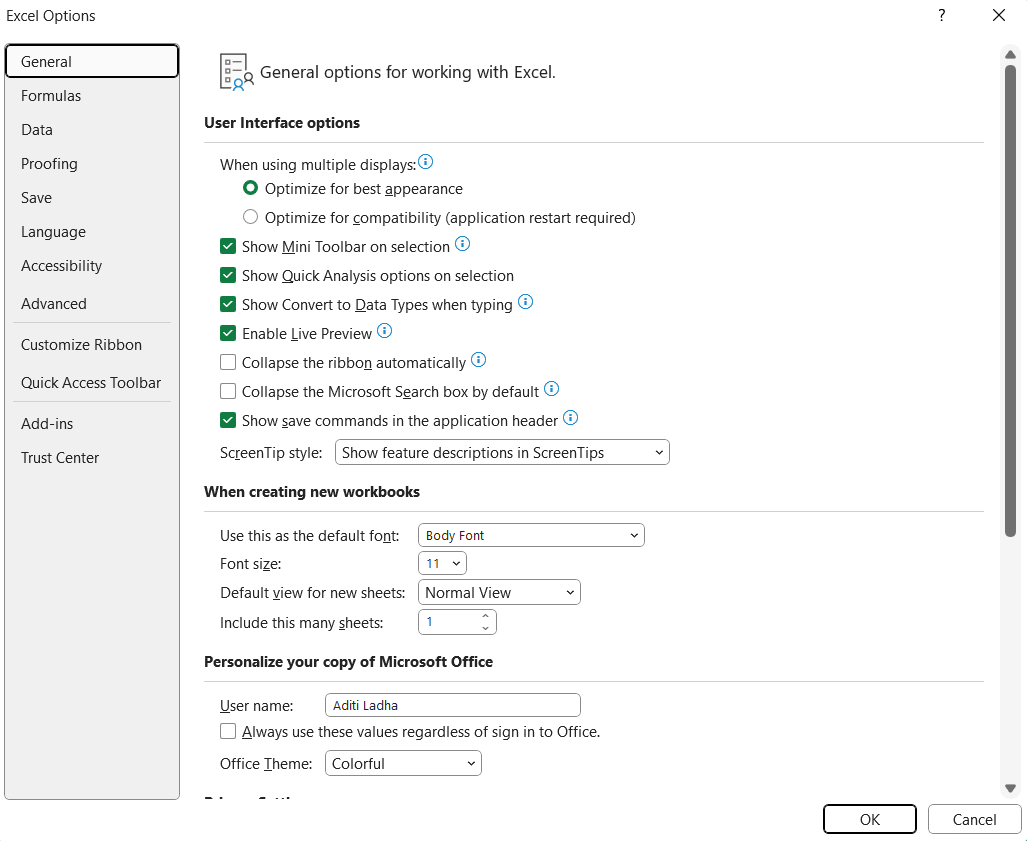
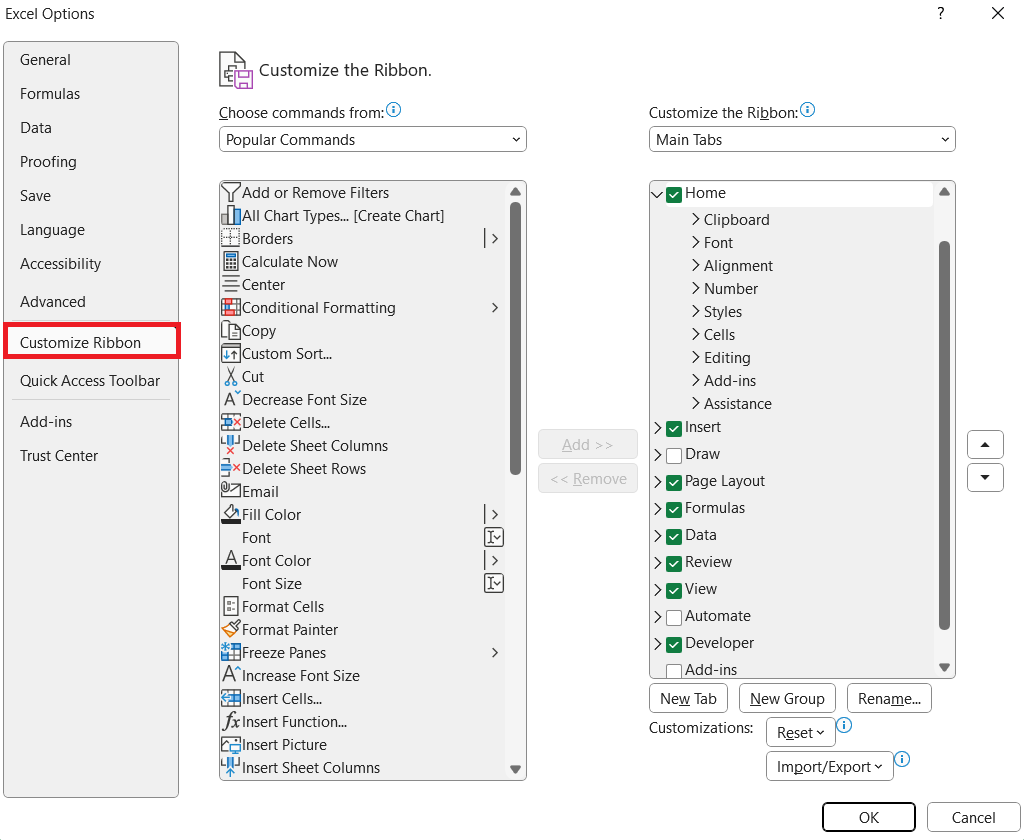
STEP 2: Select Options at the bottom of the menu to open the Excel Options dialog box.
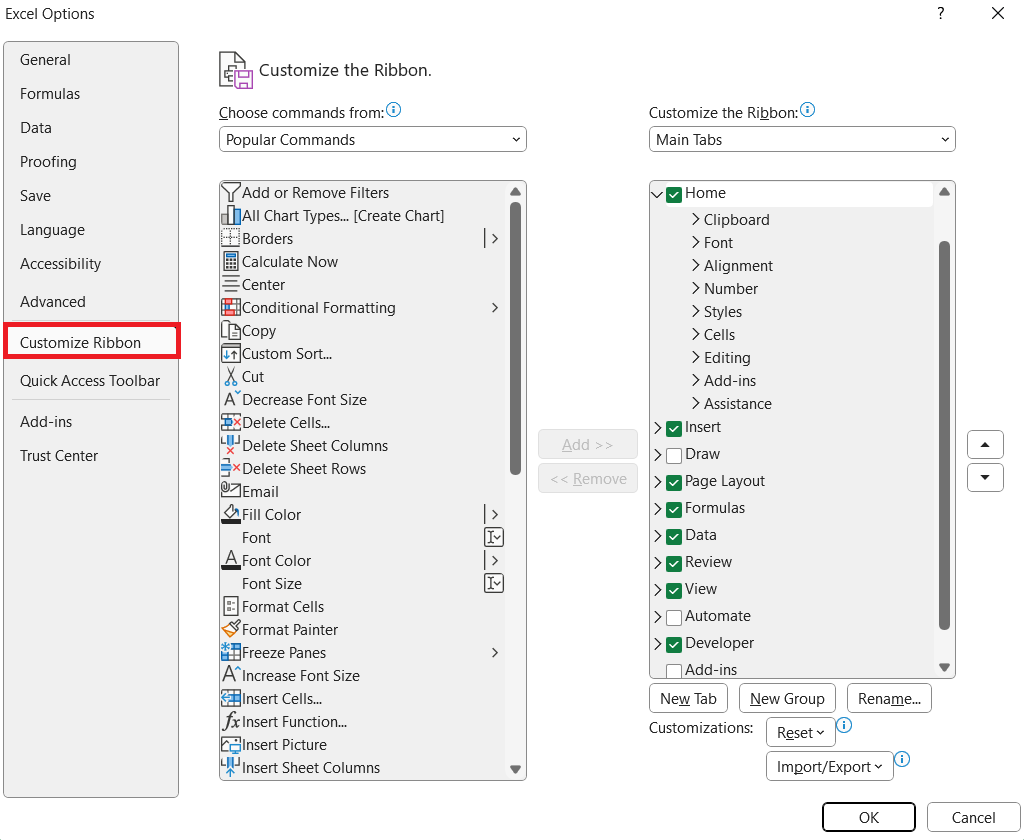
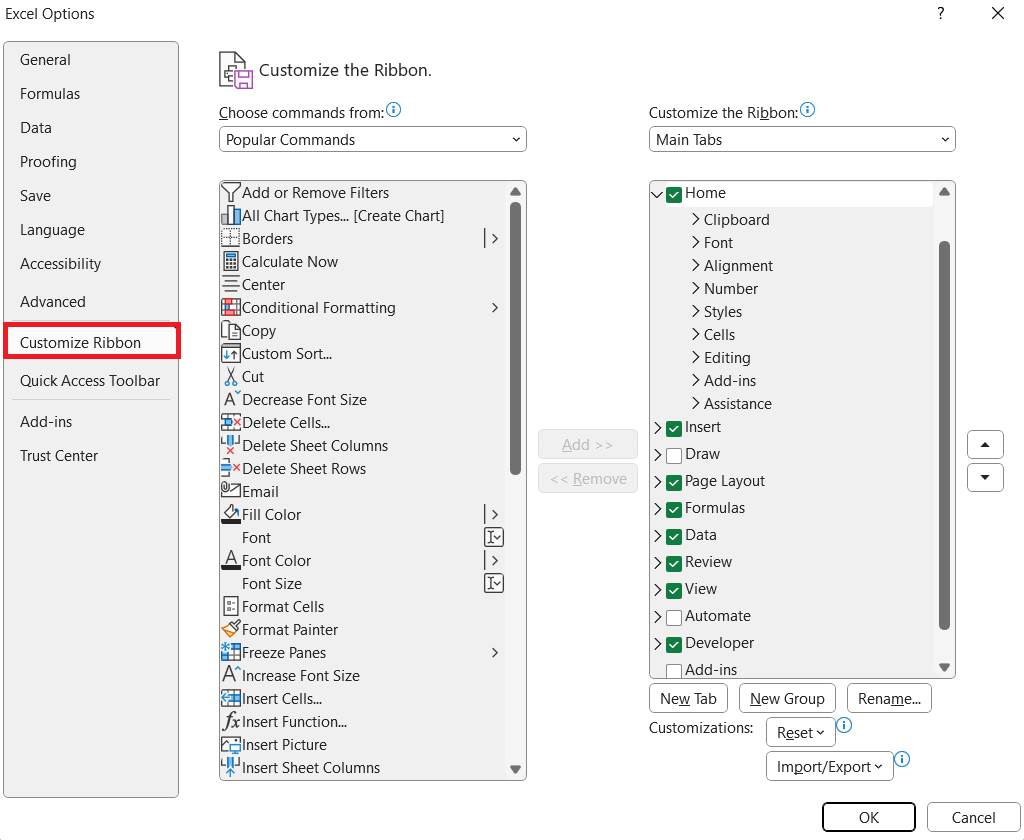
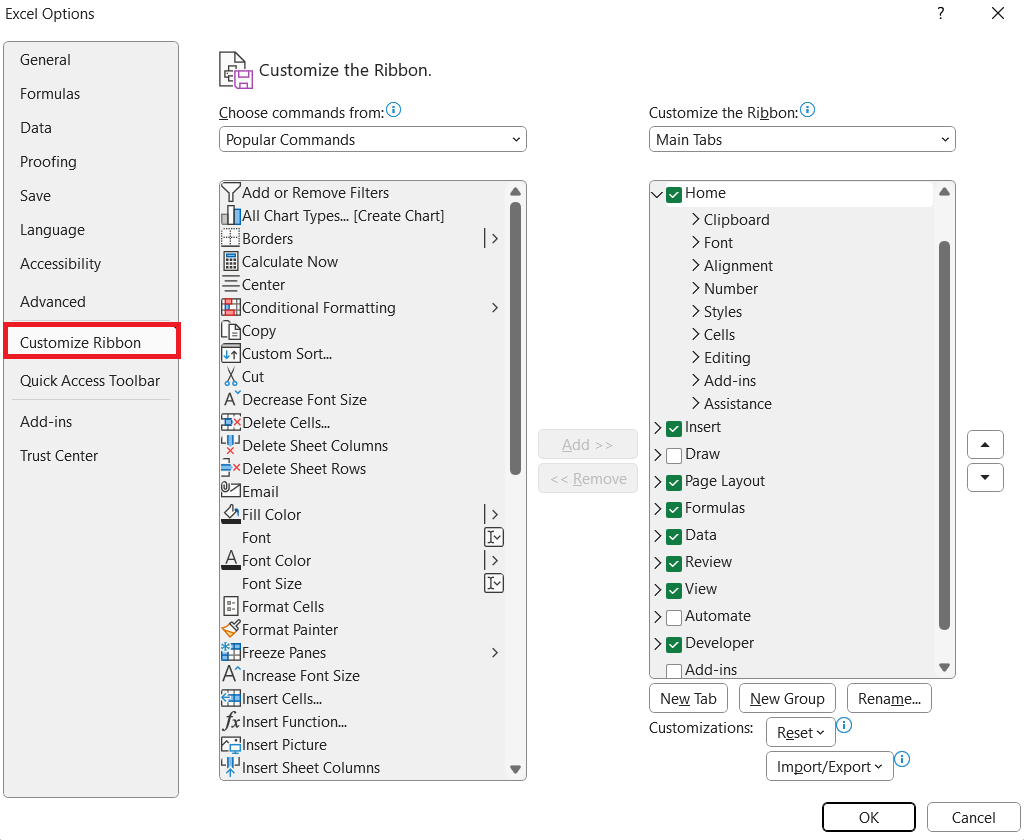
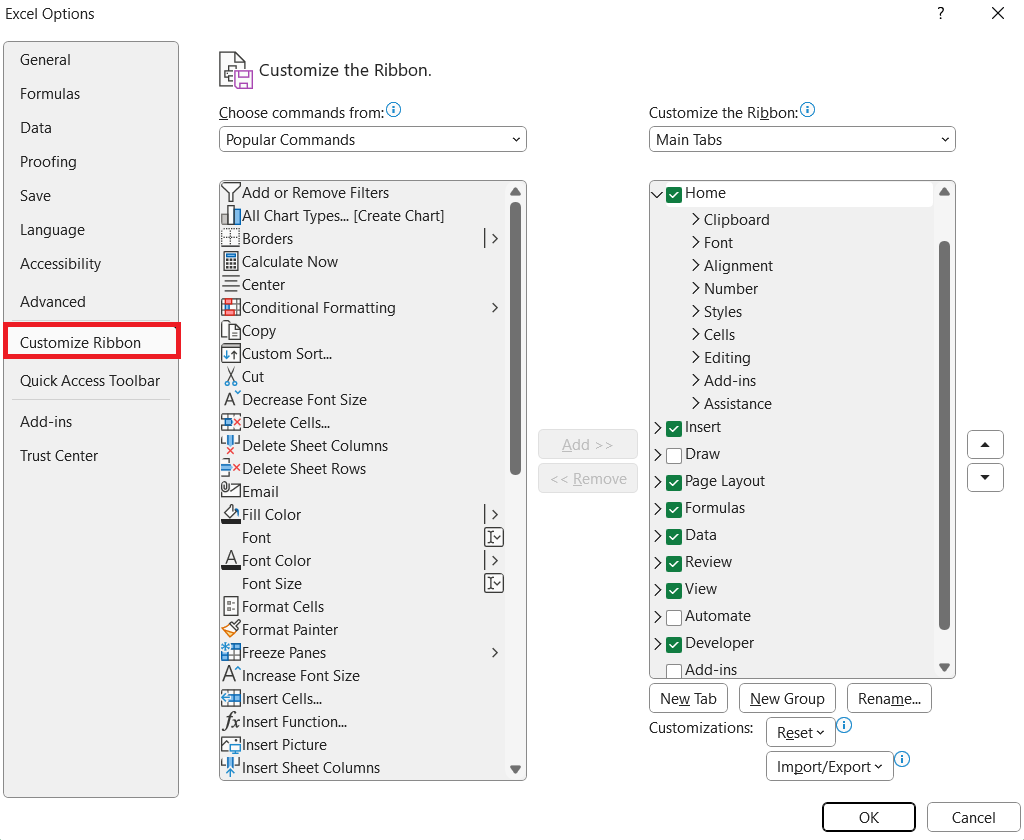
STEP 3: In the dialog box, choose Customize Ribbon on the left pane. This will display the customization options for the ribbon.
Method 2:
Right-click on an existing tab on the ribbon. This will open a context menu and from the context menu, select Customize the Ribbon. This action will also open the Excel Options dialog box, specifically focusing on the ribbon customization section.
These methods work for various versions of Excel including Excel 2019, Excel 2016, Excel 2013, and Excel 2010. Once you’re in the Customize Ribbon section of Excel Options, you’ll be presented with a range of options to add, remove, or reorder ribbon tabs and commands to better suit the way you work. Remember, these changes apply to your current spreadsheet, allowing for a personalized setup for each project if required.
Creating Your Optimal Workflow
Adding and Organizing New Tabs and Groups
Creating a personalized workspace in Excel involves adding and organizing new tabs and groups within the ribbon. This is key to having an efficient workflow, where all the necessary tools are at your disposal without having to navigate through rarely used commands. Here’s how to proceed:
Adding New Tabs:
STEP 1: Access the Customize Ribbon section in Excel Options.
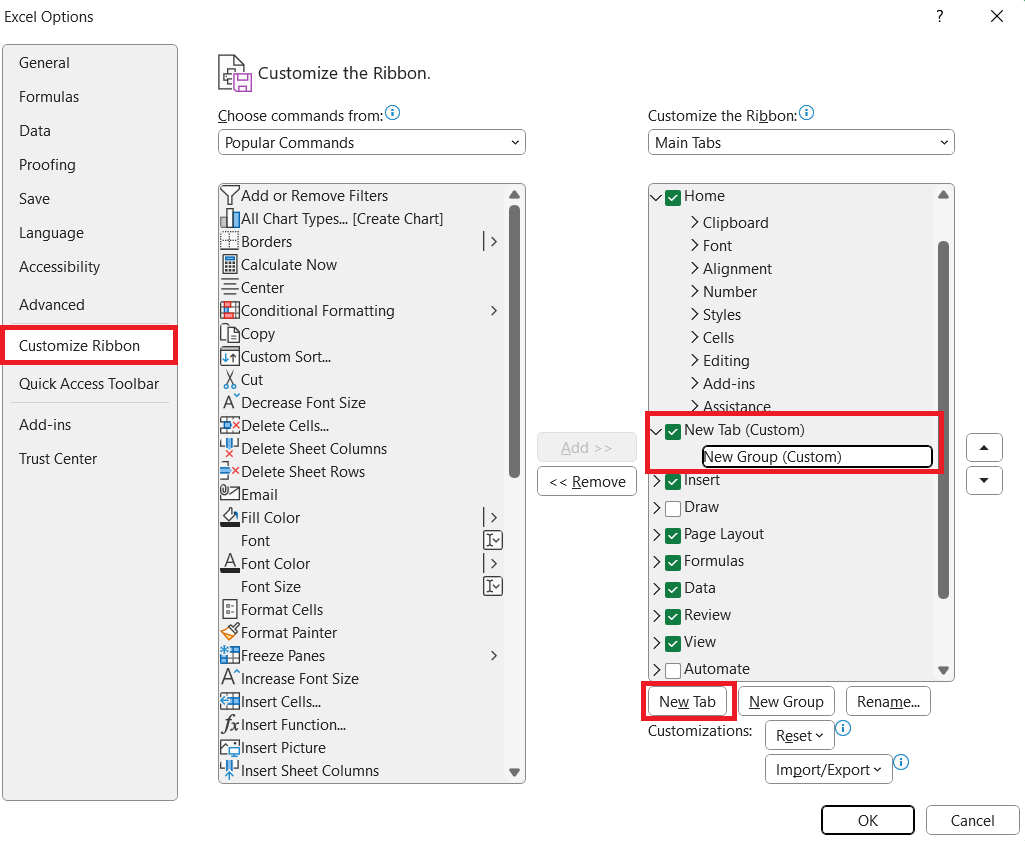
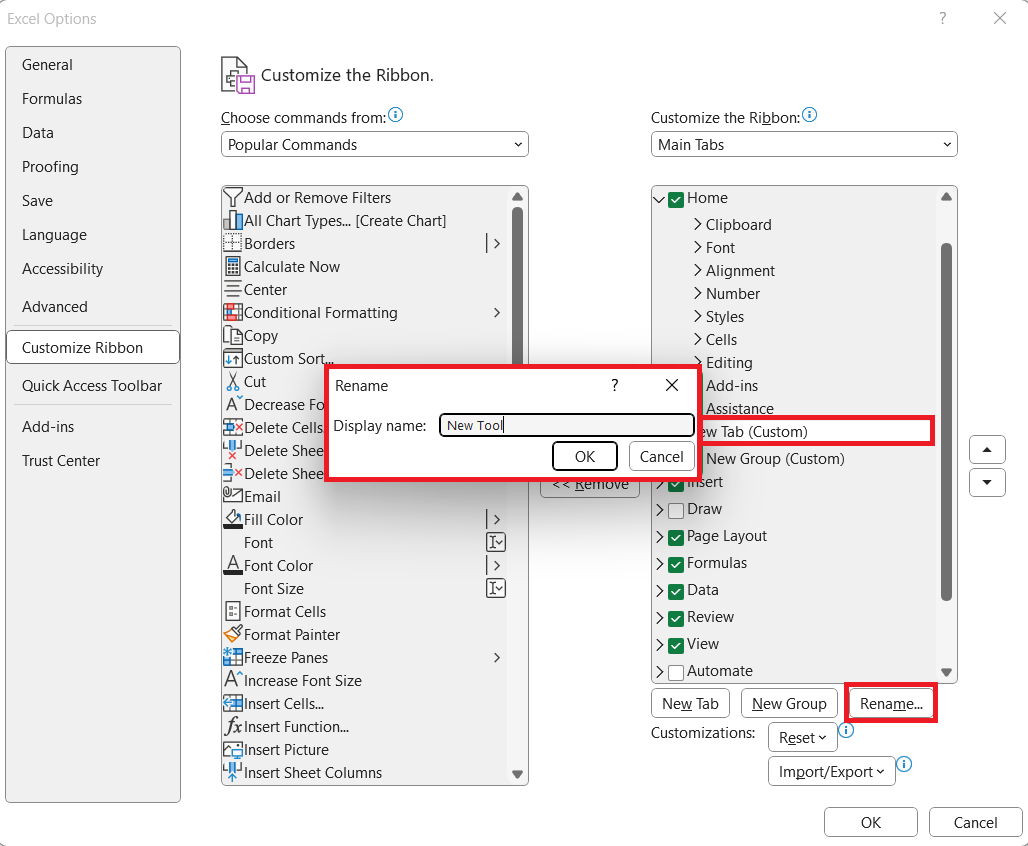
STEP 2: On the right side, where you see the main tabs, click on the New Tab button. This will add a new tab with a new group in it.
STEP 3: With the new tab selected, click the Rename button to give it a name that reflects its purpose.
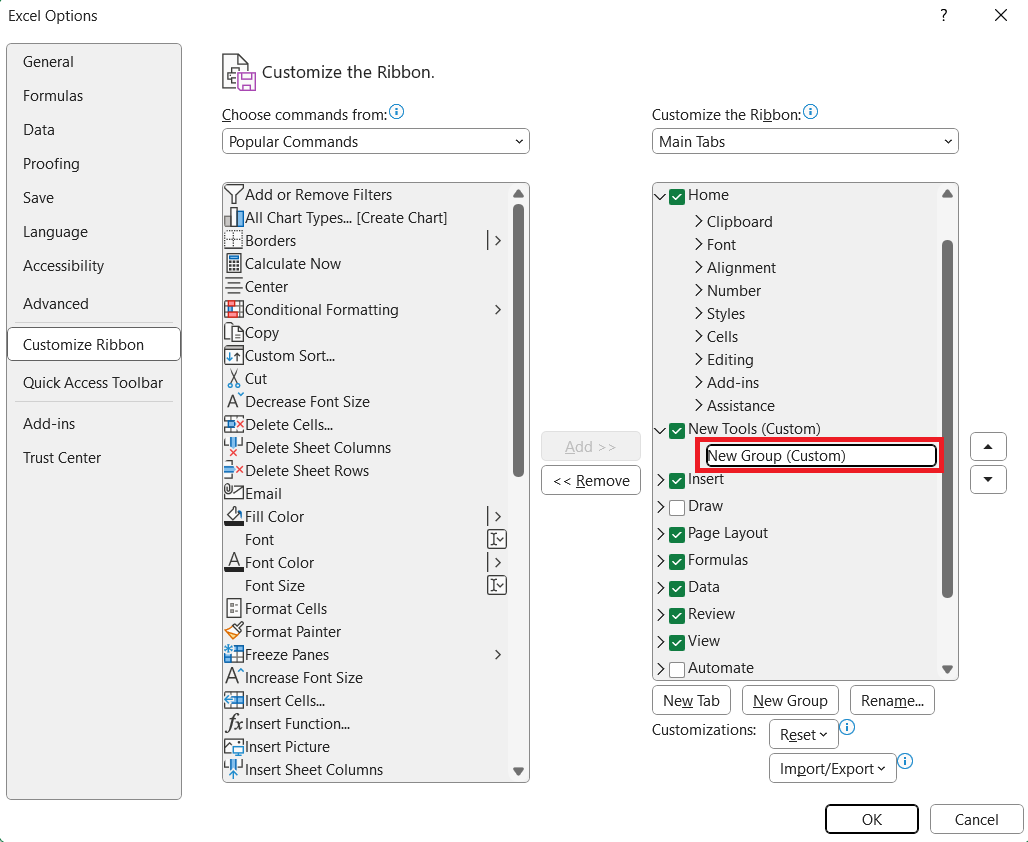
STEP 4: Remember that each tab must contain at least one group; otherwise, it isn’t possible to add commands to it.
Organizing Groups within Tabs:
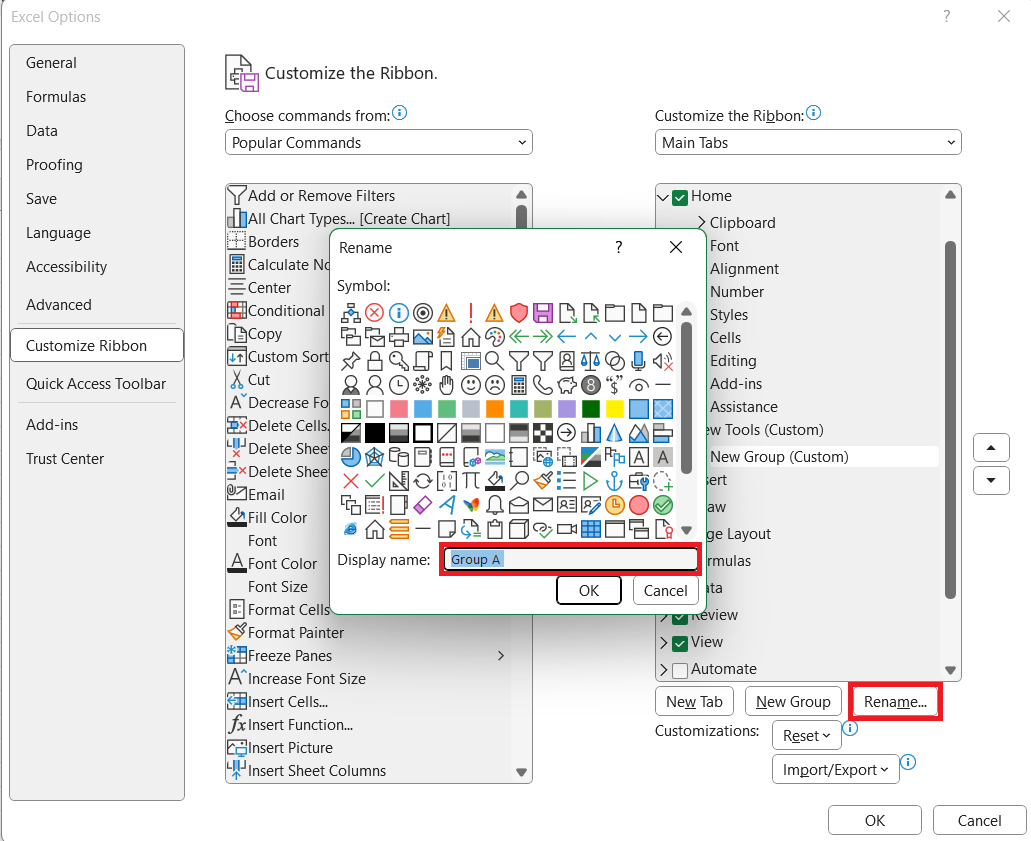
STEP 5: Use the Rename option to give the group a meaningful name.
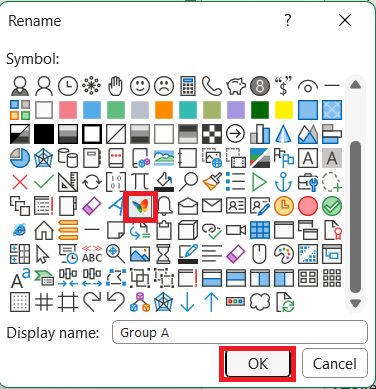
STEP 6: For better identification and a touch of personal style, you can also assign an icon to the group.
Add Custom Commands to Groups:
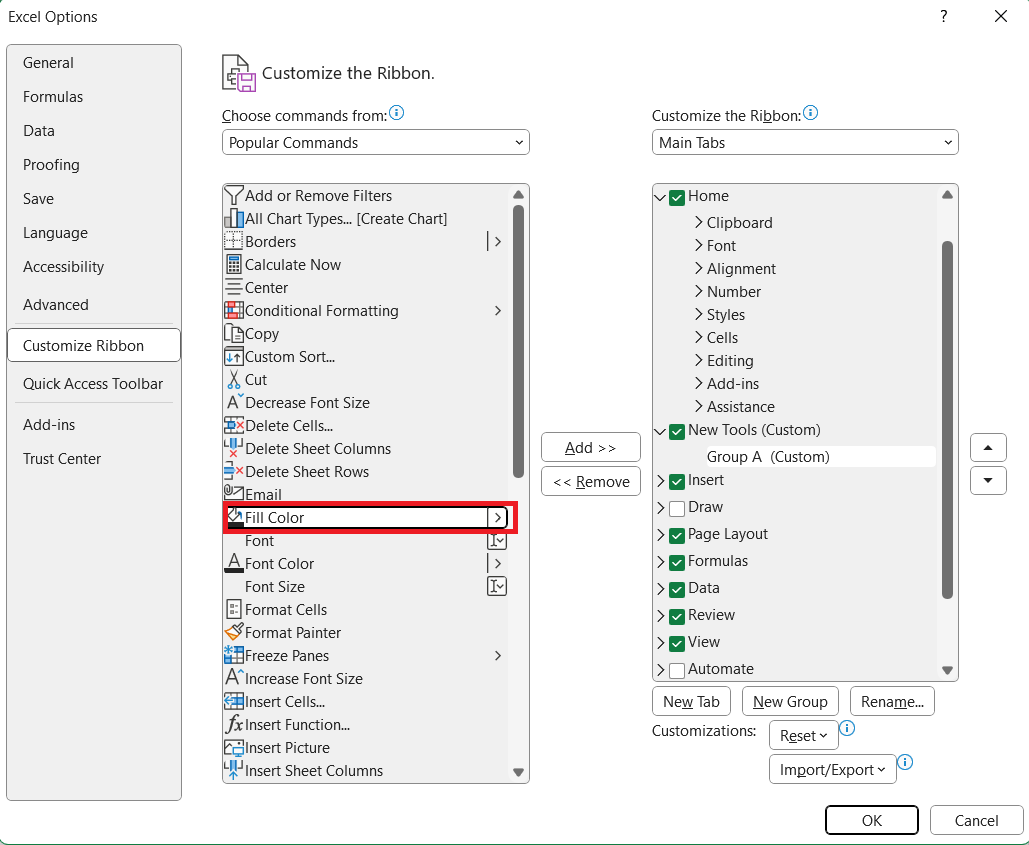
STEP 7: From the list on the left side, choose a command you want to add to a specific group.
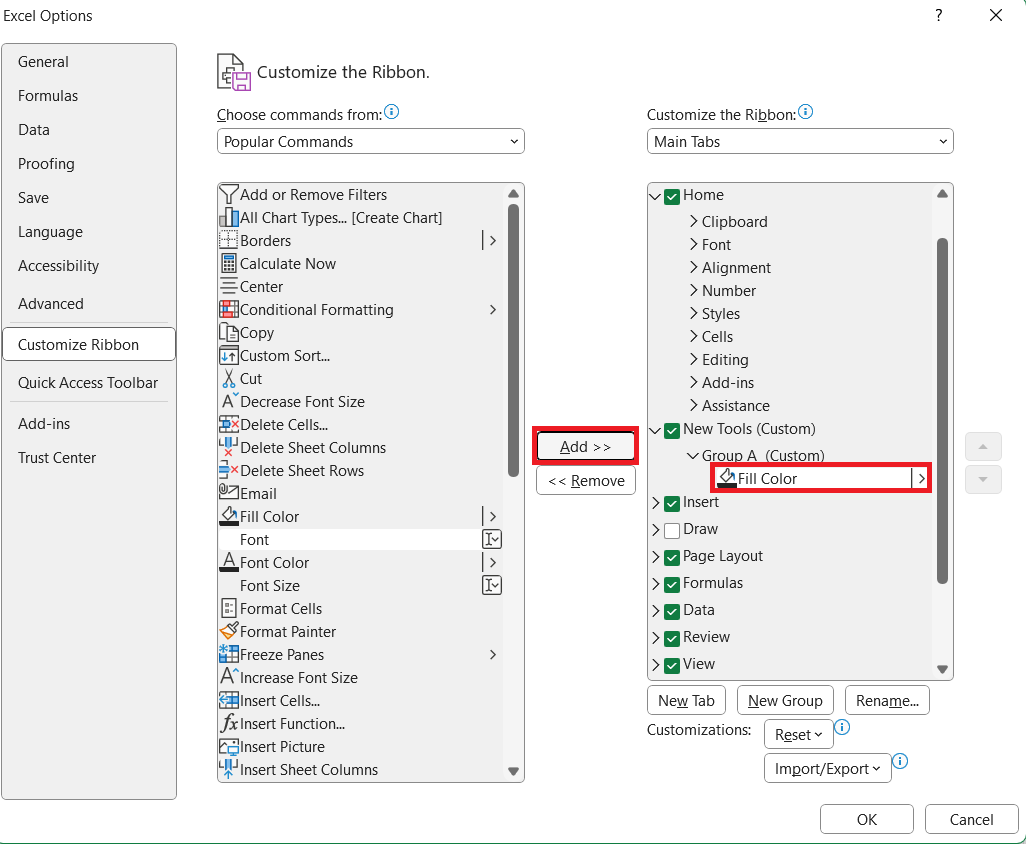
STEP 8: Select the group on the right side and then click the Add button between the two panes.
Reordering Tabs and Groups:
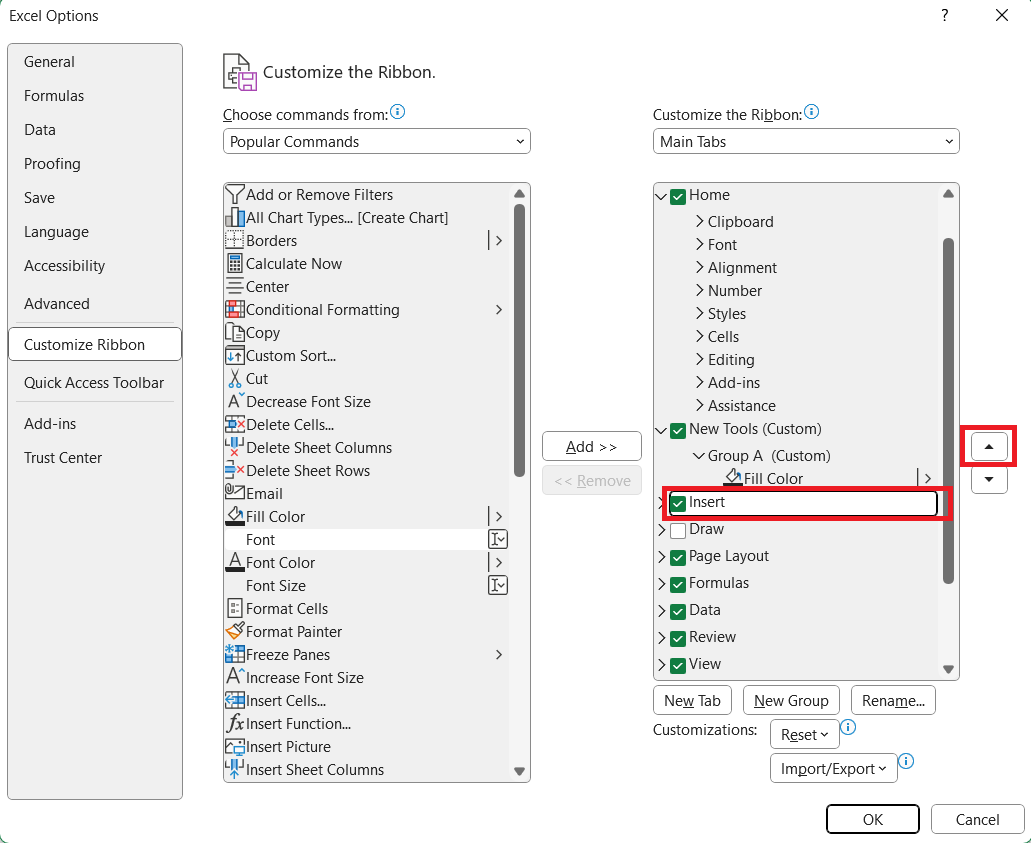
To reorder tabs or groups, simply select the item you wish to move and use the up and down arrows on the right side to position them where you like.
By following through with these steps, you can build a ribbon equipped with all the functions critical for your day-to-day tasks. It also allows you to segment your work process into logical groupings, improving your efficiency and effectiveness in Excel.
Advanced Tips for Ribbon Customization
Exporting and Importing Custom Ribbons
Excel’s ribbon customization capabilities extend to the ability to export and import your customized ribbon setup. This feature is a game-changer for users who work across multiple computers or want to share their configuration with others. Here’s how you can export and import custom ribbons in Excel:
Exporting a Custom Ribbon:
STEP 1: Navigate to the Customize the Ribbon window by accessing the Excel Options as described earlier.
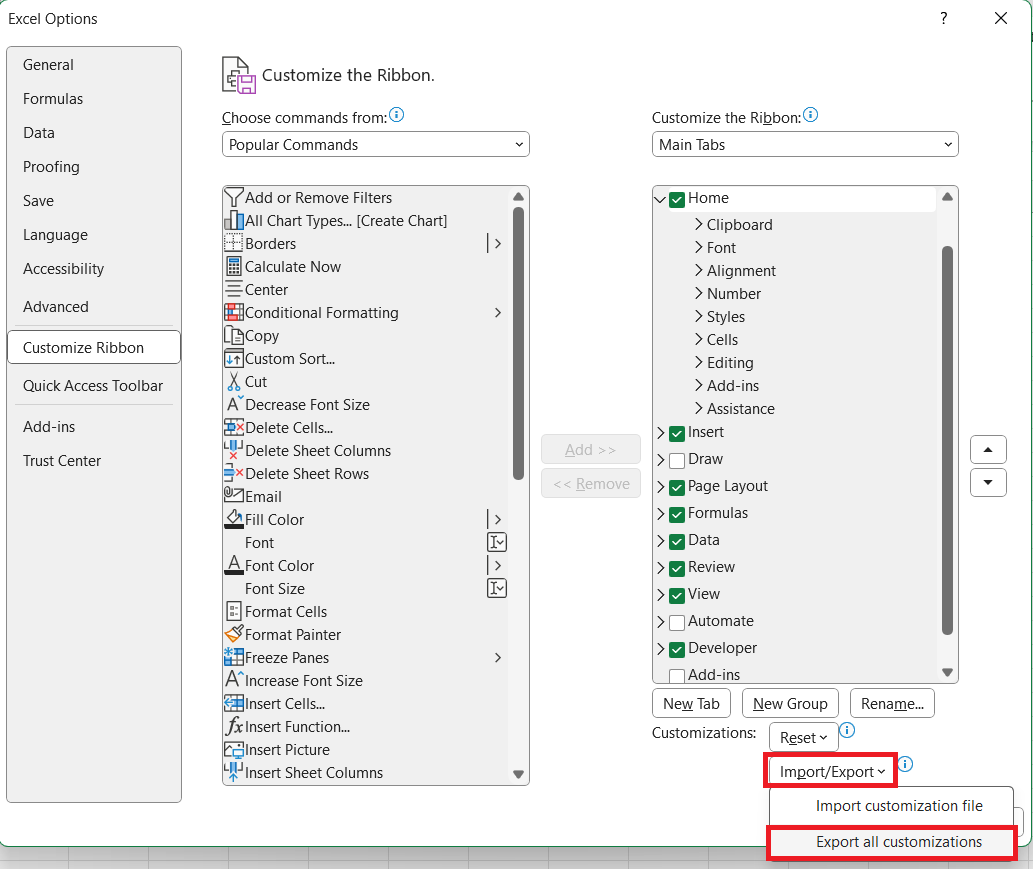
STEP 2: Click on the Import/Export button at the bottom right of the window. Choose Export all customizations.
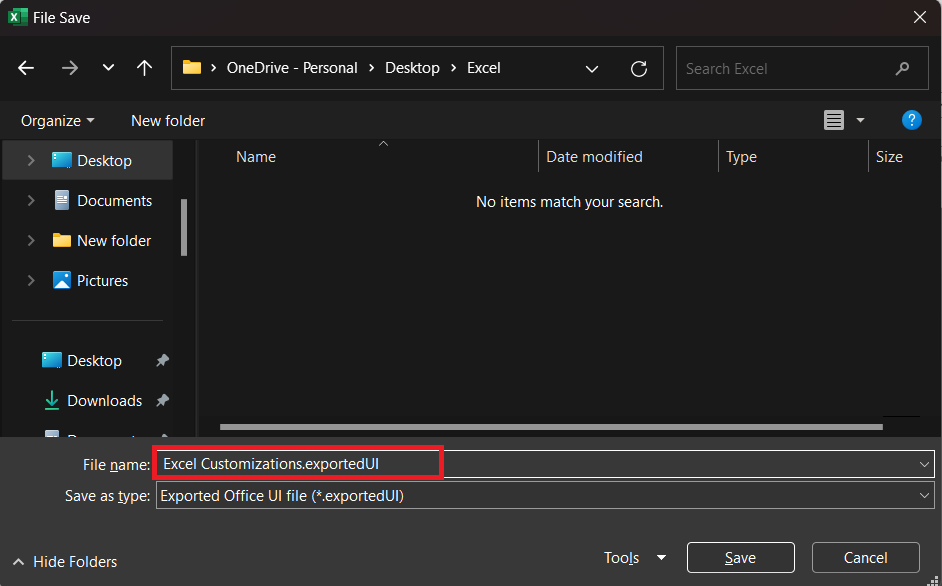
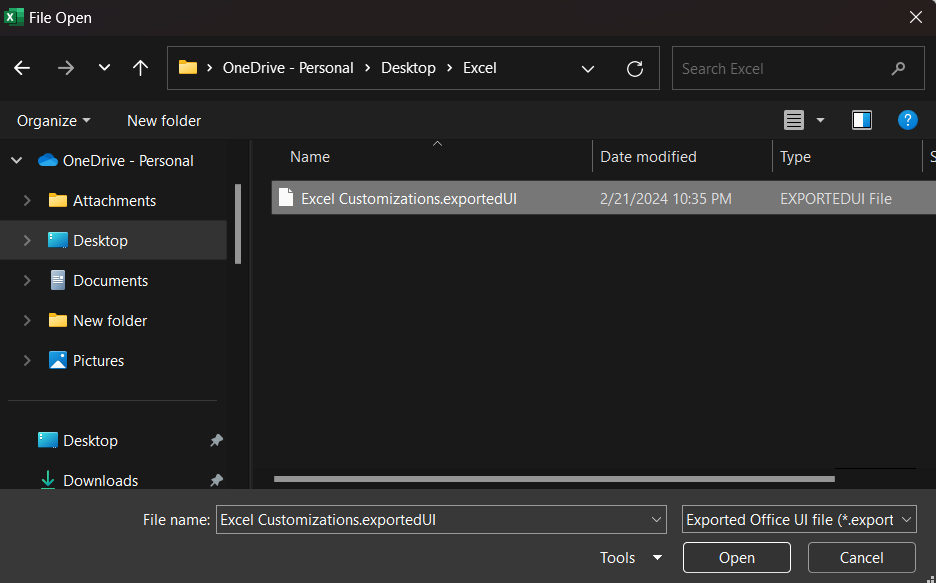
STEP 3: A file dialog box will appear. Save the Excel Customizations.exportedUI file in a secure location. You might want to name the file descriptively if you work with different customizations.
Importing a Custom Ribbon:
STEP 1: On a different computer, or the same computer after the Ribbon has been reset or you’re setting up a new profile, go to Customize the Ribbon within Excel Options.
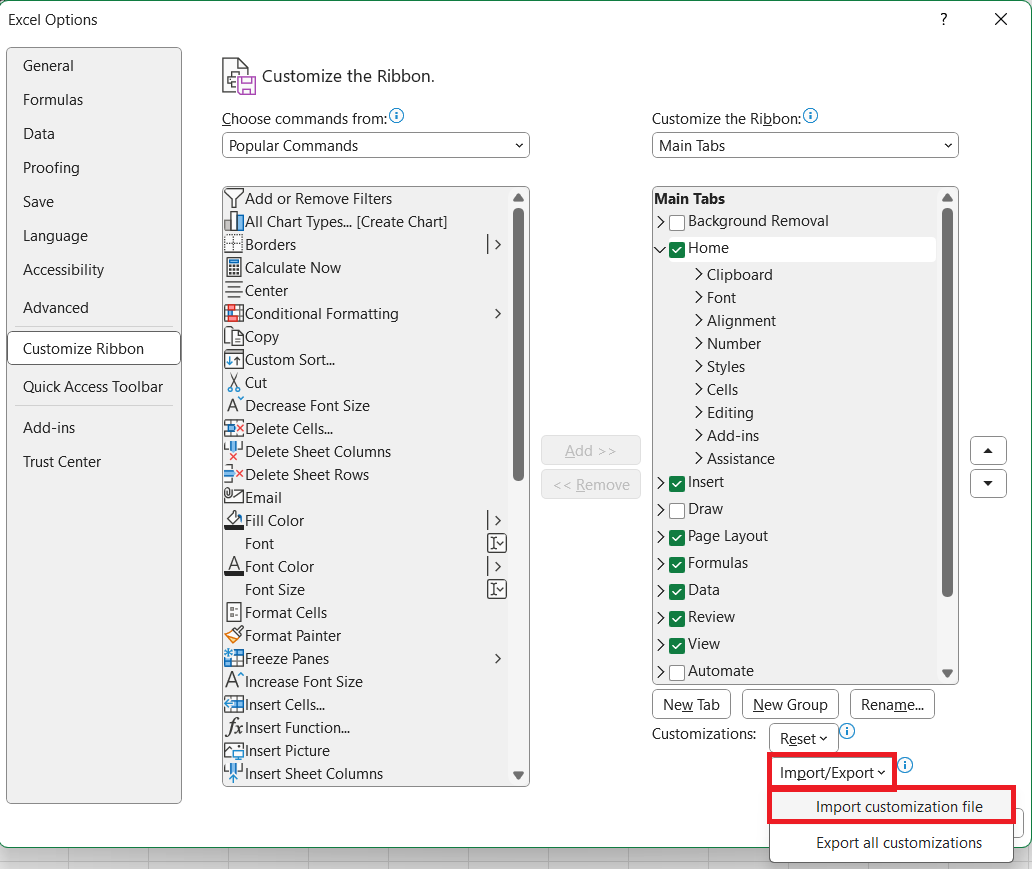
STEP 2: Click the Import/Export button and select Import customization file.
STEP 3: Select the file and click Open.
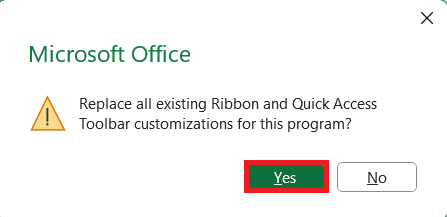
STEP 4: A prompt will notify you that all current customizations will be replaced. If you’re sure, proceed to import your custom Ribbon.
This import/export feature is invaluable for maintaining a consistent, efficient workflow regardless of which computer you’re working on, and ensures a seamless transition between workstations. It also simplifies the process of onboarding new team members or standardizing an office environment by providing a uniform starting point for all users.
By utilizing this advanced feature, you enhance not only your personal productivity but also the collective efficiency of any team or organization that relies on Excel for data management and analysis.
Resetting Modifications Without Losing Control
There may come a time when you need to reset your ribbon modifications, whether it’s due to an error or the need for a fresh start. Resetting the Excel ribbon doesn’t mean losing control over your customizations. Here’s how you can reset the modifications with precision:
Resetting the Entire Ribbon:
STEP 1: Open the Excel Options dialog box by clicking on File and then Options.
STEP 2: Go to the Customize the Ribbon section on the left.
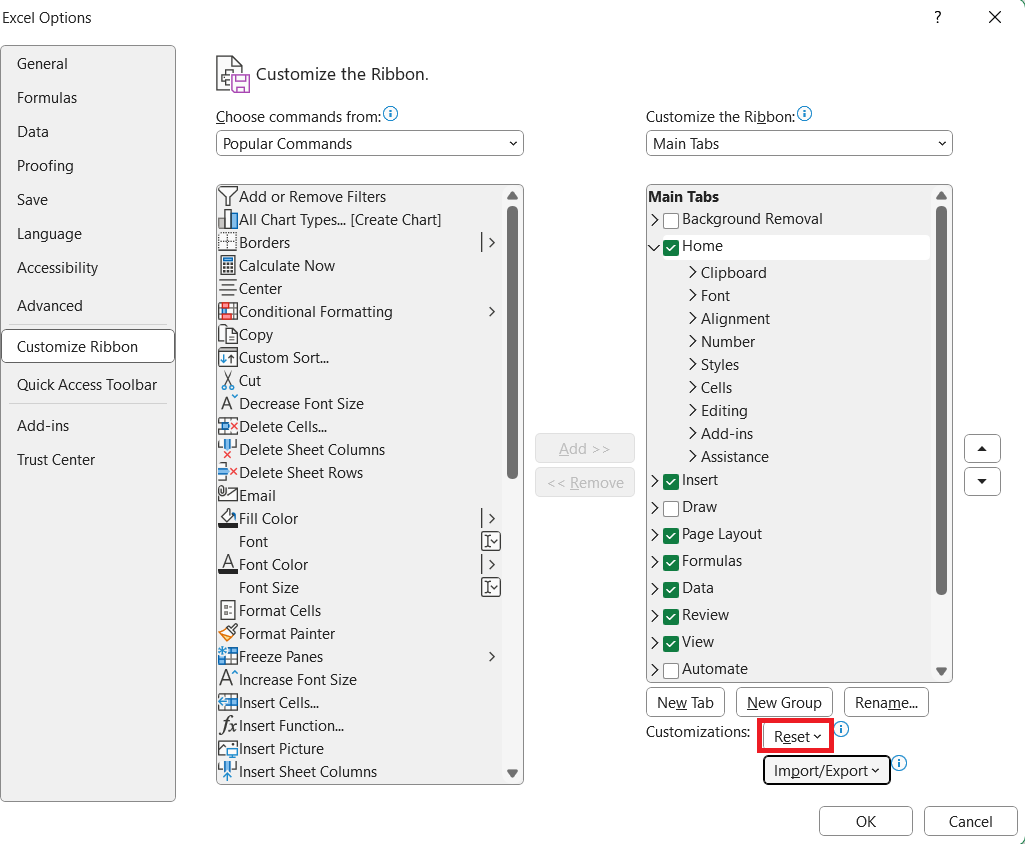
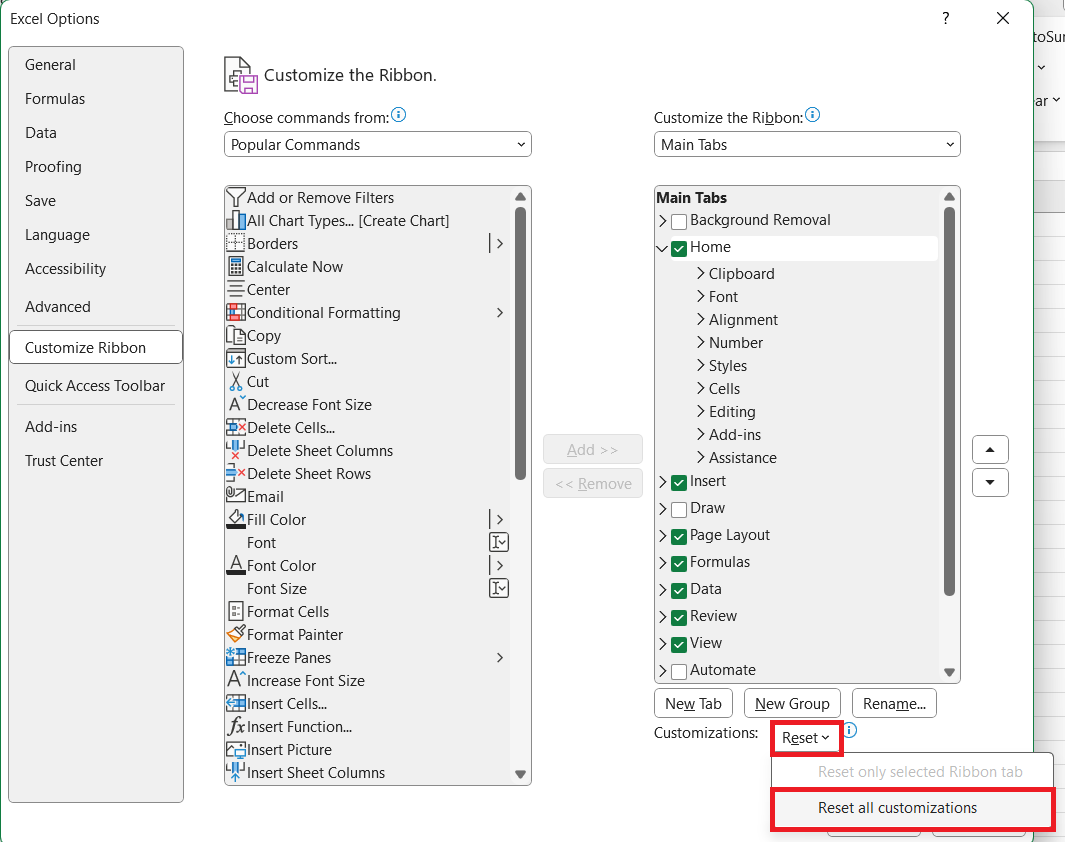
STEP 3: Within this window, click on the Reset button located at the bottom right.
STEP 4: To revert to the default ribbon setup, choose Reset all customizations. This will return your ribbon and Quick Access Toolbar to their original state, the same as when Excel was first installed.
Resetting a Specific Tab:
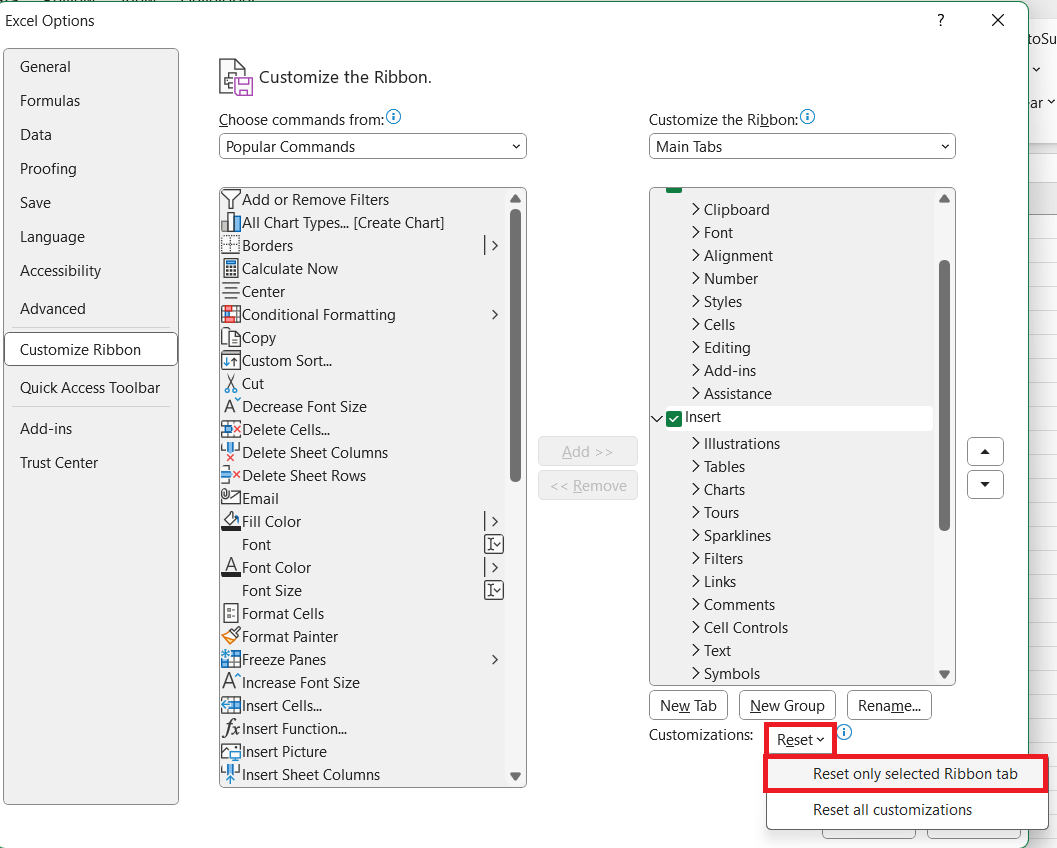
In the Customize the Ribbon window, select the tab that you want to reset. Click on the Reset button. Choose Reset only the selected Ribbon tab to revert just the selected tab to its default layout, leaving your other customizations intact.
Reverting to Previous Actions:
If you accidentally make a change that you did not intend, remember that Excel has an undo feature that can be used to reverse many kinds of actions. You can use the undo icon from the Quick Access Toolbar or press Ctrl + Z. This can reverse not just one action, but nearly 100 preceding actions, as you can repeatedly execute undo.
By managing these reset options effectively, you can approach ribbon customization with confidence, knowing that you can always revert to a known good configuration if needed, or correct small errors without having to start over completely. Moreover, periodically resetting your customizations can be part of a good practice to clear accumulated clutter and reinforce only the customizations that add value to your work process.
Do’s and Don’ts of Ribbon Customization
Best Practices for a Clutter-Free Ribbon
Maintaining a clutter-free ribbon in Excel ensures that you can work more efficiently without being overwhelmed by unnecessary options. Here are some best practices to achieve a streamlined, effective ribbon:
Prioritize Frequently Used Commands:
- Only include commands on the ribbon that you use regularly. This reduces the time spent searching for tools and increases your work pace.
Group Related Commands Together:
- Organize commands into logical groups within each tab. For instance, all chart-related operations can be placed in one group, while cell formatting options can be gathered in another.
Limit the Number of Tabs and Groups:
- Having too many tabs and groups can be just as distracting as having too few. Aim for a balanced setup that caters to your needs without excess.
Use Icons Without Labels for Familiar Commands:
- For commands that you are very familiar with, consider showing only icons and hiding the command labels to save space. Note that this can only be applied to custom groups.
Utilize the Quick Access Toolbar:
- The Quick Access Toolbar can host less frequently used but essential commands that do not warrant a spot on your main ribbon, keeping it accessible but out of the way.
Regularly Review and Refine Your Ribbon:
- Periodically assess whether the ribbon still reflects your current workflow. What was relevant six months ago might not be necessary today, so adjust as needed.
Aim For Consistency Across Environments:
- If you work on multiple machines, consider exporting your customized ribbon and importing it on other machines you work with. This provides a consistent work environment.
Consider Screen Space and Readability:
- On smaller screens, consider collapsing the ribbon by default and using more keyboard shortcuts to maximize the available workspace.
Following these practices will help ensure that the Excel ribbon remains an asset rather than a hindrance, facilitating a more productive and focused working environment. It’s all about creating a space where the tools you need the most are within easy reach when you need them, without a myriad of rarely used options causing distraction.
Leveraging the Quick Access Toolbar Alongside the Ribbon
The Quick Access Toolbar (QAT) is an essential complement to the ribbon, providing a space for easy access to your most-used commands in Excel. Effectively leveraging the QAT alongside the ribbon can save time and enhance productivity. Here’s how to make the most of the QAT:
Deciding What to Include on the QAT:
- Choose commands that you use frequently and need to access quickly. These might be functions that are not readily available on the ribbon or are nested within several clicks.
- Consider adding “Save,” “Undo,” and “Redo” as they are common actions that you may want to execute swiftly.
Customizing the Quick Access Toolbar:
STEP 1: Access the QAT customization menu by clicking the small downward arrow at the end of the toolbar or by right-clicking any command on the ribbon and selecting “Add to Quick Access Toolbar.”
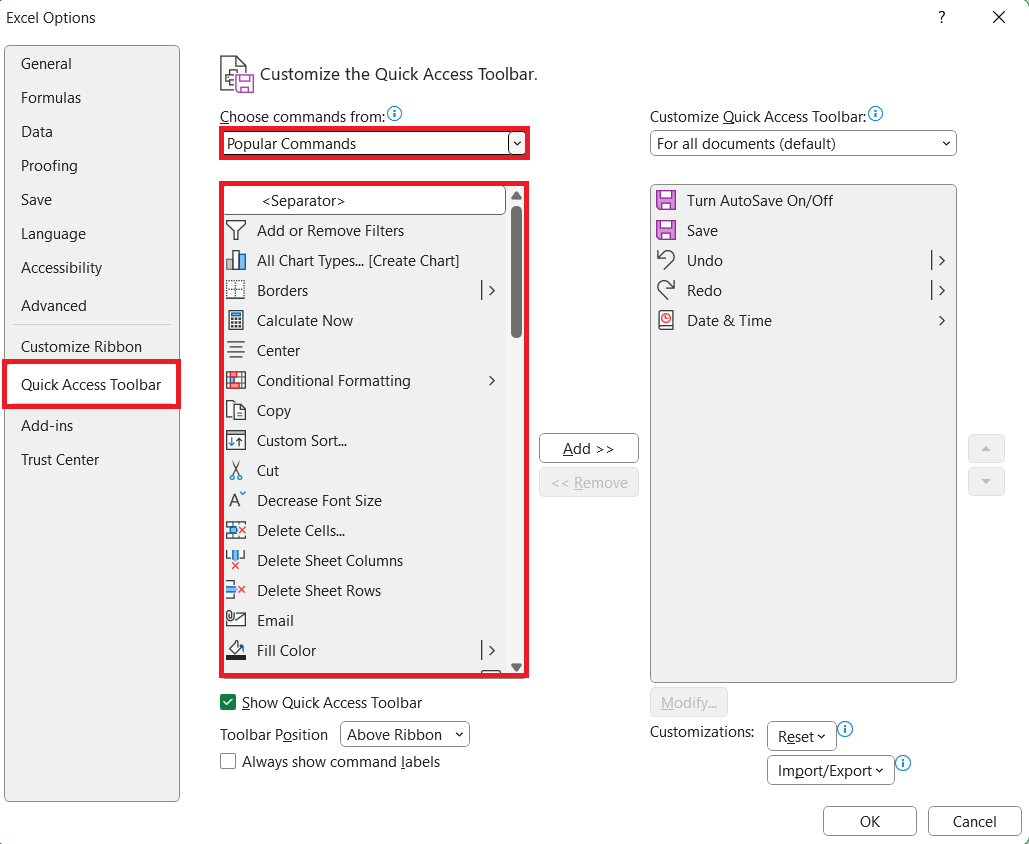
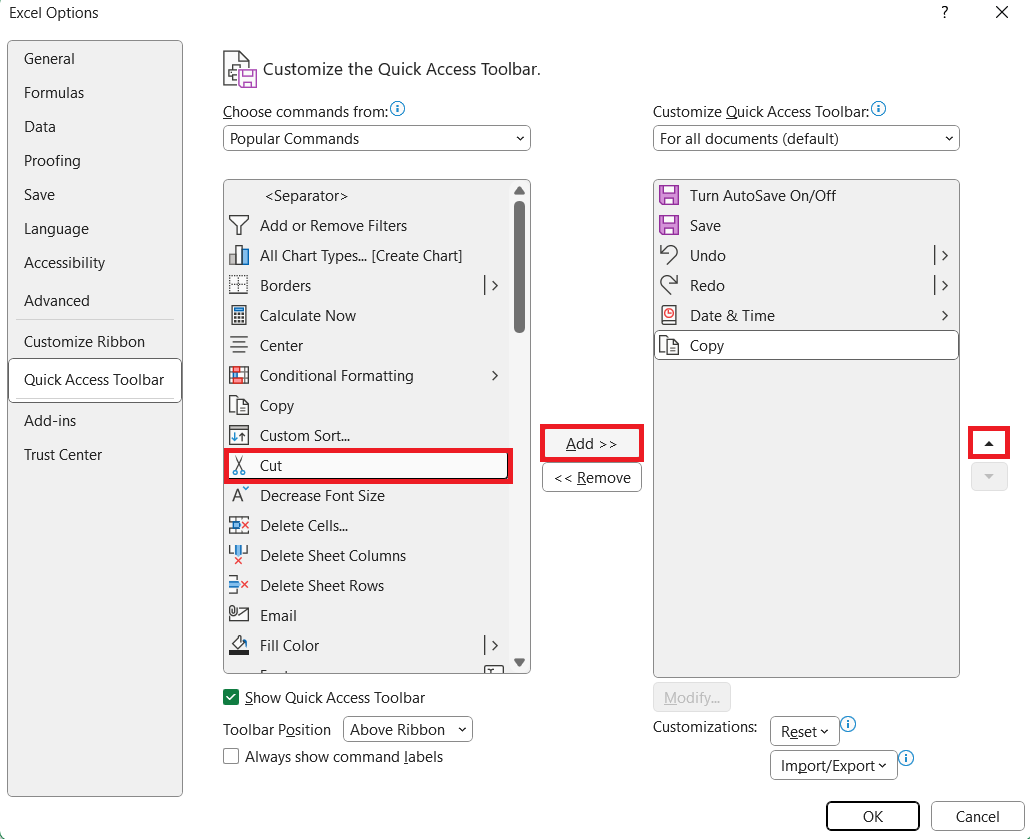
STEP 2: Click on the File menu item on the top left and then click on Options from the left menu. Once the options dialog box is opened click on the Quick Access Toolbar section where you can easily add or remove commands. For more options, select “More Commands” to open the Excel Options dialog in the Quick Access Toolbar section.
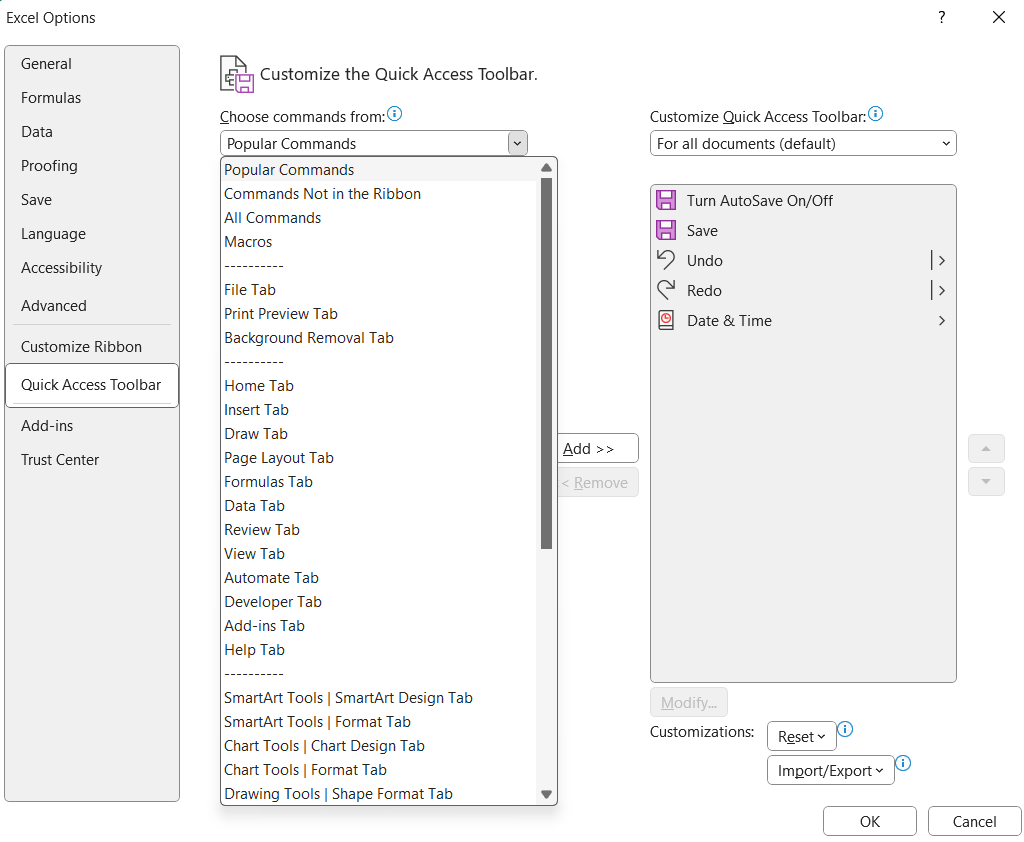
STEP 3: In the dialog, use the “Choose commands from” dropdown to select frequently used commands or macros you’ve created.
STEP 4: Add commands to the QAT by selecting them and clicking the “Add >” button. Reorder with the up and down arrows to suit your workflow.
Positioning the QAT:
- By default, the QAT is located above the ribbon, but it can be moved below for easier access or to create more screen space. Use the downward arrow to open the QAT’s customization menu and select “Show Below the Ribbon.”
Avoiding Redundancy:
- Be mindful not to duplicate commands that are already easily accessible on your ribbon, unless you specifically benefit from the repetition.
Shortcuts for the QAT:
Each command added to the QAT can be accessed using the Alt key followed by a number. The first command is Alt+1, the second is Alt+2, and so on. Utilize these keyboard shortcuts to increase the speed at which you execute common tasks.
Consistency and Familiarity:
Keep the QAT consistent across all the Excel files you work on. If you use Excel on multiple computers, consider exporting your QAT customizations along with your ribbon customizations. Train yourself to use the QAT efficiently. Forming habits around the QAT can take time, but as you become familiar with the locations of commands, your workflow will speed up significantly.
Regular Maintenance:
Periodically review the QAT to remove seldom-used commands and add new ones that align with evolving tasks or projects.
By leveraging the Quick Access Toolbar alongside the ribbon, you create a powerful duo that can significantly enhance how you interact with Excel. The QAT becomes a personalized command strip that complements the more structured and detailed customization available in the ribbon, giving you shortcut access to key tools and functions that keep your productivity at its peak.
Ultimately, the goal is to balance the ribbon and QAT in a way that they complement each other without overlap, creating a coherent and highly functional interface catered to your personal workflow preferences.
FAQs About Customizing Excel Ribbon
How Can I Add My Own Custom Tab to the Excel Ribbon?
To add a custom tab to the Excel Ribbon, right-click on the ribbon and choose “Customize the Ribbon” from the context menu. In the Excel Options dialog that appears, click “New Tab,” then rename your tab and add desired commands by selecting them from the command list. When you’re finished, click “OK” to apply and see your new custom tab on the ribbon.
Is It Possible to Reset the Ribbon to Its Default Settings?
Yes, it is possible to reset the ribbon to its default settings in Microsoft Office applications. Users can reset the entire ribbon by accessing the Customize the Ribbon window, selecting “Reset,” and then choosing “Reset all customizations.” Alternatively, for a specific tab, one can select “Reset only selected Ribbon tab” to revert it to its default state.
Can I Share My Custom Ribbon Settings with Colleagues?
Yes, you can share your custom ribbon settings with colleagues. Excel allows you to export your ribbon and Quick Access Toolbar customizations into a file, which can then be imported by a coworker or used on a different computer. Just remember to use the Import/Export feature within the Customize the Ribbon window to create a shareable file with your settings.
What Limitations Exist in Excel Ribbon Customization?
In Excel Ribbon customization, certain limitations include the inability to change or remove built-in command features, such as their names, icons, and order. Additionally, users are not permitted to resize the ribbon, alter the size of the text or the default icons, or change the ribbon’s color, although they can hide the ribbon completely or collapse it to display only tab names. The overall color theme of the Office suite can be altered, but not the ribbon specifically.
John Michaloudis is a former accountant and finance analyst at General Electric, a Microsoft MVP since 2020, an Amazon #1 bestselling author of 4 Microsoft Excel books and teacher of Microsoft Excel & Office over at his flagship MyExcelOnline Academy Online Course.


