If you’re anything like me, you probably spend a lot of time working in Excel—maybe even more than you’d like to admit! Over the years, I’ve discovered some amazing features that help me organize information, streamline my workflow, and make spreadsheets more user-friendly. One of my absolute favorites is using buttons as hyperlinks. It’s a simple trick, but it packs a punch when it comes to making your spreadsheets more interactive and easy to navigate. In this article, I’ll share how I use Excel hyperlink buttons, walk you through the process of setting them up, and answer some common questions along the way.
Key Takeaways:
- Hyperlink buttons make navigation in Excel clear, intuitive, and visually appealing.
- Creating a hyperlink button is as simple as inserting a shape, adding text, and linking it to a location or website.
- Customizing button appearance helps guide users and gives your workbook a professional look.
- Common uses include navigation menus, dashboards, quick access to files or websites, and project management tools.
- Troubleshooting common issues—like broken links or formatting quirks—ensures a smooth user experience.
Download workbookHyperlink-Buttons1.xlsx
Table of Contents
Using Excel Hyperlink Buttons to Streamline Navigation
What Are Hyperlink Buttons in Excel?
Let’s start at the beginning. A hyperlink button in Excel is exactly what it sounds like—a button that, when clicked, takes you to a different location. This could be another worksheet, a specific cell, a website, or even a file on your computer. Instead of relying on plain text hyperlinks that can be easy to overlook, hyperlink buttons stand out visually and are much more inviting to click. They help guide users through complex workbooks, making navigation smooth and intuitive. Once I started using them, I couldn’t imagine going back to the old way!
Benefits of Using Buttons for Hyperlinks
Why bother with buttons instead of regular hyperlinks? From my experience, there are several big advantages:
- Usability: Buttons are easy to spot and click, especially for users who aren’t Excel experts. They act as clear signposts, guiding users exactly where you want them to go.
- Clarity: With custom text and colors, buttons can provide context—no more guessing what a cryptic hyperlink might do! I like to label each button clearly so users know what to expect.
- Workflow Improvement: Buttons speed up navigation, especially in large workbooks with lots of sheets. I use them to jump between dashboards, data entry forms, and summary pages in just one click.
- Professional Look: Well-designed buttons make your spreadsheets look polished and modern. It’s a small touch that can make a big impression, especially in client-facing documents.
- Customizability: You can easily update, move, or change buttons as your workbook evolves. This flexibility keeps everything organized and up-to-date.
Create a Hyperlink Button: Step-by-Step Guide
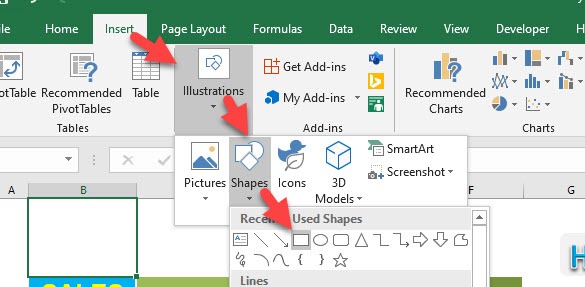
STEP 1: Go to Insert > Illustrations > Shapes > Any Rectangle Shape
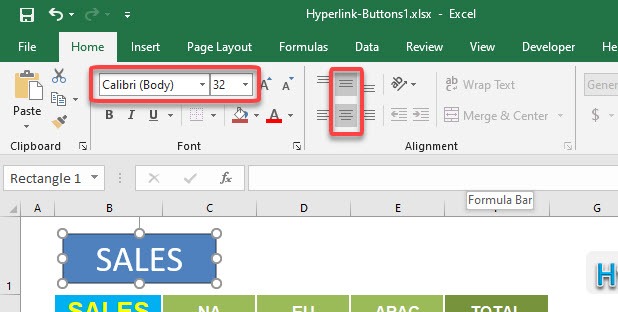
STEP 2: Create a rectangle and type SALES. Update the formatting to make the text look bigger and centered.
STEP 3: While holding CTRL + SHIFT, drag your first button using left-click to instantly duplicate it. Do it twice.
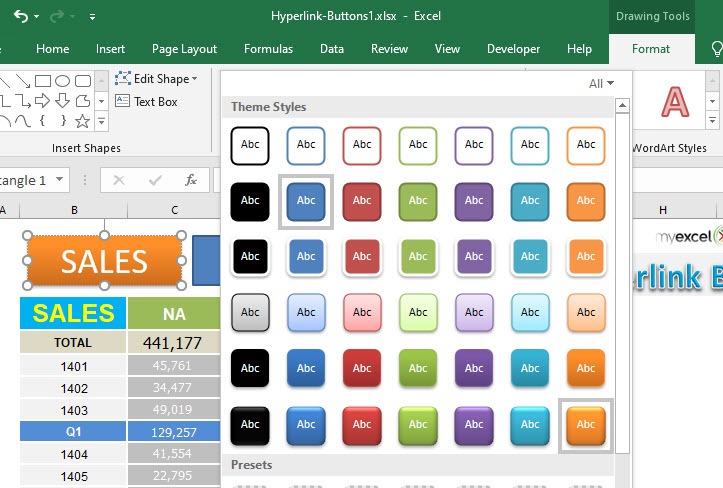
STEP 4: Go to Format > Shape Style and pick the formatting you want. Do it for all buttons to differentiate them from one another.
Make sure to change the text of the other buttons to COSTS and PROFIT.
STEP 5: We will now create the cell that our button will navigate to.
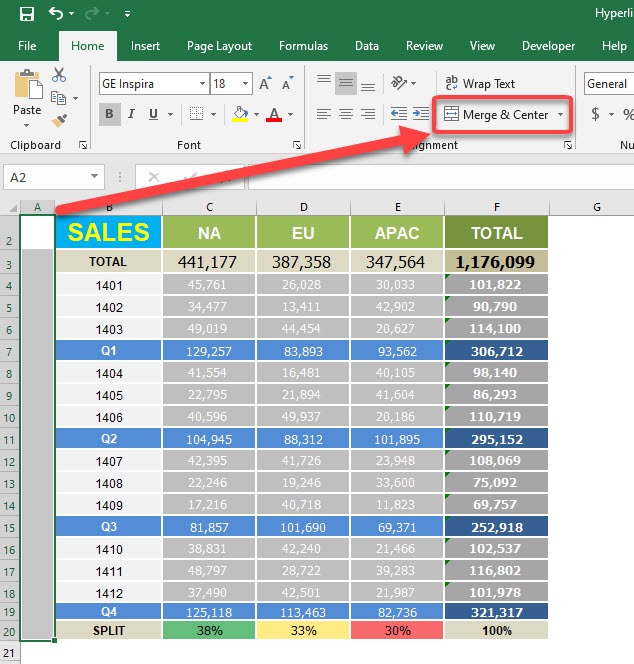
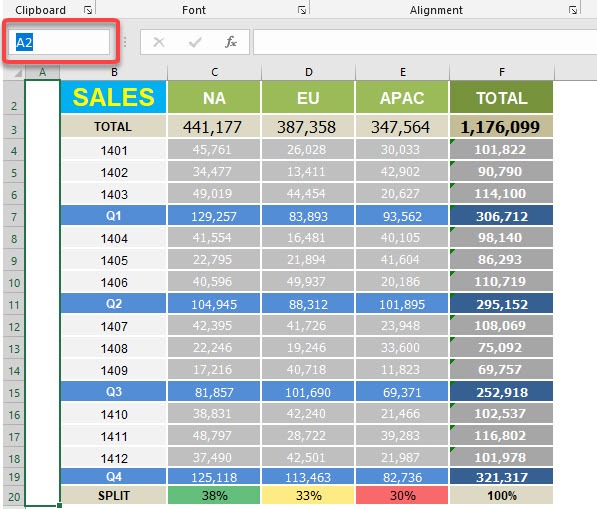
Select the blank cells beside the SALES table. Then select Home > Merge & Center
STEP 6: Take note of the cell reference and copy this. For SALES this is cell A2.
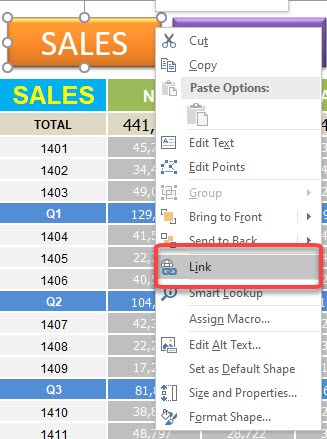
STEP 7: Right click on the SALES Button and select Link.
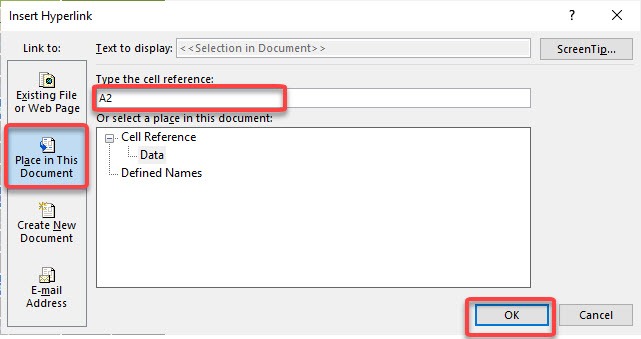
STEP 8: Make sure Place in This Document is selected then place the cell reference A2. Press OK.
STEP 9: Do the same for COSTS.
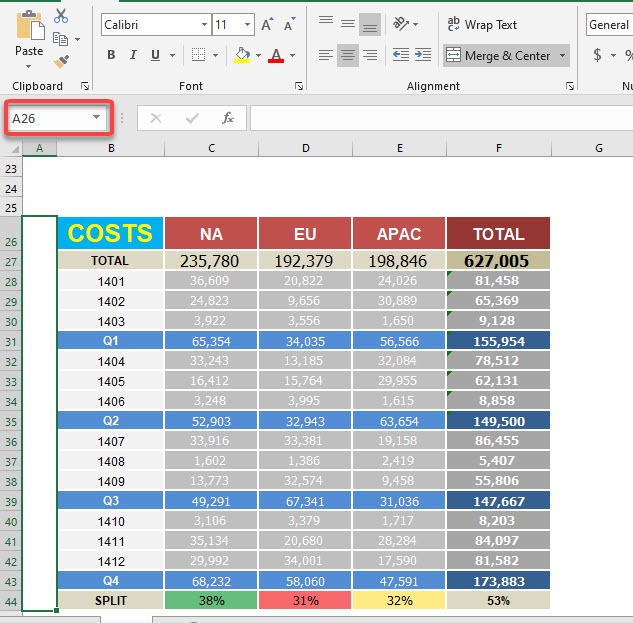
Select the blank cells beside the COSTS table. Then select Home > Merge & Center
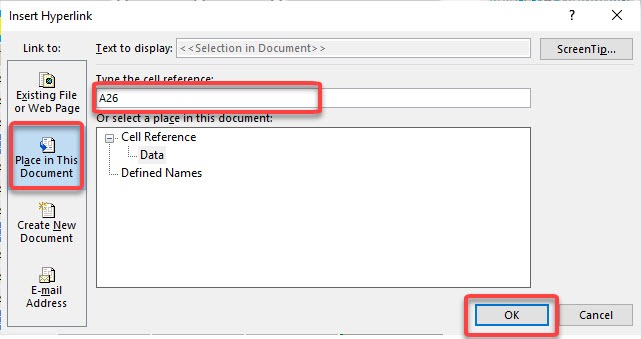
Take note of the cell reference and copy this. For COSTS this is cell A26.
STEP 10: Right click on the COSTS Button and select Link.
Make sure Place in This Document is selected then place the cell reference A26. Press OK.
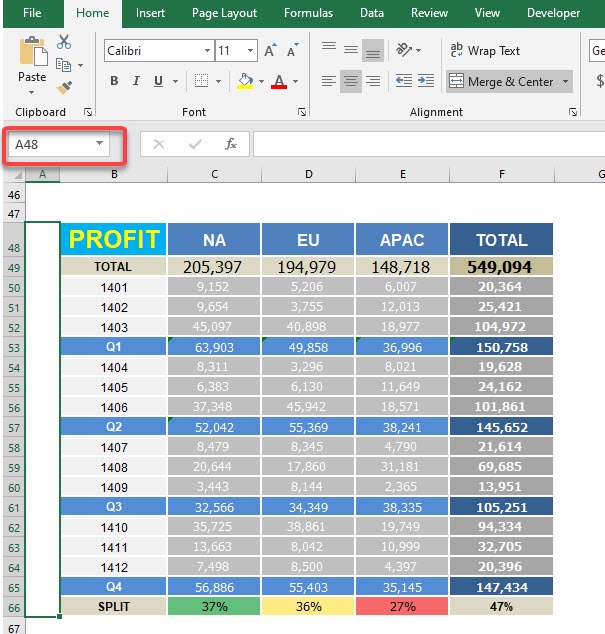
STEP 11: Select the blank cells beside the PROFIT table. Then select Home > Merge & Center
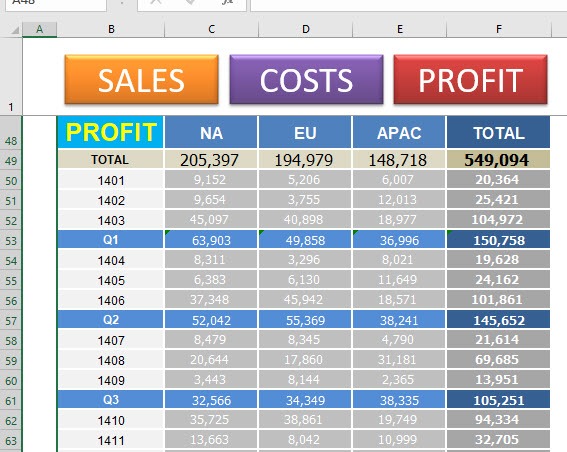
Take note of the cell reference and copy this. For PROFIT this is cell A48.
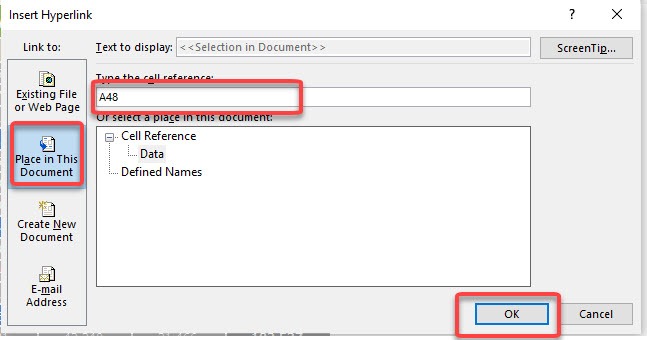
STEP 12: Right click on the PROFIT Button and select Link.
Make sure Place in This Document is selected then place the cell reference A48. Press OK.
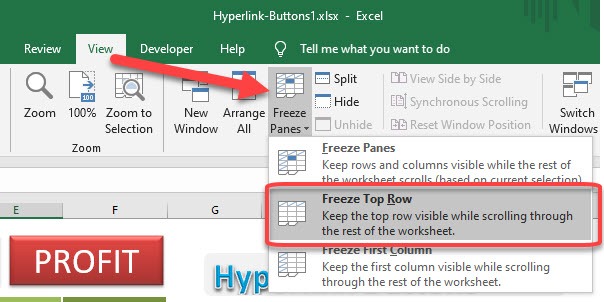
STEP 13: Let’s freeze in place the top row that contains our buttons.
Go to View > Freeze Panes > Freeze Top Row
Now try clicking on the buttons and you will be impressed with the instant navigation!
Mastering Hyperlink Buttons
Common Use Cases
Hyperlink buttons have found a permanent place in my Excel toolbelt because they’re so versatile. Here are some ways I use them:
- Navigation: In large workbooks, I create a menu with buttons that link to different sections, making it easy for anyone to find what they need.
- Dashboards: My dashboards often include buttons to jump between summary views, detailed reports, and charts.
- Quick Access: I set up buttons to open frequently used files or external websites, saving myself time hunting for links.
- Data Entry Forms: When designing forms, I use buttons to return to the main menu or submit data, streamlining the process for users.
- Project Management: Buttons help my team move between project phases or task lists, keeping everyone on the same page.
Troubleshooting and Tips
While buttons are generally straightforward, I’ve run into a few hiccups—and learned some valuable lessons. Here are my top tips:
- Hyperlink Not Working? Double-check the hyperlink address and make sure it’s pointing to the right location. If you’re linking to another sheet, spelling matters!
- Button Doesn’t Respond? Ensure that you’re clicking the shape itself and not a blank area around it. Sometimes, resizing the shape makes it easier to click.
- Formatting Gets Lost? If you copy and paste buttons between workbooks, some formatting might not carry over. I always double-check after moving buttons.
- Accidentally Moving the Button? To prevent this, group your buttons with other objects or lock the worksheet, so users can click but not drag.
- Version Differences: Some features may look slightly different depending on your version of Excel. If you can’t find an option, try searching in Excel’s help menu.
FAQs
Can I use images as Excel hyperlink buttons?
Absolutely! You can insert an image, select it, and then add a hyperlink just as you would with a shape. This is a great way to make your buttons more engaging and visually unique. Just remember that the image should clearly indicate its purpose, so users know it’s clickable. I often use icons or logos for this purpose.
How do I remove or change a hyperlink from a button?
To remove a hyperlink, right-click the button and select “Remove Link” or “Edit Link,” depending on your version. To change the destination, simply edit the link and enter the new location or URL. This process is quick and doesn’t alter the button’s appearance or formatting. I find it helpful for keeping my workbooks updated as information changes.
Will the hyperlink button work when I share the Excel file?
In most cases, yes—especially if you’re linking to locations within the same workbook. If your button links to an external file or website, make sure your colleagues have access. If linking to a file on your computer, others may not be able to open it unless they have the same file path. I always test links after sharing to ensure everything works smoothly.
Can I use VBA to enhance hyperlink button functionality?
Yes, you can use VBA (Visual Basic for Applications) to add advanced features, such as opening multiple sheets or performing actions beyond simple navigation. However, for most users, the built-in hyperlink function is more than enough. If you’re comfortable with VBA, it’s a powerful way to customize your buttons further, but it’s not required for basic link buttons.
How do I keep my buttons from moving or resizing when I change cell sizes?
Right-click the button, select “Format Shape,” and under “Properties,” choose the option to not move or size with cells. This keeps your button in place, even if you add or remove rows or columns. I use this setting to maintain a consistent layout, no matter how my data changes.
John Michaloudis is a former accountant and finance analyst at General Electric, a Microsoft MVP since 2020, an Amazon #1 bestselling author of 4 Microsoft Excel books and teacher of Microsoft Excel & Office over at his flagship MyExcelOnline Academy Online Course.


