
Enter the world of Microsoft Excel‘s IF function—a versatile tool for making decisions directly within your spreadsheets. With the IF statement, you can automate responses based on specific conditions, turning your data into a dynamic powerhouse. Understanding its basic syntax and capabilities empowers you to streamline complex data operations and analyses with ease.
Key Takeaways:
- Mastering IF Basics: Delve into the IF function’s basic syntax to unlock its potential in Excel. Learn to set conditions and specify outcomes, tailoring responses effortlessly.
- Crafting Simple Formulas: Develop rapid decision-making skills by crafting IF-THEN formulas. Direct your spreadsheet to display desired results based on predefined conditions, enhancing data analysis efficiency.
- Exploring Nested IFs: Explore nested IF functions for intricate decision-making. Stack multiple IF statements to manage complex scenarios with precision, ensuring comprehensive coverage in your formulas.
- Utilizing Logical Partnerships: Harness the synergy of IF with logical functions like AND and OR. Manage multiple conditions simultaneously to tackle real-world scenarios with precision and efficiency.
Table of Contents
Unwrapping Excel’s Swiss Army Knife: The IF Function
What is the Excel IF Statement?
The Excel IF Statement is a versatile tool that allows for decision-making right within your spreadsheets. It’s like having a diligent assistant who can quickly choose between two alternatives—giving your data a dynamic edge. Essentially, by testing a specific condition, the IF statement returns one result if true, and another if false, which can significantly streamline complex data operations and analyses.
The Basic Syntax of an IF Function
To make the most of the IF function, familiarize yourself with its building blocks. The formula looks like this:
=IF(logical_test, [value_if_true], [value_if_false])
Here, logical_test is the mandatory argument where you set the condition. If this condition is met (evaluates to TRUE), value_if_true is returned; if not, value_if_false takes the stage. These two latter arguments are optional, meaning you can tailor the function to respond in various ways, including leaving a blank response for scenarios that don’t meet your condition.
Remember, innate to its design is simplicity and adaptability, allowing you to build formulas that range from the straightforward to the complex with ease.
Upgrading Your Excel Skills with IF Command Know-how
Crafting Simple IF-THEN Formulas for Quick Decisions
Developing simple IF-THEN formulas is like having a shortcut for your decision-making processes in Excel. For those moments when you need to assess data quickly, a basic IF THEN statement efficiently directs your spreadsheet to display the result you desire based on a condition you set.
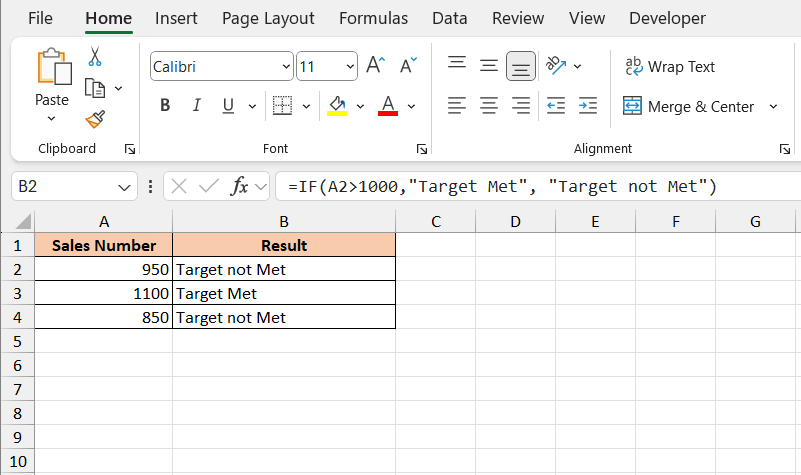
Imagine needing to determine if a sales number meets a target. Your formula might be:
IF(A2 > 1000, “Target Met”, “Target Not Met”)
This example checks if the value in cell A2 exceeds 1000, and promptly labels it “Target Met” or “Target Not Met”, assisting you in rapid decision-making. These straightforward formulas are incredibly effective for flagging data, creating alerts, and setting up simple conditions that produce immediate, actionable results.
Multi-Layered Decisions: A Dive into Nested IF Functions
When your data decisions become more intricate, that’s when nested IF functions show their value. They are like a chain of logic checkpoints, one leading to the next, allowing for multiple outcomes. The nested IF is essentially a series of IF statements stacked inside one another, checking conditions in a sequence you define.
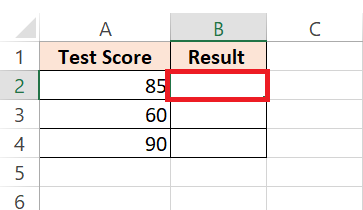
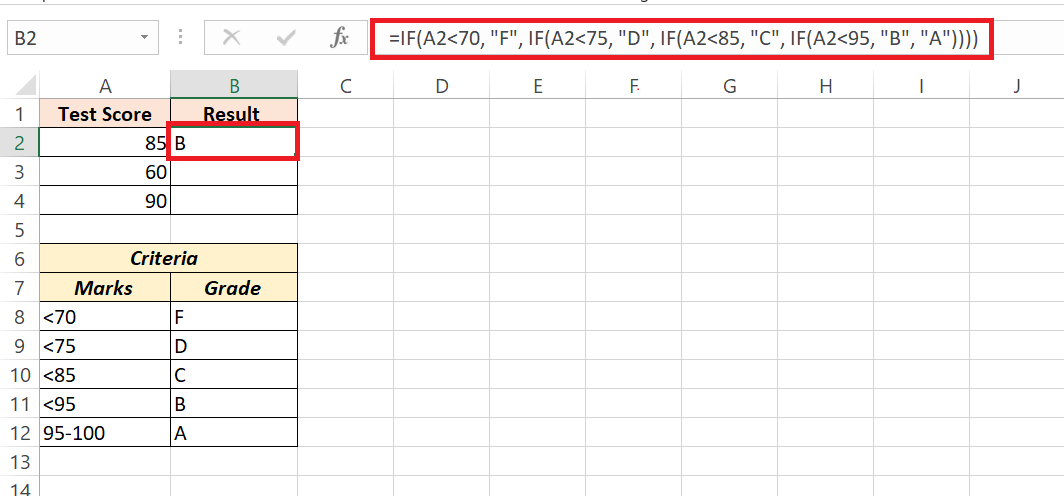
Take an example where you’re categorizing test scores:
=IF(A2<70, “F”, IF(A2<75, “D”, IF(A2<85, “C”, IF(A2<95, “B”, “A”))))
Here, the formula cascades through various conditions, assigning grades based on the score in cell A2. Each IF function checks a condition, and passes onto the next if false, like a meticulous quality control process, ensuring that every possibility is accounted for.
Steps to create a nested IF formula:
STEP 1: Select the cell where you want the result to appear.
STEP 2: Enter the formula: =IF(A2<70, “F”, IF(A2<75, “D”, IF(A2<85, “C”, IF(A2<95, “B”, “A”)))).
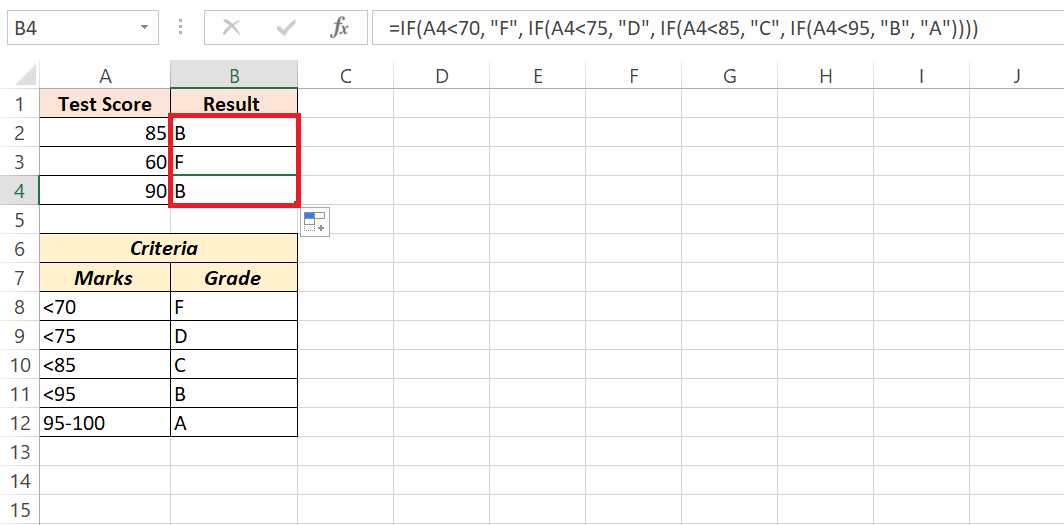
STEP 3: Drag the fill handle down to apply the formula to other cells.
Nested IFs are flexible, capable of up to 64 layers, though such complexity can be challenging to manage. Whenever your logic demands multiple layers, remember that clarity is your ally—maintaining well-organized, readable formulas ensures they remain maintainable and less prone to error.
Beyond True or False: Creative Uses of the IF Function
Assign Points, Parse Text, and More: Unique IF Scenarios
While IF functions traditionally navigate numerical data, you might be surprised by their versatility. They can assign points to qualitative assessments, parse text, manage errors, and perform an array of creative tasks that go well beyond simple true-or-false outcomes.
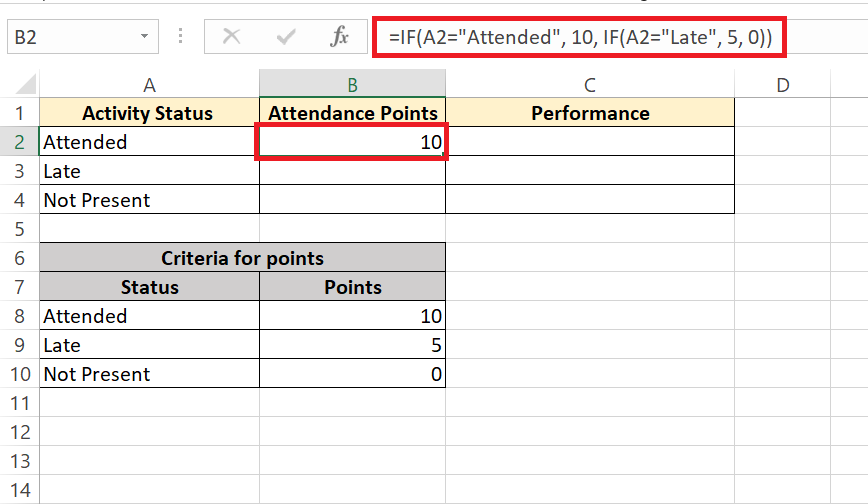
Say, for example, you’re grading participation in a series of activities, assigning points as follows:
=IF(A2=”Attended”, 10, IF(A2=”Late”, 5, 0))
In this scenario, the presence marked in cell A2 not only tracks attendance but also quantitatively reflects it in points, streamlining the tallying process.
When it comes to text, the IF function can help you categorize or flag data based on specific text content within a cell:
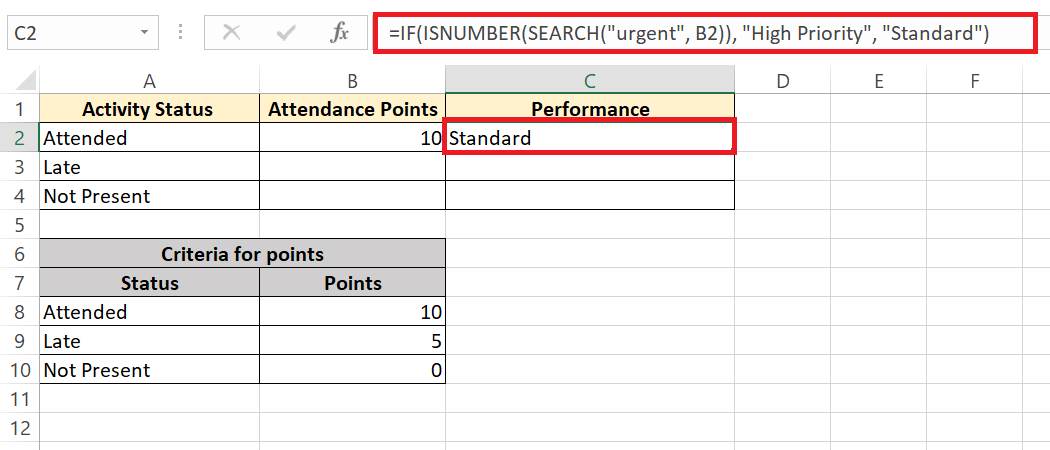
=IF(ISNUMBER(SEARCH(“urgent”, B2)), “High Priority”, “Standard”)
This formulation checks cell B2 for the word “urgent,” categorizing tasks with a priority level—hugely beneficial for triaging assignments or customer inquiries.
Steps to use IF functions for qualitative assessments for the above example:
STEP 1: Select the cell where you want the result to appear.
STEP 2: For attendance points, enter the formula: =IF(A2=”Attended”, 10, IF(A2=”Late”, 5, 0)).
STEP 3: For categorizing text, select the cell where you want the result to appear. Enter the formula: =IF(ISNUMBER(SEARCH(“urgent”, B2)), “High Priority”, “Standard”). Press Enter.
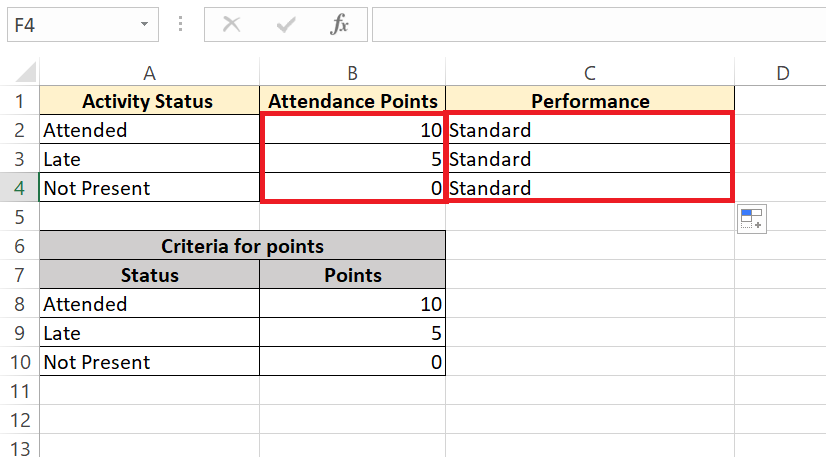
STEP 4: Drag the fill handle down to apply the formula to other cells.
From Text to Dates: Applying IF Across Various Data Types
Even when it comes to the not-so-obvious application on dates, the IF function effortlessly steps up to the challenge. Expertly navigating through the dates in your dataset, IF can classify events, track deadlines, or even automate status updates.
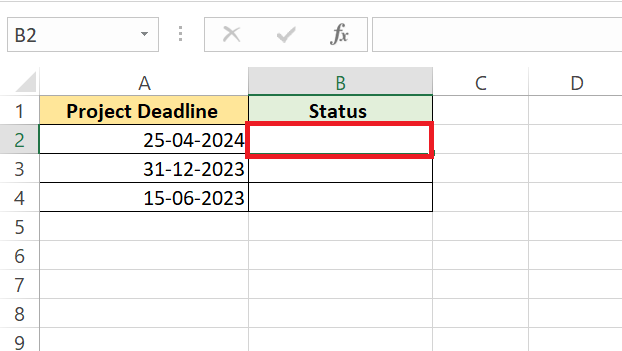
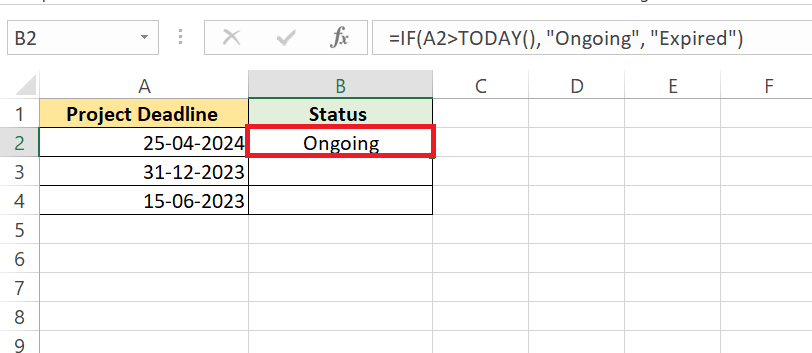
For instance, handling project timelines can be simplified with:
=IF(B2>TODAY(), “Ongoing”, “Expired”)
Steps to use IF function for handling project timelines:
STEP 1: Select the cell where you want the result to appear.
STEP 2: Enter the formula: =IF(A2>TODAY(), “Ongoing”, “Expired”).
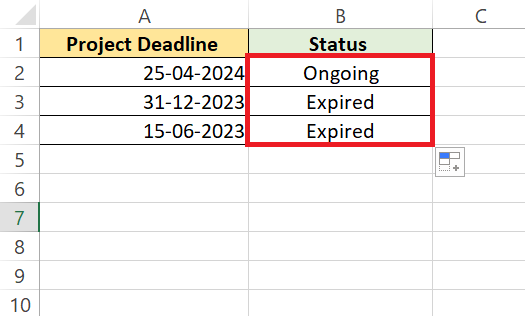
STEP 3: Drag the fill handle down to apply the formula to other cells. Now, Excel will automatically classify each project deadline as “Ongoing” if it’s in the future or “Expired” if it’s in the past, streamlining your project management tasks.
This formula inspects the date in cell A2 and compares it with the current date, effectively informing you whether a project is still active or has surpassed its completion period, without you having to manually check each date.
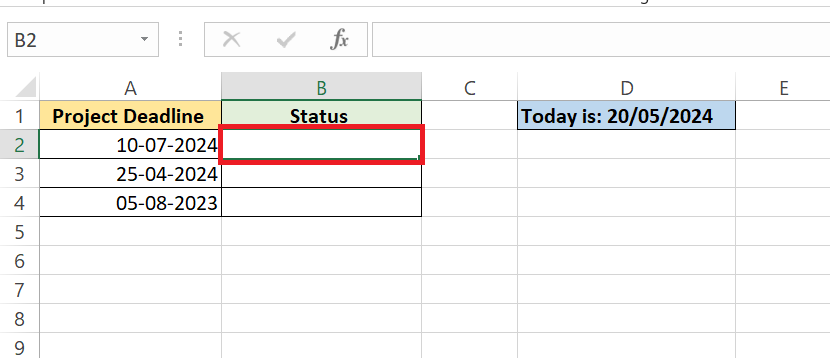
But, it’s crucial to remember, as with any good technique, understanding the nuances is key. Excel interprets dates differently than numeric or text data; you need to use the DATEVALUE function so the IF function doesn’t misinterpret them as text strings. Here’s an example of doing that correctly:
=IF(B2>DATEVALUE(“7/15/2022”), “Coming soon”, “Completed”)
Let’s have a look at the steps for the same:
STEP 1: Select the cell where you want the result to appear.
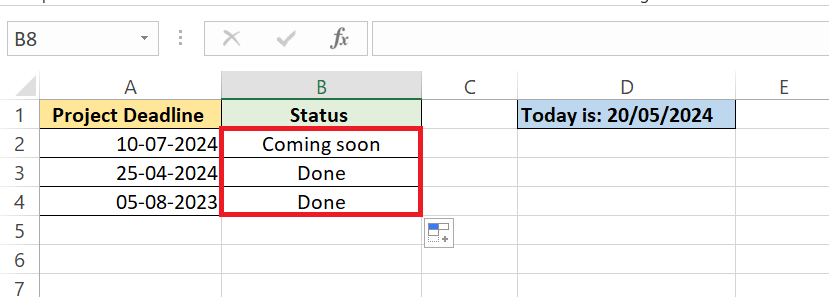
STEP 2: Enter the formula: =IF(A2>DATEVALUE(“20/04/2024”), “Coming soon”, “Done”).
STEP 3: Drag the fill handle down to apply the formula to other cells. Now, Excel will accurately classify each project deadline as “Coming soon” if it’s after July 15, 2022, or “Completed” if it’s on or before that date, ensuring precise date-based decision-making in your spreadsheet.
This savvy application of IF with dates unlocks another level of productivity, proving once again that the IF function is a powerhouse disguised as a simple spreadsheet feature.
Mastering Multiple Conditions with Excel’s Logical Partners
The Synergy of IF with AND & OR Functions
Imagine having a multifaceted team where each member brings a specialized skill—the IF function, alongside AND and OR, operates similarly in Excel. This powerful trio amplifies your logical testing capabilities, enabling you to manage multiple conditions at once.
With the AND function, all conditions need to be met to return a TRUE:
=IF(AND(C2>=500, C3=”Yes”), “Approved”, “Denied”)
Steps to use the AND function for logical testing:
STEP 1: Select the cell where you want the result to appear.
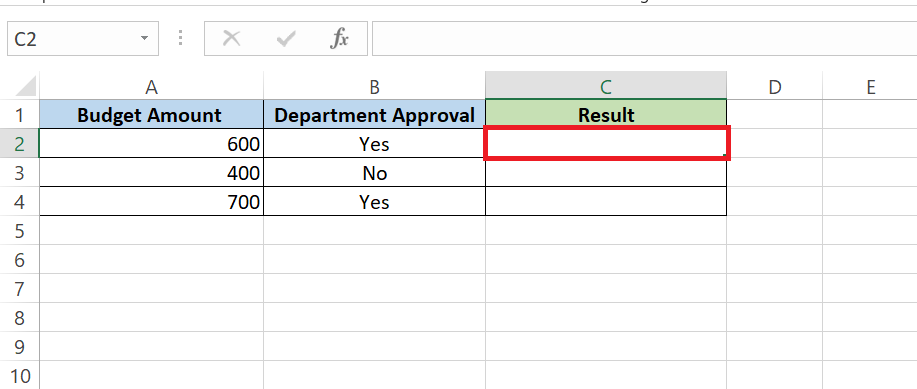
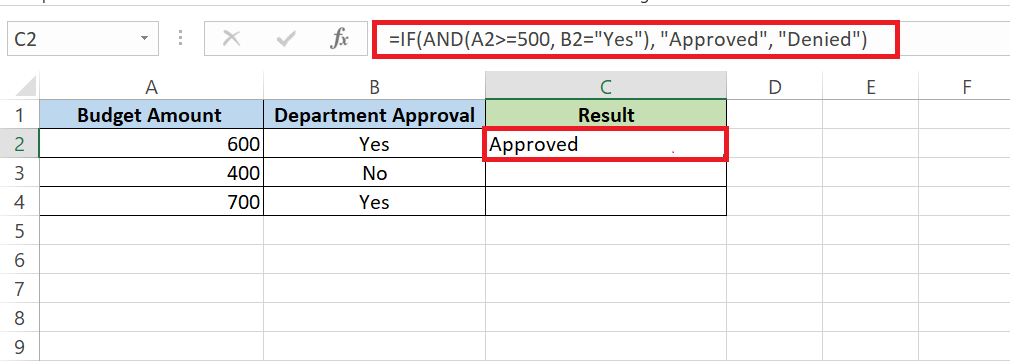
STEP 2: Enter the formula: =IF(AND(A2>=500, B2=”Yes”), “Approved”, “Denied”).
STEP 3: Drag the fill handle down to apply the formula to other cells.
Here, a budget request in cell C2 satisfies two conditions: the amount requested must be at least $500, and the department’s approval in C3 must be a “Yes”. Both conditions need to be true to confer an “Approved” status—otherwise, it’s “Denied”.
In contrast, the OR function only requires one out of several conditions to be true for a success:
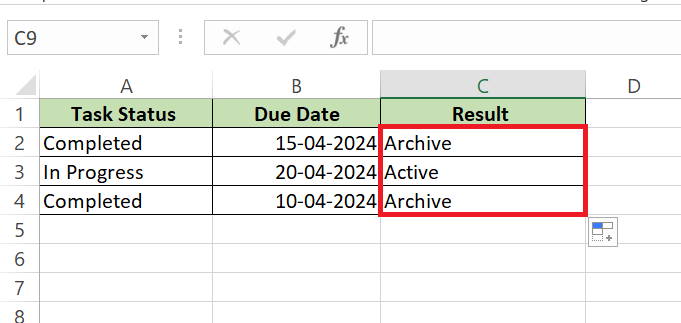
=IF(OR(A2=”Completed”, B2<TODAY()), “Archive”, “Active”)
Steps to use the OR function for logical testing:
STEP 1: Select the cell where you want the result to appear.
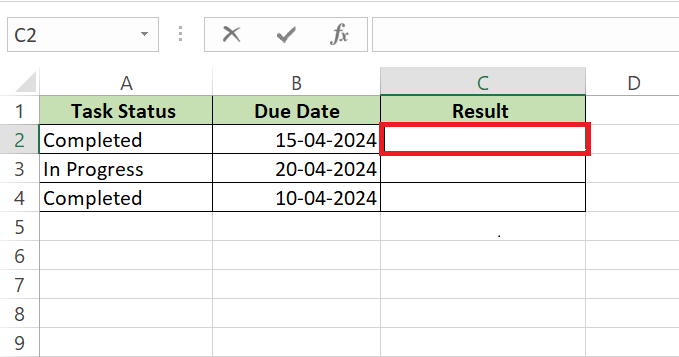
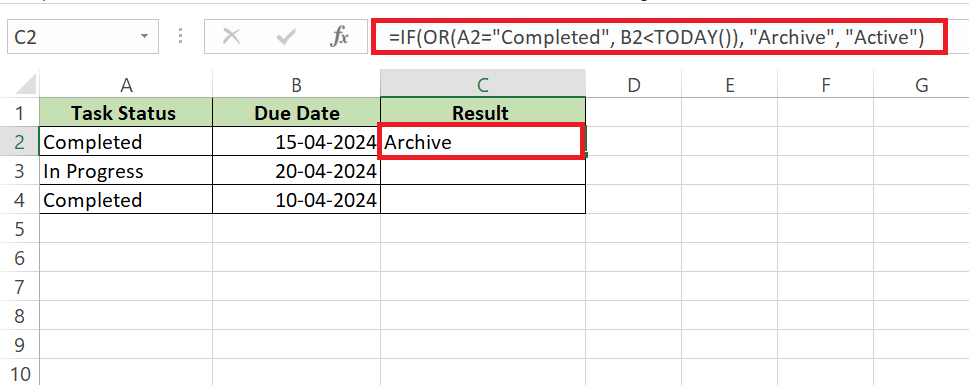
STEP 2: Enter the formula: =IF(OR(A2=”Completed”, B2<TODAY()), “Archive”, “Active”).
STEP 3: Press Enter. Copy the formula below.
This checks if a task in A2 is marked as “Completed” or if its due date in B2 has passed. If either condition is met, it’s time to “Archive”; otherwise, the task remains “Active”.
Combining these functions with IF allows you to create compact and powerful decision-making formulas that tackle intricate, real-world scenarios with precision.
Troubleshooting Tips for Bulletproof IF Formulas
Debugging Common Pitfalls in IF Statements
Like untangling a knotted necklace, debugging IF statements requires patience and careful attention to detail. Common pitfalls often revolve around mismatched logical conditions, incorrect data types, or simply overlooking the ever-important closing parenthesis.
One typical mistake is not matching the data type expected in your logical test. If A2 is a text string of a number, for example, comparing it directly to a number won’t work. You’d need to use the VALUE function in tandem with IF.
Also, beware of logical overlap, where one condition might unintentionally fulfill another. This can skew results and go unnoticed—if your ‘value_if_true’ output is the same for multiple conditions, you wouldn’t immediately realize the error.
To maintain IF formulas that are robust:
- Double-check parenthesis to ensure each IF statement is properly nested.
- Keep a tab on absolute and relative cell references that can shift and cause unexpected results if copied across cells.
- Make use of the ‘Evaluate Formula’ tool for a step-by-step breakdown of how your formula is processed.
A misbehaving IF statement can often be smoothed out by retracing your steps and validating each piece of the logic puzzle.
FAQs: Getting a Firmer Grip on Excel’s IF Function
What is an Excel if statement?
An Excel IF statement is a function that lets you make logical comparisons between a value and what you expect by testing a condition and returning a specified result for true and another for false. It’s an essential tool for data-driven decisions within your spreadsheets.
When Should You Opt for a Nested IF Instead of Multiple Single IFs?
Opt for a nested IF when dealing with interrelated conditions that depend on each other’s outcomes. It’s best when a single condition doesn’t suffice, and your logic requires a cascading decision structure, allowing you to tailor outcomes at various levels.
How Can I Avoid Errors in My IF Formulas During Data Analysis?
Avoid errors in IF formulas by double-checking logic conditions, ensuring data types match, and using parentheses properly. Additionally, make frequent use of the ‘Evaluate Formula’ tool to track your formula’s logic step by step.
How do you use the IFS function in Excel?
The IFS function in Excel allows you to test multiple conditions and return the first true result. Create the formula with the syntax IFS(condition1, value1, condition2, value2, ...), placing conditions in the order you want them tested.
How do you use advanced IF function in Excel?
Use advanced IF functions in Excel by combining them with other functions like AND, OR, SUMIFS, AVERAGEIFS, to create complex logical tests and calculations that respond dynamically to the data in your spreadsheet. Utilize nested IFs for multi-level decisions and apply IFERROR to handle potential errors gracefully.


John Michaloudis is a former accountant and finance analyst at General Electric, a Microsoft MVP since 2020, an Amazon #1 bestselling author of 4 Microsoft Excel books and teacher of Microsoft Excel & Office over at his flagship MyExcelOnline Academy Online Course.


