Ever had a time when you needed to modify data across multiple worksheets? It is very easy to do this using the Excel group sheets feature! This is only possible when you have multiple worksheets with different data but the same layout. Once you Excel group sheets and make an edit in one cell, it will be reflected in the same cell for other worksheets as well.
In this article, you will be provided with a detailed guide on how to group worksheets in Excel:
Key Takeaways:
- Grouping sheets in Excel lets you make identical edits across multiple worksheets with a single action.
- This feature works best when worksheets have the same structure or layout but contain different data.
- You can group selected worksheets using the CTRL key, or all worksheets with a single right-click.
- Always ungroup after making changes to prevent unintentional edits across all tabs.
- Grouping saves time, ensures consistency, and reduces repetitive manual work in multi-sheet Excel files.
Watch this video on how you can Excel group sheets:
Read the step-by-step tutorial below on how to group sheets in Excel and download the workbook to follow along:
Table of Contents
Master the Power of Grouping Sheets in Excel
What Does Grouping Sheets in Excel Mean?
Grouping sheets in Excel simply means linking two or more worksheets together so that any change you make in one sheet automatically happens in all the grouped ones. Think of it as creating a synchronized editing mode across multiple tabs. When sheets are grouped, they act as one — whether you’re entering data, adjusting formatting, or adding formulas.
This feature is especially useful when:
- You have multiple worksheets with identical layouts, such as monthly, quarterly, or regional reports.
- You want to standardize updates — like renaming headers, inserting rows, or changing cell formatting — across all sheets simultaneously.
- You need to save time and avoid repetitive manual edits.
However, there’s one golden rule: Only group sheets that share the same structure. If one sheet has extra columns or different formatting, your edits might land in the wrong places.
Once you’ve grouped the right sheets, Excel keeps them linked until you ungroup — and that’s where you need to stay alert (we’ll cover that soon).
Why Grouping Sheets Matters
Before we jump into the how, let’s appreciate the why. Grouping sheets lets you:
- Make identical changes across several sheets in seconds.
- Apply the same formatting or formulas to every year, region, or department tab.
- Keep your work consistent and error-free.
For example, say you manage a workbook with monthly sales reports — January through December. If you want to bold the header row, add a new formula in cell C2, or fix a date format across all months, grouping sheets makes it effortless.
How to Group Worksheets: Step-by-Step Guide
Group selected worksheets
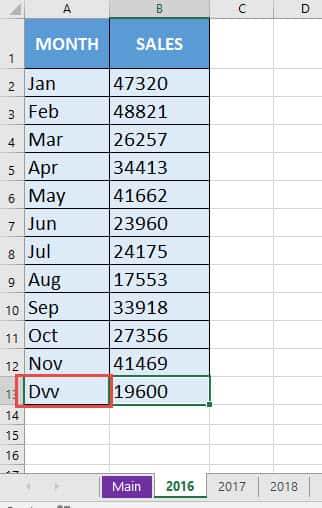
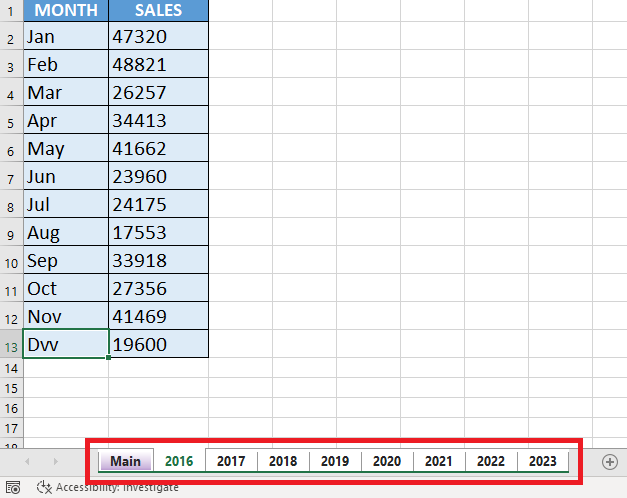
Let us say we have this same mistake on multiple worksheets – see the Dvv typo in the screenshot below. We want to change this to Dec
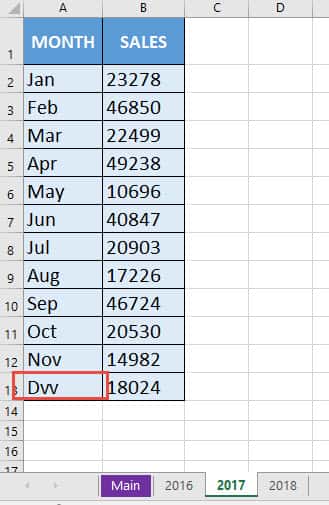
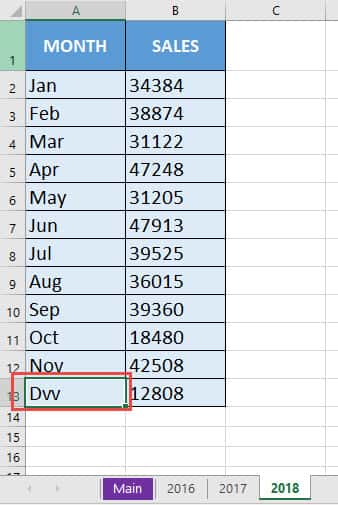
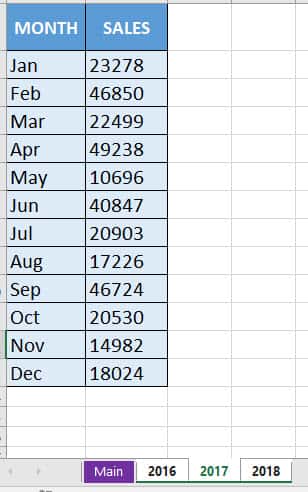
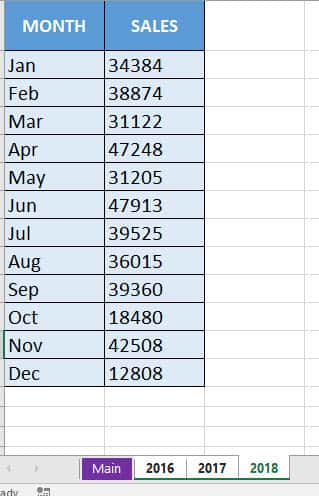
The same spelling mistake is also done for the other 2 worksheets (2017 & 2018):
Instead of making the change in each worksheet separately, you can easily group these worksheets and make changes in one of them only. This will save you a lot of time.
STEP 1: Hold the CTRL button and select the worksheets with the left mouse button that need editing. This step will Excel group sheets.
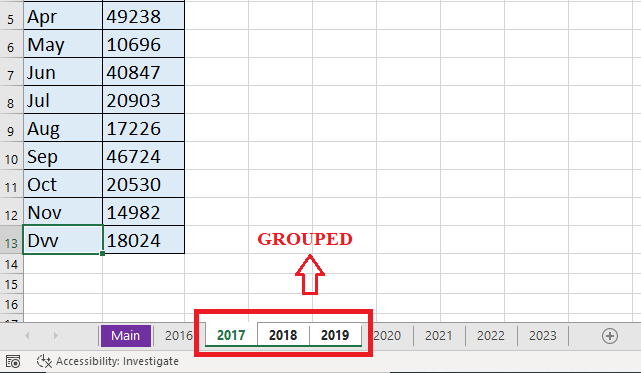
For our example, we need to select 2016, 2017, and 2018 worksheets while holding the CTRL button (this will turn each selected sheet to white color).
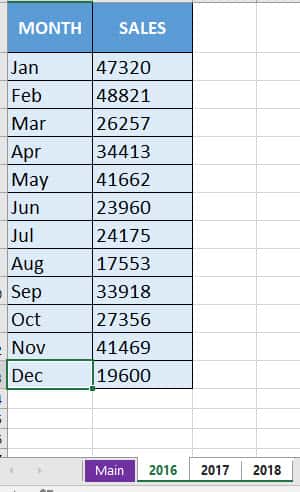
STEP 2: Edit the cell in any one of the worksheets. Let us change the Dvv to Dec and press ENTER.
This will change all of the worksheet values to reflect the same change.
Group all worksheets
In the previous example, you had to group only three worksheets. What if there are more worksheets that you need to group?
Grouping each of them would be impractical and takes a lot of time! There is a simple solution to this.
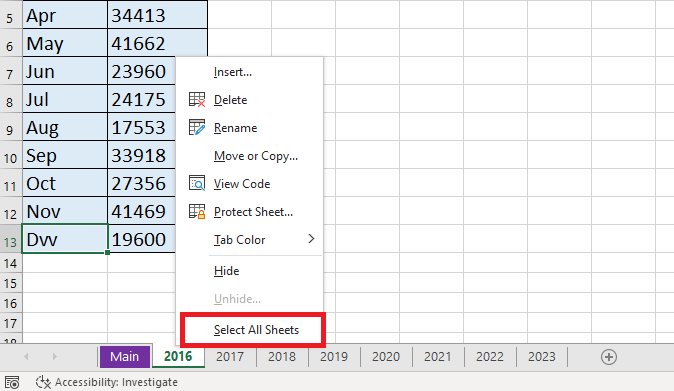
Right-click on any one of the worksheets listed at the bottom of the Excel window and click Select all Sheets.
All of these worksheets will be grouped together!
How to Ungroup Worksheets: Step-by-Step Guide
Ungroup selected worksheets
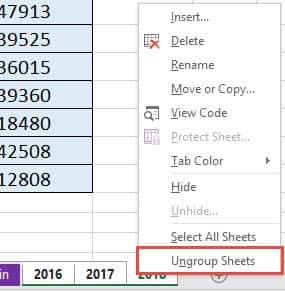
To ungroup the worksheets, right-click on the worksheet tabs and select Ungroup Sheets (super important to do this when you finish making your changes).
Or, you can simply click on any worksheet outside the group.
Ungroup all worksheets
To ungroup all worksheets together, simply right-click a selected worksheet at the bottom of the Excel window and then click Ungroup Sheets.
Tips & Tricks
It is very easy to group worksheets in Excel and make multiple changes in one go. But, it is possible that you may forget to ungroup the worksheet and continue to make edits in the file. In this case, the changes will be reflected in all of the grouped worksheets.
There are a few things that will help you notice when you have group sheets in Excel:
- The tabs that have a white background are grouped together; whereas the tabs that have grey background are outside the group.
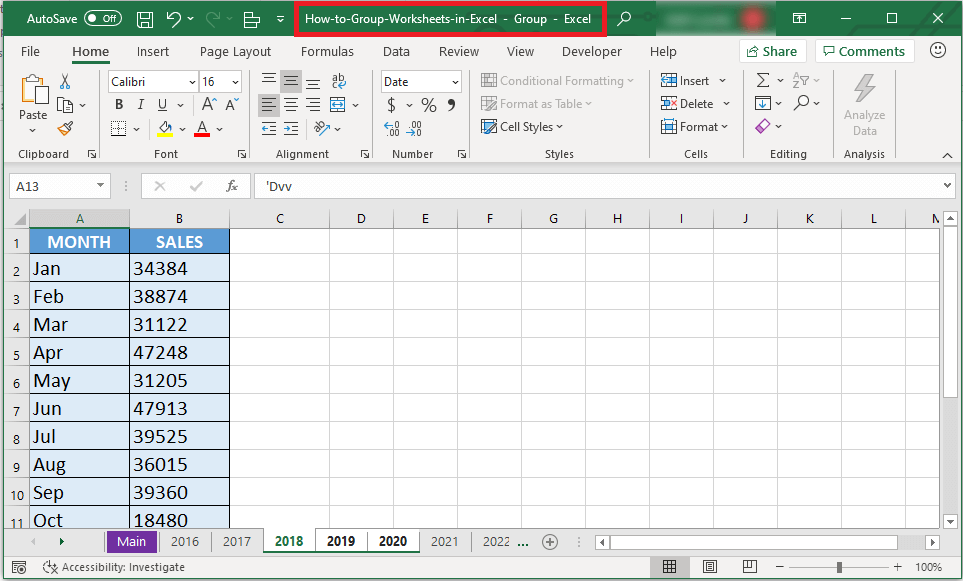
- If you have worksheets grouped, the word Group will be added to the name of the workbook.
FAQs
Q1: What does grouping sheets actually do in Excel?
Grouping sheets links multiple worksheets together so that any edits, formulas, or formatting changes you make in one sheet are automatically reflected in all grouped sheets. It’s like editing clones — you type once, and every grouped sheet updates in sync. This is especially useful for monthly reports, department summaries, or similar templates.
Q2: Can I group sheets that have different structures or layouts?
It’s not recommended. Grouping works best when all worksheets share the same layout — same rows, columns, and formatting. If you group sheets with different structures, your edits might end up in the wrong cells or overwrite unrelated data. Always double-check that the sheets are identical before grouping.
Q3: How can I tell if my sheets are currently grouped?
Excel gives two clear signals: the word [Group] appears next to your file name in the title bar, and the grouped sheet tabs turn white (while ungrouped ones remain gray). These visual indicators are your cues that you’re in grouped mode — always check them before editing to avoid accidental changes.
Q4: What happens if I forget to ungroup the worksheets after editing?
If you forget to ungroup, every new change you make — from typing data to deleting rows — will affect all grouped sheets. This can lead to major data errors if unnoticed. To prevent this, make it a habit to right-click → Ungroup Sheets immediately after completing your edits.
Q5: Can I copy formatting or formulas using grouping?
Absolutely! Grouping is not just for fixing data — it’s also perfect for applying consistent formatting, inserting headers, or writing formulas across several sheets at once. For example, you can bold header rows, add borders, or enter a new formula, and Excel will replicate those actions on all grouped tabs simultaneously.

Bryan
Bryan Hong is an IT Software Developer for more than 10 years and has the following certifications: Microsoft Certified Professional Developer (MCPD): Web Developer, Microsoft Certified Technology Specialist (MCTS): Windows Applications, Microsoft Certified Systems Engineer (MCSE) and Microsoft Certified Systems Administrator (MCSA).
He is also an Amazon #1 bestselling author of 4 Microsoft Excel books and a teacher of Microsoft Excel & Office at the MyExecelOnline Academy Online Course.

