Transposing data in Excel means swapping rows and columns. It’s a handy skill for rearranging datasets, creating summary reports, and preparing data for charts or analysis. With Excel’s built-in tools and formulas, you can quickly flip data without retyping, even for large or dynamic ranges. In this guide, you’ll learn several easy ways to transpose data, plus advanced tips for automation, Power Query, and avoiding common mistakes.
Key Takeaways
- You can transpose data in Excel using Paste Special, the TRANSPOSE function, or Power Query.
- Paste Special is great for quick, static transformations; formulas and Power Query are best for dynamic updates.
- The TRANSPOSE function works for arrays and Excel Tables, updating results automatically if the source changes.
- Power Query allows advanced transformations and can automate repeated transposing tasks.
- Transposing can help reformat exported data, prepare for mail merges, or flip survey results for easier reporting.
Table of Contents
About Transposing Data in Excel
Transposing swaps the orientation of a range: rows become columns and columns become rows. This is useful when data is not arranged in the format you need for analysis, pivot tables, or charts. Transposing can also help when you import data from external sources with a structure that does not match your workflow.
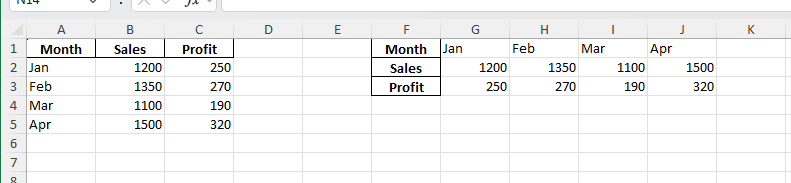
Turn a vertical list (A2:A6) into a horizontal row (B1:F1)
Convert a table with headers in rows to one with headers in columns
Rearrange data for easier copying, charting, or reporting
How to Transpose Data in Excel
Step 1: Transpose Using Paste Special
Select the range you want to transpose (e.g., A1:D4).
Copy the selection (Ctrl+C).
Right-click where you want the new data to appear.

Select Paste Special > Transpose (the two arrows icon).
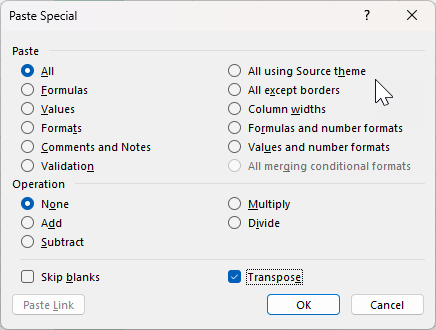
Your rows become columns and vice versa. The result is static – changes to the original data are not reflected.
Step 2: Transpose Using the TRANSPOSE Function
Select the empty area that matches the new dimensions (e.g., if your original is 3×5, select a 5×3 range).
Type:
=TRANSPOSE(A1:C5)
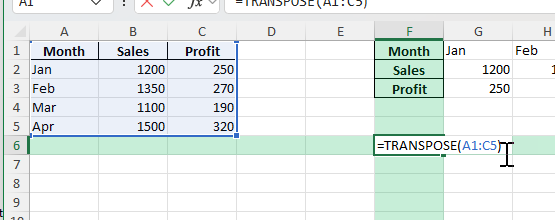
For Excel 365/2019, press Enter. For earlier versions, press Ctrl+Shift+Enter to create an array formula.
This creates a dynamic link. Changes in the source data update automatically.

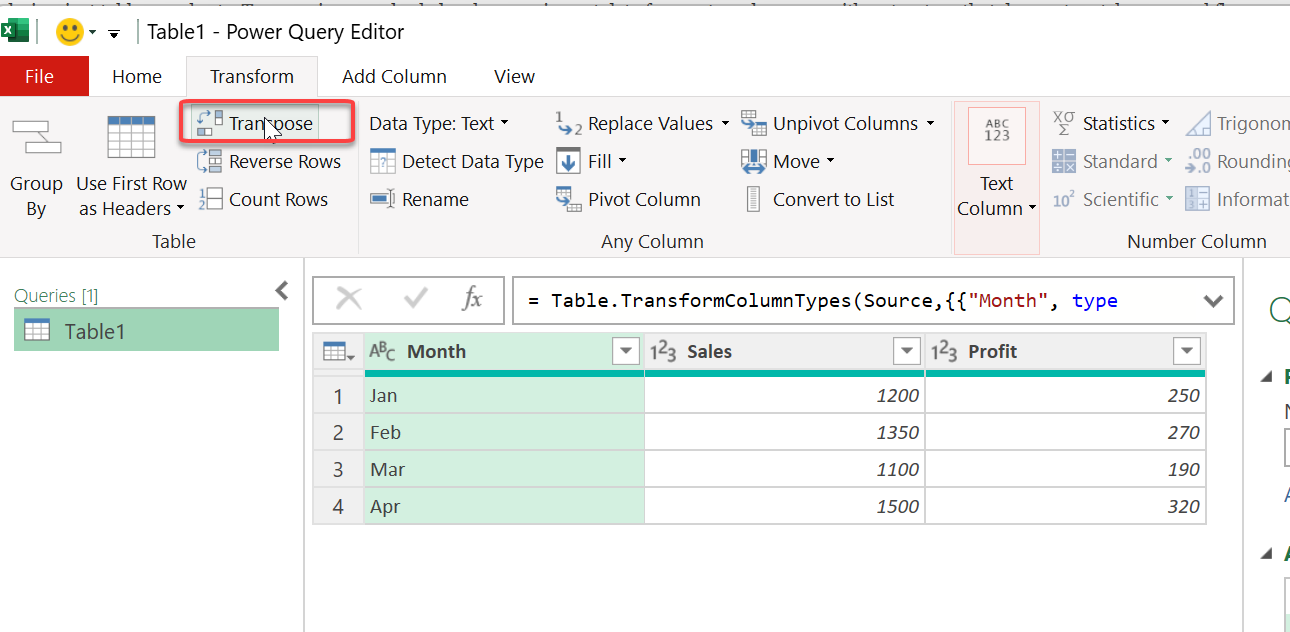
Step 3: Transpose Data with Power Query
Select your data and go to Data > From Table/Range to load it into Power Query.
In Power Query Editor, go to Transform > Transpose.
Close & Load to output the transposed data to a new sheet.
Power Query works well for recurring or large data sets.
Common Mistakes and Tips
Mistake: Overwriting existing data when pasting transposed values
Always check that your paste area is empty before transposing.
Mistake: Not selecting the correct size range for the TRANSPOSE formula
The new range must match the number of original columns and rows swapped.
Tip: Use dynamic arrays in Excel 365/2019 for easy formulas
The TRANSPOSE function spills automatically if you use the new Excel.
Tip: Use Tables to make source ranges dynamic
Use structured references like =TRANSPOSE(Table1[Column1]) for updates as your data grows.
Tip: Document your workflow if using Power Query or VBA
Add instructions in a helper sheet for team members.
Bonus Tips and Advanced Scenarios
Transpose and Remove Blanks
Use Power Query to clean and transpose in a single step: filter out blanks before transposing.
Transpose with Headers (First Row as Header)
In Power Query, use “Use First Row as Headers” after transposing.
Transpose with Dynamic Named Ranges
Create a named range with OFFSET or Table, then use TRANSPOSE for always-updated output.
Practical Use Cases
Reformatting exports for import into other software
Preparing data for mail merge or label printing
Turning survey questions into columns for analysis
Flipping monthly/quarterly data for charting
Automating repetitive transformation tasks for templates
FAQ
Q: Can I transpose formulas and keep them dynamic?
A: Use the TRANSPOSE function. Paste Special only copies values, not formula links.
Q: What if my data changes size often?
A: Use Tables or dynamic ranges with TRANSPOSE for automatic updates.
Q: Can I transpose data with formatting?
A: Paste Special > Transpose does not copy formatting. Copy and paste formats separately if needed.
Q: Is there a limit to the size I can transpose?
A: Excel handles large ranges, but very large transposes may be slow or cause errors in older versions.
Q: Can Power Query handle transposes with blank rows or columns?
A: Yes, you can remove or fill blanks before or after transposing in Power Query.

John Michaloudis is a former accountant and finance analyst at General Electric, a Microsoft MVP since 2020, an Amazon #1 bestselling author of 4 Microsoft Excel books and teacher of Microsoft Excel & Office over at his flagship MyExcelOnline Academy Online Course.


