Power Query or Get & Transform (In Excel 2016) lets you perform a series of steps to transform your Excel data. One of the steps it allows you to take is to split your date into year, month and day for easier processing.
Key Takeaways
-
Easily Break Down Dates – Power Query lets you split a date column into day, month, and year components with just a few clicks.
-
Use Built-in Transform Options – No formulas needed—Power Query provides Date > Year, Month, Day commands in its ribbon.
-
Supports Custom Columns Too – You can add custom columns to create new formats like “Month-Year” or “YYYY/MM”.
-
No Need to Modify Original Data – Splits are done in Power Query’s preview window, keeping your source data untouched.
-
Refreshable and Reusable – Once you set up the query, new date entries are automatically split when refreshed.
Table of Contents
How to Split the Date Using Power Query
STEP 1: Select your data and turn it into an Excel Table by pressing the shortcut Ctrl + T or by going to Insert > Table

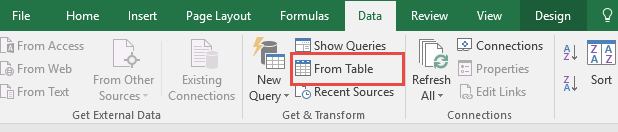
STEP 2: Go to Data > Get & Transform > From Table (Excel 2016) or Power Query > Excel Data > From Table (Excel 2013 & 2010)
Excel 2016:
Excel 2013 & 2010:

STEP 3: This will open up the Power Query Editor. Let us now get the Year, Month and Day.
Make sure the Order Date column is selected. Go to Add Column > From Date & Time > Date > Year> Year

Make sure the Order Date column is selected. Go to Add Column > From Date & Time > Date > Month > Month

Make sure the Order Date column is selected. Go to Add Column > From Date & Time > Date > Day > Day

STEP 4: Click Close & Load from the Home tab and this will open up a brand new worksheet in your Excel workbook with the updated records!

You now have your dates split to Year, Month and Day!

Frequently Asked Questions
Can I split a date column into multiple columns for year, month, and day?
Yes, Power Query has built-in options to extract the year, month, and day directly from any date column.
Will splitting the date affect the original Excel data?
No, Power Query transformations occur in a separate preview layer and do not alter your original worksheet data.
Can I format the extracted values (like showing full month names)?
Yes, you can convert the numeric month to text using the “Format” options or by creating a custom column.
Do I need to use formulas to split the date?
No formulas are needed—Power Query handles all transformations through its graphical interface.
What if new dates are added later—do I have to repeat the steps?
No, just click Refresh, and Power Query will apply the same splitting logic to the new data.

Bryan
Bryan Hong is an IT Software Developer for more than 10 years and has the following certifications: Microsoft Certified Professional Developer (MCPD): Web Developer, Microsoft Certified Technology Specialist (MCTS): Windows Applications, Microsoft Certified Systems Engineer (MCSE) and Microsoft Certified Systems Administrator (MCSA).
He is also an Amazon #1 bestselling author of 4 Microsoft Excel books and a teacher of Microsoft Excel & Office at the MyExecelOnline Academy Online Course.


