If you’ve ever grappled with managing data sizes in Excel, you’re not alone. Converting bytes to kilobytes (KB) is a common task that many face, especially when dealing with large datasets. Fortunately, Excel provides efficient methods to handle these conversions quickly. In this guide, I’ll walk you through the straightforward steps to transform bytes to KB, ensuring you can manage your data efficiently.
Key Takeaways:
- 1 Kilobyte (KB) = 1,024 Bytes, not 1,000—Excel uses the binary system for data size conversion.
- Excel’s CONVERT() function makes byte-to-KB conversion effortless and accurate.
- Syntax matters — incorrect spelling or punctuation in the formula will cause errors.
- Use dynamic labels and formatting for clear, real-time file size displays.
- Avoid common mistakes like inconsistent data, wrong units, or incorrect cell references.
Table of Contents
Understanding Data Units in Excel
Why Data Conversion is Important
Data conversion is crucial for facilitating clarity and uniformity, especially in data analysis and reporting. As data sets escalate in size, converting and standardizing data units helps in better comprehension and communication. When data is presented in consistent units, comparisons and calculations become more straightforward, reducing errors and aiding in precise decision-making.
Converting data sizes like bytes to kilobytes in Excel allows us to better manage storage and comply with reporting standards, ultimately enhancing the accuracy and efficiency of data handling processes.
Basic Concepts of Bytes and Kilobytes
Bytes are the fundamental units of digital data, serving as the building blocks for measuring data size. Each byte consists of eight bits, representing a binary digit. In contrast, a kilobyte (KB) is a larger data unit, equivalent to 1,024 bytes, following the binary measurement system commonly used in computing.
Understanding this relationship is vital, especially when handling substantial quantities of data, as it influences how file sizes are represented and managed. Accurate conversion between these units ensures that data storage and transmission are optimized, meeting the expectations of various applications and systems.
Use Excel’s Built-in Functions to Convert Bytes to KB
The CONVERT Function Explained
The CONVERT function in Excel is a powerful tool designed to facilitate the easy conversion of measurements between different units. It can convert data size units without requiring manual calculations. When converting bytes to kilobytes, the CONVERT function simplifies the process by handling the complex conversion ratio automatically.
By inputting the correct syntax, which includes specifying “byte” as the original unit and “kbyte” as the target unit, Excel can perform the conversion seamlessly. This function supports a wide array of unit conversions beyond data size, making it an essential tool for managing spreadsheets efficiently.
Applying the Formula for Byte to KB Conversion
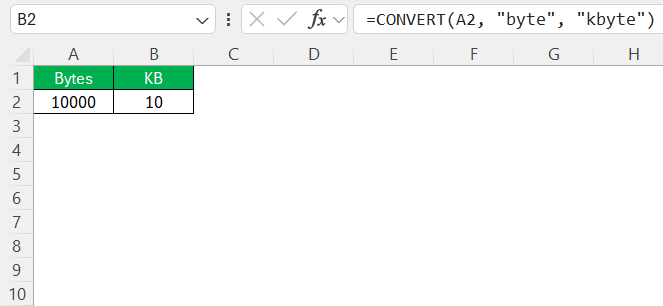
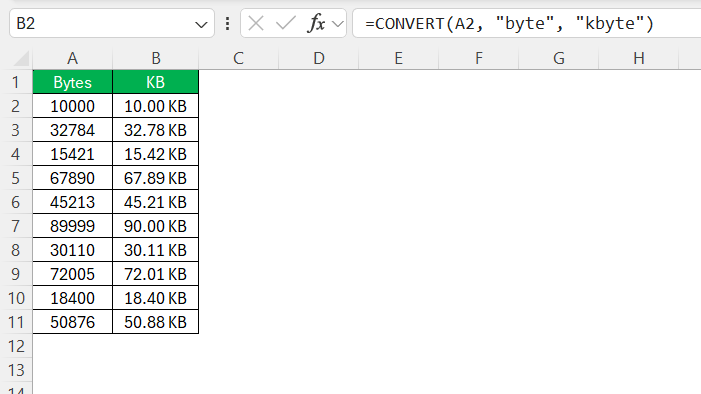
To convert bytes to kilobytes in Excel using the CONVERT function, you’ll apply a straightforward formula. Begin by selecting the cell where you wish to display the result. Use the formula =CONVERT(A1, "byte", "kbyte"), where A1 is the cell containing the byte value you intend to convert.
This formula instructs Excel to convert the value in A1 from bytes to kilobytes automatically. Remember that Excel assumes 1 kilobyte equals 1,024 bytes using this formula, adhering to the binary system standard. This method effectively reduces manual conversion errors and enhances data accuracy.
Inputting the Conversion Formula
With your Excel spreadsheet prepared, it’s time to input the conversion formula to transform bytes into kilobytes. Follow these steps to ensure a smooth process:
STEP 1: Click on the cell where you want the converted kilobyte value to appear.
STEP 2: Type =CONVERT( followed by your data cell (e.g., A2) where the byte value is located, then ,"byte","kbyte"). The full formula should look something like =CONVERT(A2, "byte", "kbyte").
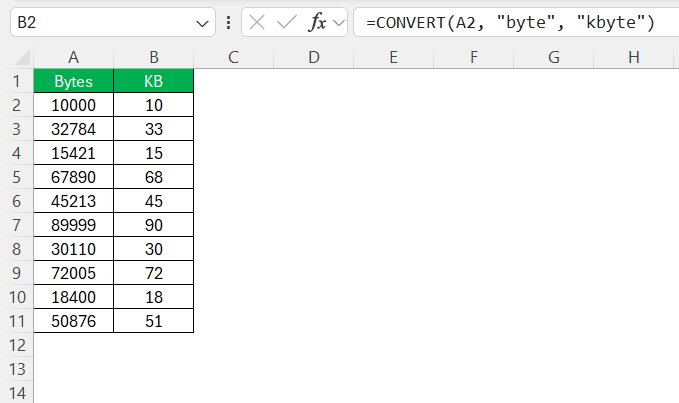
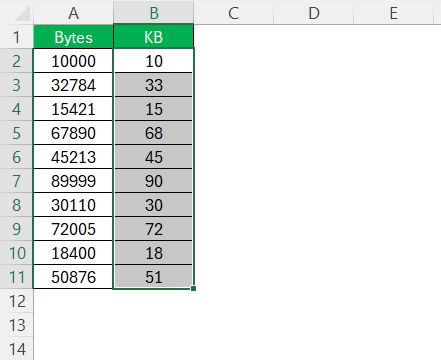
STEP 3: If you have multiple byte values to convert, click on the small square at the bottom-right corner of the selected cell, commonly known as the fill handle, and drag it down to cover the cells adjacent to your data.
By following these steps, you can efficiently input and replicate the conversion formula across all necessary data points, streamlining the conversion process and maintaining accuracy throughout.
Common Mistakes and How to Avoid Them
When converting bytes to kilobytes in Excel, several common mistakes can occur, but these are easily avoidable with a bit of caution:
- Incorrect Formula Syntax: Ensure the syntax of your formula is accurate. A minor typo, such as missing a comma or misplacing quotation marks, can result in errors. Double-check the spelling of units within the CONVERT function to prevent this.
- Cell Reference Errors: Make sure cell references in the formula are correct. If they do not correspond to the intended cells, the outcomes will be inaccurate. Adjust relative and absolute references as needed when copying the formula.
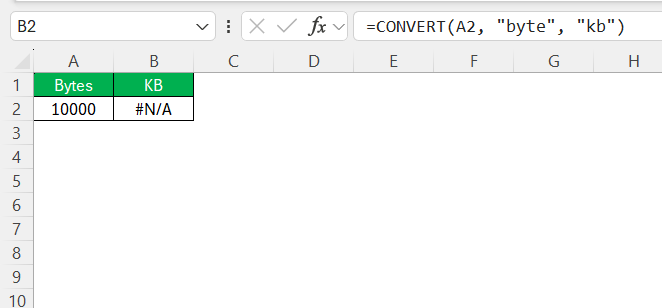
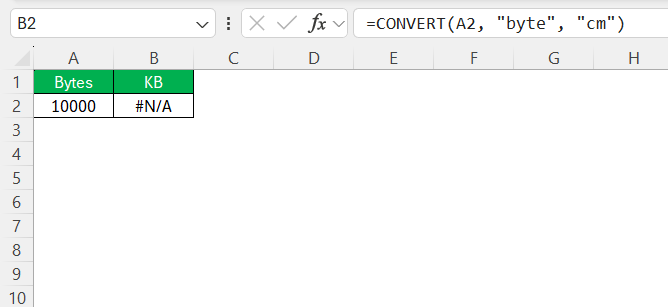
- Unit Mismatch: Only use the units supported by the CONVERT function. Using unsupported or incorrectly spelled units will lead to errors. Always refer back to Excel’s guidelines for acceptable units.
- Overlooking Data Consistency: Inconsistent data entry can affect conversions. Ensure all byte values are entered correctly and consistently to facilitate accurate processing.
- Rounding Issues: Be aware that conversion may result in rounded values. Adjust the number formatting to display more decimal places if precision is needed.
By paying close attention to these details, you can prevent common pitfalls and ensure a smoother data conversion experience in Excel.
Tips & Tricks for Efficient Conversion
Dynamic Labeling with Units
Dynamic labeling in Excel allows you to create labels that automatically update when data changes, providing clarity and context to your data presentation. To implement dynamic labeling with units for your byte-to-kilobyte conversions, consider these steps:
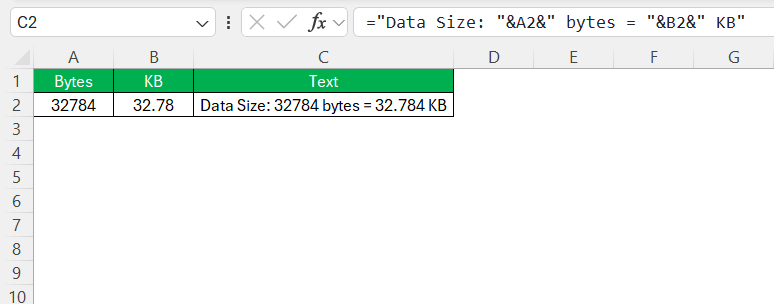
- Use Concatenation: Combine text and cell values to create labels. For example, in a new cell, enter a formula like
="Data Size: "&A2&" bytes = "&B2&" KB"whereA2is the original data andB2is the converted result.
- Utilize the TEXT Function: Format numbers for readability within your labels. You can add
TEXTto the above formula to enhance it, such as="Data Size: "&TEXT(A2,"0")&" bytes = "&TEXT(B2,"0.00")&" KB".
- Dynamic Updates: Excel automatically updates these labels whenever the data or conversions change, ensuring real-time accuracy and consistency.
This approach provides clear and informative cell descriptions, helping users understand the context of data at a glance without manually checking conversions. Dynamic labeling enhances both the usability and presentation quality of your Excel spreadsheets.
Formatting Numbers as File Sizes
Formatting numbers to display as file sizes in Excel improves the readability of your data, especially when working with storage metrics. To format numbers as file sizes, follow these guidelines:
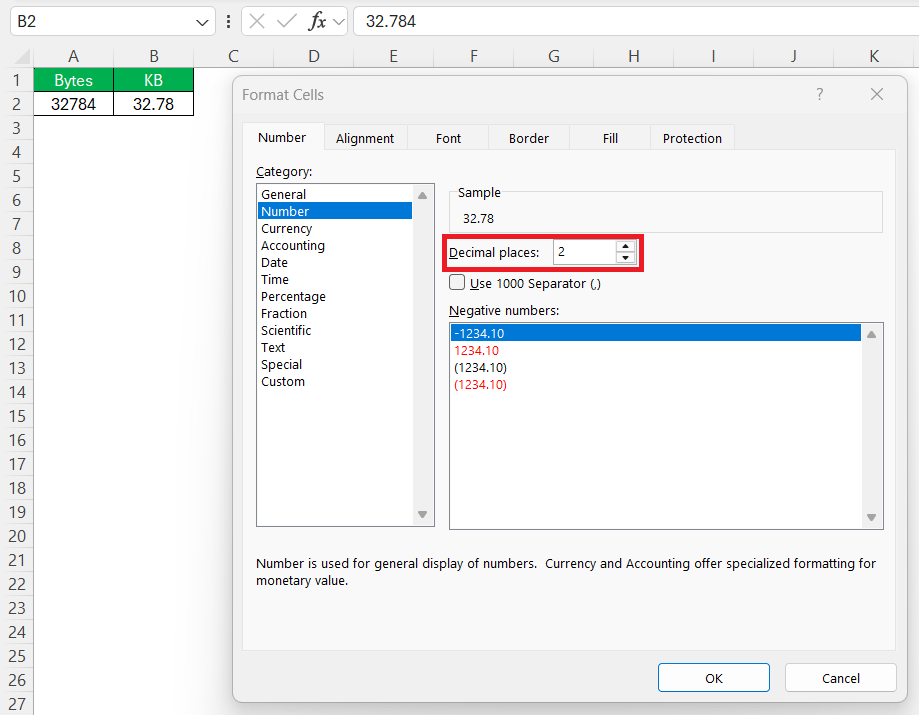
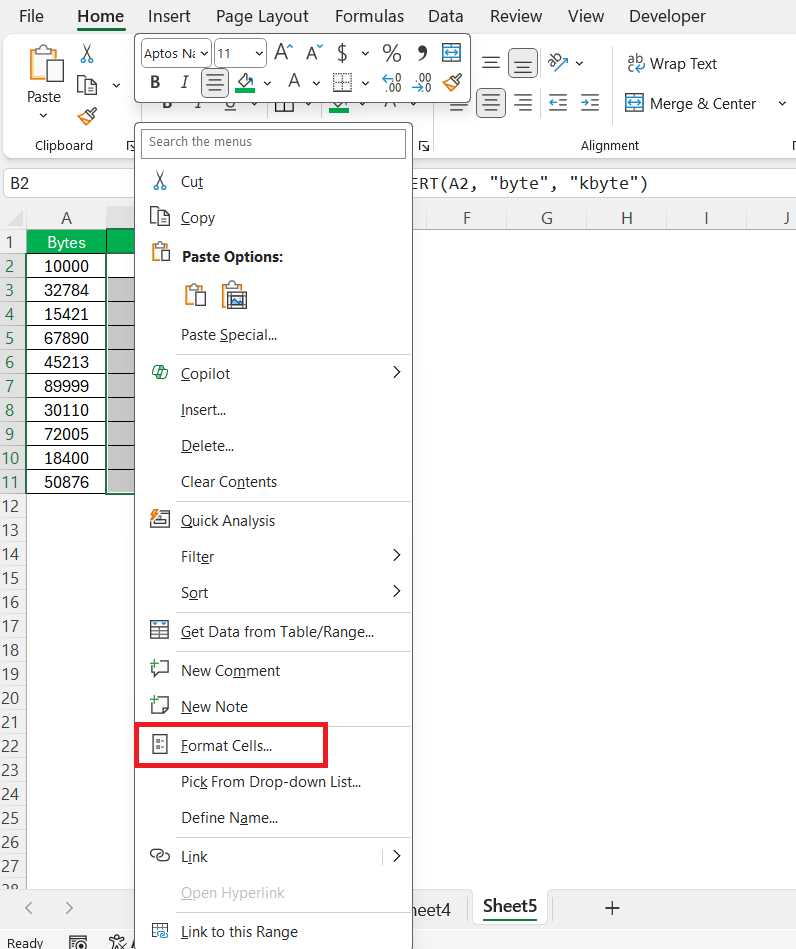
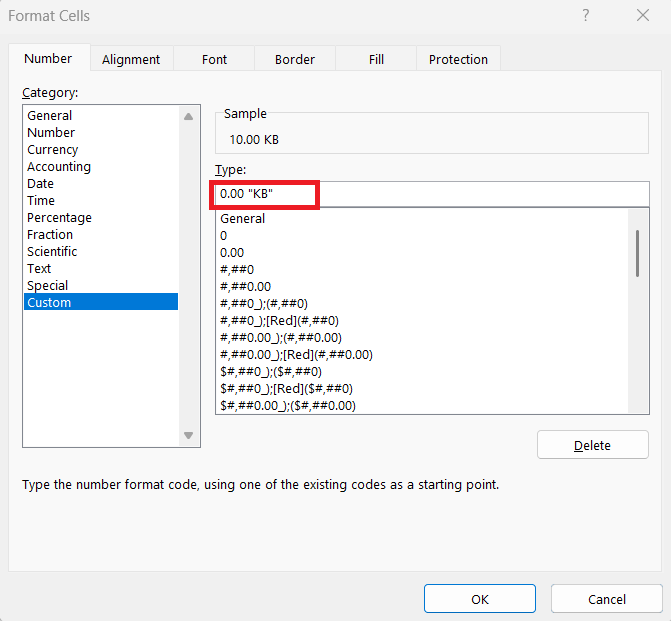
STEP 1: Highlight the cells containing the kilobyte values you want to format.
STEP 2: Right-click and choose “Format Cells” from the context menu.
STEP 3: In the Format Cells dialog, switch to the “Custom” category.
Input a format like 0.00 "KB" in the “Type” field. This format maintains two decimal places and appends “KB” to each value, visually denoting kilobytes.
Click “OK” to apply the changes.
The formatted value will be displayed in the cell.
By formatting numbers with this method, you ensure that your spreadsheet reflects file sizes, making it easier for users to interpret and analyze data without additional context. This enhances both the functionality and the aesthetic appeal of your data presentation.
Real-World Applications
Practical Scenarios of Data Size Management
Data size management becomes particularly crucial in numerous practical scenarios, helping to streamline operations and optimize resources. One such scenario is in the IT department, where professionals manage server storage and data backups. By converting and standardizing data sizes in Excel, they can accurately gauge storage needs and optimize capacity planning.
Another scenario involves data analysts who work with large datasets in fields like finance or logistics. By converting data sizes to a common unit like kilobytes, analysts can easily compare and aggregate data, facilitating more straightforward data analysis and trend interpretation. This practice also extends to everyday business operations, such as preparing reports or presentations, where clear, consistent data size representation ensures effective communication and decision-making. These examples highlight the importance of efficient data size management across various industries, enhancing both productivity and operational efficiency.
Case Studies on Successful Data Handling
Successful data handling is illustrated through various case studies where organizations have significantly benefited from efficient data size management. One notable case is from a global e-commerce company that optimized its inventory management system. By converting all data sizes to kilobytes in their Excel systems, they streamlined data analysis processes, leading to faster, more accurate inventory tracking and reduced data processing times.
Another case involves a healthcare provider managing extensive patient databases. They implemented data size conversion strategies to maintain electronic health records effectively. This led to improved data retrieval speeds and reduced issues related to data storage limits, ultimately enhancing the provider’s capability to deliver timely patient care.
Finally, a logistics company improved its freight management system by standardizing data unit conversions. This approach minimized errors in data interpretation and supported better freight routing decisions, leading to increased efficiency and reduced operational costs.
These case studies demonstrate the tangible benefits organizations can achieve through strategic data handling and conversion practices, showcasing improved accuracy, efficiency, and resource management across diverse sectors.
FAQs
What is the exact formula to convert bytes to KB in Excel?
To convert bytes into kilobytes in Excel, use the formula:
=CONVERT(A1, “byte”, “kbyte”),
where A1 contains the byte value. This formula leverages Excel’s built-in CONVERT() function, using “byte” as the original unit and “kbyte” as the target. Excel will return the result based on the binary standard (1 KB = 1,024 bytes), ensuring accurate conversion for tech-related data sizes.
Can I convert other data units like MB or GB using the same method?
Absolutely. Excel’s CONVERT() function supports multiple digital storage units. For example, to convert bytes to megabytes, use: =CONVERT(A1, “byte”, “Mbyte”). For gigabytes, use “Gbyte” as the target unit. Just be sure to check Excel’s documentation for exact unit syntax, as it’s case-sensitive and follows predefined naming conventions. This makes Excel a powerful tool for managing a wide range of file sizes.
Why does my conversion sometimes show rounded results or decimals?
Excel might round numbers based on the default cell formatting or number precision. For instance, converting 10,000 bytes results in approximately 9.77 KB, but it may display as 10 KB if formatting is set to zero decimal places. To fix this, right-click the cell → Format Cells → Number → Increase Decimal Places. You can also use the TEXT() function to control number formatting dynamically within formulas.
What if the CONVERT() function gives me an error?
If you see an error, double-check the formula syntax:
- The unit names must be correct—use “byte” and “kbyte” (not “bytes” or “KB”).
- Ensure all quotation marks and commas are placed correctly.
- Verify the referenced cell contains a valid numeric value. Unsupported units or spelling issues will break the formula. Refer to Excel’s unit list under CONVERT() documentation if unsure.
How do I automate conversions for multiple rows of data?
Once you enter the formula in a cell (e.g., =CONVERT(A2, “byte”, “kbyte”)), you can apply it to other rows quickly using the fill handle. Just click the bottom-right corner of the formula cell and drag it down alongside your dataset. Excel will automatically adjust cell references for each row. This allows you to convert hundreds or even thousands of entries in seconds, boosting your productivity.
John Michaloudis is a former accountant and finance analyst at General Electric, a Microsoft MVP since 2020, an Amazon #1 bestselling author of 4 Microsoft Excel books and teacher of Microsoft Excel & Office over at his flagship MyExcelOnline Academy Online Course.

