Whether you’re managing employee shifts, logging project time, or analyzing machine usage, calculating hours between two time values in Excel is a common and practical task. Excel provides built-in time functions and arithmetic support that makes it easy to work with time intervals accurately. In this guide, you’ll learn how to calculate hours between two times, account for overnight shifts, format results, and use bonus tools like Power Query and VBA.
Key Takeaways
- Use simple subtraction to find the difference between two time values
- Format cells with [h]:mm to display total hours correctly
- Handle overnight time spans by adding 1 if End Time is smaller than Start Time
- Multiply the result by 24 to convert time difference to decimal hours
- Power Query and VBA offer advanced solutions for automation
Table of Contents
The Basics of Time Calculation in Excel
Understanding Excel’s Time Formats
To effectively calculate the hours between two times in Excel, it’s essential to understand how Excel handles time data. Excel stores dates and times as serial numbers, with the date 1 January 1900 represented as 1. Time is displayed as fractions of a day: 0.5 equates to 12:00 PM. This design allows seamless calculations once the correct format is applied.
You can input time in various formats, such as “hh:mm” for hours and minutes, or “hh:mm:ss” for more precise timings. Using Excel’s custom format options, you ensure clarity and consistency in your calculations.
Important Functions for Time Management
Excel provides several powerful functions to aid in effective time management. Understanding these can save you time and reduce errors.
- TIMEVALUE Function: This function converts a text-based time into a serial number Excel can process. For instance, =TIMEVALUE(“2:30 PM”) returns 0.604167, the fractional part of a 24-hour day.
- HOUR, MINUTE & SECOND Functions: These functions extract the respective components from a time value. The
HOUR(time)function will return 14 when given “2:30 PM”, whereasMINUTE(time)returns 30. - DATEDIF Function: Though not listed in Excel’s function wizard, it’s pivotal for calculating the difference between two dates, including a time component. For example, =DATEDIF(start_date, end_date, “h”) efficiently finds the hours between two times.
- NETWORKDAYS Function: This calculates the number of business days between two dates, factoring in specified holidays. Useful for work-related time tracking.
- EOMONTH Function: Although more date-centric, it’s beneficial for determining the end of a month, which can intersect with time management when considering month-end timings.
Step-by-Step: Calculate Hours Between Two Times
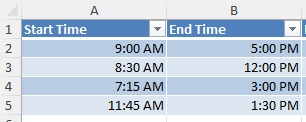
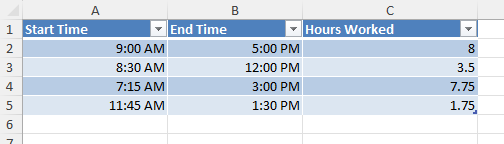
Step 1 – Set Up Your Data
Enter your time values in two separate columns:
Step 2 – Subtract Time Values
In cell C2, use this formula:
=B2 - A2
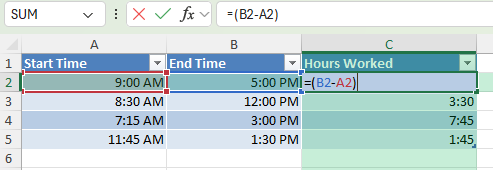
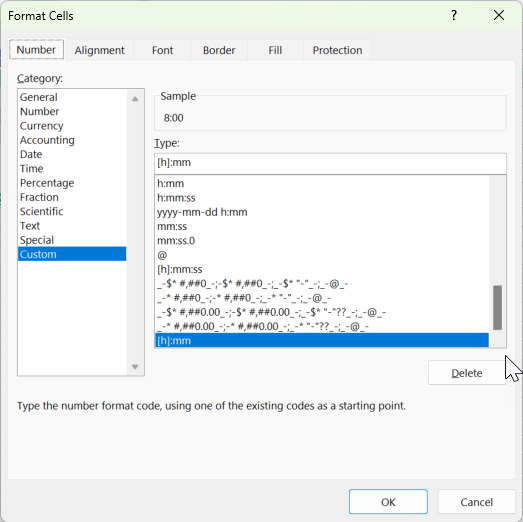
Make sure the result cell is formatted as [h]:mm to correctly display total hours. You can do this by selecting the cell, pressing Ctrl + 1, choosing “Custom” under Number Format, and entering [h]:mm.
Step 3 – Convert to Decimal Hours (Optional)
To get a decimal value (e.g. 8.5 hours), multiply the difference by 24:
=(B2 – A2) * 24
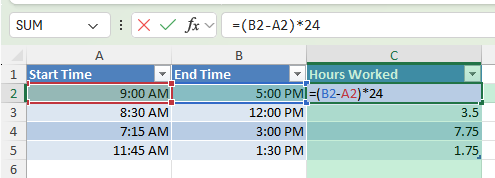
You now get your results in the decimal hours.
Best Practices and Common Mistakes
Handling Time Zones Efficiently
Handling time zones in Excel can be streamlined with a few strategic approaches, ensuring your data remains consistent and accurate across regions.
- Standardize Input Format: Ensure all time data includes a time zone suffix, like “EST” or “GMT,” to prevent confusion. Standardizing input minimizes errors during calculations.
- Adjusting for Time Zones: Use the
TIMEfunction to adjust time based on zone differences. For example, to convert Eastern Time to Pacific Time, you could calculate by subtracting three hours:=A1 - TIME(3,0,0). - Use of Helper Columns: Maintain a separate column for time zone offsets when dealing with multiple zones. This can help in swiftly recalculating times without altering original values.
- Leverage World Clock APIs: For businesses requiring accurate and dynamic conversions, integrating Excel with external world clock APIs can automate the syncing of time zones.
- Automated Conversion Tools: Use Excel add-ons or power queries that can fetch and convert international time zones accurately, minimizing manual errors.
By implementing these methods, managing international schedules becomes less cumbersome and more precise.
Avoiding Errors With Formulas and Formats
Errors in formulas and formats can lead to incorrect time calculations, but by following best practices, you can prevent these mishaps.
- Consistent Format Use: Always use consistent time and date formats throughout your workbook. This helps in avoiding discrepancies. For instance, if using “hh:mm:ss”, ensure all time entries adhere to this format.
- Error Checking: Excel offers error-checking features that highlight potential issues with formulas. Enable these under the “Formulas” tab to catch mistakes quickly.
- Divergence in Data Types: Ensure you’re not mixing data types in formulas, such as text with time values, which causes errors. Utilize the
VALUEorTIMEVALUEfunctions for necessary conversions. - Formula Debugging Tools: Use the “Evaluate Formula” tool to break down and understand complex formulas, allowing step-by-step insight and correction of potential errors.
- Avoid Overwriting Essential Data: Protect formula cells with cell locking to prevent accidental overwriting, maintaining formula integrity.
By mindful application of these strategies, you can fortify your workbook against common errors.
Bonus Tips and Advanced Scenarios
1. Calculate Total Hours for a List of Entries
=SUM(C2:C10)
Format the result cell using [h]:mm to show total accumulated hours, even beyond 24.
2. Use Power Query to Handle Time Calculations
Power Query can load time data, calculate differences using the Duration function, and return cleaned-up results to your worksheet.
- Select your data > Data > Get & Transform > From Table/Range
- Add a custom column:
=[End Time] - [Start Time] - Format and load back into Excel
3. Use VBA to Automate Time Difference Calculation
Sub CalculateHours()
    Dim ws As Worksheet
    Dim lastRow As Long
    Set ws = ThisWorkbook.Sheets("Sheet1")
    lastRow = ws.Cells(ws.Rows.Count, "A").End(xlUp).Row

    Dim i As Long
    For i = 2 To lastRow
        If ws.Cells(i, 2) < ws.Cells(i, 1) Then
            ws.Cells(i, 3).Value = (ws.Cells(i, 2).Value + 1) - ws.Cells(i, 1).Value
        Else
            ws.Cells(i, 3).Value = ws.Cells(i, 2).Value - ws.Cells(i, 1).Value
        End If
    Next i
End Sub
FAQ
How do I calculate hours worked if the time includes breaks?
Subtract break time from the total duration using: =End - Start - Break
Can Excel track time beyond 24 hours?
Yes, but format the result cell as [h]:mm instead of standard time
Why am I seeing a decimal instead of time format?
That means the result cell is formatted as General or Number. Change the format to Time or [h]:mm
What if Start or End time is missing?
Use IF statements to check for empty values to avoid errors: =IF(OR(A2="", B2=""), "", B2 - A2)
Can I apply this logic to multiple rows at once?
Yes. Write your formula in one row and drag it down

John Michaloudis is a former accountant and finance analyst at General Electric, a Microsoft MVP since 2020, an Amazon #1 bestselling author of 4 Microsoft Excel books and teacher of Microsoft Excel & Office over at his flagship MyExcelOnline Academy Online Course.


