I’ve found myself working with unit conversions in Excel more times than I’d like to admit. Whether it’s for tracking weights for shipping, inventory, recipes, or health logs, converting 1 oz to lbs quickly in Excel has been a lifesaver. If you’re in the same boat, don’t worry — here’s exactly how I do it, step by step.
Key Takeaways:
- Converting ounces to pounds in Excel is simple: just divide by 16 or use the
CONVERTfunction. - Proper column labeling and spreadsheet setup make conversion workflows more efficient and error-free.
- Excel’s
=CONVERT(A2, "ozm", "lbm")and=A2/16are both valid methods, depending on preference. - Formatting cells to handle decimals ensures clean, accurate output for reporting or analysis.
- Unit conversion is not just academic — it’s crucial in inventory, finance, shipping, and recipe planning.
Table of Contents
Introduction
Understanding Weight Conversion in Excel
Converting weights from ounces to pounds in Excel is a practical task that many users encounter. Excel offers various tools and functions designed to simplify these types of conversions. By leveraging built-in functionalities, I can streamline the process and ensure that my calculations are consistently accurate. Whether it’s for personal use or business operations, understanding how to perform this conversion is invaluable.
Importance of Accurate Conversions
Accurate conversions in Excel are fundamental, especially when precision impacts decisions, financial outcomes, or inventory assessments. Even slight inaccuracies can lead to significant discrepancies over time. By maintaining precise conversions, I can ensure that my data remains reliable, supporting informed decision-making and minimizing potential errors in records and reports. This precision is particularly crucial in fields like finance and logistics, where accuracy underpins successful operations.
Basics of Unit Conversion
Overview of Ounces and Pounds
Ounces and pounds are both units of weight commonly used in the United States. An ounce is a smaller unit of weight, often used for measuring lighter objects or ingredients, particularly in culinary applications. One pound equals 16 ounces, establishing a straightforward relationship between the two units. Understanding this basic conversion relationship is crucial when setting up conversions in Excel, as it allows me to accurately transform data from one unit to another efficiently.
Standard Formula for Conversion
The standard formula for converting ounces to pounds is straightforward: divide the number of ounces by 16, as there are 16 ounces in one pound. In mathematical terms, this is expressed as:
Pounds = Ounces/16
This formula serves as the basis for setting up conversions in Excel, helping me ensure that data transformation is both accurate and consistent. By embedding this formula into Excel functions, I can effectively automate the conversion process, making it easier to handle large datasets.
Step by Step Guide to Convert 1 oz to lbs
Setting Up Your Spreadsheet
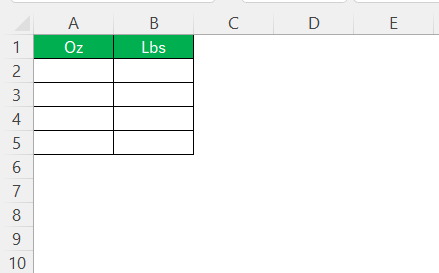
Setting up your spreadsheet for converting ounces to pounds in Excel involves several straightforward steps. First, I create columns to organize my data clearly: one for ounces and one where the converted values will be displayed in pounds.
It’s helpful to label these columns appropriately to avoid confusion later. I also ensure that my layout is logical and easy to follow, which speeds up both the input and analysis processes. Properly setting up the spreadsheet is crucial as it lays the foundation for accurate data handling and effective use of functions.
Creating a Conversion Formula
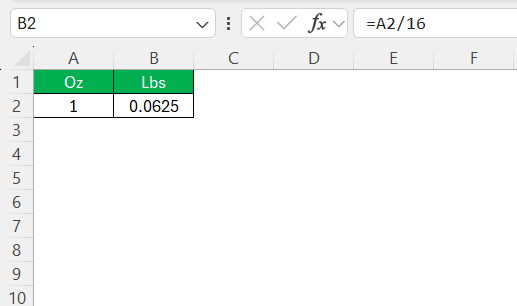
To create a conversion formula in Excel, I start by positioning my cursor in the cell under the “Pounds” column that corresponds to the first entry in the “Ounces” column. I then input the formula by typing:
=A2/16
Here, “A2” refers to the cell containing the ounce value I wish to convert. After entering the formula, I press “Enter,” and Excel automatically calculate 1 oz to lbs. To apply this conversion across an entire column, I use the fill handle (the small square at the cell’s bottom-right corner) to drag the formula down, thus copying it to adjacent cells. This approach ensures that each ounce value is converted efficiently and accurately.
Applying the CONVERT Function
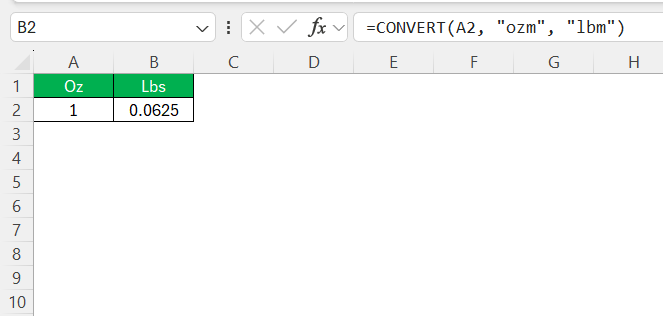
The CONVERT function in Excel simplifies the conversion of ounces to pounds. To apply this function, I first select the cell where I want the converted value to appear. Then, I use the formula:
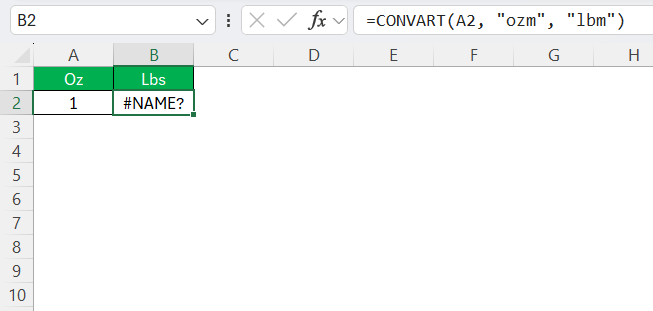
=CONVERT(A2, “ozm”, “lbm”)
In this formula, “A2” represents the cell containing the ounce value, “ozm” is the unit from which I am converting, and “lbm” is the unit to which I am converting. By using the CONVERT function, I can efficiently transform data without manually recalculating for each entry, ensuring that my conversions are consistent and accurate.
Troubleshooting Common Issues
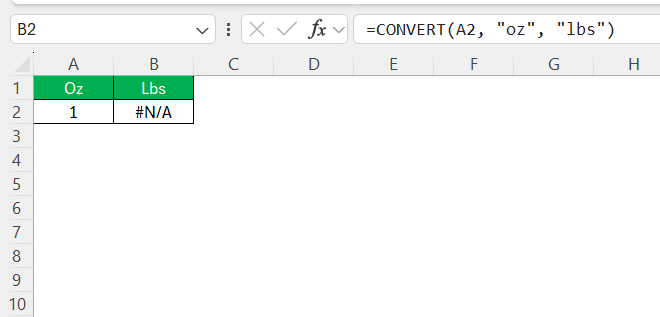
When applying conversions in Excel, I might encounter a few common issues. One issue is incorrect unit abbreviations in the CONVERT function. Ensuring “ozm” and “lbm” are used correctly is crucial.
Another potential problem is formatting errors; data might be mistakenly formatted as text, causing conversion issues.
Lastly, if I encounter a “#NAME?” error, it typically indicates misspelled function names or unsupported unit conversions in Excel version.
Checking these areas helps resolve most problems effectively.
Advanced Tips and Tricks
Handling Large Datasets Efficiently
When working with large datasets in Excel, efficiency becomes paramount. First, I ensure that my spreadsheet is well-organized, with clearly labeled columns to facilitate easy navigation. I use Excel’s built-in functions, like the CONVERT function, for quick calculations across many rows. Applying these functions in bulk can be streamlined with the fill handle or by copying and pasting the formula across a range.
Additionally, I consider using Excel’s tables to manage data, which can automatically apply formulas to new entries. Filtering and sorting tools help me focus on specific data subsets without altering the entire dataset. To enhance performance, I sometimes limit the active range to only the necessary data and disable unnecessary calculations using the manual recalculation mode. This approach ensures that handling vast amounts of data doesn’t impede my workflow or lead to errors.
Incorporating Decimal Places Accurately
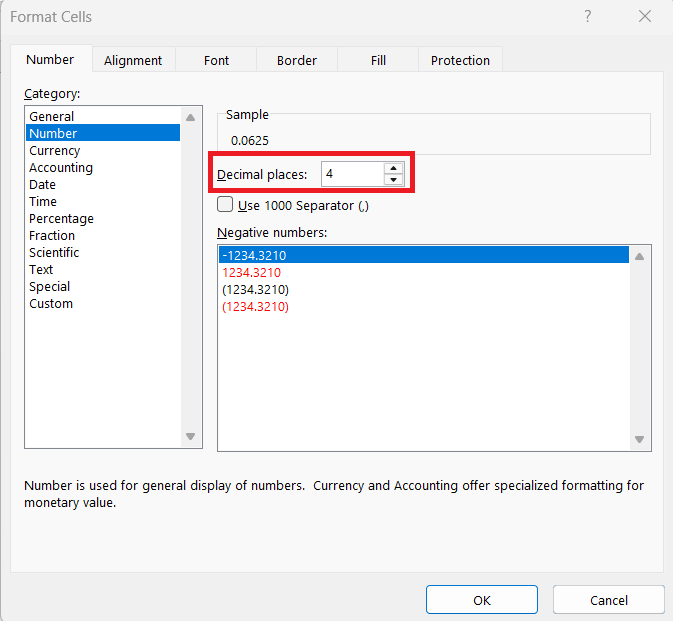
Accurate handling of decimal places is crucial when converting ounces to pounds to ensure precise results. In Excel, I can control the number of decimal places displayed by selecting the cells with the converted values and using the “Increase Decimal” or “Decrease Decimal” buttons on the Ribbon under the “Home” tab.
This allows me to adjust the precision to meet my specific needs, whether I require exact figures for detailed analysis or rounded values for general reporting. Additionally, I can apply number formatting by right-clicking on selected cells, choosing “Format Cells,” and selecting “Number” to specify the number of decimal places desired.
This approach ensures that my data is both accurate and visually consistent across my spreadsheet.
Exploring Built-in Functions for Precision
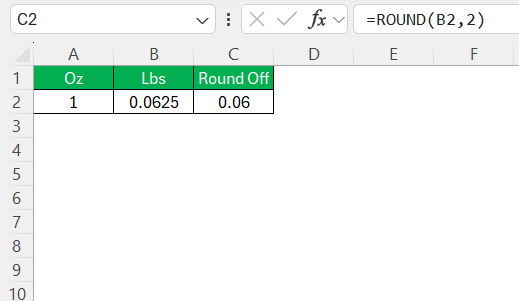
Excel offers several built-in functions that enhance precision when converting units. Aside from the CONVERT function, which is specifically designed for unit conversions, I can use functions like ROUND, ROUNDUP, or ROUNDDOWN to control how results are displayed. The ROUND function is particularly useful for adjusting decimal precision, where I specify the number of decimal places by:
=ROUND(B2, 2)
In this example, “B2” refers to the cell with the calculated weight in pounds, and “2” indicates rounding to two decimal places. These functions help me manage rounding errors, ensuring that my data aligns with the required level of precision. By leveraging these tools, I maintain both the accuracy and readability of my converted data without sacrificing detail.
Real-World Applications
Use Cases in Personal Finance
In personal finance, converting ounces to pounds using Excel can be surprisingly useful. For instance, if I’m tracking physical commodities like precious metals, the ability to convert weights accurately ensures I can properly value and account for my assets. Additionally, for culinary budgeting, understanding portions and weight conversions helps in planning meals cost-effectively, calculating food expenses more precisely. This conversion process aids in maintaining an organized and detailed financial analysis, ultimately supporting informed decision-making regarding purchases and investments. In essence, the capability to handle such conversions efficiently aids me not only in compiling accurate financial data but also in managing everyday expenses better.
Application in Inventory Management
In inventory management, precise weight conversions are essential for maintaining accurate stock records and ensuring efficient operations. When I manage inventories that include items measured in ounces, converting to pounds in Excel helps streamline ordering, shipping, and storage processes. This conversion aids in optimizing space and cost calculations, particularly for bulk purchasing and logistics.
For example, when consolidating inventory across multiple units or suppliers, using Excel to convert weights ensures consistency in reporting and analysis. It helps in forecasting inventory needs more accurately, thus preventing overstocking or stockouts. Utilizing Excel’s conversion functions, I can efficiently handle and analyze large volumes of inventory data, contributing to more effective management and strategic planning.
FAQs
What’s the easiest way to convert ounces to pounds in Excel?
The simplest method is to divide the ounce value by 16 using a formula like =A2/16, where A2 holds the ounce amount. Alternatively, you can use the CONVERT function like =CONVERT(A2, "ozm", "lbm"). Both options deliver accurate results. If you’re doing this frequently or across large datasets, the CONVERT function might offer better clarity and built-in unit handling.
Why is using the CONVERT function in Excel better than just dividing by 16?
While dividing by 16 works perfectly, the CONVERT function makes your spreadsheet more readable and less error-prone. It also safeguards against misunderstandings when sharing sheets with others. Plus, it’s scalable — you can use CONVERT for hundreds of different units, not just weight. This makes your Excel file more flexible for future conversions.
How do I fix the #NAME? error when using the CONVERT function?
The #NAME? error usually indicates a typo or that Excel doesn’t recognize the function. Make sure you’re using Excel 2007 or later (earlier versions don’t support CONVERT). Also, double-check that you typed "ozm" and "lbm" correctly, including quotation marks. Lastly, ensure the Analysis ToolPak add-in is enabled in older versions of Excel.
How can I ensure decimal places are handled accurately in my converted data?
After converting, select the result cells and use the “Increase Decimal” or “Decrease Decimal” buttons under the “Home” tab to adjust precision. You can also apply the ROUND, ROUNDUP, or ROUNDDOWN functions to maintain uniformity, e.g., =ROUND(B2, 2). This is especially useful for financial or shipping data where rounding errors can add up over time.
How do I ensure accuracy when converting units in Excel?
To ensure accuracy when converting units in Excel, consistently use the CONVERT function or precise formulas. Verify that cells are formatted as numbers and check for correct unit abbreviations. Employ functions like ROUND to manage decimals, and perform validation checks on your results to catch any discrepancies.
John Michaloudis is a former accountant and finance analyst at General Electric, a Microsoft MVP since 2020, an Amazon #1 bestselling author of 4 Microsoft Excel books and teacher of Microsoft Excel & Office over at his flagship MyExcelOnline Academy Online Course.

