Navigating time zone conversions in Excel can be a crucial task, especially when dealing with international data. I’ve found that a clear understanding and accurate implementation of time zone changes can significantly improve data accuracy and workflow efficiency. This guide aims to demystify the process of converting ET to GMT within Excel. With step-by-step instructions and advanced tips, you’ll be equipped to handle these calculations smoothly and effectively.
Key Takeaways:
- Eastern Time (ET) shifts between UTC-5 (EST) and UTC-4 (EDT), while GMT remains fixed at UTC+0 year-round.
- In Excel, converting ET to GMT involves adding either 5 hours (EST) or 4 hours (EDT) to the ET time.
- You can add hours by using either the fraction method (
+ 5/24) or theTIMEfunction (+ TIME(5,0,0)) for clarity. - Accounting for Daylight Saving Time with a conditional formula is essential for accurate conversions throughout the year.
- Proper cell formatting and avoiding common errors like ignoring DST or incorrect time formats help maintain data accuracy in Excel.
Table of Contents
Understanding Time Zones
What Are ET and GMT?
Eastern Time (ET) is a time zone used in the eastern part of North America, including states like New York and Florida. ET pivots between Eastern Standard Time (EST), which is UTC-5, and Eastern Daylight Time (EDT), which is UTC-4, depending on the time of year.
Meanwhile, Greenwich Mean Time (GMT) is a time standard often used globally, remaining constant throughout the year at UTC+0. Understanding these distinctions is essential when converting time accurately, especially in a digital environment like Excel, where precise data handling is key.
Why Accurate Conversions Matter
Accurate time zone conversions are vital for maintaining precision in global communications and operations. Mistakes can lead to scheduling errors, missed meetings, and data misalignment, which are detrimental in business contexts. Precise conversions ensure that meeting invites display correctly across international teams and that data analysis aligns with the intended time frame, improving collaboration and decision-making processes.
Setting Up Excel for Conversion
Formatting Your Excel Sheets
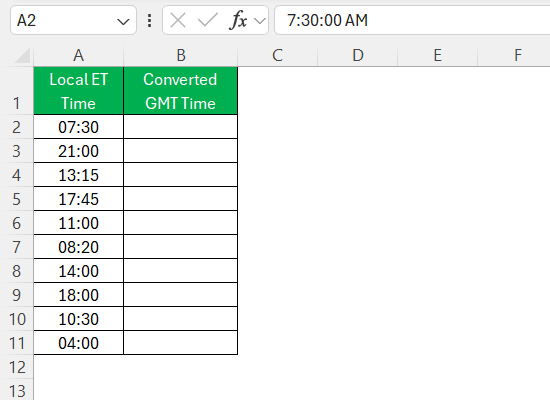
Proper formatting of Excel sheets enhances readability and reduces errors during time conversions. Start by labeling your columns clearly; for instance, you might use “Local ET Time” and “Converted GMT Time” as headers.
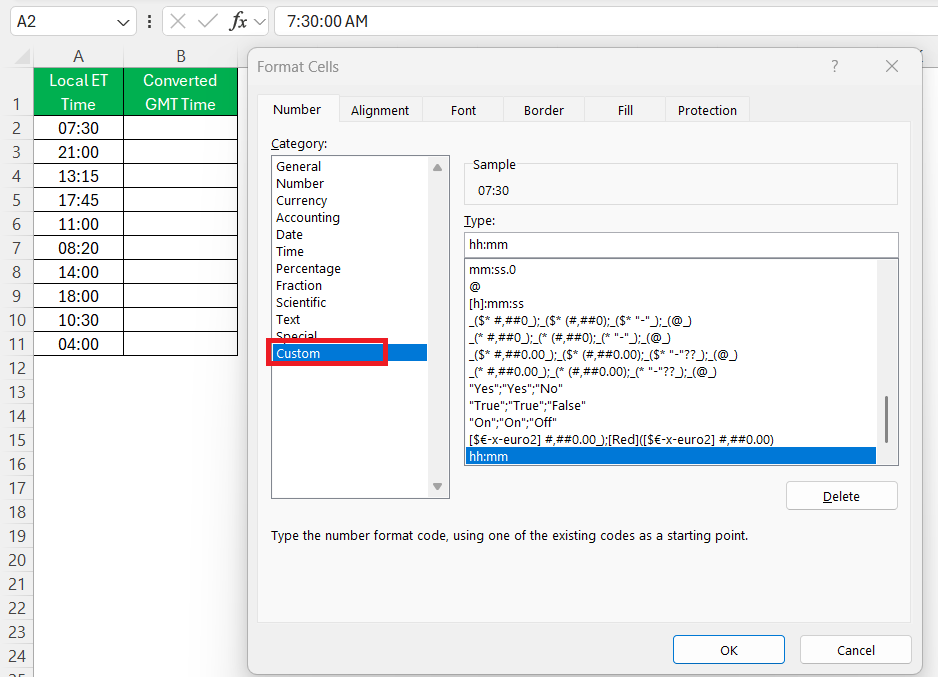
Ensure the cells containing time data are set to “Time” or “Custom” format to support accurate computation.
You can adjust the format by highlighting the relevant cells, right-clicking to access “Format Cells,” and then selecting the appropriate time format. Consistency in formatting ensures that Excel can process and display time data correctly, providing a dependable basis for conversions.
Step-by-Step Guide to Converting ET to GMT
Manual Calculations
For manual calculations, converting ET to GMT involves adding five hours to your ET time. This is because GMT is five hours ahead of Eastern Standard Time (EST). You simply add 5 to the hour component of your ET time. For example, if your ET time is 3:00 PM, add 5 hours to get 8:00 PM GMT.
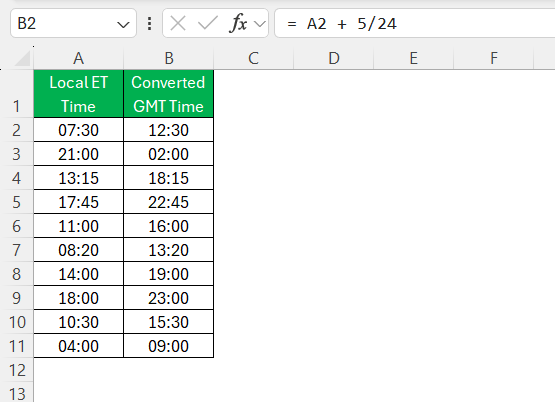
Excel stores dates as whole numbers and times as fractions of a day. One hour = 1/24. So, adding 5 hours is adding 5/24. If your ET datetime is in cell A2, I simply write:
= A2 + 5/24
That’s it. Excel adds 5 hours perfectly. It’s fast and easy for a quick conversion without any fancy formulas.
Use the TIME Function
Alternatively, Excel’s built-in TIME function can be used to improve the readability of the formula. The TIME function accepts hours, minutes, and seconds as arguments.
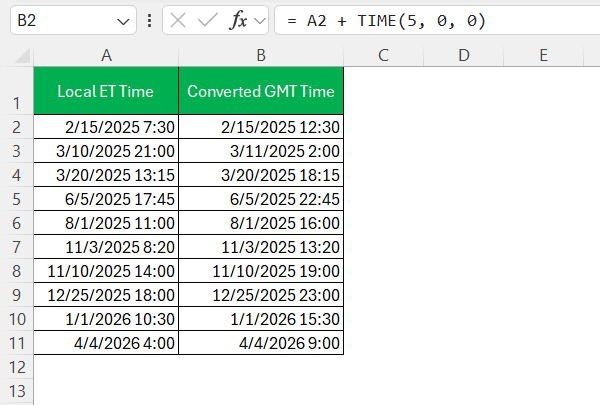
Using the same cell A2, the formula would be:
= A2 + TIME(5, 0, 0)
This approach adds 5 hours, 0 minutes, and 0 seconds to the ET datetime, yielding the corresponding GMT value. This method enhances formula clarity, especially when shared with other users.
Common Mistakes to Avoid
When converting ET to GMT, several common mistakes can compromise accuracy. One frequent error is neglecting to account for Eastern Daylight Time (EDT), which requires a four-hour difference rather than five. Another slip-up is failing to format cells correctly, potentially resulting in Excel treating time as text.
Additionally, overlooking overflow issues when adding hours can cause incorrect day transitions, especially when dealing with times around midnight. Vigilance in these areas ensures reliable conversions and helps safeguard the integrity of your data.
Advanced Tips for Efficient Time Zone Calculations
Adapting for Daylight Saving Changes
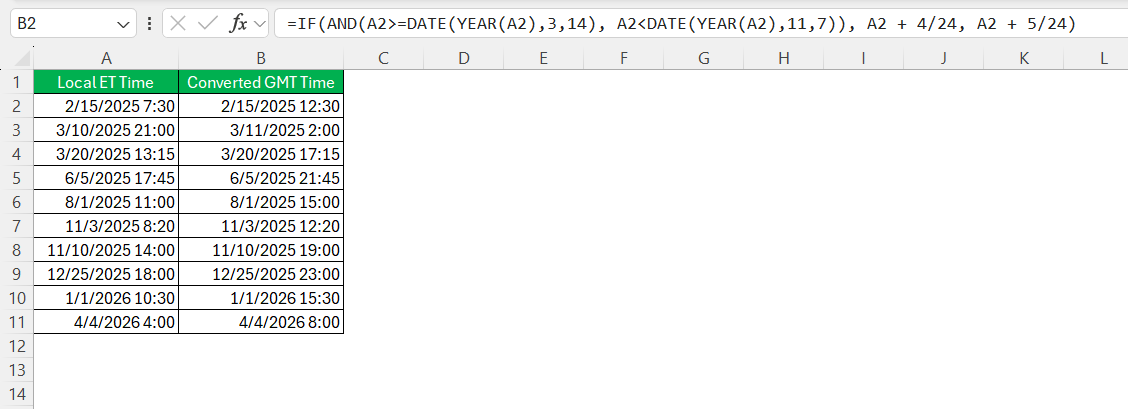
Adapting Excel spreadsheets for Daylight Saving Time (DST) changes is crucial in maintaining conversion accuracy. DST typically starts on the second Sunday in March and ends on the first Sunday in November in the United States. To manage this, your formula should inspect the current date with conditions that check if it falls within the DST period.
For instance, you might employ a condition like =IF(AND(A2>=DATE(YEAR(A2),3,14), A2<DATE(YEAR(A2),11,7)), A2 + 4/24, A2 + 5/24).
By incorporating DST adjustments into your formulas, you ensure all calculations reflect the correct time changes throughout the year.
Applying to Multiple Rows or Data Sets
To apply time zone conversions to multiple rows or data sets in Excel, we can effectively use formula drag and copy functions. Start by entering your conversion formula in the first cell of a new column. Once you have your initial formula set up, click on the cell’s bottom right corner and drag it down to fill the entire column.
This ensures all cells inherit the formula automatically. For larger data sets, consider extending the formula’s range using Excel’s array functions, allowing bulk processing with minimal input. This approach provides a scalable solution for handling extensive data without individual manual adjustments.
FAQs
How do you convert ET to GMT?
To convert ET to GMT, add 5 hours during Eastern Standard Time (EST) or 4 hours during Eastern Daylight Time (EDT). Use Excel with a formula like =A1 + 5/24 for EST or =A1 + 4/24 for EDT to ensure accuracy. Adjust based on the current time of year for correct DST.
How do I handle Daylight Saving Time in conversions?
To handle Daylight Saving Time (DST) in conversions, implement a conditional formula in Excel that checks whether the date falls within the DST period. Adjust the time offset accordingly: add 4 hours for EDT (DST) and 5 hours for EST. Automating this process reduces manual checking and enhances conversion accuracy.
Can I convert multiple time zones simultaneously in Excel?
Yes, you can convert multiple time zones simultaneously in Excel by setting up separate columns with formulas for each specific conversion. Use Excel functions like IF with time zone offsets or create a custom function for different zones. Drag the formula across rows to apply it to entire data sets for efficient batch processing.
What is the difference between EST and EDT?
Eastern Standard Time (EST) is the standard time zone for the Eastern US during the non-daylight saving period, 5 hours behind GMT. Eastern Daylight Time (EDT) is the daylight saving time, 4 hours behind GMT, observed between the second Sunday in March and the first Sunday in November.
What is the formula for GMT time in Excel?
To calculate GMT time in Excel, use the formula =A1 + 5/24 for converting from Eastern Standard Time (EST). If it’s during Daylight Saving Time, use =A1 + 4/24 instead since Eastern Daylight Time (EDT) is an hour ahead of EST. Adjust the formula based on whether EST or EDT is applicable.
John Michaloudis is a former accountant and finance analyst at General Electric, a Microsoft MVP since 2020, an Amazon #1 bestselling author of 4 Microsoft Excel books and teacher of Microsoft Excel & Office over at his flagship MyExcelOnline Academy Online Course.

