
The Importance of Notebook Management
Organizing your notes in Microsoft OneNote is a critical part of staying productive. Whether they’re meeting minutes or grocery lists, keeping your digital binder tidy isn’t just good housekeeping; it’s a matter of efficiency. Learning how to delete OneNote notebooks ensures that you can find information quickly and that you’re not overwhelmed by outdated or unnecessary content cluttering your workspace.
Learn about Excel with our Free Microsoft Excel Online Course!
Key Takeaways
- To delete a OneNote notebook stored on OneDrive, access your OneDrive account at www.onedrive.live.com, navigate to the Documents folder, find the notebook, click on the triple dot option next to it, and select Delete’. Confirm deletion when prompted.
- For locally stored OneNote notebooks, open Windows File Explorer, go to the Documents folder, enter the ‘OneNote Notebooks’ subfolder, right-click the notebook you want to remove, and choose ‘Delete’. This notebook will be moved to the recycle bin, where it can be restored or permanently removed.
- Prior to deleting a shared OneNote notebook, it’s essential to inform all individuals with access to the notebook to avoid loss of their work as deletion is irreversible. After notifying shared users, follow the same steps for deletion on OneDrive or locally, depending on where the notebook is saved.
Overview of OneNote Across Devices
OneNote’s flexibility shines bright when you realize that they are with you just about everywhere. OneNote works harmoniously on different platforms, from Windows and MacOS to iOS and Android devices. Because it’s based on cloud storage, your notebooks sync seamlessly across devices through OneDrive. This means that changes made on one device can reflect on all others, provided you are connected to the internet. Whether you’re annotating on a tablet, jotting down quick notes on your phone, or compiling research on your laptop, OneNote’s cohesive cross-device experience helps maintain a smooth workflow.
Table of Contents
Deleting Notebooks on Windows 10
Using File Explorer to Remove Notebooks
Deleting OneNote notebooks on a Windows 10 device can be quick and straightforward, especially if you’re doing it directly from the File Explorer. Here’s a step-by-step guide:
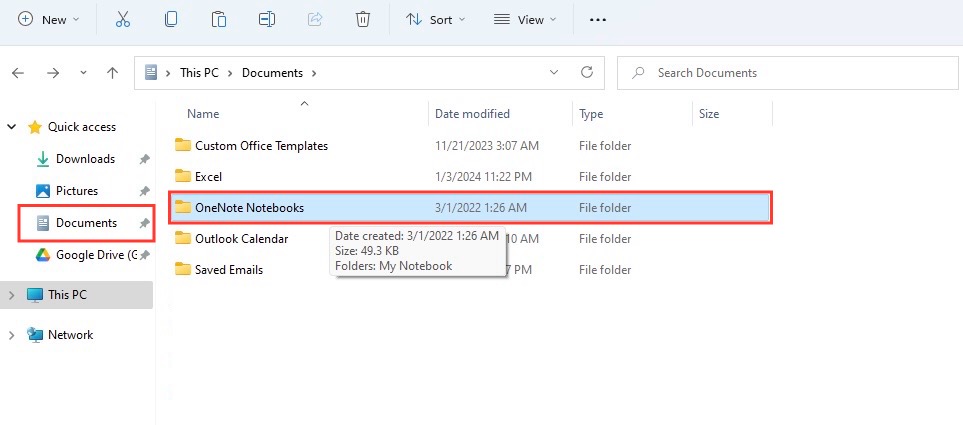
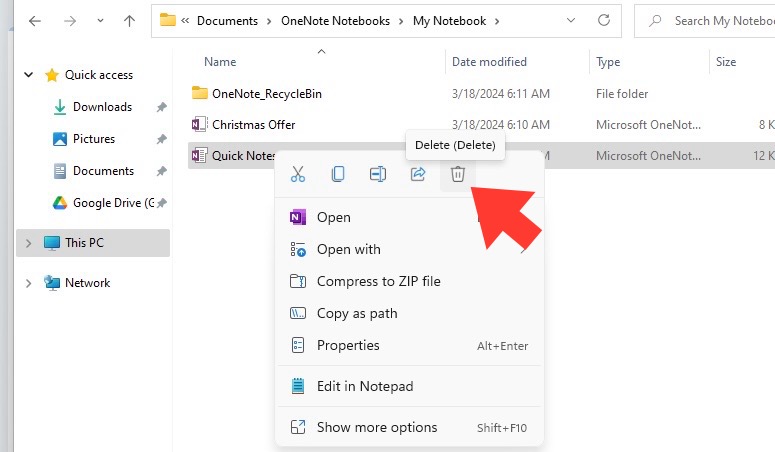
STEP 1: Open a File Explorer window and navigate to where your notebooks are located. In most cases, they will be stored in the Documents folder in a subfolder called “OneNote Notebooks.”
STEP 2: Find the OneNote folder you want to delete. It’s helpful to know the exact name of the notebook to avoid any accidental deletions.
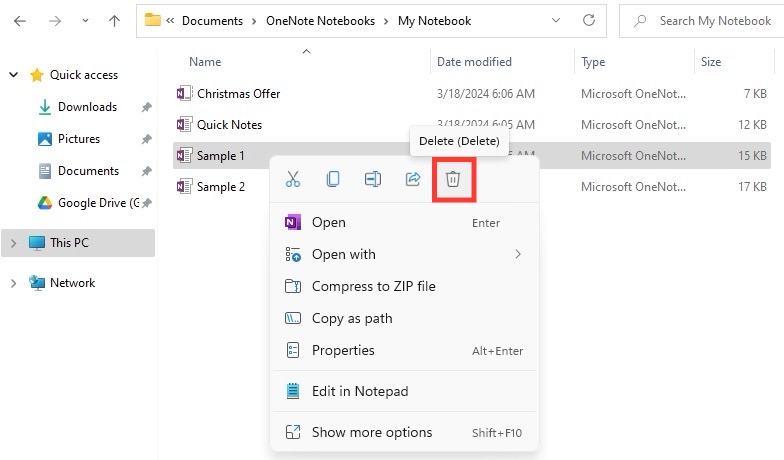
STEP 3: Right-click on the folder containing the OneNote notebook and select ‘Delete.’ Alternatively, you can select the folder and press the Delete key on your keyboard.
STEP 4: Confirm the deletion. You can still recover the notebook from the Recycle Bin if needed.
Remember, this moves the notebook to the Recycle Bin. To permanently remove the notebook:
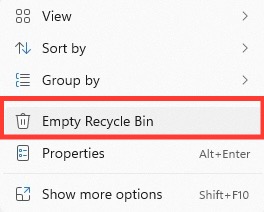
STEP 1: Right-click the Recycle Bin icon on your desktop.
STEP 2: Select “Empty Recycle Bin” from the contextual menu.
STEP 3: A warning prompt box appears; click ‘Yes’ to permanently delete the notebook.
Please note that this does not delete the notebook from OneDrive if it has been synced there.
Closing and Deleting via OneNote App
When you’re ready to close or delete notebooks within the OneNote app, here’s how you can proceed:
STEP 1: Launch OneNote and navigate to the ‘Show Notebooks’ list to access all your notebooks.
STEP 2: Right-click (or tap and hold on touch devices) on the notebook you wish to remove.
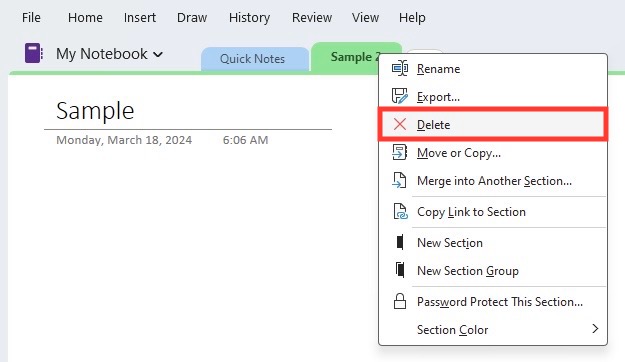
STEP 3: Select ‘Delete’ to remove it from your OneNote list. Doing so closes the notebook and stops it from syncing, but doesn’t delete the notebook from your device or OneDrive.
To delete the notebook after closing it:
STEP 1: Go to the folder where your OneNote files are stored (typically in your Documents folder under “OneNote Notebooks”).
STEP 2: Delete the notebook file, as you would with any other file on your system.
Remember to close the notebook in OneNote before deleting the file from your system to prevent any sync issues or errors.
Clearing Out Notebooks in OneDrive
Step-by-Step Deletion Process
Clearing out OneNote notebooks from OneDrive also follows a straightforward process:
STEP 1: Sign in to your OneDrive account online.
STEP 2: Navigate to the ‘Notebooks’ section, where all your OneNote notebooks are listed.
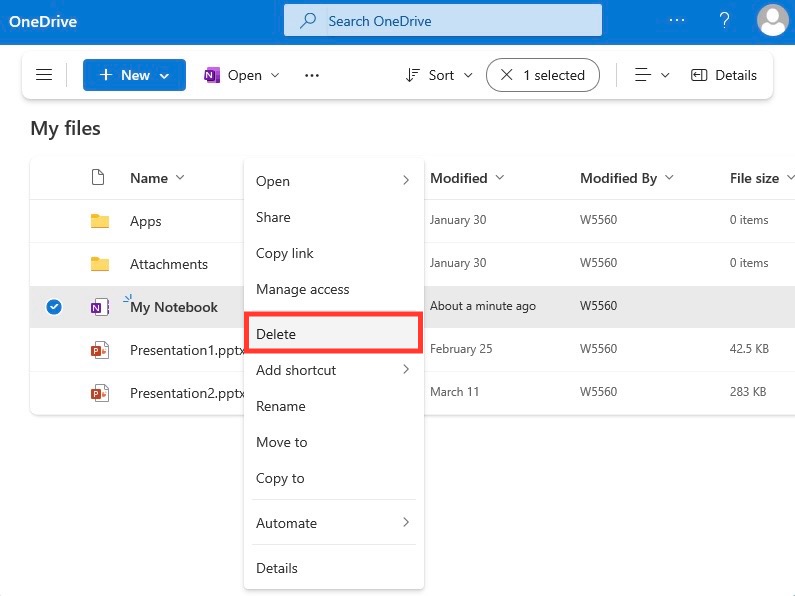
STEP 3: Locate the notebook you want to delete, click the three dots (more options) beside the notebook, or right-click on the notebook.
STEP 4: Select ‘Delete,’ and the notebook will be moved to the OneDrive recycle bin.
For complete removal:
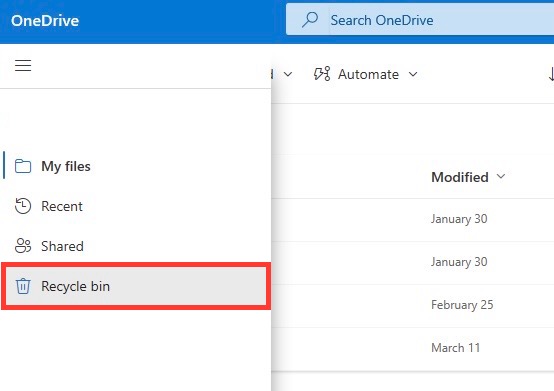
STEP 1: Head to the ‘Recycle bin’ on your OneDrive.
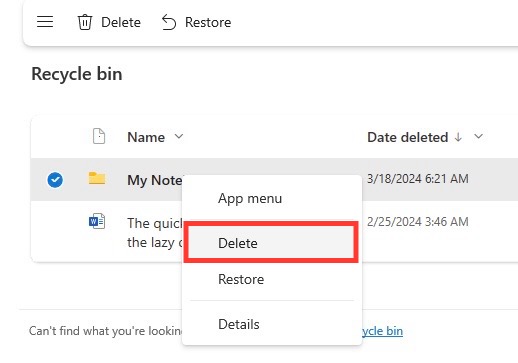
STEP 2: Select the notebook(s) you want to permanently delete.
STEP 3: Click ‘Empty recycle bin’ or ‘Delete’ to permanently erase the notebook.
Be careful with these steps because once a notebook is purged from your OneDrive recycle bin, it cannot be retrieved.
Permanently Deleting Shared Notebooks
If you’re dealing with shared notebooks, the removal process requires extra caution and courtesy:
STEP 1: Navigate to the notebook in your OneDrive.
STEP 2: Select the notebook and choose ‘Delete’ to move it to the recycle bin.
STEP 3: Go to the OneDrive recycle bin.
STEP 4: Select the notebook again and choose ‘Delete’ to remove it forever.
Remember, deleting a shared notebook removes access for everyone involved, not just you.
Deleting Notebooks on MacOS and iPad
Remove Notebooks Using OneNote for Mac
On a Mac, while you don’t have local storage option for OneNote notebooks because they sync with OneDrive, deleting them is still an accessible process:
STEP 1: Open the OneNote app on your Mac.
STEP 2: Navigate to the ‘View’ tab and select ‘Notebooks’ to see all available notebooks.
STEP 3: Control-click on the notebook you want to remove, then select ‘Close This Notebook’ to stop syncing.
To delete it from OneDrive:
STEP 1: Go to the OneDrive website and sign in.
STEP 2: Locate the ‘Documents’ folder and then ‘OneNote Notebooks.’
STEP 3: Find the notebook you closed and want to delete, click it to select, and then press the ‘Delete’ option.
Be aware that once you delete it from OneDrive, it will disappear from all devices synced to that account.
Deleting from an iPad’s Perspective
Handling OneNote notebooks on an iPad differs slightly from other platforms. To delete a notebook on your iPad, follow these steps:
STEP 1: Open OneNote and locate the ‘Notebooks’ list.
STEP 2: Tap and hold on the notebook you wish to delete to reveal additional options.
STEP 3: Tap the notebook icon with a circled minus sign – this icon indicates the option to remove the notebook.
Remember, this action won’t delete the notebook from OneDrive. To fully delete the notebook:
STEP 1: Navigate to the OneDrive app or via a web browser on your iPad.
STEP 2: Find your notebook in the ‘Files’ or ‘Documents’ section.
STEP 3: Swipe left on the notebook and tap the red ‘Delete’ button to move it to the OneDrive recycle bin.
STEP 4: For permanent deletion, go to the recycle bin and repeat the deletion process.
Keep in mind that deleting a notebook is irreversible, and all its contents, including sections and pages, will be lost.
Handling Notebooks on Mobile Platforms
Removing Notebooks in Android
On Android, removing OneNote notebooks involves a few specific steps:
STEP 1: Open the OneNote app on your Android device.
STEP 2: Go to the ‘Notebooks’ view where all your notebooks are listed.
STEP 3: Press and hold on the notebook you wish to delete to select it.
From here, you have two options:
- Tap the ‘Close Notebook’ option that appears at the top.
- Open the OneDrive app or access OneDrive through a web browser on your device.
- Locate the ‘Documents’ section, find the notebook and delete it.
- Confirm the deletion, and the notebook will move to the OneDrive’s recycle bin.
Ensure you empty the OneDrive recycle bin if you want to permanently delete the notebook from all synced devices.
Tidy Up Your OneNote Online
How to Delete Online via Browser
Clearing out OneNote notebooks via a web browser is straightforward, here’s the process:
STEP 1: Open your preferred web browser and sign in to your OneDrive account at Office.com.
STEP 2: Navigate to the ‘Documents’ section and locate the ‘OneNote Notebooks’ folder.
STEP 3: Hover over the notebook that you intend to delete and select the check box that appears.
STEP 4: Click ‘Delete’ to move the notebook to the OneDrive recycle bin.
For permanent deletion:
STEP 1: Visit the OneDrive recycle bin by clicking on the ‘Recycle bin’ link usually located in the left sidebar.
STEP 2: Select the notebook you want to remove permanently and click ‘Delete’ again.
Before proceeding, ensure you’ve communicated with any collaborators and backed up any vital information, as this deletion is irreversible.
Sharing and Notification Protocol Before Deletion
Before deleting a notebook that’s been shared with others, considerate collaboration suggests following a simple protocol to prevent any data loss or surprises:
- Notify all collaborators in advance about the planned deletion, specifying the exact date of deletion to allow them time to back up any necessary information.
- If the notebook is extensively shared or contains critical information, consider multiple notifications, including a final reminder just before you delete.
- Determine if any co-author requires continued access to the information and if necessary, facilitate the transfer of ownership of any sections they may need.
Adhering to this protocol respects the collaborative nature of shared documents and minimizes disruptions to others’ workflows.
Tips Before You Delete
Backing Up Important Notes
Before you take the leap and delete a notebook, backing up your notes is a vital step to ensure no important information is lost:
STEP 1: Open OneNote 2016 on your computer.
STEP 2: Click on the ‘File’ tab and select ‘Options’.
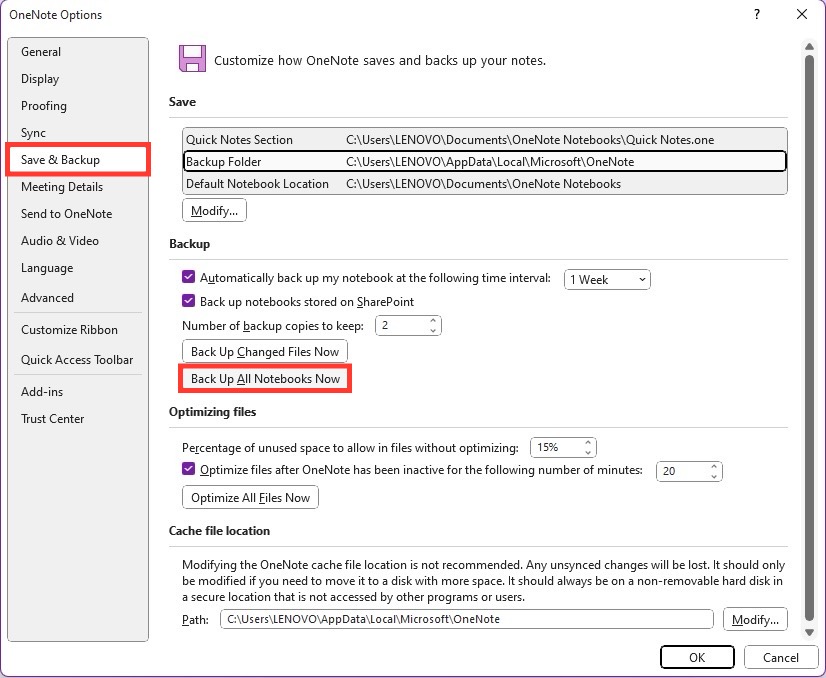
STEP 3: In the ‘Options’ dialog box, go to the ‘Save & Backup’ section.
STEP 4: Set your preferences for backup under ‘Backup Folder’ and ‘Number of backup copies to keep’.
Click on ‘Back Up All Notebooks Now’ to start the manual backup process.
Whether they choose automatic backups at regular intervals or a one-time manual save, this simple precaution could save users from future headaches if they ever need to revisit archived information.
Communicating with Collaborators Pre-Deletion
It’s pivotal to have clear communication with collaborators before deleting a shared OneNote notebook to ensure that everyone can safeguard their work. Here’s how to manage that communication effectively:
- Send out an initial notification via email or a message within OneNote, giving collaborators notice of the pending deletion and the timeline.
- Provide instructions on how they can back up any information they may need from the notebook.
- Offer to assist with exporting sections or pages if they need help.
- Follow up with a reminder shortly before the deletion date to ensure everyone has had time to prepare.
- After you’ve deleted the notebook, send a confirmation message so that all collaborators are aware of the change in status.
By keeping communication open and clear, you maintain respect and professionalism within your team and reduce the risk of inconvenient data loss.
FAQ: Navigating OneNote Notebook Deletion
Can I retrieve a notebook once it has been deleted?
Yes, if you’ve just deleted a notebook, it’s often possible to retrieve it from the Recycle Bin or from the OneDrive recycle bin online. However, if it has been permanently deleted from the recycle bin, recovery may not be possible. Always back up notebooks before deletion as a precaution.
How do I ensure all devices sync deletion correctly?
To ensure that all devices sync the deletion correctly, manually close the notebook in OneNote on all devices before you delete it from OneDrive. After deletion, occasionally check OneNote on your devices to confirm the notebook is no longer listed or syncing.
What should I do if I still see a notebook after attempting to delete it?
If a notebook still appears after you’ve deleted it, try manually closing it in OneNote across all devices. Then clear the notebook from OneDrive’s recycle bin to force a sync update. If it persists, sign out of OneNote and sign back in to refresh the notebook list.


John Michaloudis is a former accountant and finance analyst at General Electric, a Microsoft MVP since 2020, an Amazon #1 bestselling author of 4 Microsoft Excel books and teacher of Microsoft Excel & Office over at his flagship MyExcelOnline Academy Online Course.


