Understanding the significance of a contingency plan for your contact list cannot be overstated. You’d go to lengths to fix a crashed computer, but the precious contacts lost in the process are irreplaceable. That’s why backing up contacts is essential. Should your computer meet an unfortunate fate, a backup ensures you’re not left empty-handed; you can restore all connections in Outlook effortlessly.
Download our 101 Advanced Excel Formulas & Functions Examples!
Key Takeaways
- To export Outlook contacts, first access Outlook via your Office 365 account, navigate to the “People” option, and under “Manage,” select “Export Contacts.”
- Choose “All Contacts” or a specific folder to export, select your preferred file format, and click “Export” to download your contacts to your desired location.
- An alternative method involves using the copy-paste function within Outlook’s table view, allowing you to select specific contact fields and paste them into a spreadsheet program like Excel, which can then be saved as a .csv file.
What’s New in 2024 for Outlook Contact Export
As we sail through 2024, you’ll be delighted to know that Outlook has implemented a couple of fresh features and streamlined processes for contact export. Their continual updates intend to provide you with an intuitive and more efficient backup experience. Keep an eagle eye out for enhanced compatibility with various file formats and the possibility of faster, more seamless transfers. These upgrades are designed to keep your productivity in full swing and mitigate the technical hitches that once made exporting a chore.
Table of Contents
Preparing to Export Your Contacts from Outlook
Ensuring Your Outlook Version is Up-to-Date
Before you dive into exporting contacts, it’s crucial to ensure your Outlook is as current as the morning’s news. An up-to-date version not only equips you with the latest security patches but also guarantees access to the newest features, including improved export functions. Checking for updates is a breeze – simply head over to the ‘File’ tab, peek into the ‘Office Account’, and click ‘Update Options’. If there’s a fresh update, let it roll out and soon you’ll be set with the most modernized Outlook at your service.
The Export Process
Step-by-Step Guide to Export Contacts to CSV
Alright, let’s make a move and get those contacts safely exported:
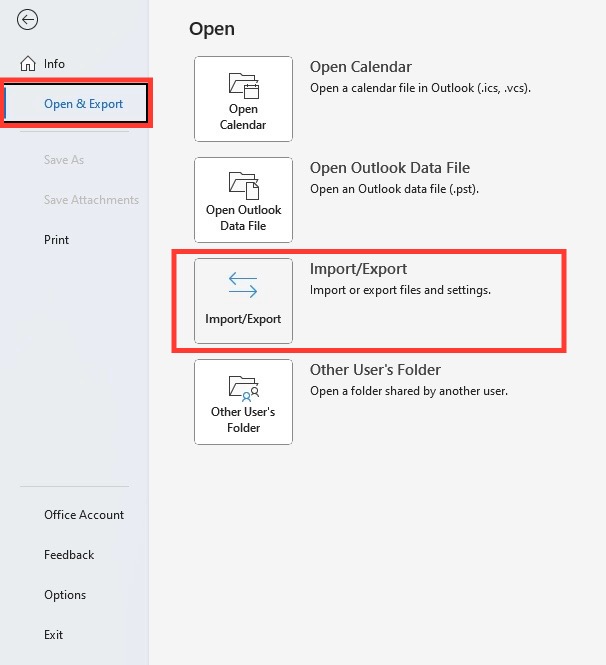
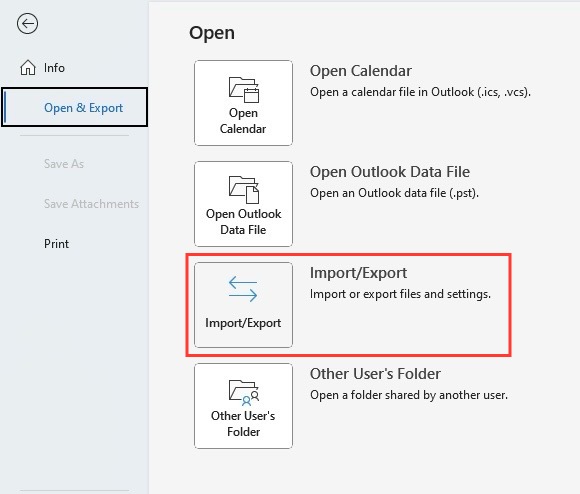
STEP 1: Open your Outlook and tap ‘File > Open & Export > Import/Export’.
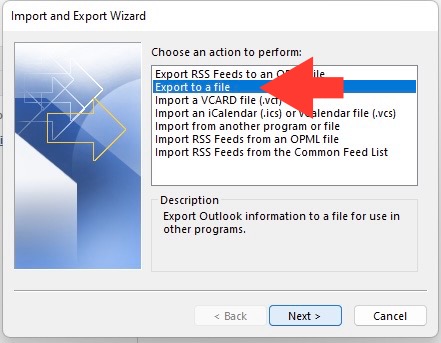
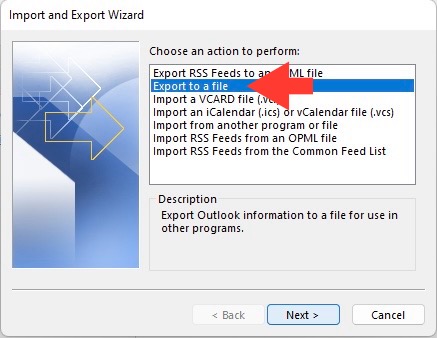
STEP 2: Choose ‘Export to a file,’ then click the ‘Next’ button.
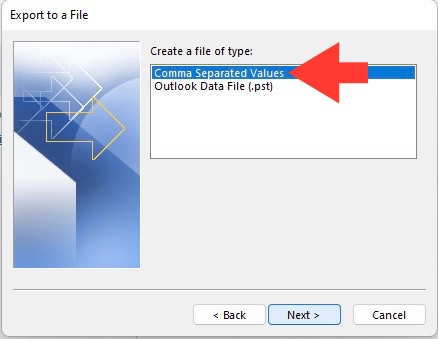
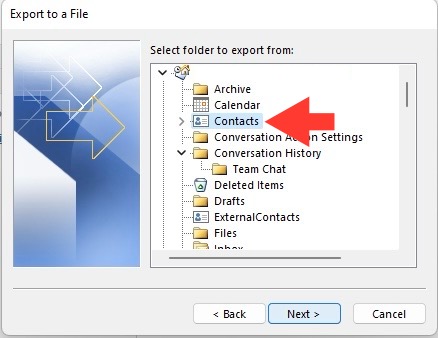
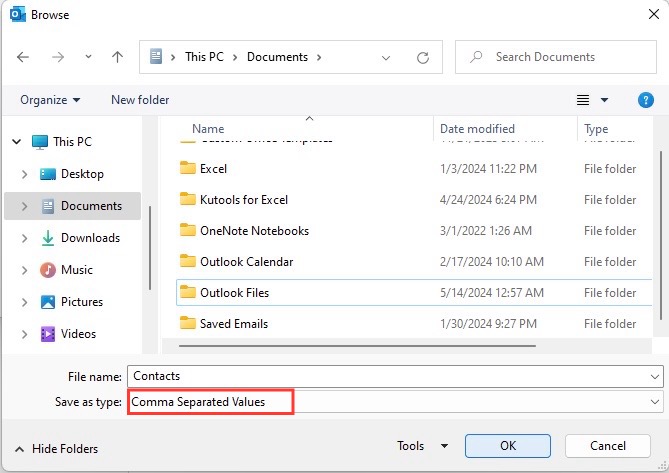
STEP 3: Select ‘Comma Separated Values’ > Click ‘Contacts’ > ‘Next’ > ‘Browse’ to pick a spot for your CSV and give the file a name.
STEP 4: Click ‘Next’ > ‘Finish’ button.
Now, watch in awe as your contacts sail smoothly into a CSV file.
How to Export Contacts as PST Files
If you’re set on exporting contacts not as a mere CSV but as a sturdy PST file, here’s how:
STEP 1: Open Outlook and head to ‘File > Open & Export > Import/Export’.
STEP 2: Select ‘Export to a file,’ then click ‘Next’.
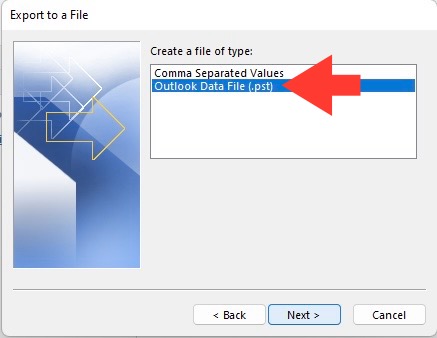
STEP 3: Now, choose ‘Outlook Data File (.pst)’ and let the ‘Next’ button feel your click.
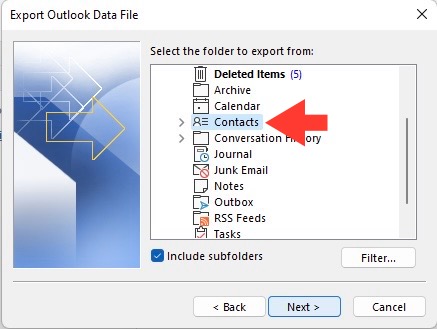
STEP 4: Select the Contacts to export—pin it down and proceed with ‘Next’.
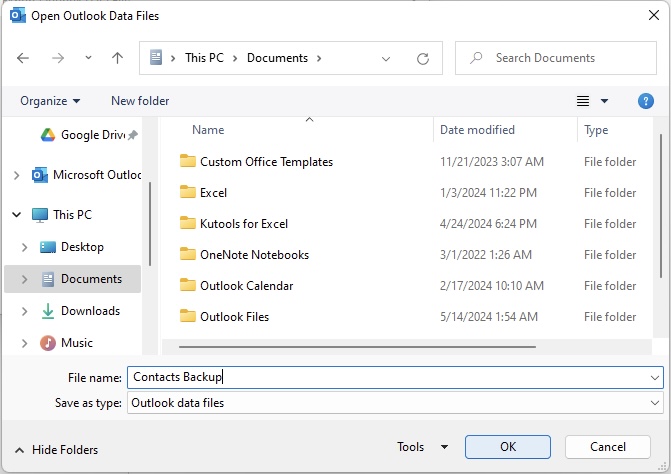
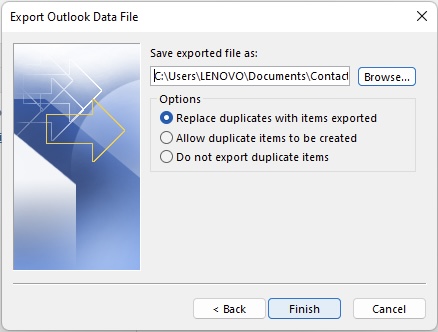
STEP 5: Name the files through ‘Browse’.
STEP 6: Click ‘Finish’.
And just like that, your contacts are securely locked away in a PST file, ready to be summoned when duty calls.
Exporting From Different Platforms
Differences in Exporting Contacts from Outlook 365 vs. Outlook.com
Navigating the differences in exporting contacts from Outlook 365 and Outlook.com is smooth sailing once you get the knack. In Outlook 365, the desktop application, you have the luxury to export contacts to both CSV and PST formats, reveling in a bounty of options for backup or migration. On the daring seas of Outlook.com, the web-based version, you’re more likely to export directly to CSV through the ‘People’ page.
While Outlook 365 feels robust with features for corporate buccaneers, Outlook.com offers a user-friendly fit. Remember, regardless of the platform, exporting your crew of contacts means they’re ready to set sail with you, no matter the changing tides of email service providers.
Handling Common Issues During Export
Troubleshooting Export Errors
If you find yourself marooned with export errors, don’t wave the white flag yet! Begin your troubleshooting expedition by ensuring your Outlook is up to date – outdated maps never led anyone to treasure. Next, comb through your contact list for any unusual characters that might be leading you astray; these can often cause errors when exporting. If you’re still navigating through fog, try exporting a smaller batch of contacts to determine if one of them is a mutinous file causing the issue.
Tips for Managing and Organizing Contacts Post-Export
After successfully exporting your contacts, it’s time to ensure they aren’t a jumbled mess on the deck. First, run a tight ship by sorting and filtering the contacts in the exported file – a good captain knows where their crew is. Organizing contacts by categories like ‘Family’, ‘Friends’, or ‘Work’ in the spreadsheet can save time down the line. Don’t let duplicates lead to confusion in your ranks; use spreadsheet functions to identify and merge them.
Frequently Asked Questions
Can I Export Only a Specific Category of Contacts?
Yes, you can selectively export contacts by category from Outlook. Simply categorize your contacts first, then pull up the list view and group by category. Right-click the category you wish to export and select ‘Copy.’ Now, navigate to Excel or your preferred sanctuary to paste and thus, save your categorized contacts.
How do I export my entire contact list?
To export your entire crew of contacts, select ‘File > Open & Export > Import/Export’, choose ‘Export to a file’, then ‘Outlook Data File (.pst)’. Select the Contacts folder, set your sails with ‘Next’, and chart your course to the finish. Your entire list will now be safely stowed away.
Why Are Some Contacts Not Exporting Correctly?
If you’re noticing some of your crew hasn’t made it aboard the CSV or PST lifeboat, it’s time to scan the horizon for answers. Typically, missing contacts from your export could be due to incomplete information or format misalignment that Outlook can’t recognize during the export.
John Michaloudis is a former accountant and finance analyst at General Electric, a Microsoft MVP since 2020, an Amazon #1 bestselling author of 4 Microsoft Excel books and teacher of Microsoft Excel & Office over at his flagship MyExcelOnline Academy Online Course.

