Excel is a versatile tool that simplifies the management of large data sets, including names. Understanding how to separate first and last name can enhance your data accuracy and relevance significantly. Whether you are working with a mailing list or compiling a customer database, mastering this skill will streamline your processes and improve overall data utility. Accurate name separation is often the foundation for personalized communication and ensures that your database remains organized and efficient.
Key Takeaways:
- Name separation in Excel improves organization and personalization.
- Text to Columns is ideal for standard name formats with clear delimiters.
- Flash Fill is great for quick pattern-based name splitting.
- Custom formulas offer flexibility for irregular name entries.
- Pre-cleaning data ensures accurate separation and reduces errors.
Table of Contents
Mastering Name Separation in Excel
The Importance of Accurate Data Entry
Accurate data entry is crucial in maintaining the integrity and reliability of your information. When separating names in Excel, precision ensures that communication, analytics, and reporting are based on correct and usable data. Mistakes in data entry can result in misaddressed communications, erroneous data analysis, and a loss of credibility. By taking the time to ensure names are correctly split, we affirm the foundation of dependable data management.
Key Benefits of Splitting Names
Splitting names in Excel offers several advantages that can enhance both organizational efficiency and data utility. Here are the key benefits:
- Improved Data Organization: Breaking names into first and last components allows for easier sorting and filtering, making data more manageable.
- Enhanced Personalization: Personalized communications become more feasible, as you can address individuals by their first names in emails or letters.
- Streamlined Data Analysis: Separating names simplifies analyses, such as frequency counts of first names, aiding in demographic studies or customer profiling.
- Efficient Data Entry: It facilitates data importation and entry from diverse sources, ensuring consistency and integrity in your datasets.
- Automated Processes: Enables the use of automated tasks, like creating personalized labels or documents, thus saving time.
By utilizing name separation, we can achieve cleaner datasets that support various tasks, from marketing to reporting, with greater ease and accuracy.
How to Separate First and Last Name in Excel
Using Text to Columns
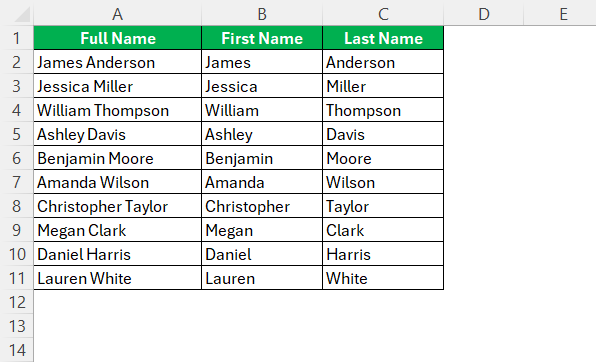
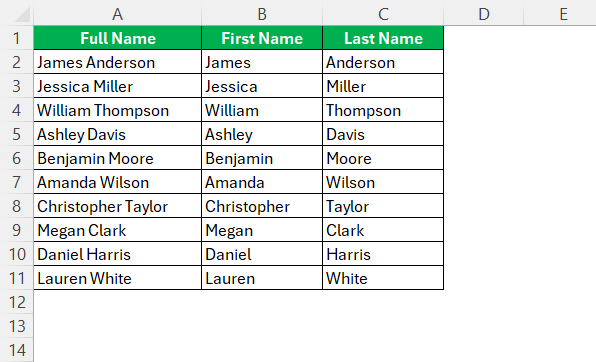
The Text to Columns feature in Excel is a straightforward tool for dividing names into separate cells. This feature efficiently handles large datasets and offers precise division using a delimiter of your choice, such as a space.
To use Text to Columns, follow these steps:
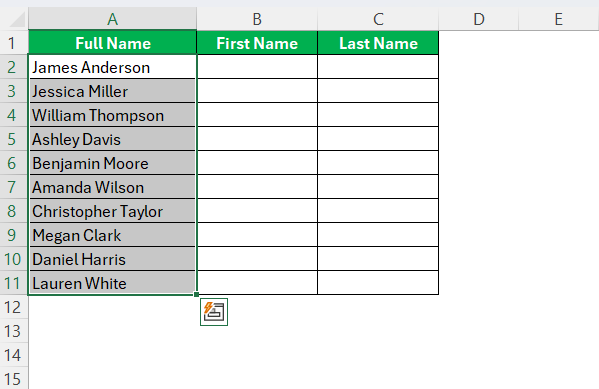
STEP 1: Highlight the column containing the full names you wish to separate.
STEP 2: Go to the “Data” tab in the Excel ribbon. Click on “Text to Columns” to open the Convert Text to Columns Wizard.
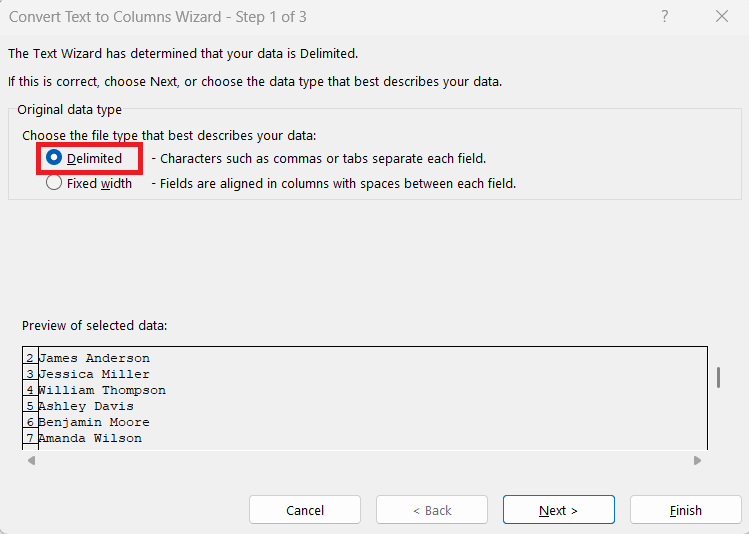
STEP 3: Select “Delimited” and click “Next.”
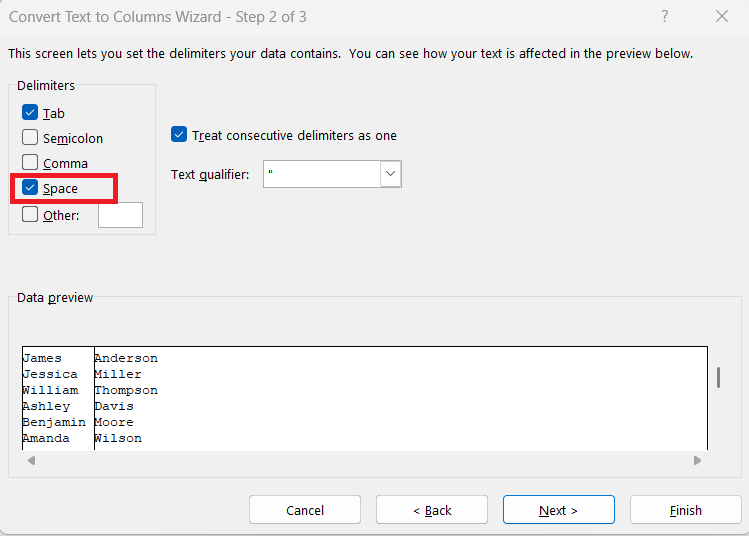
STEP 4: Check “Space” as your delimiter and click “Next.”
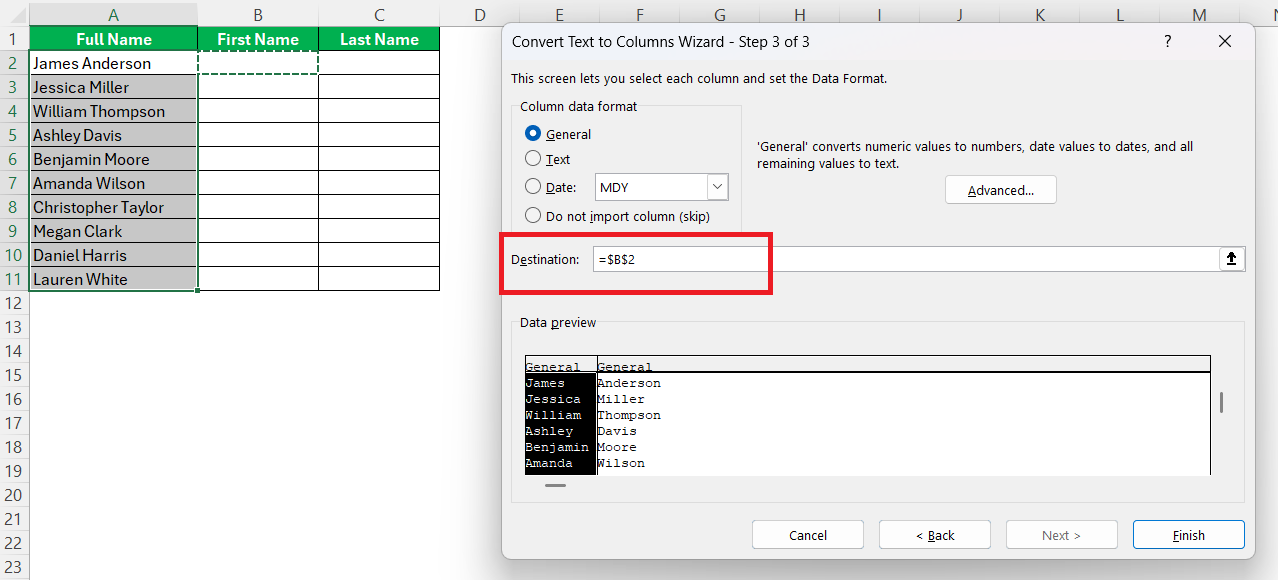
STEP 5: Choose the destination for the separated names (same or new cells), then click “Finish.”
Using this method is an effective way to maintain data integrity while performing the separation task, particularly useful for consistent datasets with standardized entries.
Employing Flash Fill for Quick Results
Excel’s Flash Fill is an intelligent feature that can quickly separate names based on patterns you provide. It’s ideal for cases where you’re dealing with consistent entries and need to rapidly divide data without extensive setup.
To use Flash Fill, follow these simple steps:
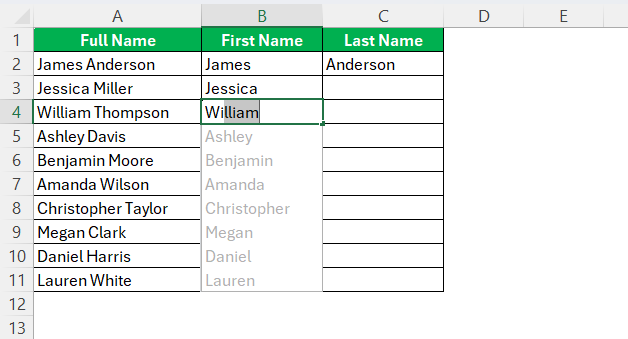
STEP 1: Start by typing the desired first name from the full name in a new column adjacent to your data. Press “Enter.”
STEP 2: In the next cell, begin typing the first few letters of the next intended first name. Excel will predict the remaining entries using Flash Fill.
STEP 3: Press “Ctrl + E” or go to the “Data” tab and select “Flash Fill” to apply the fill to the remaining cells.
Flash Fill leverages data recognition power to replicate your pattern quickly. This tool offers a fast alternative to more manual processes, making it perfect for users looking for simplicity when handling routinely formatted data.
Applying Custom Formulas
For those comfortable with Excel’s formula capabilities, custom formulas provide a dynamic way to separate first and last names. This approach is highly adaptable, especially useful when dealing with non-standard entries or additional formatting complexities.
Here’s a basic method using formulas:
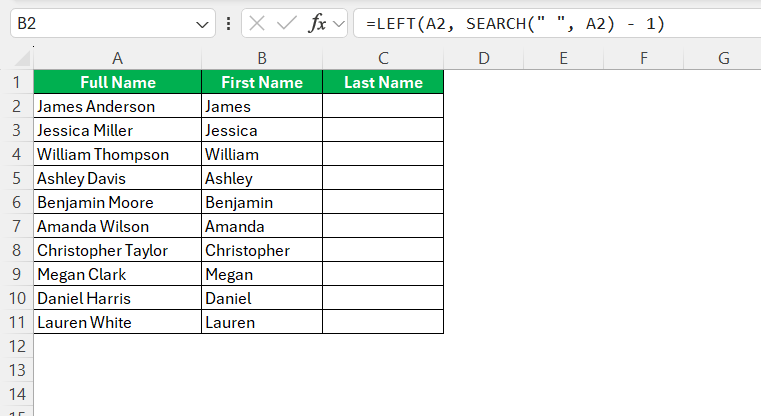
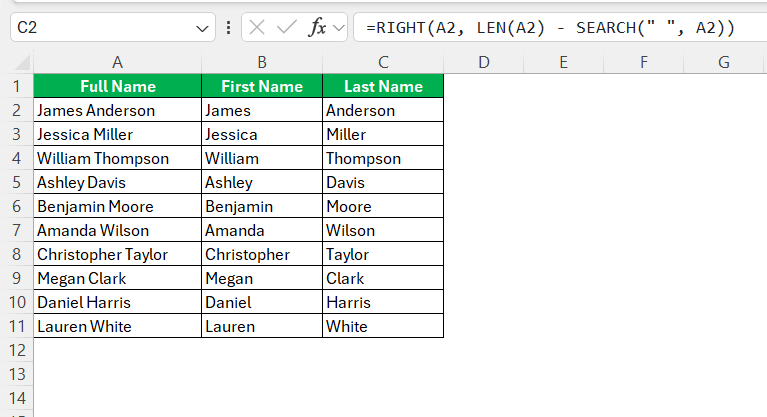
Separate First Names: Use the LEFT and SEARCH functions.
Formula: =LEFT(A2, SEARCH(" ", A2) - 1)
This extracts everything before the first space from cell A1, yielding the first name.
Extract Last Names: Combine RIGHT, LEN, and SEARCH functions.
Formula: =RIGHT(A2, LEN(A2) - SEARCH(" ", A2))
This takes the remaining string after the first space from cell A1, extracting the last name.
These formulas dynamically adapt to changes in the data, providing flexibility and accuracy. They are particularly beneficial when handling datasets where automation of name separation is required over repeated tasks.
Common Challenges and Solutions
Troubleshooting Formula Errors
When working with formulas in Excel, encountering errors is common. However, knowing how to troubleshoot them can save time and prevent frustration.
- Understand Error Codes: Familiarize yourself with common error codes, like
#VALUE!,#REF!, and#NAME?. Each indicates a different type of issue, such as data type mismatches, invalid cell references, or unrecognized text in formulas. - Check for Common Mistakes: Ensure that all parentheses are properly closed, ranges are correctly defined, and necessary references are included. Missed or incorrect elements often lead to errors.
- Use the Error Checking Tool: Excel’s built-in error-checking tool helps identify and suggest fixes for the errors in your formulas. It’s found under the “Formulas” tab.
- Evaluate Formulas: The “Evaluate Formula” feature allows you to step through parts of the formula and observe intermediate results. This way, you can pinpoint exactly where the formula is going wrong.
- Simplify Formulas: Break down complex formulas into smaller, more manageable components to isolate and troubleshoot specific parts.
By systematically addressing these areas, formulas can be corrected efficiently, restoring functionality to your data operations.
Preventing Loss of Data during Separation
Data integrity is crucial when separating names in Excel, as errors can lead to significant data loss or misplacement. Here are some strategies to prevent such issues:
- Create Backups: Always create a backup of your original dataset before making any changes. This ensures you have a failsafe in case of errors during the separation process.
- Use Temporary Columns: Separate the names into temporary columns first. This allows you to review the results before finalizing any changes to your main dataset.
- Formulas Over Manual Entry: Use formulas or tools like Text to Columns for separation rather than manual entry. Automated processes reduce human error, maintaining data integrity.
- Error Checking: After separation, conduct a quick review of the results, paying special attention to any anomalies or inconsistencies in the separated data.
- Save Incrementally: Throughout the separation process, incrementally save your work. If an error occurs, you can revert to the last correct version without starting from scratch.
By adhering to these guidelines, you can minimize data loss and ensure your separated data remains accurate and reliable.
Best Practices for Clean Data
Preparing Your Data Before Separation
Preparing your data before separating names in Excel is key to achieving accurate and efficient results. Here’s a concise guide to ensure your data is ready for processing:
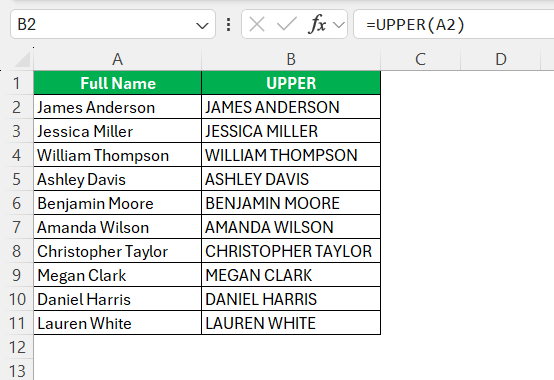
- Standardize Formats: Ensure that names are consistently formatted. Uniform capitalization and spacing simplify separation and reduce the likelihood of errors. Use
LOWER,UPPER, orPROPERfunctions if needed.
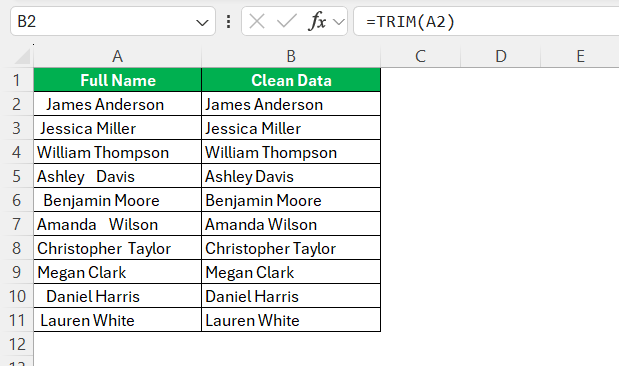
- Clean Data: Remove any unwanted characters, symbols, or additional spaces using Excel functions like
CLEANandTRIM. These functions help tidy the dataset, making it ready for separation.
- Validate Data Entries: Check for and correct any misplaced, misspelled, or incomplete entries. This manual scan helps catch errors that automated processes might overlook.
- Organize and Sort: Arrange the data in a logical order, such as by last name, which can provide a reference in case any manual adjustments need to be made post-separation.
- Identify Anomalies: Look for and flag any name entries that might pose issues, such as entries with only initials, hyphens, or other unusual formats that require a tailored approach.
By preparing your data carefully, you ensure that the separation process runs smoothly and produces dependable, error-free results, safeguarding the integrity and usability of your dataset.
Removing Duplicates Effectively
Effectively removing duplicates from your dataset is vital for maintaining data accuracy and reliability. Here’s how you can ensure this process is done efficiently in Excel:
- Identify Duplicate Fields: Determine which columns will be checked for duplicates. Typically, this involves checking full names, but other identifiers like emails or ID numbers may also be important.
- Use the Remove Duplicates Tool: Navigate to the “Data” tab and select “Remove Duplicates.” A dialog box will appear where you can select the columns to scan for duplicates.
- Preview Changes: Before confirming, Excel lets you see the number of duplicates found and the unique values remaining. This offers a chance to review changes before they are made.
- Conduct a Backup: Always back up your original data before removing duplicates, ensuring you can restore any accidentally deleted information if necessary.
- Review the Results: After removal, scan through the data to ensure pertinent data hasn’t been inadvertently deleted, especially in columns related to the duplicate identifiers.
Following these steps assures that all duplicate entries are meticulously addressed, enhancing data quality and operational efficiency.
FAQs
How to separate first and last name in Excel?
If your data follows a standard format (like “First Last”), the Text to Columns feature is the most efficient tool. It allows you to split names based on a delimiter, such as a space. For less structured data or quicker results, Flash Fill works great. If you’re dealing with irregular formats, custom formulas provide the most control.
Why is it important to separate names instead of keeping them in one cell?
Separating names allows for better sorting, filtering, and personalization in communication. For example, you can address users by their first names in emails or create more tailored reports. It also simplifies tasks like frequency analysis or mail merge operations. Clean, split data enhances both utility and professionalism in data-driven tasks.
Can I split names if there is inconsistent spacing between them?
Yes, you can split names with inconsistent spacing by first using the TRIM function. This removes extra spaces, ensuring only single spaces remain between words. Once spaces are consistent, use Text to Columns or formulas for accurate separation.
How do I handle splitting names when some entries have middle names and others do not?
To handle names with variable components like middle names, use a combination of formulas that can dynamically adjust. Employ IF functions to check the number of spaces and apply different formulas based on the result, ensuring adaptable and accurate separation for each case.
Is there a way to reverse the process and combine split names back into full names?
Yes, you can recombine split names using the CONCATENATE function or the & operator. Ensure proper placement of spaces by joining the first, middle, and last names with spaces in between: =A1 & " " & B1 & " " & C1. Adjust for entries without middle names as needed.
John Michaloudis is a former accountant and finance analyst at General Electric, a Microsoft MVP since 2020, an Amazon #1 bestselling author of 4 Microsoft Excel books and teacher of Microsoft Excel & Office over at his flagship MyExcelOnline Academy Online Course.

