Converting units of measurement can be a daunting task, but Microsoft Excel makes it straightforward with its built-in functionalities. Whether you’re working on a personal project, analyzing business data, or conducting scientific research, knowing how to convert ounces to pounds can save time and enhance accuracy. In this informative blog post, I’ll walk through the steps to convert 80 oz to lb in Excel and provide insights into both practical applications and advanced automation techniques.
Key Takeaways:
- Excel’s CONVERT function simplifies weight conversions like ounces to pounds.
- Use “ozm” and “lbm” as unit codes for ounces and pounds, respectively.
- Organizing your spreadsheet with proper labels boosts clarity and accuracy.
- Use the ROUND function to control decimal precision in results.
- Automating conversions via macros saves time and reduces errors.
Table of Contents
Mastering Excel for Weight Conversions
Why Convert Ounces to Pounds in Excel?
Converting ounces to pounds in Excel is crucial for several reasons. Firstly, it ensures precision in data-driven environments like business operations, where weight measurements impact inventory management. Secondly, Excel simplifies repetitive conversions, reducing manual errors.
Lastly, using Excel for conversions allows us to efficiently handle large datasets, which is essential for scientific and statistical analysis, ensuring clarity and consistency across our work.
Essential Excel Functions for Unit Conversion
Excel offers several essential functions for unit conversion, simplifying complex calculations. One of the most powerful is the CONVERT function, allowing us to transform values between various units effortlessly. For instance, to convert ounces to pounds, the syntax =CONVERT(number, "ozm", "lbm") is ideal.
Additionally, functions like ROUND can be used in tandem to manage decimal precision, ensuring accuracy in our results. These functions provide a robust toolkit for tackling diverse conversion needs, enhancing productivity and accuracy in our tasks.
Step-by-Step Guide to Convert 80 oz to lb
Setting Up Your Excel Spreadsheet
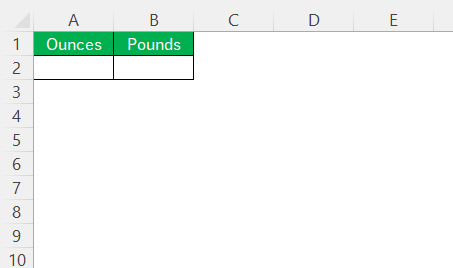
To set up your Excel spreadsheet for converting ounces to pounds, start by opening a new or existing workbook. In the first column, enter a label like “Ounces” in cell A1 and “Pounds” in cell B1 for clarity.
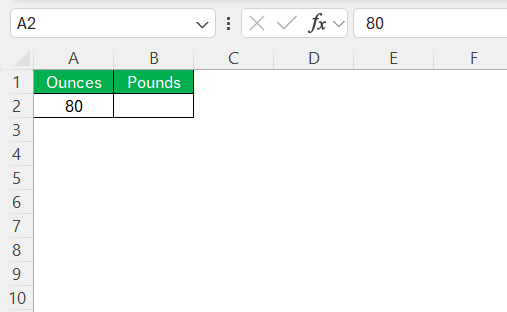
Then, in cell A2, input the value “80” to represent the ounces you wish to convert.
These simple steps lay the groundwork for accurate unit conversion, ensuring your spreadsheet is organized and easy to navigate. By labeling and structuring our data from the beginning, we streamline the conversion process and minimize any potential confusion later on.
Using the CONVERT Function Accurately
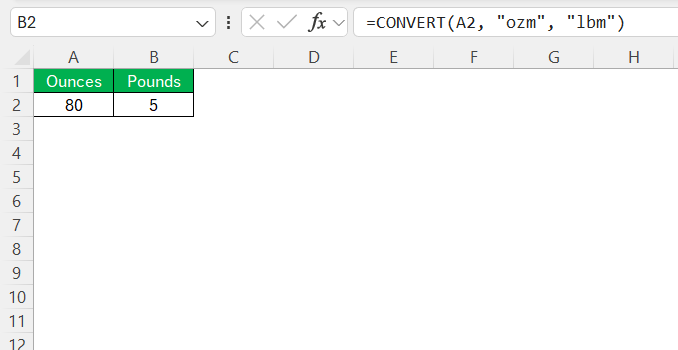
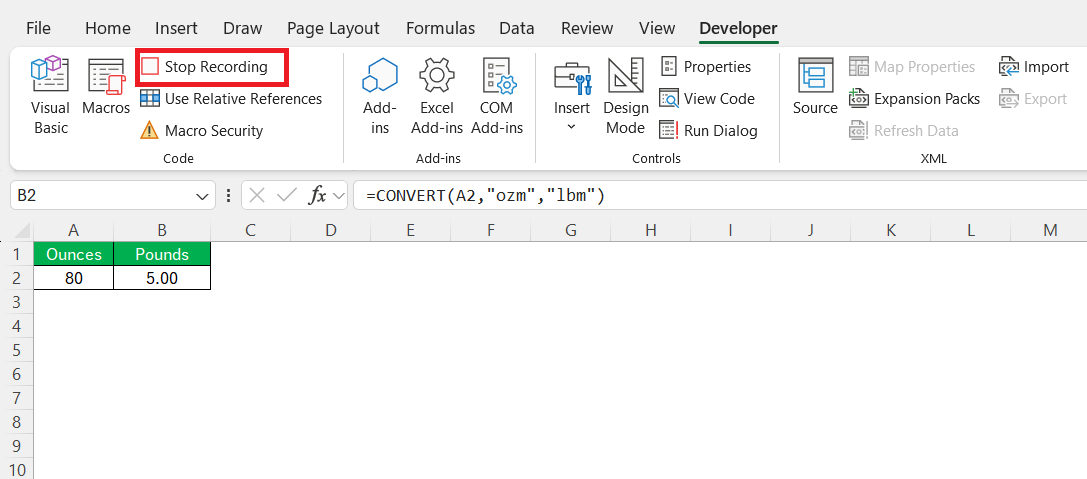
To use the CONVERT function accurately in Excel, follow these steps. Click on cell B2, where you want the converted weight in pounds to appear. Enter the formula =CONVERT(A2, "ozm", "lbm"). This formula instructs Excel to convert the value in cell A2 with the unit “ozm” (ounces) into “lbm” (pounds). Ensure that the units are typed correctly to avoid errors. Once you press Enter, Excel will automatically calculate and display the result, giving you the converted weight in B2.
This precise application of the CONVERT function allows us to handle unit transformations with ease and confidence.
Tips for Ensuring Formula Precision
Ensuring formula precision is crucial for accurate conversions in Excel. First, double-check the unit abbreviations; for ounces and pounds, use “ozm” and “lbm,” respectively. Next, verify that all cells used in your formulas contain the correct input values and avoid hidden spaces that can lead to errors.
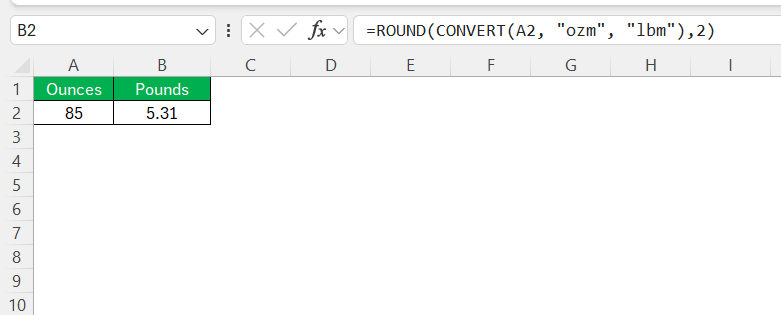
Additionally, consider using the ROUND function to manage decimal places for a cleaner, more precise output. Including ROUND(CONVERT(A2, "ozm", "lbm"), 2) will limit results to two decimal places, enhancing readability.
Finally, consistently review your formulas and conduct sample calculations as necessary to ensure data integrity throughout your spreadsheet.
Automating Weight Conversions in Excel
Creating a Macro for Quick and Easy Conversions
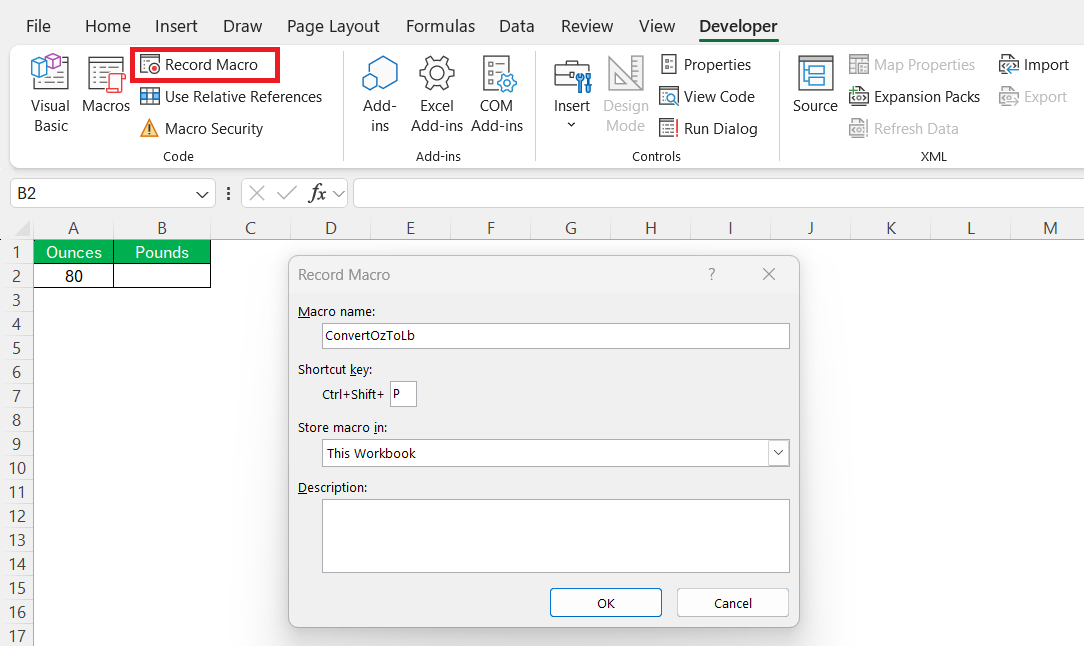
Creating a macro in Excel for quick conversions can significantly boost efficiency, especially when dealing with multiple data entries. Start by launching the Developer tab, which you can enable through Excel’s options if it isn’t visible. Select “Record Macro,” name it appropriately (e.g., “ConvertOzToLb”), and assign it a shortcut key for easy access.
With recording active, perform the conversion using the CONVERT function in any cell as described earlier. Stop recording once the conversion is complete.
This macro automates the conversion process, allowing us to execute it swiftly with just a key combination. It saves time and reduces manual input errors, making it ideal for repeated tasks or large datasets. If needed, you can edit the macro to refine its functionality by accessing it through the VBA editor, enhancing its application to suit specific needs.
Troubleshooting Common Errors
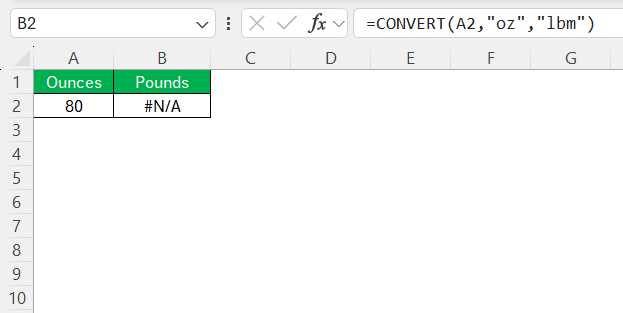
Troubleshooting errors in Excel, especially when converting units, starts with checking the formula syntax. Ensure that the CONVERT function’s unit codes are correct; “ozm” should be used for ounces and “lbm” for pounds.
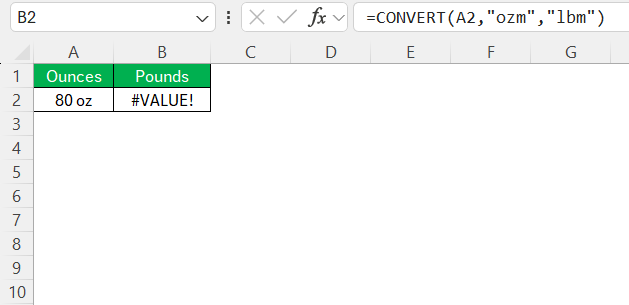
If the function returns an error, verify that the cells being referenced contain numeric values without any unwarranted characters.
A frequent issue might also involve Excel’s regional settings affecting decimal separators; ensure they are set to the expected standard in your setup. For persistent errors, reviewing Excel’s calculation options through the settings can help, ensuring they’re not inadvertently set to manual calculations. Always consult Excel’s formula error display for specific guidance, as this often provides clues to the root of the problem.
Practical Applications of Weight Conversion
Applications in Business Operations
Weight conversion plays a pivotal role in business operations across various industries. In inventory management, accurately converting ounces to pounds can influence product pricing, packaging, and shipping logistics. For retailers, it ensures consistent product descriptions and helps in maintaining compliance with standards that require precise weight information.
Additionally, manufacturing processes benefit from such conversions to maintain quality control, as many raw materials and products rely on exact weight measurements to avoid wastage and optimize production. By leveraging Excel’s capabilities for these conversions, we enhance productivity and reduce costly errors, ensuring smooth, efficient operations.
Benefits in Scientific Research
In scientific research, precise weight conversion is integral to experimental accuracy and result reliability. Researchers often need to convert ounces to pounds when dealing with measurements in varying units. This precision is crucial for experiments where small weight differences can significantly impact results and conclusions. Excel facilitates these conversions, enabling us to quickly calculate and manipulate large datasets.
Moreover, maintaining consistency in unit measurements ensures clear communication of findings across research papers and collaborations, where exactness is paramount. By using Excel, I contribute to a streamlined workflow, enhancing data analysis and reducing potential errors in studies.
FAQs
What is the correct formula to convert ounces to pounds in Excel?
The correct formula is =CONVERT(A2, “ozm”, “lbm”), where A2 holds the value in ounces. Excel will return the equivalent weight in pounds using this built-in function. Be sure to use the exact unit codes; otherwise, Excel will return a #N/A error. This formula is ideal for simple, one-time conversions or large batch conversions with structured data.
Why should I use Excel for weight conversions instead of a calculator?
Excel provides greater efficiency, especially when working with large datasets or repeating conversions. Instead of manually calculating each entry, Excel automates the process with formulas and functions. This reduces human error and ensures consistent output, making it more reliable than a calculator. Additionally, features like macros and conditional formatting offer advanced automation options.
What if my CONVERT function shows an error in Excel?
If the CONVERT function returns an error, first verify the syntax and unit codes. Ensure the cell you’re referencing contains a numeric value and is free of text or special characters. Also, check if your regional settings are affecting decimal formatting, such as using a comma instead of a period. Lastly, ensure calculation mode isn’t set to manual, which can prevent formulas from updating.
Can I apply the conversion formula to multiple cells at once?
Yes, you can apply the formula across a range of cells by dragging the fill handle after entering it in the first cell. Excel will automatically adjust the references if they are relative (like A2 to A3, A4, etc.). For larger datasets, using named ranges or structured tables enhances readability and control. This method streamlines mass conversions without rewriting formulas manually.
How do I create a macro for automatic ounce-to-pound conversions?
Enable the Developer tab, click “Record Macro,” and perform the conversion using the CONVERT formula. Stop the recording once done, and Excel will save the steps as a macro. You can then assign a shortcut key to this macro and use it anytime with just a keystroke. For more customization, you can edit the macro in the VBA editor to apply it across ranges or add error handling.
John Michaloudis is a former accountant and finance analyst at General Electric, a Microsoft MVP since 2020, an Amazon #1 bestselling author of 4 Microsoft Excel books and teacher of Microsoft Excel & Office over at his flagship MyExcelOnline Academy Online Course.

