In the world of health and fitness, tracking Body Mass Index (BMI) is crucial. It serves as a key indicator of whether one is in a healthy weight range. By leveraging Excel, I can efficiently manage BMI calculations, ensuring quick and accurate results. Through this guide, we’ll explore the step-by-step process to master the BMI formula in Excel, enhancing our ability to make informed health decisions.
Key Takeaways:
- BMI is a quick health indicator that relates weight to height for assessing potential health risks.
- Excel simplifies BMI tracking with formulas for both metric and USC units.
- Consistent units and correct formulas are vital to avoid errors in BMI calculations.
- IF formulas and charts in Excel help classify BMI and visualize health trends easily.
- VBA automation boosts efficiency when handling large BMI datasets in Excel.
Table of Contents
Demystifying the BMI Formula
Understanding BMI and Its Significance
Body Mass Index (BMI) is a widely used metric to determine whether an individual’s weight is appropriate for their height. It’s a useful screening tool that categorizes people into ranges such as underweight, normal weight, overweight, and obese. Understanding BMI is important because it can highlight potential health risks associated with excess body fat.
Although BMI doesn’t measure body fat directly, it correlates well with more direct measures, allowing quick assessments of health risks related to weight issues. For individuals and health professionals alike, monitoring BMI can inform lifestyle choices and medical interventions.
The Basic Formula Explained
The basic BMI formula is a simple mathematical calculation that uses a person’s weight and height to determine their body mass index. The formula is as follows:
- For the metric system, BMI is calculated by dividing a person’s weight in kilograms by the square of their height in meters (BMI = weight(kg) / height(m)^2).
- For the US Customary (USC) units, the formula adjusts slightly: BMI is calculated by dividing the weight in pounds by the square of height in inches, and then multiplying the result by 703 (BMI = (weight(lb) / height(in)^2) * 703).
This formula provides a numerical value that helps categorize an individual’s weight in relation to their height, offering a quick snapshot of potential weight-related health issues.
Setting Up Excel for BMI Calculation
Preparing Your Spreadsheet
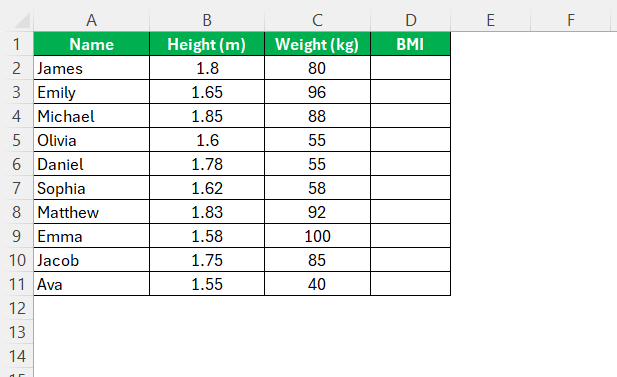
To accurately calculate BMI in Excel, it’s essential to set up the spreadsheet correctly. Start by opening a new Excel document and labeling the necessary columns for easy reference. Typically, you will need columns for “Name,” “Height (m or in),” “Weight (kg or lb),” and “BMI.”
In the “Height” and “Weight” columns, you’ll input each individual’s data. Make sure the units are consistent with the formula you intend to use—kilograms and meters for the metric system, or pounds and inches for USC units. Next, create a column for the BMI calculation where you’ll enter the formula relevant to the unit system being used, ensuring that it’s error-free and logical.
Proper preparation of your spreadsheet is crucial for accurate and automated BMI calculations.
Common Mistakes to Avoid
When calculating BMI in Excel, it’s essential to avoid common pitfalls that can lead to inaccurate results. One frequent error is mixing measurement units, such as mistakenly using kilograms with inches or pounds with meters. This inconsistency can skew results significantly. Another mistake involves incorrect formula application; ensure the formula is entered correctly, particularly the proper placement of parentheses for accurate calculations.
Additionally, watch out for incorrect cell references, which can occur if cells are not locked when copying formulas across the spreadsheet. Lastly, avoid data entry errors by double-checking all inputs for accuracy. By keeping these common mistakes in mind, you’ll enhance the reliability of your BMI calculations in Excel.
Step-by-Step Guide to BMI Calculation in Excel
Using the Metric System
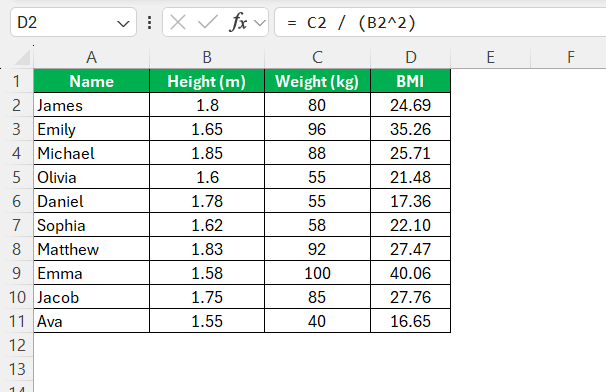
Calculating BMI using the metric system in Excel is straightforward, provided the data is accurately input. First, ensure that your spreadsheet is set up with columns for the necessary data: “Height (m),” “Weight (kg),” and “BMI.” Enter each person’s height in meters and weight in kilograms into their respective columns.
In the “BMI” column, you will input the formula that calculates the BMI using the metric system:
= [Weight (kg) cell reference] / ([Height (m) cell reference]^2)
For example, if the weight is in cell B2 and the height is in cell C2, the formula should be:
= C2 / (B2^2)
This formula divides the weight by the square of the height. Once entered, you can drag the formula down the column to apply it to multiple entries. Remember to check your inputs for accuracy to ensure the correctness of the BMI values calculated. By following these steps, you can efficiently calculate BMI using the metric system in Excel.
Calculating with USC Units
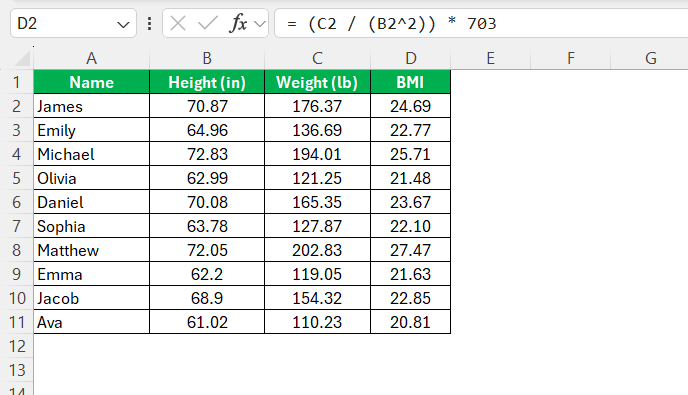
For users preferring the US Customary (USC) units in Excel, calculating BMI requires slight modifications to the formula. Start by preparing your spreadsheet with columns labeled “Height (in),” “Weight (lb),” and “BMI.” Input the individuals’ height in inches and weight in pounds into the appropriate columns.
To calculate BMI using USC units, use the following formula:
= ([Weight (lb) cell reference] / ([Height (in) cell reference]^2)) * 703
For instance, if the weight is in cell B2 and the height in cell C2, the formula should look like this:
= (C2 / (B2^2)) * 703
This formula takes the weight divided by the square of the height and multiplies the result by 703 to adjust for the units. After entering the formula, use it across multiple records by dragging it down through the column. This straightforward approach ensures you get accurate BMI calculations using USC units.
Utilizing IF Formulae for BMI Classification
To enhance the functionality of your BMI calculations in Excel, you can use IF formulae to classify BMI results into categories such as underweight, normal weight, overweight, and obese. Once you’ve calculated BMI values in a designated column, create another column titled “BMI Category” or similar.
In this column, apply the IF formula to classify the BMI value. For example, use the following nested IF formula:
=IF(D2<18.5, "Underweight", IF(D2<24.9, "Normal weight", IF(D2<29.9, "Overweight", "Obese")))
Replace D2
with the cell reference containing the BMI value. This formula checks the BMI value and assigns a corresponding category based on conventional BMI classifications:
- Less than 18.5 is labeled as “Underweight.”
- Between 18.5 and 24.9 is deemed “Normal weight.”
- Between 25 and 29.9 is “Overweight.”
- 30 and above is classified as “Obese.”
Implementing these logical tests allows you to automate the classification process, making it easy to interpret BMI data efficiently. This approach transforms a simple numerical value into meaningful health insights with just a few steps in Excel.
Automate Calculations with VBA Code
Automating BMI calculations with VBA (Visual Basic for Applications) in Excel can significantly streamline the process, especially when dealing with large datasets. VBA enables customization and automation, enhancing efficiency by reducing repetitive tasks. Here’s a step-by-step approach to setting up VBA for BMI calculations:
STEP 1: Press Alt + F11
to open the VBA editor in Excel. This environment allows you to write and manage your VBA code.
STEP 2: In the editor, go to Insert > Module
to create a new module, which is where your BMI calculation code will reside.
STEP 3: Here’s a simple script to calculate BMI using metric units:
Sub CalculateBMI() Dim i As Integer Dim lastRow As Integer lastRow = Cells(Rows.Count, "B").End(xlUp).Row For i = 2 To lastRow If Cells(i, 2).Value &gt; 0 And Cells(i, 3).Value &gt; 0 Then Cells(i, 4).Value = Cells(i, 3).Value / (Cells(i, 2).Value ^ 2) Else Cells(i, 4).Value = "Invalid" End If Next i End Sub
This code assumes your spreadsheet has “Height (m)” in column B, “Weight (kg)” in column C, and outputs the “BMI” in column D. It loops through each row, calculates BMI if both height and weight values are valid, and marks the entry as “Invalid” if not.
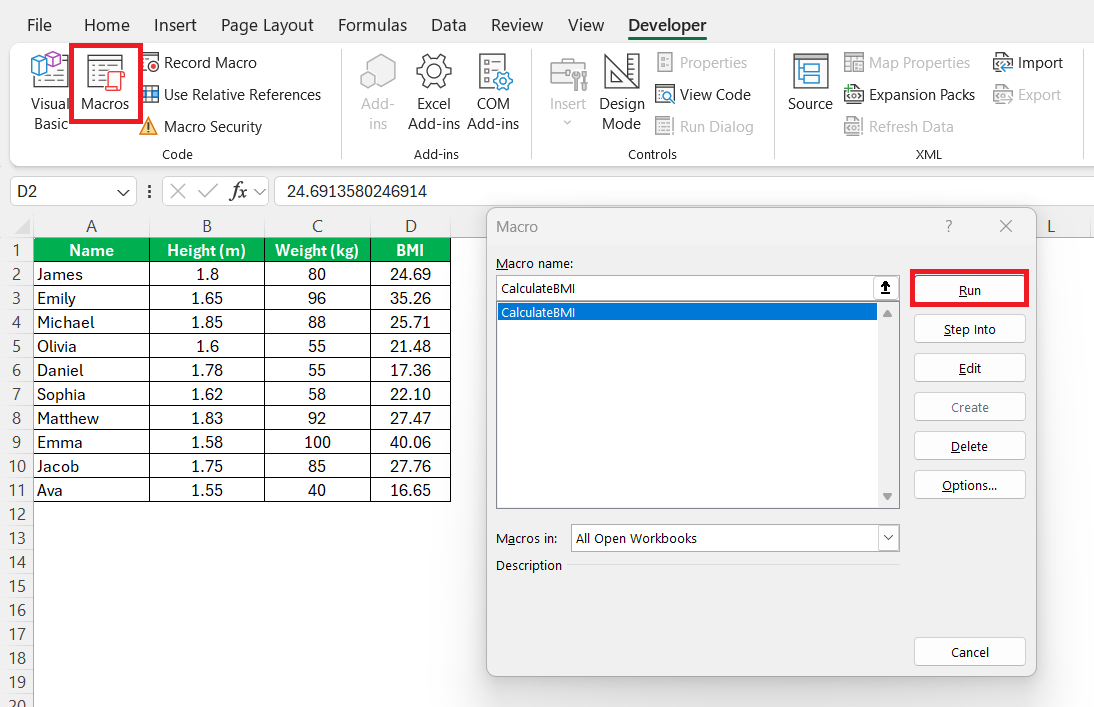
STEP 4: Save your code and return to Excel. Run the macro by pressing Alt + F8
, selecting CalculateBMI
, and clicking Run
. This action executes the calculation across all applicable rows.
VBA automation ensures consistent and rapid calculations, minimizing error potential during manual entry. It’s an excellent step for users looking to optimize their Excel workflow, especially when managing extensive data sets over time.
Practical Applications and Examples
Case Studies of BMI Analysis
BMI analysis using Excel drives decisions across healthcare, corporate, and public sectors.
- Healthcare: Hospitals use Excel and PivotTables to track patient BMI trends, leading to wellness programs that reduce obesity-related issues.
- Corporate: Companies analyze employee BMI via dashboards to improve wellness initiatives, boosting productivity and reducing absenteeism.
- Public Health: Agencies map regional BMI data in Excel to launch targeted fitness campaigns, showing measurable drops in obesity rates.
These examples highlight how Excel-powered BMI insights can improve health, efficiency, and community outcomes.
Real-world Usage Scenarios
BMI calculations in Excel are widely used across industries:
- Schools: Track student health trends to tailor education and wellness programs.
- Fitness Centers: Trainers monitor client progress and customize workout plans using Excel reports.
- Insurance: Underwriters assess health risks and set premiums by analyzing BMI data in spreadsheets.
- Workplaces: Employers evaluate wellness programs by spotting health patterns, leading to initiatives like gym memberships.
These scenarios show how Excel transforms BMI data into actionable strategies for better health and operational gains.
FAQs
What is body mass index & why is it important?
Body Mass Index (BMI) is a numerical value derived from an individual’s weight and height, providing a quick assessment of whether one’s weight falls within a healthy range. It’s important because it highlights potential health risks related to being underweight or overweight, aiding in the early identification of conditions such as obesity or malnutrition. This makes BMI a valuable tool for individuals and healthcare providers to monitor and promote optimal health.
How to calculate the BMI formula?
To calculate BMI in Excel using metric units, use the formula:
= Weight (kg) / (Height (m) ^ 2)
Simply input weight in kilograms and height in meters into their respective columns. This formula will instantly provide the BMI value, which can then be copied down for multiple entries.
How can I convert BMI calculations between metric and USC units?
Yes, you can automate BMI calculations using VBA (Visual Basic for Applications). A simple macro can loop through your data, calculate BMI, and even handle invalid entries. This saves time, reduces manual errors, and is ideal when working with hundreds or thousands of records.
How can I classify BMI results automatically in Excel?
Use a nested IF formula to classify BMI values into categories like Underweight, Normal, Overweight, or Obese. For example:
=IF(B2<18.5,"Underweight",IF(B2<24.9,"Normal",IF(B2<29.9,"Overweight","Obese")))
This allows instant categorization based on BMI thresholds, making your data more insightful.
How can charts improve BMI analysis in Excel?
Charts make BMI data visually clear by showing trends, distributions, and categories at a glance. Bar charts can display how many individuals fall into each BMI group, while pie charts highlight proportions. Visuals not only enhance understanding but also make reports more engaging and easier to present.
John Michaloudis is a former accountant and finance analyst at General Electric, a Microsoft MVP since 2020, an Amazon #1 bestselling author of 4 Microsoft Excel books and teacher of Microsoft Excel & Office over at his flagship MyExcelOnline Academy Online Course.