
Key Takeaways
- Utilize simple formulas by multiplying the number of weeks by 7 and then adding to the original date cell (e.g., =A2+3*7 to add 3 weeks).
- For subtracting weeks, adjust the formula to subtract the total number of days (e.g., =A2()-2*7 to subtract 2 weeks).
- Leverage Excel’s fill handle feature to apply the addition or subtraction formula across multiple cells efficiently.
- Use the Fill Series option to autofill a series of dates in Excel.
Download the Excel Workbook and follow along with the tutorial on How to Add N Weeks in Excel – Download excel workbookAdd-N-weeks-in-Excel.xlsx
Table of Contents
Introduction to Excel Date Shortcuts
The Importance of Efficient Date Calculations in Excel
Handling dates efficiently in Excel is not just about mere data entry; it’s about streamlining your workflows, ensuring accuracy in reporting, and saving time. Dates and times serve as the backbone for many professionals’ datasets, from financial analysts to project managers. Mastering Excel’s date shortcuts allows you to perform complex date calculations with minimal effort, paving the way for improved productivity.
Overview of Adding and Subtracting Weeks Using Shortcuts
Getting comfortable with shortcuts for adding and subtracting weeks in Excel can make your life much easier, especially when managing schedules or timelines. With a few quick keystrokes, you can push a project deadline forward, look back at historical data, or plan future events with precision. The ability to quickly manipulate dates ensures that your spreadsheets remain dynamic and adaptable to changes that may occur.
Quick Methods to Add Weeks to a Date
Using Simple Formulas to Add N Weeks
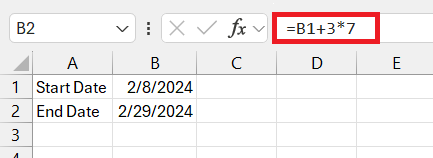
To swiftly add weeks to a date in Excel, you’ll rely on simple arithmetic formulas. The concept is straightforward: since a week always consists of 7 days, simply multiply the number of weeks you want to add by 7, and add that to your original date. For example, to add 3 weeks to the date in cell B1, use the formula =B1+3*7. It’s an easy yet powerful trick to project dates into the future without complications.
Benefits:
- Saves time with fast computations
- Increases accuracy in date management
- Enhances productivity in planning phases
- Simplifies project scheduling
- Eliminates the need for manual counting of days
Cons:
- Not a dedicated date function, so can cause confusion for beginners
- May require additional formatting for proper date display
The Fill Handle – Your Tool for Rapid Date Addition
The Fill Handle in Excel is a potent tool for quickly adding weeks to a given date. This feature offers a drag-and-drop approach to extend a series of dates just by dragging the cell corner. To add weeks using the Fill Handle, enter a start date in a cell and a date one week later in an adjacent cell. Then, select both dates and drag the corner of the selection box downward or to the side. Excel intelligently fills in the following dates in weekly increments. It’s a simple and effective way to populate a column or row with consecutive dates.
Benefits:
- Greatly reduces the time for entering sequential dates
- Eliminates manual calculation errors
- User-friendly for individuals at any skill level
- Efficient for creating timelines and schedules
- Seamless integration into Excel’s workflow
Cons:
- Can inadvertently create incorrect patterns if not set up properly
- May not work as expected with more complex date intervals
Excel’s Hidden Gems for Date Calculations
The EDATE Function Explored
Amidst the arsenal of date functions in Excel, the EDATE function stands out for its simplicity and laser focus on manipulating months. While weeks are not the primary unit of this function, knowing the intricacies of EDATE can still enhance your date calculation prowess.
The EDATE function is straightforward:
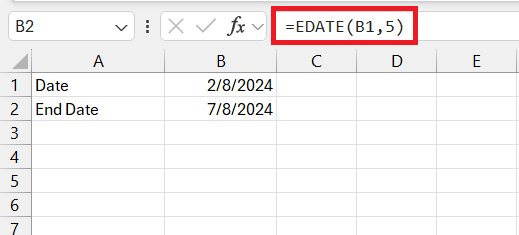
=EDATE(start_date, months)
This function rolls the calendar precisely the number of months forward (positive value) or backward (negative value) from the start_date. While it’s built around months, you can repurpose EDATE for week adjustments by converting weeks into months.
- Determine the number of weeks you need to adjust.
- Convert these weeks into approximate months (consider 4 weeks as a rough month).
- Use the converted value in the EDATE function.
For example, if you’re looking to project 20 weeks into the future, you might approximate this to about 5 months, and use the EDATE formula accordingly.
Remember, EDATE is especially helpful for monthly cycles or billing periods and can serve as a complementary function when combined with other date functions to manage weekly calculations.
Subtracting Weeks with a Few Keystrokes
Crafting Formulas to Subtract Weeks from a Given Date
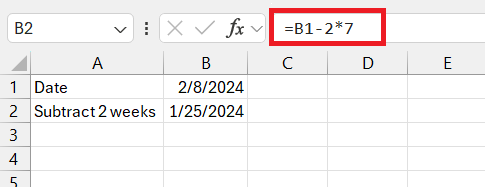
When the need arises to move dates backward, Excel has you covered just as efficiently. To subtract weeks from a date, you’ll craft formulas quite similar to those used for addition, only this time, you’ll subtract the total number of days equivalent to the weeks you wish to go back. For instance, if you’d like to subtract 2 weeks from a date in cell B1, your formula would be =B1-2*7. It’s a quick solution for recalculating deadlines, revisiting past events, or adjusting timelines in the blink of an eye.
Benefits:
- Streamlines backward scheduling
- Assists in historical data analysis
- Maintains accuracy and consistency in records
- Aids in forecasting and planning
- Reduces the complexity of date manipulation in Excel
Cons:
- If mishandled, can result in negative date values
- Requires extra attention to ensure correct historical date formatting
Utilizing Series Filling to Move Backwards in Time
Reverse time travel in Excel is possible through the clever use of Series Filling. This feature mimics the Fill Handle, but it’s specifically designed for subtracting time. Follow the steps below to use the Series option to move backward in time –
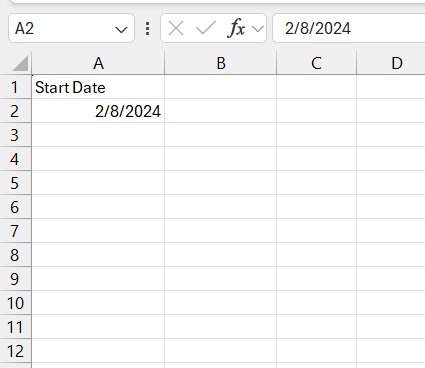
STEP 1: Enter your starting date in one cell.
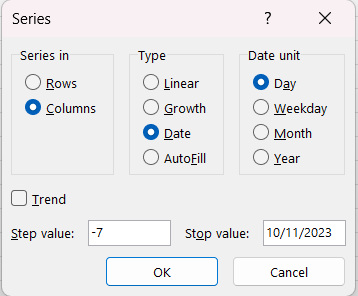
STEP 2: Highlight the cell go to the ‘Home’ tab, select ‘Fill,’ and then choose ‘Series.
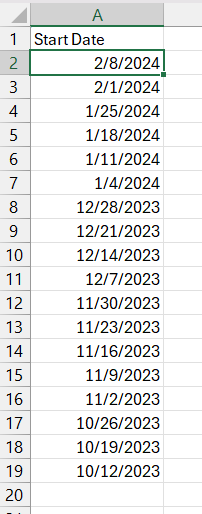
STEP 3: In the ‘Series’ dialog, pick ‘Rows,’ enter a step value of -7 to signify the weekly decrement, enter type as Date, Daye unit as Day, and Stop Value as 10/11/2023 and hit OK.
Excel will automatically fill in the preceding weeks, letting you quickly navigate back to past dates without cumbersome calculations.
Benefits:
- Saves significant amounts of time in data preparation
- Enhances the accuracy of backdated periods
- Provides a visual method of date subtraction
- Flexible for a variety of historical data tasks
- Enhances your Excel efficiency repertoire
Cons:
- Might be less intuitive for new Excel users
- Requires a couple of extra clicks compared to using basic formulas
Advanced Tips and Tricks for Handling Weeks in Excel
When adding weeks to dates in Excel, consider these tips and tricks to streamline the process:
- Use a simple addition formula: To add n weeks to a date, multiply the number of weeks (n) by 7 to get the number of days, and then add that to the original date (e.g., `=A2+n*7`).
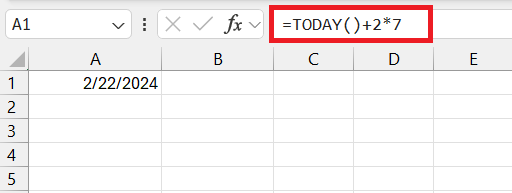
- Leverage the TODAY() function to add weeks to the current date: If you need to work from today’s date, use `=TODAY()+n*7′.
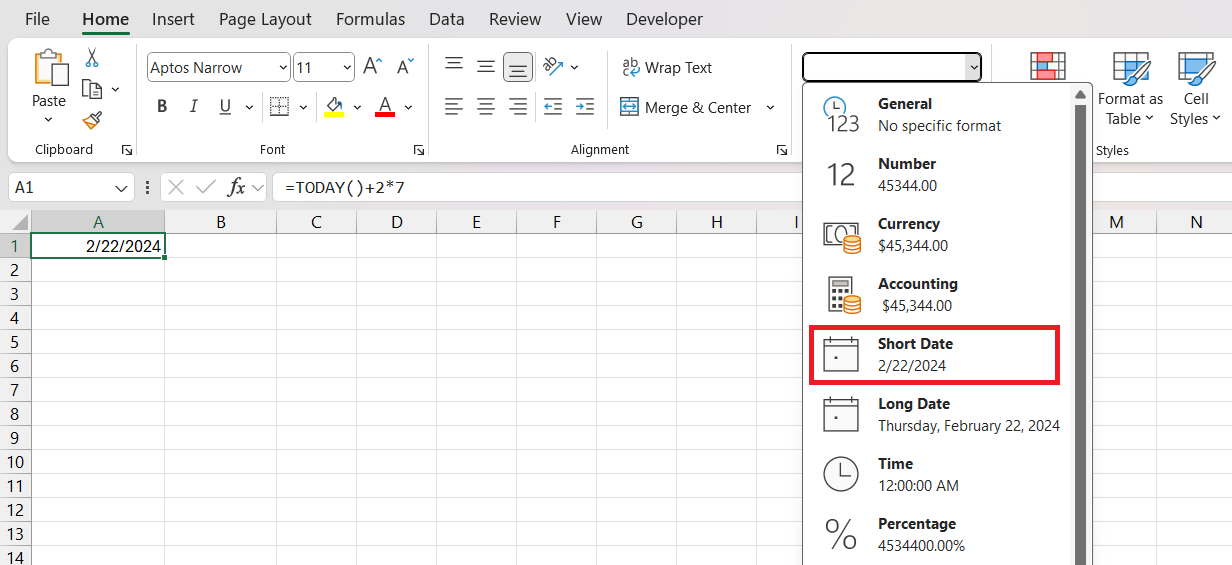
- Ensure the cell format is set to Date: Remember to ensure correct cell formatting in Excel for dates, you can do this by choosing your desired date format under the ‘Home’ tab.
- Use the Fill Handle to quickly apply the same operation to multiple cells: Enter your formula in the first cell and then drag the Fill Handle down or across to fill other cells with the formula.
- Remember Excel’s date limitation: Excel’s date system begins on January 1, 1900. Ensure your dates fall within the valid range for Excel’s date system (January 1, 1900, to December 31, 9999 for Windows).
Real-world Application: Planning and Project Management
Forecasting Deadlines by Adding Weeks
Forecasting deadlines by adding weeks in Excel lets project managers and team members alike visualize future milestones with ease. Whether you’re setting goals for a marketing campaign or estimating the completion date for a construction project, adding weeks to your starting date can align your team’s expectations and help in pacing the project efficiently. Simply input your start date, use a formula like =START_DATE + (N weeks * 7), and voilà, you’ve got your forecasted deadlines laid out.
Reviewing Past Data by Subtracting Weeks
Reviewing past data by subtracting weeks allows analysts and managers to look back over completed phases of projects, to assess performance over previous cycles, or to compare current data with historical data. Subtraction of weeks can reveal trends, patterns, and insights that are invaluable for informed decision-making. This backdating technique, a simple formula like =REFERENCE_DATE - (N weeks * 7), helps you navigate through historical data with ease, making temporal comparisons a breeze.
Conclusion
In conclusion, mastering Excel’s date shortcuts empowers users to efficiently manage timelines, forecast deadlines, and analyze historical data with precision. The variety of methods discussed, from basic formulas to advanced techniques, provides a comprehensive toolkit for professionals seeking to optimize their Excel date manipulation skills. Whether you’re a beginner or an experienced user, incorporating these strategies will undoubtedly enhance your efficiency in handling dates within Excel.
FAQ: Harnessing the Full Potential of Excel’s Date Features
How do I add 13 weeks to a date in Excel?
To add 13 weeks to a date in Excel, type the original date into a cell, then in a new cell write the formula =ORIGINAL_DATE + (13*7). Press Enter, and the cell will display the date that is exactly 13 weeks after the original date. Make sure the cell with the formula is formatted as a date.
How do you calculate N weeks from today in Excel?
To calculate weeks from today’s date in Excel, enter =TODAY() + (N*7) in a cell, replacing ‘N’ with the number of weeks you want to add. To subtract weeks, use =TODAY() - (N*7). This will give you the date that falls N weeks from today. Always ensure the cell is set to a date format for clarity.
Why do my results appear as numbers instead of dates?
If your results appear as numbers instead of dates, it’s likely because Excel is formatting the cell as a number or general format. To fix this, select the cell, go to ‘Home’, click on the ‘Number’ group, and choose the ‘Date’ format. This will convert the serial number to a recognizable date format in Excel.
What is the formula for 3 weeks from a date in Excel?
For 3 weeks from a given date in Excel, use the formula =DATE_REFERENCE + (3*7), where DATE_REFERENCE is the cell containing the start date. Ensure the resulting cell’s format is set to display dates correctly. This formula calculates the date that falls 3 weeks from the start date specified.
John Michaloudis is a former accountant and finance analyst at General Electric, a Microsoft MVP since 2020, an Amazon #1 bestselling author of 4 Microsoft Excel books and teacher of Microsoft Excel & Office over at his flagship MyExcelOnline Academy Online Course.

