
This article explores the calculation of how many days is 2 months using Microsoft Excel. Discover time-saving Excel tricks for easy day counting, blending calendar, and calculator features. Ideal for project managers and finance professionals, these tricks enhance efficiency and precision in Excel.
Key Takeaways
- Excel allows for an accurate calculation of the days spanning exactly two months, considering all peculiarities like leap years and months of varying lengths.
- Understanding the Day Equivalent of Months is Crucial. It unlocks the ability to accurately plan schedules and financial forecasts, ensuring precision in project timelines and fiscal calculations.
- DATEDIF Function offers a straightforward method to calculate the duration between two dates in years, months, or days, serving as an essential tool for various time-sensitive assessments.
- By identifying the last day of any given month with precision, EOMONTH aids in setting up deadlines, invoicing cycles, and project milestones effectively.
Table of Contents
Introduction
Unveiling the Time-Saving Excel Tricks for Day Count
Welcome to the intersection of calendars and calculators! Excel, your versatile digital assistant, is about to unveil some impressive time-saving tricks that will make counting days look like a cakewalk. Whether you’re a project manager with deadlines looming or a finance aficionado crunching numbers, be ready to harness the real power of Excel’s date functions!
Why Knowing the Day Equivalent of Months Matters
Understanding the day equivalent of months is like having a secret key to unlock schedules and financial forecasts—it’s essential for precision in planning and fiscal calculations. Whether you’re calculating interest for a loan over a two-month period or estimating the time needed to complete a phase of a project, knowing exactly how many days you have can make all the difference.
It helps in setting realistic deadlines, and allocating resources efficiently, and can save you from the all-too-common pitfall of underestimating time requirements.
Understanding Excel’s Date and Time Functions
The Role of DATEDIF in Calculating Durations
DATEDIF stands as one of Excel’s hidden gems, functioning as a time-traveling device for your data. This function is your go-to when you need to calculate the duration between two distinct dates. Perhaps you’re curious about an employee’s tenure, or you’re measuring the time since a project kicked off; DATEDIF stealthily computes the difference in years, months, or days without breaking a sweat.
Consider this function as your arithmetic timekeeper, diligently keeping track of the passing days, months, and years between any two calendar dates you pitch against each other—a truly invaluable tool for time-sensitive calculations.
Harnessing EOMONTH for Month-End Calculations
Harnessing the power of the EOMONTH function can be your secret weapon for managing month-end magic. By pinpointing the last day of the month with a wizard-like precision, EOMONTH serves a multitude of purposes—be it setting expiration dates, invoicing cycles, or ensuring your project milestones align with month-end close-ups. You just feed it any date, and, like pulling a rabbit out of a hat, it reveals the finale date of that month.
And remember, if you’re planning ahead or revisiting past months, you can easily travel forwards or backwards in time by tweaking the function’s parameters.
Crafting the 2-Month Day Count Formula
Step-by-Step Guide to the Magic Formula
Ready to craft your two-month day count spell in Excel? Follow these steps:
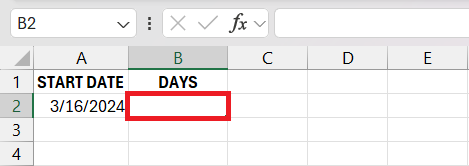
STEP 1: Select the cell where you want the day count displayed.
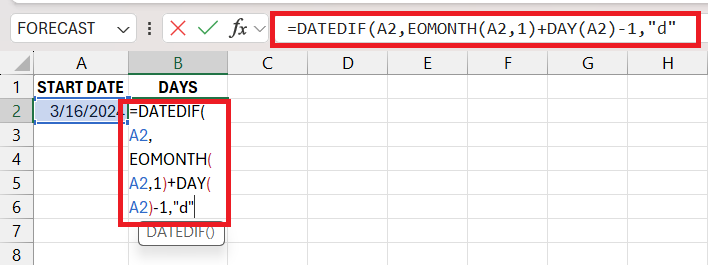
STEP 2: Begin your formula with =DATEDIF( and select or type in your start date cell reference.
STEP 3: Add a comma, then use the EOMONTH function alongside your start date and a ‘2’ to move two months ahead, EOMONTH(start_date,1)+DAY(start_date)-1.
STEP 4: Close the EOMONTH function and add the unit “d” for days in quotes, followed by another comma.
STEP 5: Close off your DATEDIF function with a parenthesis ). Hit Enter and behold the number of days spanning exactly two months from your start date.
Your complete formula will look like this: =DATEDIF(start_date,EOMONTH(start_date,1)+DAY(start_date)-1,"d").
This method ensures you’re not just multiplying by an average month length but are accurately capturing the specific days in each month, including any peculiarities with leap years or 30 and 31-day months.
Advanced Tweaks for Precise Results
To fine-tune your formula for even more precise results beyond the two-month scenario, you can employ some advanced Excel sorcery:
- Adjust for Business Days: Swap
DATEDIFforNETWORKDAYSorNETWORKDAYS.INTLif you wish to exclude weekends and holidays from your day count.
- Get Specific: Include a
DAYfunction to adjust your end date in theEOMONTHcalculation to count exact days of the month. - Factor in Leap Years: For longer spans, incorporate a leap year check by adding a conditional clause that adjusts for February 29th when it occurs.
Remember, every dataset has its unique quirks, and these tweaks ensure your formula stays robust, whatever the calendar throws at it.
Real-World Applications
Project Planning and Deadline Management
For the project maestros and deadline wranglers out there, the importance of precise date calculations in Excel cannot be overstated. In project planning, the ability to determine the exact number of days in a given timeframe ensures a seamless workflow and helps prevent scheduling conflicts. This becomes especially critical when coordinating multiple projects with overlapping resources.
Meanwhile, in deadline management, knowing the day count facilitates setting clear, achievable milestones for team members. It allows for agile adjustments along the project timeline, helping to accommodate any project scope changes or unexpected delays without compromising the overall delivery dates.
Financial Calculations and Interest Forecasts
Excel also proves to be a staunch ally in the realm of finance: precise day counts afford treasury minds the clarity needed for interest and cash flow forecasts. Calculating the correct number of days between payments affects accrued interest on loans and investments, directly impacting financial statements and profitability analysis.
For financial wizards dealing with instruments like bonds or term deposits, these calculations ensure adherence to market conventions and accurate yield estimations. Furthermore, investors can plan fund allocations and expected returns by having a clear forecast of interest accrual periods.
Troubleshooting Common Hurdles
Dealing with Leap Years and Irregular Months
Leap Years and the irregular lengths of months pose a unique challenge in Excel calculations. Here’s how to tackle them:
- Leap Years: Remember to factor in the extra day in February when working with date ranges that span this month. Excel functions recognize leap years, so using
DATEorEOMONTHcan automatically adjust for February 29th. - Irregular Months: Using
EOMONTHensures you don’t have to count the days individually for 30 or 31-day months, and it will consider the 28 or 29 days in February.
This is particularly important when working with fiscal periods, insurance policies, or any contract-based calculations where every single day can influence the outcome.
Handling Holidays and Non-Working Days
Calculating workdays while steering clear of holidays and non-working days is crucial for realistic timeline planning. Excel steps up with NETWORKDAYS or NETWORKDAYS.INTL to easily exclude weekends and custom-defined holidays. Here’s how to use them:
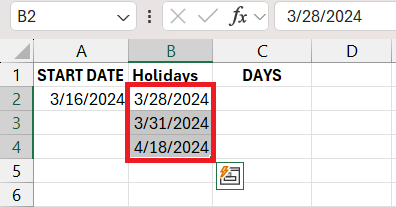
STEP 1: Define a list of holidays in a range of cells.
STEP 2: Use the formula =NETWORKDAYS(start_date, end_date, holidays) to count only business days.
STEP 3: For non-standard weekends, opt for =NETWORKDAYS.INTL(start_date, end_date, weekend_days, holidays) and specify your weekend if you want to.
By tailoring your formulas this way, you ensure that project timelines and due dates account for the real-world ebb and flow of work schedules.
Streamlining Your Calculations with Excel Shortcuts
Keyboard Shortcuts for Speedier Date Entry
Time spent navigating Excel can be just as valuable as the data crunched within its cells. To streamline your date entry, here’s a couple of keystrokes worth memorizing:
- To enter today’s date quickly, press
Ctrl + ;(semicolon). - To enter the current time, use
Ctrl + Shift + ;.
These keyboard shortcuts can shave precious seconds off repetitive tasks, helping maintain your focus on the analysis rather than the input.
Quick Access Toolbar Customizations
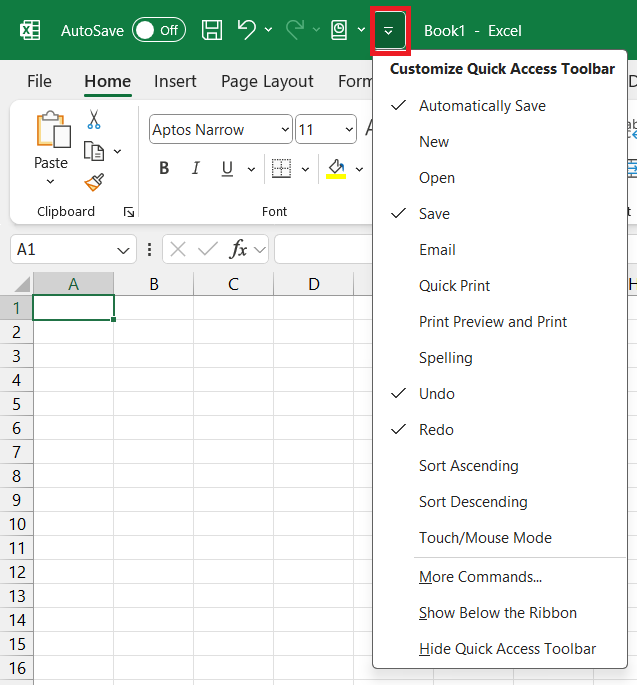
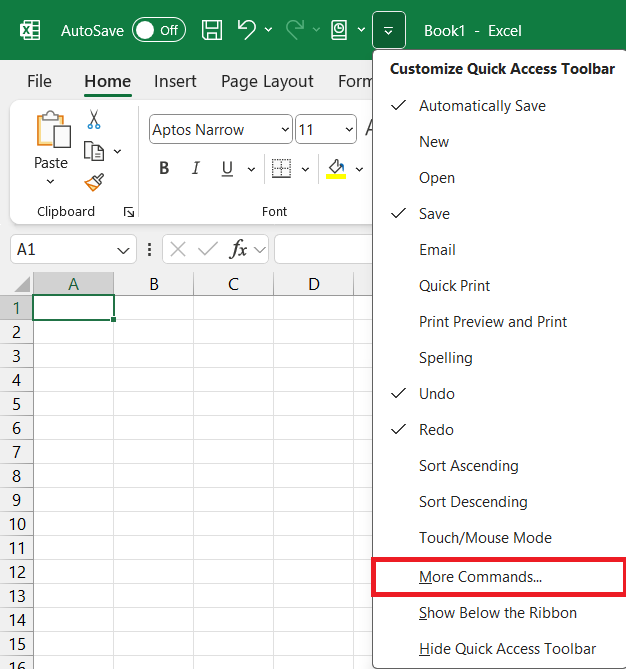
The Quick Access Toolbar in Excel is the command post that welcomes your most-used functions. Personalize it for date calculations by adding shortcuts like the “Format Cells” dialog or the “Fill Series” command for rapid date series creation.
Adjusting the toolbar to fit your workflow can dramatically cut down the number of clicks per task, elevating your efficiency to expert levels.
STEP 1: Click on the dropdown arrow on the Quick Access Toolbar.
STEP 2: Select “More Commands…”.
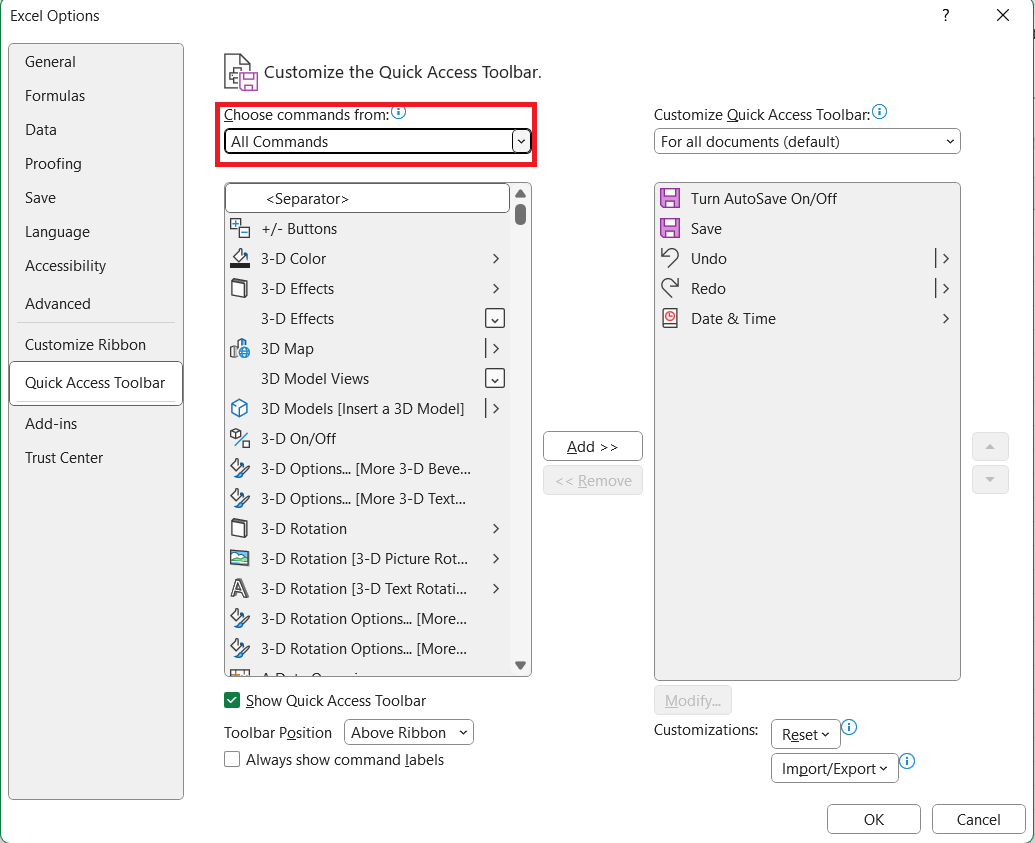
STEP 3: In the “Choose commands from” dropdown, select “All Commands”.
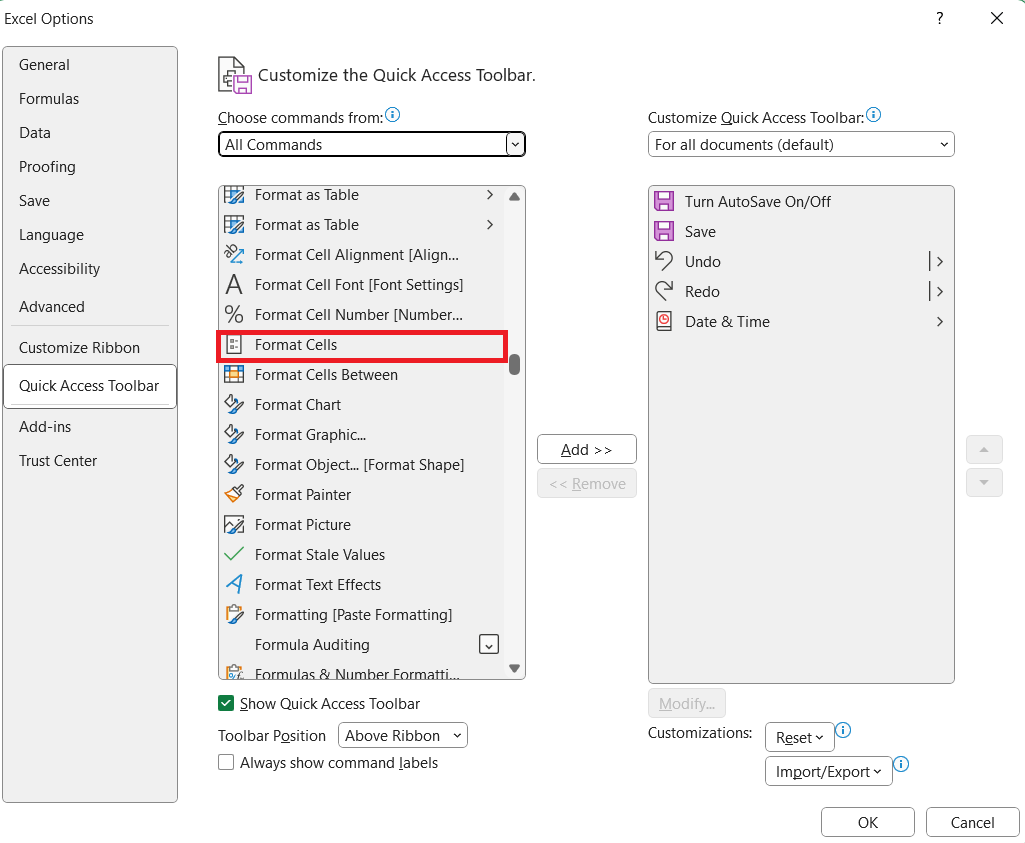
STEP 4: Scroll and select “Format Cells” or other date-related commands.
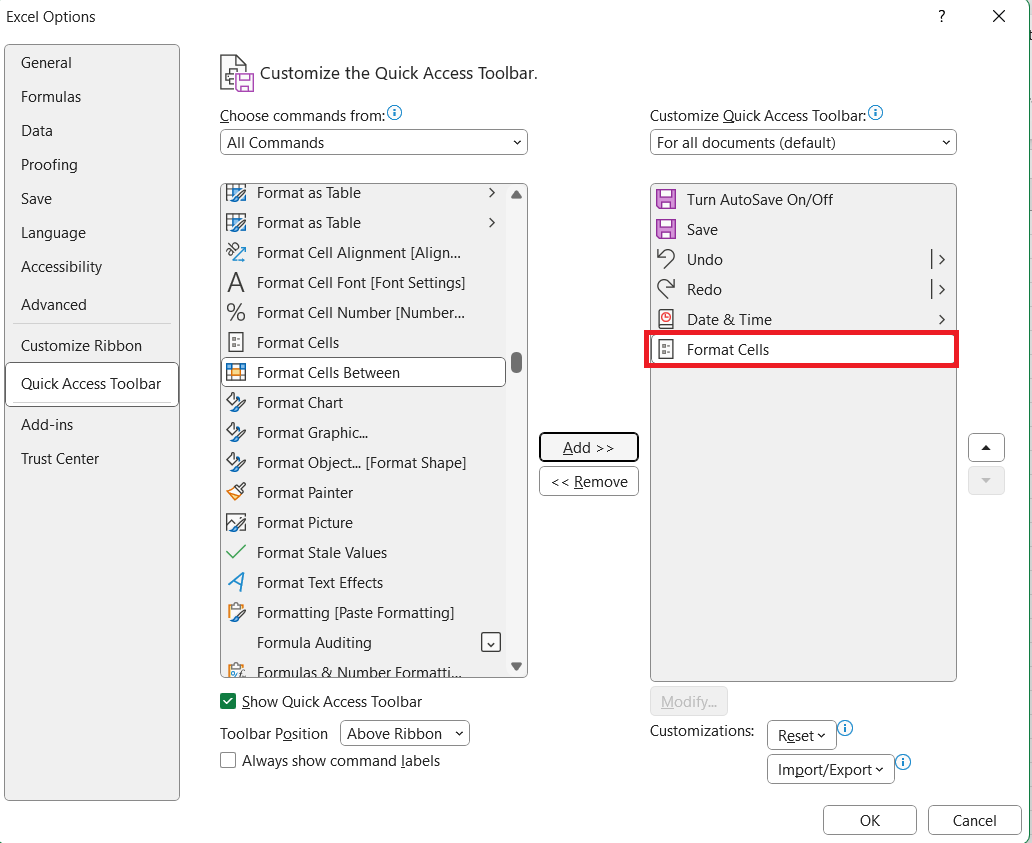
STEP 5: Click “Add >>” to include them in your toolbar.
Customize it once, and save countless clicks every day!
FAQs
What is the DATEDIF Function Used For?
The DATEDIF function calculates the time difference between two dates. You can determine the number of days, months, or years, making it handy for tracking project timelines, employee tenure, or even personal milestones like anniversaries.
[Include a small table showing an example of DATEDIF being utilized for various date difference calculations.]
How Does One Account for Leap Years When Calculating Days?
To account for leap years in Excel, use functions like DATE or YEARFRAC since they automatically adjust for February 29th. Ensure your date range includes the leap day for accurate calculations.
[Include a simple formula example illustrating the adjustment for leap years.]
How do you calculate 2 months from a date in Excel?
Use =EDATE(start_date, 2) to calculate 2 months from a date in Excel, where “start_date” is the cell containing the original date.
[Include a visual or table showcasing the EDATE function in use.]
How do I count days between dates in Excel?
To count days between dates, subtract the start date from the end date =(end_date - start_date) in Excel. The result is the number of days between the two.
[Insert a screenshot showing two different dates with the formula yielding the days between them.]
How do you calculate how many days are in a month?
Use =DAY(EOMONTH(date, 0)) to calculate the number of days in a month, where “date” is any date within the intended month.
[Present a visual aid demonstrating the use of this formula across different months, highlighting varying day counts.]


John Michaloudis is a former accountant and finance analyst at General Electric, a Microsoft MVP since 2020, an Amazon #1 bestselling author of 4 Microsoft Excel books and teacher of Microsoft Excel & Office over at his flagship MyExcelOnline Academy Online Course.


