
Unveil the magic of Microsoft Excel dates and unlock the power of date arithmetic. Excel, the modern-day sorcerer’s stone for number manipulation, offers a world of possibilities when it comes to handling dates. Dive into the enchanting realm of Excel’s date functions to master precise calculations and streamline your data management.
Key Takeaways:
- Understanding Excel’s Date System: Excel converts dates into serial numbers, making arithmetic operations effortless and precise.
- Mastering Date Calculations for Enhanced Skills: Proficiency in date arithmetic elevates your Excel skills, enabling accurate projections and strategic decision-making.
- Advanced Techniques with DATEDIF: Explore the DATEDIF function to precisely calculate the difference between two dates in years, months, and days, tailored to your specific needs.
- Simplified Methods for Swift Results: Learn simple subtraction methods and specialized functions like NETWORKDAYS to calculate workdays, excluding weekends and holidays, with ease.
Table of Contents
Unveiling the Magic of Excel Dates
The Essentials of Date Arithmetic in Excel
Ah, Excel—the modern-day magic wand for anyone looking to juggle with numbers or dates effectively! When you’re knee-deep in data, understanding how Excel sees dates is crucial. Dates are fairy dust turned into serial numbers starting on the enchanting date of January 1, 1900. Dig into any calendar date in Excel, and you’ll find a corresponding serial number, making arithmetic operations a walk in the park.
Imagine you want to find out the period between two dates. With the flick of a wand—or rather, a simple formula—you can subtract one date’s serial number from the other’s to reveal the number of days that have passed. This sorcery sounds complex, but once you’ve seen it in action, it’ll be like a charm that you can’t forget.
Why Mastering Date Calculations Can Elevate Your Excel Skills
Well, think of Excel as your very own enchanted forest where date calculations are the secret paths that lead to hidden treasures. Crafting those paths allows you to maneuver through time with precision and confidence.
Whether you’re a project manager scheduling milestones, a human resource specialist tracking employment periods, or a marketer analyzing campaign durations, becoming proficient with date arithmetic unleashes your potential to make accurate projections and strategic decisions.
Not only does mastering date calculations in Excel keep your tasks and projects on track, but it also adds a layer of proficiency to your skill set that makes your work more efficient and your insights more impactful. In the workplace, these are the spells that impress—turning you into the go-to wizard when anyone needs to make sense of time-related data.
The Art of Calculating Days Between Dates
Using DATEDIF to Count Days with Precision
Now let’s sprinkle some advanced magic dust on your date calculations with the DATEDIF function. This not-so-well-known yet powerful feature in Excel is like a crystal ball that precisely forecasts the difference between two dates in years, months, and days.
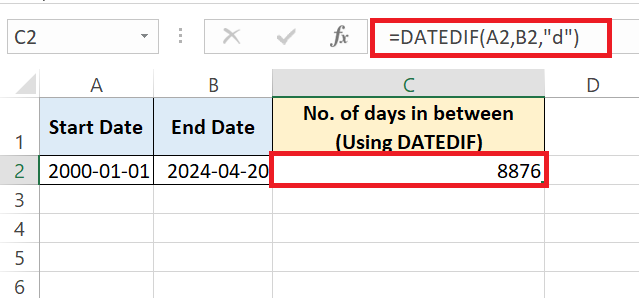
By using it, you can get the exact number of days between any two dates by invoking the formula =DATEDIF(start_date, end_date, "d"). This function is versatile and can be adapted to count in units other than days by changing the third argument—thus allowing for precise time-span calculations tailored to your needs.
To use the DATEDIF function for precise date calculations:
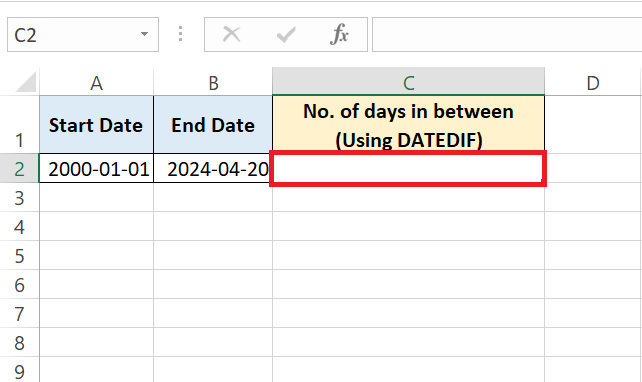
STEP 1: Enter the start date in cell A2 and the end date in cell B2.
STEP 2: In cell C2, enter the formula =DATEDIF(A2, B2, “d”). The result in cell C2 will be the exact number of days between the two dates.
For calculating months and years, replace “d” in the formula with “m” and “y” respectively.
With DATEDIF, you unlock accuracy in your date calculations, ensuring you’re not overlooking the specifics of different months or leap years. Whether you’re measuring age, service tenure, or warranty periods, precise day counts mean that your calculations are always on point.
A Simple Subtraction Method for Swift Results
For those moments when you need a quick enchantment without the complex incantations, the simple subtraction method is your go-to spell. It’s as easy as taking the end date’s serial number and minusing the start date’s serial number, giving you swift results in the form of the total days between the two dates. You’ll be pleasantly surprised at how straightforward it is to grasp—you’re basically just doing elementary school math here!
You don’t need any special formulas or functions; just type =(End_Date - Start_Date) into a cell, and Excel does the rest, returning the number of full days in between.
To calculate the time span between the two dates:
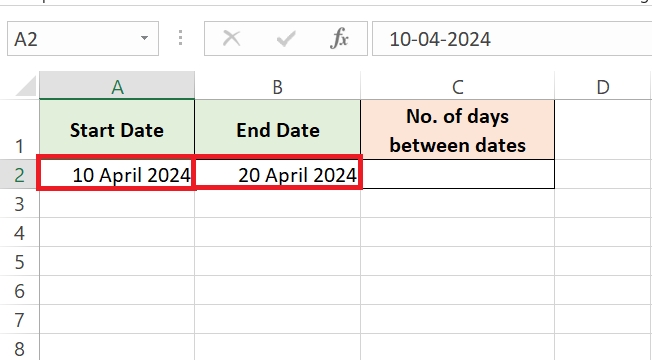
STEP 1: Enter the dates in cells A2 and B2.
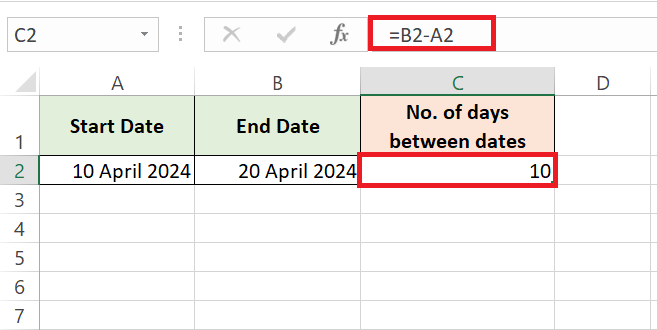
STEP 2: In cell C2, subtract Date 1 (A2) from Date 2 (B2) using the formula =B2-A2. The result in cell C2 will be the number of days between the two dates.
NOTE: Format the cell C2 as a number if it doesn’t display properly.
It’s a practical approach that works perfectly for straightforward scenarios where you just need to know the span of days from one calendar date to another—quick, clean, and without extra fuss.
Tricks for Specific Time Frames
Computing Workdays Minus Holidays Like a Pro
When weekends and holidays need to take a back seat in your date calculations, the NETWORKDAYS function is your secret weapon. By letting you define a range of standard workdays and excluding specific holidays, it ensures that you’re only counting the days when the work happens.
Let’s say your typical workweek is the standard Monday to Friday, and you’re looking to calculate actual workdays for a certain project duration. Roll up your sleeves and use the following spell: =NETWORKDAYS(start_date, end_date, [holidays]). This will give you a clear count of workdays, leaving out the weekends and any dates you’ve defined as holidays—pure practical magic!
For the standard Monday to Friday workweek:
STEP 1: Enter the start date in cell A3 and the end date in cell B3. Optionally, list any holidays in cells C and D onwards.
STEP 2: In cell E2, input the formula =NETWORKDAYS(A3, B3, C3:D4) to calculate workdays excluding weekends and holidays.
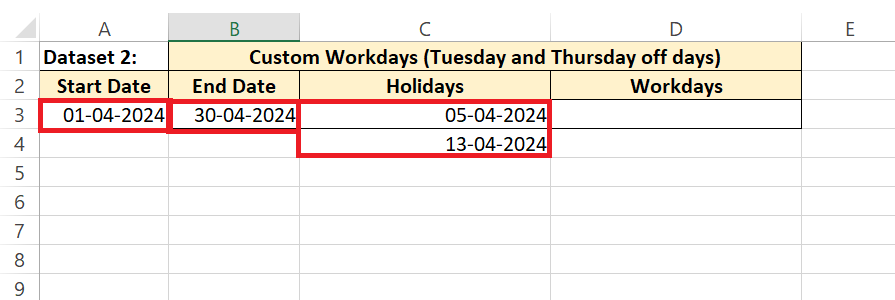
But what if your workdays are more Merlin than mundane? Perhaps you only work Tuesdays and Thursdays. No problem! With =NETWORKDAYS.INTL(start_date, end_date, "1010111", [holidays]), you can customize which days are considered weekends.
Here, the “1010111” string comprises seven digits, each representing a day of the week starting with Monday. A ‘1’ marks it as non-working, and a ‘0’ as working—so this particular string tells Excel that all days except Tuesday and Thursday are “weekend” days.
For custom workdays like Tuesdays and Thursdays:
STEP 1: Enter the start date in cell A3 and the end date in cell B3. Optionally, list any holidays in cells C3 onwards.
STEP 2: In cell E3, input the formula =NETWORKDAYS.INTL(A2, B2, “1010111”, C2:C5) to calculate workdays excluding custom weekends and holidays.
With these formulas, you’ll perform date calculations based on your specific workdays, excluding weekends and defined holidays—a truly customizable magic!
Dealing with Different Date Formats Seamlessly
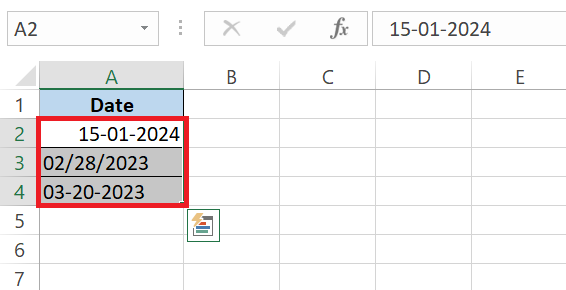
Navigating through Excel’s forest of date formats is a cinch once you know the lay of the land. You might encounter dates formatted differently depending on the source or regional settings, such as “DD/MM/YYYY” vs. “MM/DD/YYYY”. No matter the format, with a wave of your Excel wand, you can standardize them for flawless comparisons and calculations.
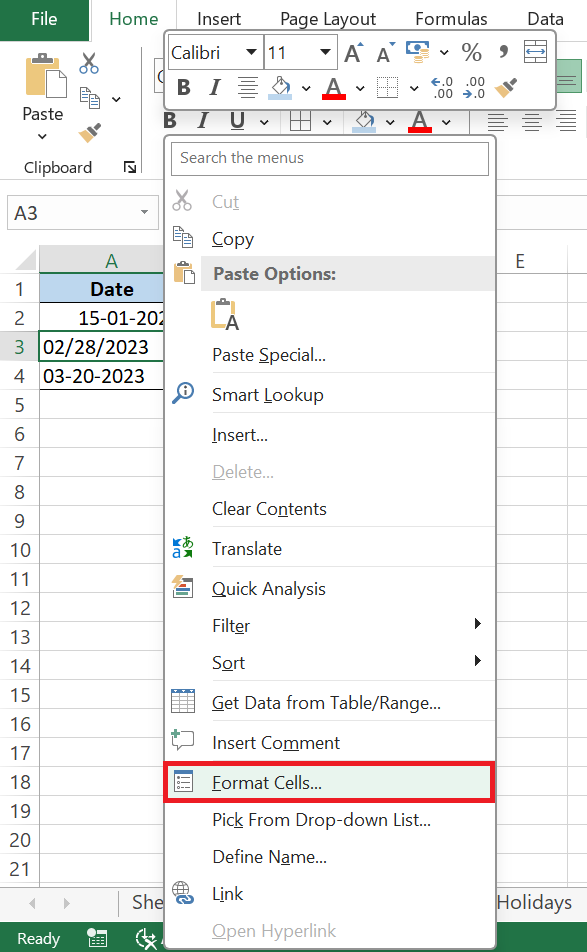
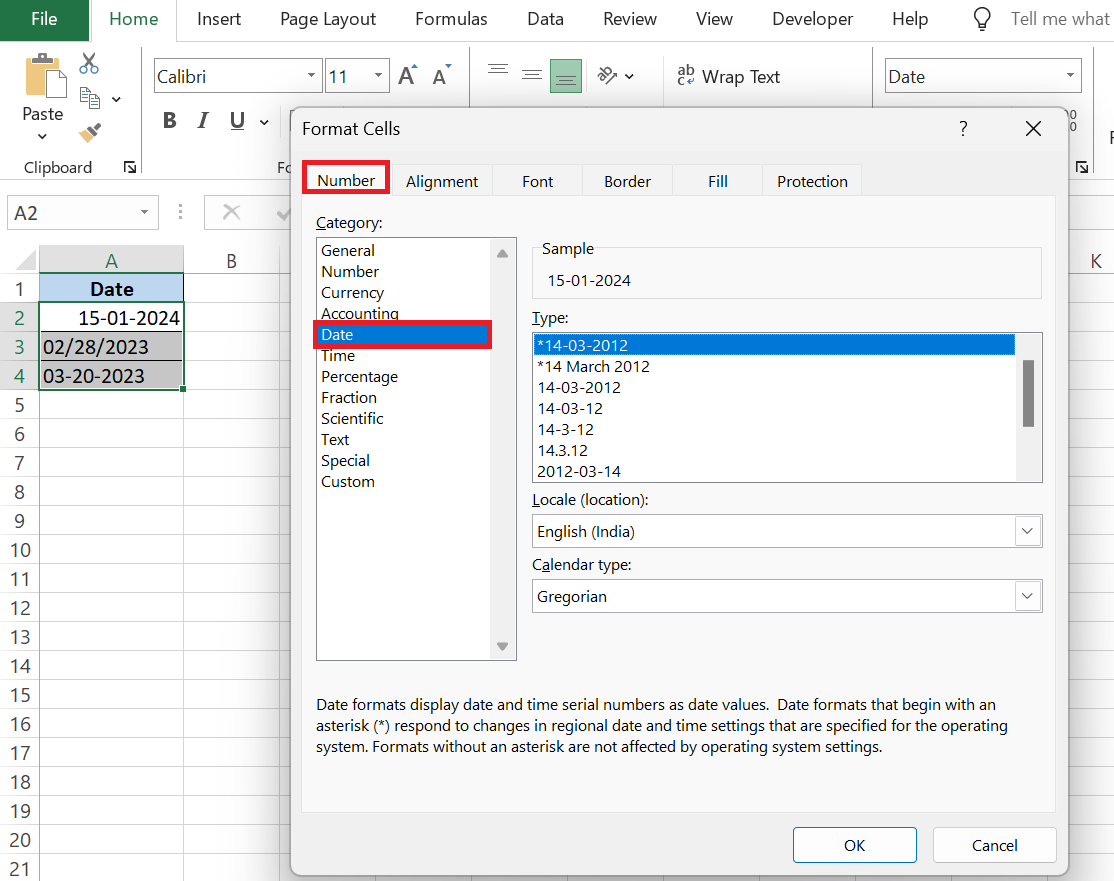
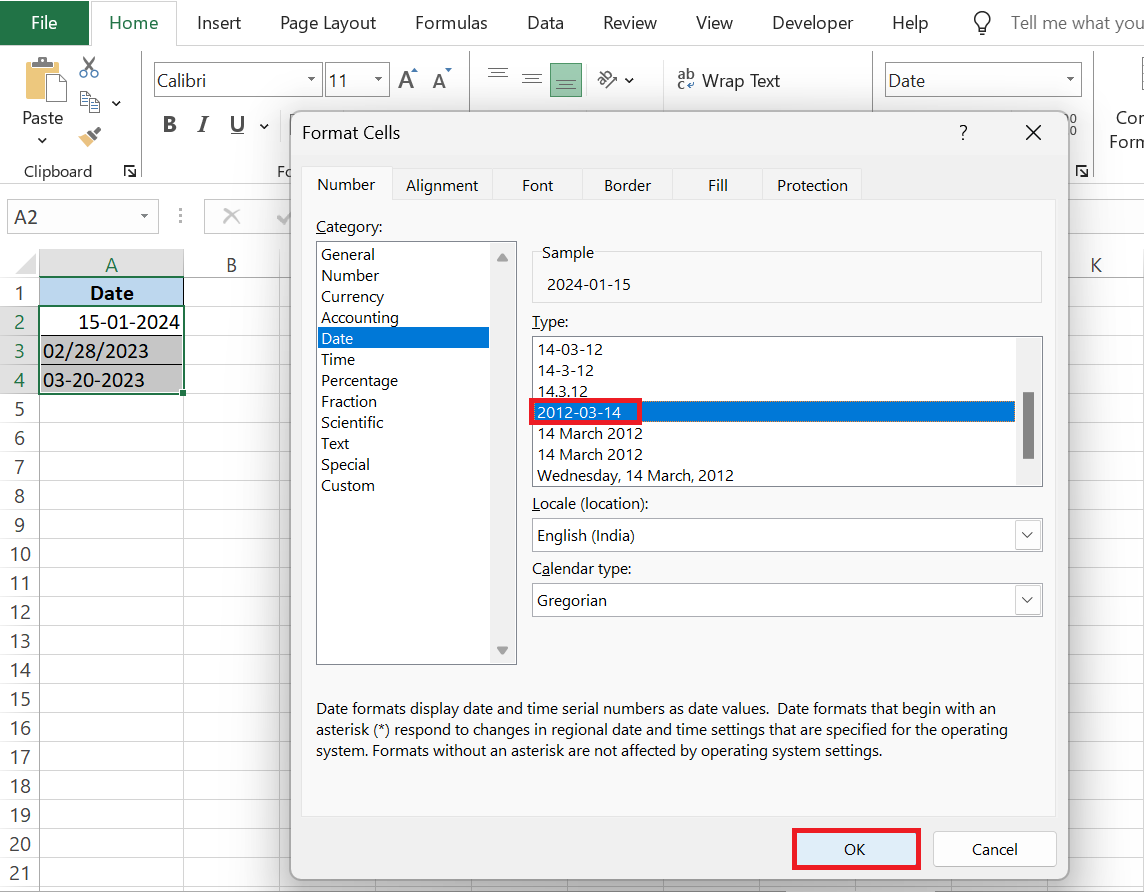
To do this, select the cells with the dates you want to reformat, right-click, and select ‘Format Cells’. Then, in the ‘Date’ category, choose the format that matches your spellbook—or business needs. This ensures that all dates speak the same language, allowing for error-free calculations across different formats.
To standardize date formats:
STEP 1: Select the cells containing dates.
STEP 2: Right-click and choose ‘Format Cells’.
STEP 3: In the ‘Number’ tab, select ‘Date’ category.
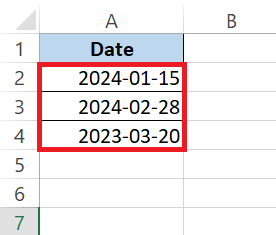
STEP 4: Choose the desired format, like “YYYY-MM-DD” for consistency.
RESULT:
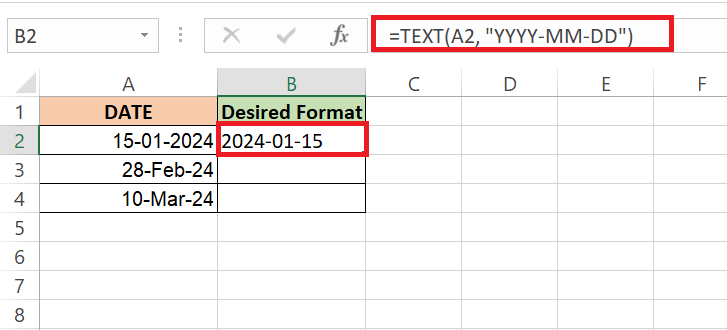
Another trick to handle various date formats is to use the TEXT function, which can transform any date into your desired format by changing its appearance without altering its underlying value.
Here’s the alchemy behind it: =TEXT(value, "format_code").
To use the TEXT function to standardize date formats:
STEP 1: In cell B2, input the formula =TEXT(A2, “YYYY-MM-DD”) to convert the date in cell A2 to the desired format.
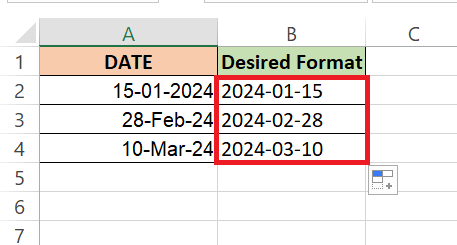
STEP 2: Copy the formula down for other cells if needed.
Excel also allows you to import and convert dates from different locales. With the ‘Text to Columns’ wizard, you can transform dates imported in text format into actual date values that Excel can recognize and work with, no matter the original formatting.
Advanced Sorcery: Combined Calculations
Extracting Years, Months, and Days with One Formula
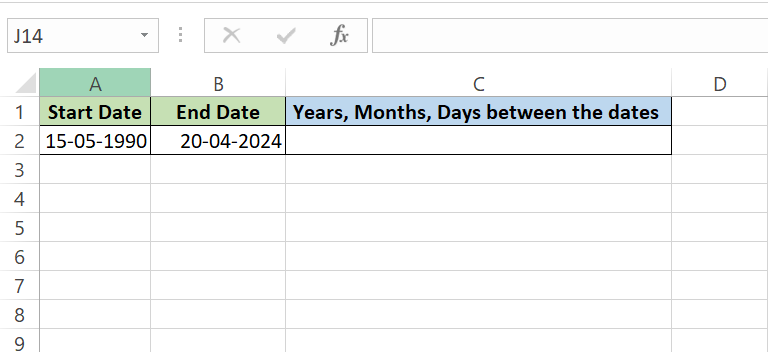
To become adept at Excel’s date wizardry, knowing how to extract years, months, and days as a combined calculation from two dates is a must. Imagine calculating someone’s exact age or the precise time a product has been in use; that’s where a combined formula comes into play.
With this enchantment, you can wave your wand and reveal a complete age in years, months, and days, all with a single formula.
Here’s the spellbinding formula that works like a charm:
=DATEDIF(startDate, endDate, "Y") & " years, " & DATEDIF(startDate, endDate, "YM") & " months, " & endDate - DATE(YEAR(endDate), MONTH(endDate), 1) & " days"
To calculate age in years, months, and days:
STEP 1: Select cell C2 where you will input the formula.
STEP 2: In cell C2, input the formula =DATEDIF(A2, B2, “Y”) & ” years, ” & DATEDIF(A2, B2, “YM”) & ” months, ” & (B2 – DATE(YEAR(B2), MONTH(B2), 1)) & ” days”. Now, Excel will display the exact age in years, months, and days, combining three powerful calculations seamlessly.
Think of it as combining three powerful incantations. The first part calculates the full years between dates, the second part computes the leftover months after accounting for those full years, and the last part magically works out the remaining days to give you a full and precise age.
This combination is more than just a neat trick; it provides clarity and insight across various scenarios, such as figuring out the exact tenure of employees in an organization or understanding the specific age of inventory.
Addressing Unique Calendaring Systems with DAYS360
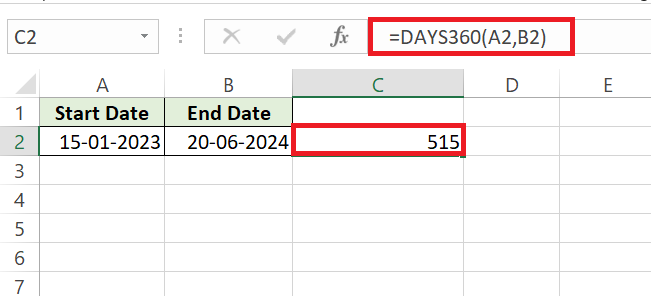
Excel’s DAYS360 function is a special kind of enchantment tailored for businesses that thrive on a simplified, uniform calendar—the financial world. Need to compare loan schedules or interest accruals uniformly across different months? DAYS360 is your go-to wizardry, treating each month as equally lasting 30 days and summing up to a neat, 360-day year.
For those in accounting, finance, or anything where you budget and forecast, using the formula =DAYS360(start_date, end_date, [method]) can greatly streamline annual calculations. The optional [method] argument lets you pick between the U.S. (NASD) and European methods, with subtle differences in how the year’s end date is handled.
To use the DAYS360 function for financial calculations:
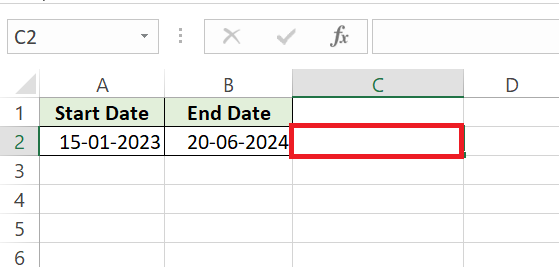
STEP 1: Select Cell C2 where you will input the formula.
STEP 2: In cell C2, input the formula =DAYS360(A2, B2). Optionally, add the [method] argument for U.S. or European method preference. Now, Excel will calculate the number of days between the two dates using a 360-day year, ideal for financial analyses and comparisons.
With DAYS360, you can rest easy knowing that the quirks and curveballs thrown by the Gregorian calendar, like varying month lengths and leap years, won’t mess with your meticulously planned financial models.
Tips to Avoid Common Pitfalls
Navigating Through Leap Years and Other Anomalies
Leap years are like the leapfrogs of the calendar, popping up every four years to ensure our earthly calendar stays aligned with the celestial one. They add an extra layer of complexity to date calculations in Excel, but fear not! You can hop over this challenge with the same agility.
To account for the quadrennial appearance of February 29th, Excel’s date functions inherently recognize leap years, adjusting calculations accordingly. When using DATEDIF or counting days between dates, if your time span crosses February 29th, Excel includes that day in its count without you having to cast any additional spells.
While leap years are largely handled by Excel’s internal calendar logic, keeping an eye out for other anomalies, such as Time Zone differences when dealing with global data, daylight saving time adjustments, or even different fiscal year endings, may require manual adjustments or custom formulas to ensure accuracy.
Preventing and Solving the Dreaded #NUM! Errors
Seeing the #NUM! error in your otherwise pristine Excel sheet can be like stumbling upon a hex in the middle of your spell casting. It’s Excel’s way of saying that something’s gone awry with your numerical inputs. Fear not, for you can often prevent these pesky errors with a bit of foresight and solve them with some clever troubleshooting.
These errors typically arise when your formulas include dates outside of Excel’s date range, which is from January 1, 1900, to December 31, 9999, for both Windows and Mac. Always ensure your dates sit comfortably within this temporal corridor.
Another common cause is when your DATEDIF function ends up with a start date that’s after your end date. This confuses Excel as it tries to calculate a negative time span, which, in the realm of dates, does not compute. So be vigilant about your date order.
Tips to Prevent and Solve #NUM! Errors:
- Verify the range of your dates—they must be valid within Excel’s date limits.
- Confirm the sequence of your start and end dates to avoid negative day counts.
- Double-check your formulas for typos or incorrect references.
- Ensure all cells referenced in calculations contain appropriate date values, not text or other data types.
- Consider using conditional statements like IF to handle potential errors gracefully.
Practical Applications for Day-to-Day Tasks
Projecting Deadlines and Managing Timelines
When you’re spinning multiple plates with deadlines dangling over your head, managing timelines in Excel can be your knight in shining armor. Excel empowers you to project deadlines with precision, tailor schedules to specific needs, and visualize timelines in a way that’s clear and actionable. It’s the veritable temporal tapestry that keeps you from unraveling.
Craft a timeline projection by simply adding a number of days to a start date, like this: =StartDate + NumberOfDays. This will give you the finish line for any project or goal ahead. This capability becomes even more profound when you link it with other functions and formulas to dynamically adjust as your project nudges forward.
Using conditional formatting, you can transform basic date data into a rainbow of colors, automatically highlighting looming deadlines or completed tasks. This not only adds visual appeal but makes the ever-important time dimension of project management instantly discernible.
Combine these tricks with a dash of pivot tables or Gantt charts, and you’ve got yourself an interactive timeline that is as informative as it is enchanting.
Conducting Age Analysis and Time-Based Reporting
Keeping a pulse on ‘the when’ can be just as critical as ‘the what’ in your reports. That’s where age analysis and time-based reporting come into the picture as powerful storytelling tools in Excel. They let you decipher the history and predict the future of your inventory, customer accounts, and a myriad other time-sensitive elements.
Use the DATEIF function to perform age analysis on your client’s unpaid invoices, identifying which ones are reaching critical old age, or analyze inventory to flag items that are nearing the end of their shelf life. These insights help mitigate risk and prioritize actions based on the age of the data.
Time-based reporting isn’t just about looking back; it’s also about forecasting and planning. It can shape everything from cash flow forecasting to customer relationship management by weighing the time element in every analysis, providing you a multi-dimensional view of performance.
FAQs
Can Excel calculate dates across different months or years accurately?
Yes, absolutely! Excel can masterfully calculate dates that span across different months or years. Whether you’re charting the difference from January to June or from 1999 to 2022, Excel’s date functions are well-equipped to handle varying day counts in months and leap years. The DAYS or DATEDIF functions are your trusty tools for this task, providing precise calculations no matter the distance between your start and end points. Just make sure those dates are in Excel’s accepted format, and you’re set for an accurate journey through time.
How can I use Excel to count only business days between two dates?
Harness the power of the NETWORKDAYS function in Excel to count only the business days between two dates, neatly bypassing weekends and any holidays you specify. By entering =NETWORKDAYS(start_date, end_date, holidays), you get the number of workdays, with an option to list all public holidays or company-specific days off within the ‘holidays’ parameter for even more accurate calculations. This feature is a boon for project planning and tracking, ensuring you’re only counting the days when business is actually buzzing.
How do you calculate days between two dates in Excel?
Calculating the number of days between two given dates in Excel is like a magic trick that’s both impressive and incredibly simple. No need for complicated formulas or arcane knowledge—just plain old subtraction. Take the later date and subtract the earlier one. Key in =(Later_Date - Earlier_Date) into a cell, and the difference in days appears as if by a flick of a wand. This straightforward method gives you the exact count of days separating the two dates, making it perfect for quick calculations and basic date differences.
How do I calculate workdays between two dates in Excel?
To calculate workdays between two dates in Excel, waving away weekends and holidays, you’ll want the NETWORKDAYS function at the ready. By casting =NETWORKDAYS(start_date, end_date, [holidays]) into your Excel cauldron, you summon the number of workdays in a specified range, making it the perfect potion for planning and tracking work schedules. If there’s a list of specific holidays you wish to exclude, include them in the optional ‘holidays’ argument to tailor your count like a bespoke suit of armor, fit for your business battles.
How do I calculate the number of days between 2 dates if the dates are in this number format: 11/12/2021 and 04/01/2022?
Calculating the number of days between two dates formatted like “11/12/2021” and “04/01/2022” is straightforward in Excel. Ensure first that Excel recognizes these as date formats. If so, simply subtract the earlier date from the later one using the formula =(Later_Date - Earlier_Date). Plug in your dates such that =DATE(2022, 1, 4) - DATE(2021, 12, 11) reflects the accurate year, month, and day order, and Excel will reveal the days between them with ease. Double-check the format settings if you encounter any errors, and adjust them as needed to ensure Excel interprets the dates correctly.


John Michaloudis is a former accountant and finance analyst at General Electric, a Microsoft MVP since 2020, an Amazon #1 bestselling author of 4 Microsoft Excel books and teacher of Microsoft Excel & Office over at his flagship MyExcelOnline Academy Online Course.


