Table of Contents
Let’s look at these methods thoroughly!
Download the Excel Workbook below to follow along the How to Move Rows in Excel tutorial! –
download excel workbook MoveRowsinExcel.xlsx
Table of Contents
Drag and Drop with the Shift Key
Here we have data on the results of the 2008 Beijing Olympics Men’s 200m Freestyle Finals. Suppose there was a slight mistake, and we want to relocate Row 5 to occupy the position of Row 4.
Click on the row number to select the entire row that you want to move.
Press and hold the Shift key.
Hover the cursor over the border of the selected row. The cursor should change to a four-sided arrow.
Click and hold the left mouse button, then drag and drop the row to the desired location.
Cut and Paste Rows
Using the same example, click on the row number to select the entire row that you want to move.
Right-click on the selected row, choose Cut from the context menu, or use the keyboard shortcut (Ctrl + X).
Click on the row number where you want to move the cut row. In our case, it’ll be row 4.
Right-click on the selected destination row, choose Insert Cut Cells from the context menu, or use the keyboard shortcut (Alt + i + e).
Move Multiple Rows
It is possible to move multiple rows at the same time. However, it’s important to keep in mind that only adjacent rows or columns can be moved together. For instance, you can move Rows 3 to 6 together, but moving Row 3 and Row 5 concurrently is not possible.
Highlight the rows you would like to move.
Right-click on the selected rows, choose Cut from the context menu, or use the keyboard shortcut (Ctrl + X).
Click on the row number where you want to move the cut row.
Right-click on the selected destination row, choose Insert Cut Cells from the context menu, or use the keyboard shortcut (Alt + i + e).
Insert Copied Cells
Click on the row number to select the entire row that you want to move. In our example, it is row 5.
Right-click on the selected row, choose Copy from the context menu, or use the keyboard shortcut (Ctrl + C).
Click on the row number where you want to move the copied row. In our case, it is row 4.
Right-click on the selected destination row and choose Insert Copied Cells from the context menu.
Delete the original row by Right-clicking the row number, then press Delete.
Using the Sort Feature
The Sort feature method is one of the most creative and useful methods when it comes to moving rows in Excel. This method is the most useful when you need to move a lot of rows. The essence of this method is to mark the order of the data in a new column using numbers. The Sort feature will then automatically arrange the data based on the assigned numbers.
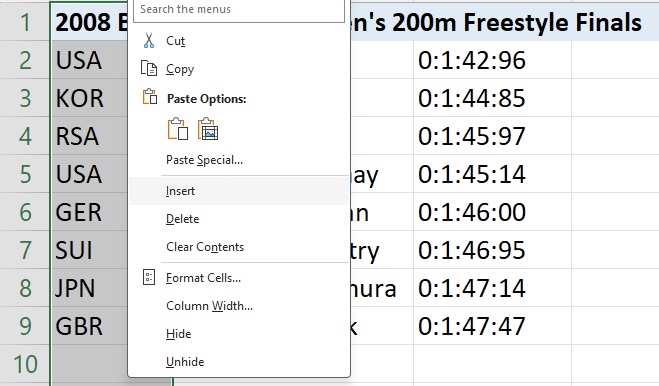
First, Right-click on column A and click Insert.
From there, mark the new order of the data using numbers. 1 being first place and 8 being 8th place.
Highlight the entire range of data from A2 to D9.
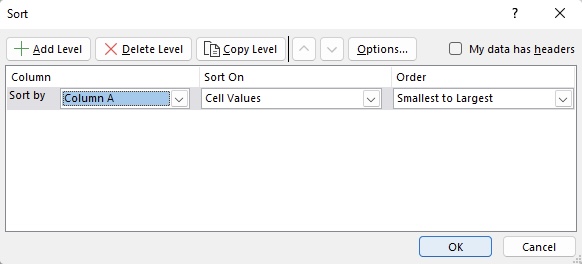
Go to the Data tab on the Excel ribbon, click Sort, and specify the sorting criteria.
Click on Options and make sure that it is set to Sort from Top to Bottom, as we are working with rows.
On the Sort by drop-down options, click on Column A.
Click OK.
As you can see, the data is now set according to the numbers we entered.
Lastly, Right-click on Column A, and click Delete.
Conclusion:
There you have it! You have successfully acquired the skills to move rows in Excel using the simple methods and shortcuts demonstrated above. Be sure to apply these methods the next time you’re manipulating data, or just looking to showcase your Excel skills!
John Michaloudis is a former accountant and finance analyst at General Electric, a Microsoft MVP since 2020, an Amazon #1 bestselling author of 4 Microsoft Excel books and teacher of Microsoft Excel & Office over at his flagship MyExcelOnline Academy Online Course.


