When I first started working with Excel to manage project timelines and employee data, I often found myself juggling months and years. At first, I’d just mentally divide the months by 12—but that got old really fast. So I figured out how to convert months to years in Excel in a few easy ways. If you’ve ever faced the same situation, let me walk you through exactly how I convert months to years in Excel.
Key Takeaways:
- Converting months to years improves clarity in reports and timelines.
- A simple
=A1/12formula gives a quick decimal year conversion. - LAMBDA functions allow you to create reusable and clean custom formulas.
- Proper formatting ensures accurate calculations and avoids formula errors.
- Using
INTandMODdisplays results in a clear “years and months” format.
Table of Contents
The Basics of Time Conversion in Excel
Understanding Date Functions
Excel provides a robust suite of date functions that allow users to perform a wide range of operations involving time and date calculations. These functions are designed to simplify tasks like converting time periods, calculating intervals, and analyzing durations. For instance, you might use the YEAR, MONTH, or DAY function to extract specific components from a date serial number. Furthermore, functions like DATE and EDATE enable users to construct dates from individual components, adding precision to projects requiring date manipulations.
I often find that the flexibility of Excel’s date functions lies in their ability to work with different data configurations, providing a comprehensive toolkit for users dealing with deadlines, schedules, and time-bound data analysis. Integrating date functions effectively can significantly streamline your workflow, especially in converting months into years, as you’ll learn in our guide.
Why Convert Months to Years?
Converting months to years in Excel can be particularly useful for various practical reasons. One primary motive is financial analysis, where understanding durations in years can unlock insights into trends, returns, or loan amortizations. It helps when assessing investments or projecting cash flows over more extended periods.
Additionally, in project management, translating months into years provides clarity, simplifying timelines and aiding in long-term planning. Comparing project durations or amortizations in a standardized time frame makes it easier to communicate plans or outcomes to stakeholders who require quick, precise overviews.
For personal records or reports, converting months into a yearly format assists in maintaining uniformity and straightforward interpretation of data. These conversions allow for more accessible summaries, helping to convey the correct information without overwhelming detail or complexity. As I delve deeper into Excel tools, having the ability to switch between months and years ensures flexibility across different applications.
Step-by-Step Guide to Converting Months to Years
Setting Up Your Data
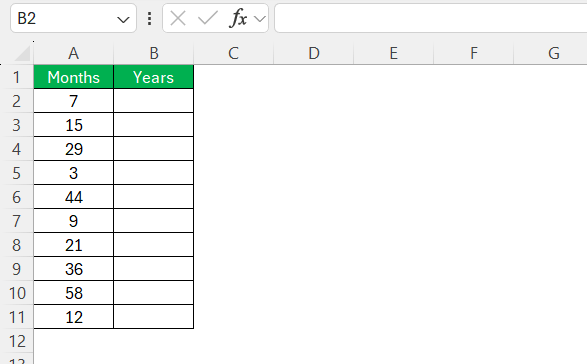
Setting up your data correctly is a crucial first step before you begin converting months to years in Excel. Start by organizing your data in a clear and logical manner, typically in columns. For a basic setup, label one column “Months” where you’ll input the number of months for conversion. This organization helps in maintaining clarity and ease when applying formulas later on.
Next, ensure that the cells containing your month data are input as integers without any date format applied.
This prevents any inadvertent calculation errors when executing the conversions. You can arrange the data by typing each entry into successive rows within the column. I always use a header row for labeling, which assists in organizing my sheet and provides context for each column without needing external documentation.
Before proceeding with calculations, double-check the data for any inaccuracies or discrepancies. Consistency in data entry ensures that when you apply formulas, the outputs are accurate and reliable. Taking time during setup can save substantial effort when troubleshooting later stages in the process.
Utilizing Simple Formulas
Utilizing simple formulas in Excel is a straightforward way to convert months into years without diving into complex functions. One of the easiest methods is to use a basic division calculation, given that a year consists of 12 months. Here’s a simple step-by-step approach:
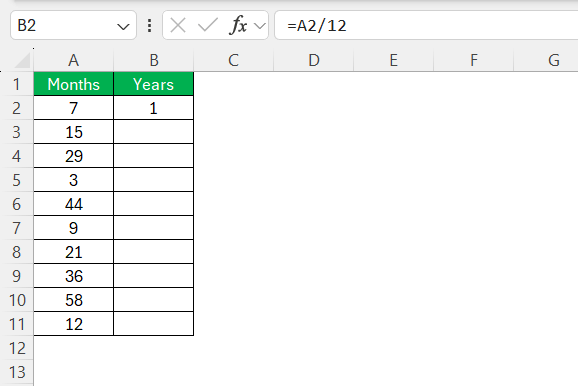
STEP 1: Select the cell where you want the result of your conversion to appear.
STEP 2: Use the division formula to convert months into years. If the months are listed in cell A2, the formula you would type is =A2/12. This divides the number of months by 12, resulting in the equivalent number of years.
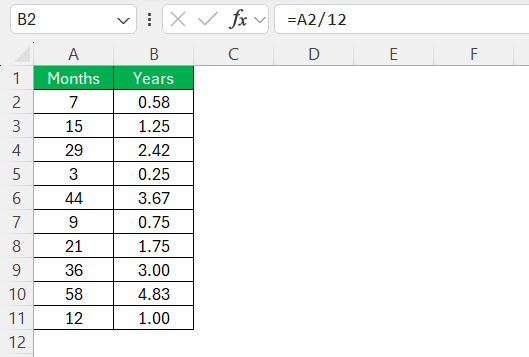
STEP 3: Drag the fill handle (the small square at the cell’s bottom right corner) down to apply the formula to other cells in the column. This automatically populates the calculation across your data set.
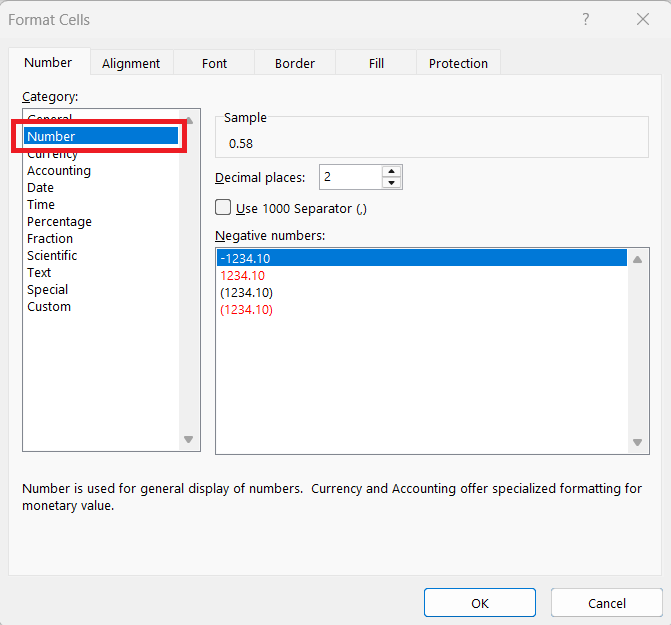
STEP 4: Format the cells displaying years to show decimals if precision is needed. You can adjust this by right-clicking the cells, selecting “Format Cells,” and choosing the “Number” or “Custom” category to adjust the decimal place setting.
I find this method especially useful for quick calculations.
Simplicity in formulation minimizes errors and ensures that even users with basic Excel skills can perform and understand the conversion process. This straightforward approach is perfect for scenarios where precision up to a few decimal places suffices, making it ideal for simple reporting or individual projections.
Using Advanced Formulas with LAMBDAs
For those seeking more sophistication in data transformation, Excel’s advanced Lambda functions can provide the perfect solution to convert months to years dynamically. By using LAMBDA, you can create reusable, custom formulas that make your spreadsheets more versatile and efficient.
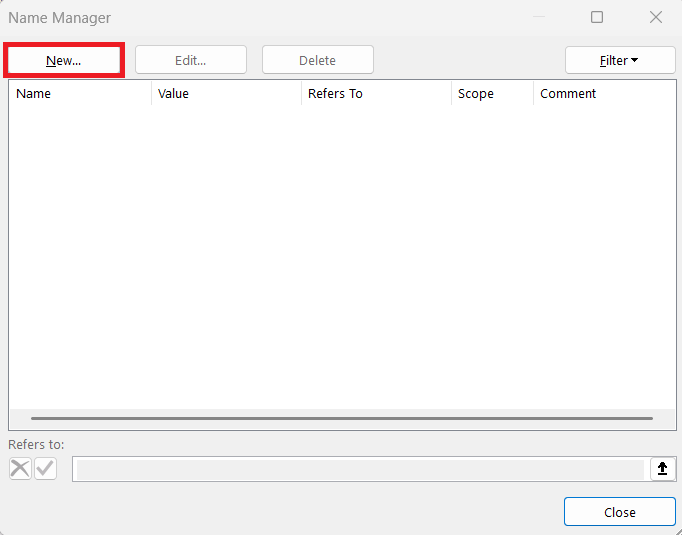
STEP 1: Press Ctrl + F3 to open the Name Manager, or navigate to Formulas > Name Manager on the Ribbon.
STEP 2: Click New.
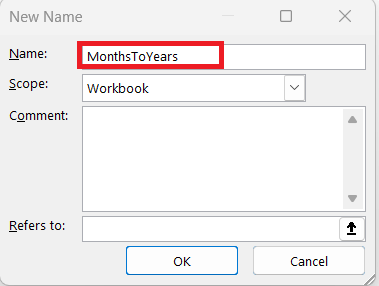
STEP 3: In the dialog box, for the Name field, enter:
MonthsToYears
STEP 4: In the “Refers to” field, enter the following formula:
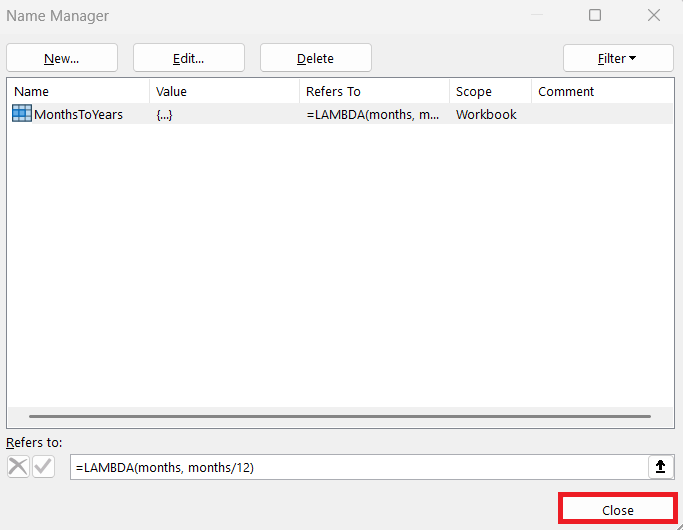
=LAMBDA(months, months/12)
STEP 5: Click OK, then close the Name Manager.
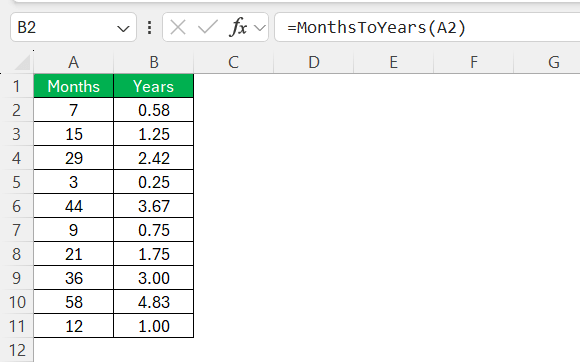
STEP 6: Once defined, you can use your new custom function just like any standard Excel formula.
=MonthsToYears(A2)
Creating a LAMBDA function to convert months to years simplifies data analysis and improves efficiency in Excel. It allows for cleaner workbooks and reusable logic across multiple sheets or files. This approach is particularly valuable when managing project timelines, employee records, or any scenario involving time-based calculations.
Common Errors and Troubleshooting
Fixing Formula Mistakes
When working with Excel, formula mistakes can frequently occur, particularly when converting months to years. Identifying and rectifying these errors is crucial for maintaining the integrity of your data and achieving accurate results.
- Double-Check Cell References: The most common error is incorrect cell referencing. Ensure the formula references the right cell, like
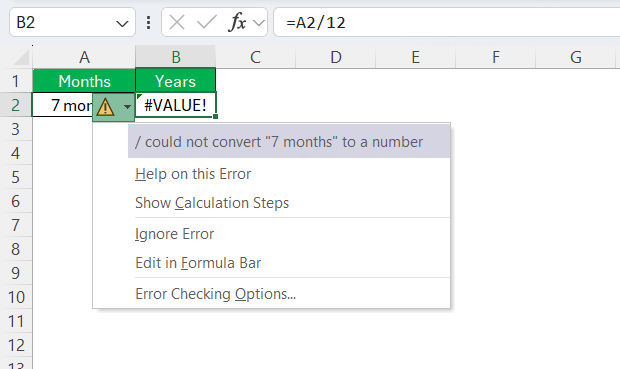
=A2/12, and adjust for other rows as necessary. - Investigate Formula Input: Ensure the data types input into the formula are correct. Non-integer entries or text strings in cells meant for numerical data can lead to errors. Check the formatting of your input cells to guarantee they’re set as ‘Number’ or ‘General’.
- Verify Formula Syntax: Misplaced parentheses or syntax errors can disrupt calculations. Carefully check the formula syntax to ensure all components are correctly arranged.
- Utilize Excel’s Error Checking Tools: Excel provides tools to identify erroneous formulas. Small green triangles in the corner of a cell indicate potential issues. Clicking on these cells offers options for troubleshooting and correcting problems.
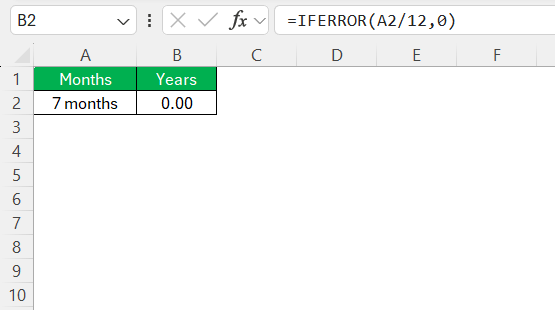
- Handle Division by Zero: If a formula includes division by zero, it will result in an error. Using a function like
IFERROR(A2/12, 0)or specifying another logical outcome helps manage such errors gracefully, allowing the spreadsheet to remain functional and error-free.
By addressing these common issues, repairs can ensure reliable data calculations, making this conversion process efficient and effective. It’s always beneficial to systematically scan through formulas for these mistakes to uphold the precision of analysis and results.
FAQs
How do I use the DATEDIF function for conversions?
To use the DATEDIF function in Excel for conversions, input the start date, end date, and specify the interval type. For converting months to years, enter =DATEDIF(start_date, end_date, "y"). This calculates the complete years between two dates. Adjust your interval type to “m” to see total months if needed. Ensure dates are formatted correctly to avoid errors.
Can I convert months into years without formulas?
Yes, you can convert months into years without formulas by manually calculating it. Divide the number of months by 12 to determine the total years. For instance, for 24 months, simply write “24 months = 2 years” next to the data point. This method is quick for small datasets but less efficient for extensive data analysis.
What are the common errors when converting months to years in Excel?
Common errors when converting months to years in Excel include incorrect cell references, using text instead of numerical data, and division by zero when cells contain null values. Formatting issues, like applying a date format to raw numbers, can also cause unexpected results. Always verify data consistency and formula syntax to prevent these errors.
When converting years to days?
To convert years to days, multiply the number of years by 365 for a standard year or 366 if accounting for a leap year. This straightforward calculation provides an estimate, but remember that using exact date functions like =DATEDIF(start_date, end_date, "d") in Excel captures precise day counts between specific dates.
How to convert months to years and months in Excel?
To convert months into years and months in Excel, use =INT(A1/12) & " years and " & MOD(A1,12) & " months", assuming the total months are in cell A1. This formula divides the total months by 12 to yield years and utilizes the remainder to determine months. This displays durations in a clear format, enhancing readability and presentation.
John Michaloudis is a former accountant and finance analyst at General Electric, a Microsoft MVP since 2020, an Amazon #1 bestselling author of 4 Microsoft Excel books and teacher of Microsoft Excel & Office over at his flagship MyExcelOnline Academy Online Course.

