When working on woodworking or construction projects, estimating the amount of plywood required can be tricky. Buying too much material increases costs, while buying too little causes project delays. With Excel, you can create a plywood calculator that quickly determines how many sheets you need based on project dimensions. This saves time, reduces waste, and ensures your projects stay on budget.
Key Takeaways
- Plywood is typically sold in standard 4×8 sheets (48 x 96 inches, or 32 square feet).
- Excel formulas can calculate total sheet requirements based on length, width, and quantity of pieces.
- The formula structure is
=(Length * Width * Pieces) / 4608where 4608 is the area of one plywood sheet in square inches. - Use
CEILINGorROUNDUPfunctions to round sheet requirements to whole numbers. - A sample workbook is included with raw data, formulas, and final outputs.
Table of Contents
What is a Plywood Calculator?
A plywood calculator determines the number of plywood sheets required for a project by calculating the total surface area of pieces needed. Since plywood comes in fixed sizes, the formula compares your project’s area requirements with the area of a standard sheet. This approach ensures accurate estimates and prevents costly mistakes when purchasing materials.
Step-by-Step: Building a Plywood Calculator in Excel
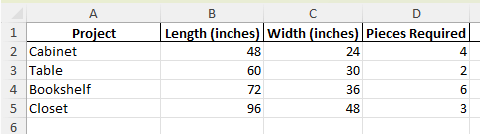
Step 1: Create the Raw Data Table
In Excel, set up a table with columns for Project, Length, Width, and Pieces Required:
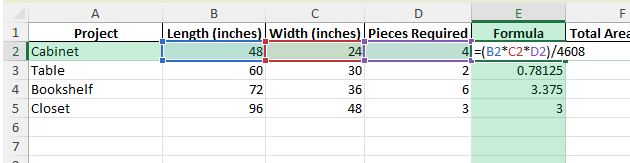
Step 2: Apply the Plywood Formula
In a new column, calculate total area in square inches per project:
=B2*C2*D2Then divide by 4608 (the area of one 4×8 sheet in square inches) to calculate sheets required:
=(B2*C2*D2)/4608

Step 3: Round Up to Whole Sheets
Plywood sheets cannot be purchased in fractions, so use:
=ROUNDUP((B2*C2*D2)/4608,0)


Step 4: Copy the Formula
Drag the formula down for all projects. Each row now shows how many sheets are required.

Common Mistakes and How to Fix Them
Using the wrong units: Always use inches for calculations if referencing the 48 x 96 standard.
Forgetting to round up: Not rounding will underestimate sheets required.
Not accounting for waste: Add an extra sheet if cuts may lead to unusable scraps.
Incorrect formula references: Double-check cell references when copying formulas.
Bonus Tips and Advanced Scenarios
Include Waste Allowance: Add 10% to calculations by multiplying the formula by 1.1.
Power Query for Multiple Projects: Import project data from another file and run sheet calculations automatically.
VBA Optimization: Use VBA macros to simulate cut layouts and minimize waste:
Sub PlywoodCalculator()
    Dim lastRow As Long
    lastRow = Cells(Rows.Count, "A").End(xlUp).Row
    For i = 2 To lastRow
        Cells(i, 6).Formula = "=ROUNDUP((B" & i & "*C" & i & "*D" & i & ")/4608,0)"
    Next i
End Sub
Dashboard View: Build a summary sheet with total sheets required across all projects.
Custom Sheet Sizes: Allow input for sheet dimensions if using non-standard plywood.
Use Cases for a Plywood Calculator
A plywood calculator in Excel can be applied in many situations. Below are detailed scenarios showing how different groups can benefit from this tool, along with how Excel can be used effectively for each purpose.
1) Woodworking Projects
Context: Woodworkers building cabinets, tables, bookshelves, or custom furniture often need precise estimates of how many sheets of plywood are required. Small errors in estimating can lead to either wasted money on excess materials or project delays due to shortages.
How to use in Excel:
Create a list of all furniture components with their dimensions (length, width, and number of pieces).
Use formulas like =(Length*Width*Pieces)/4608 to calculate how much sheet area is needed for each component.
Round up results with =ROUNDUP() to ensure full sheets are counted.
Summarize totals across projects for a full workshop material estimate.
Benefits:
Eliminates guesswork when planning cuts for furniture pieces.
Reduces wasted material by accurately forecasting sheet requirements.
Supports workshop planning by ensuring enough stock is on hand before beginning work.
2) Construction Projects
Context: Contractors often use plywood for flooring, roofing, and wall sheathing. In construction, material costs add up quickly, so accurate estimates are crucial to stay within budget.
How to use in Excel:
Record project areas such as total square footage of walls or floors.
Convert square footage into sheet requirements by dividing by 32 (since a 4×8 sheet = 32 square feet) or use square inches (4608 sq in) if detailed dimensions are available.
Use =ROUNDUP(TotalArea/SheetArea,0) to ensure you account for whole sheets.
Add helper columns for waste factors, such as +10% for cuts and adjustments.
Benefits:
Improves job site planning by ensuring the right number of sheets are delivered.
Prevents delays from underestimating materials needed for large builds.
Helps contractors provide more accurate quotes to clients.
3) DIY Home Improvements
Context: Homeowners often underestimate plywood needs when tackling smaller projects such as shelving, closets, or garage storage solutions. A calculator ensures they don’t make unnecessary trips to the store.
How to use in Excel:
Create a worksheet listing each planned piece of shelving or paneling with dimensions.
Apply formulas to calculate sheet needs, rounding up to account for cutting errors.
Add cost-per-sheet columns to understand the total project cost upfront.
Benefits:
Simplifies planning for homeowners without professional estimating tools.
Saves time by reducing extra trips to buy more plywood mid-project.
Helps with budgeting by giving a clear idea of material costs before starting.
4) Budgeting and Cost Forecasting
Context: Whether you’re a contractor, woodworker, or homeowner, material costs are a significant part of any project budget. Knowing exactly how much plywood is required makes it easier to estimate expenses.
How to use in Excel:
Extend the plywood calculator by adding a column for Cost per Sheet.
Multiply the number of sheets required by the cost per sheet to calculate total cost.
Use SUM formulas to add up costs across multiple projects or materials.
Incorporate waste allowance by multiplying the final total by 1.1 (10% extra).
Benefits:
Provides accurate cost forecasts for clients or personal projects.
Helps control budgets by avoiding last-minute material purchases.
Supports financial planning by identifying material costs as part of overall project expenses.
5) Inventory Management
Context: Workshops and warehouses often keep plywood in stock for ongoing projects. Without tracking, it’s easy to lose sight of how much material is available, leading to stockouts or over-purchasing.
How to use in Excel:
Maintain a master sheet listing current plywood stock, including size and thickness.
Deduct sheets used in each project by linking formulas to project requirement sheets.
Use conditional formatting to highlight low stock levels for reordering.
Create a dashboard showing available inventory, pending usage, and reorder points.
Benefits:
Prevents delays by ensuring plywood is always available when needed.
Reduces waste and storage costs by avoiding unnecessary overstocking.
Helps managers or shop owners plan purchases efficiently and negotiate bulk deals.
FAQ
What size is a standard plywood sheet?
Most sheets are 48 x 96 inches (4×8 feet), equal to 4608 square inches.
How do I adjust for different sheet sizes?
Replace 4608 with the sheet area (Length * Width) of your chosen material.
Can I calculate cost as well?
Yes, multiply sheets required by cost per sheet in another column.
What if my pieces have cutouts or irregular shapes?
Estimate the usable area or add an allowance for scrap.
Is Excel better than online calculators?
Yes, Excel lets you customize inputs, formulas, and add advanced features.

John Michaloudis is a former accountant and finance analyst at General Electric, a Microsoft MVP since 2020, an Amazon #1 bestselling author of 4 Microsoft Excel books and teacher of Microsoft Excel & Office over at his flagship MyExcelOnline Academy Online Course.


