
Microsoft Excel plays a pivotal role in organizing information effectively. The ability to swap columns in Excel is more than a neat trick; it’s essential for enhancing data accessibility and utility. Whether for aesthetic or analytical reasons, knowing how to rearrange columns efficiently is a valuable skill for any Excel user. This guide will explore several techniques to master column swapping, ensuring your data is always perfectly aligned with your needs.
Key Takeaways
- Utilize Quick Swap Techniques: Familiarize yourself with swift methods like Cut and Insert Cut Cells, Drag-and-Drop, and the use of a helper column for efficient data reorganization.
- Master the Basics: The ‘Cut, Copy, and Paste’ method remains a fundamental technique for column swapping, ensuring data integrity is maintained.
- Explore Excel’s ‘Transpose’ Feature: For converting columns into rows and vice versa, the ‘Transpose’ function offers a simple yet powerful tool for data manipulation.
- Leverage Excel’s Safety Nets: Utilize the ‘Undo’ feature and Version History to minimize data loss during column reorganization, and consider automating repetitive swaps with VBA for efficiency and accuracy.
Table of Contents
Introduction to Column Swapping in Excel
The Necessity for Efficient Data Management
In our data-driven world, efficient management of information is paramount, and Excel sits at the very heart of this practice. Have you ever found yourself staring at an Excel spreadsheet, realizing that the columns could be better organized? Swapping columns in Excel is not just about tidiness; it’s about making your data more accessible, comprehensible, and ultimately more powerful. Let’s delve into why mastering column swapping is a key skill for anyone who regularly works with Excel.
Overview of Quick Column Swap Techniques
Before you dive in elbows-deep into reorganizing your data, it’s important to have a quiver of quick column swap techniques at your disposal. These are the clever tricks that can turn a cumbersome task into a swift flick of your Excel mastery. You can achieve this through a range of methods: the Cut and Insert Cut Cells, the intuitive Drag-and-Drop approach, and for the more nuanced moves, the use of a helper column. And don’t forget that these techniques are just as effective for row organization too. With these at your fingertips, your Excel data management is about to get a whole lot smoother.
Mastering Basic Swaps
Cut, Copy, and Paste: The Classic Approach
The classic ‘Cut, Copy, and Paste’ approach is your reliable toolkit for swapping columns in Excel. Let’s break down the steps:
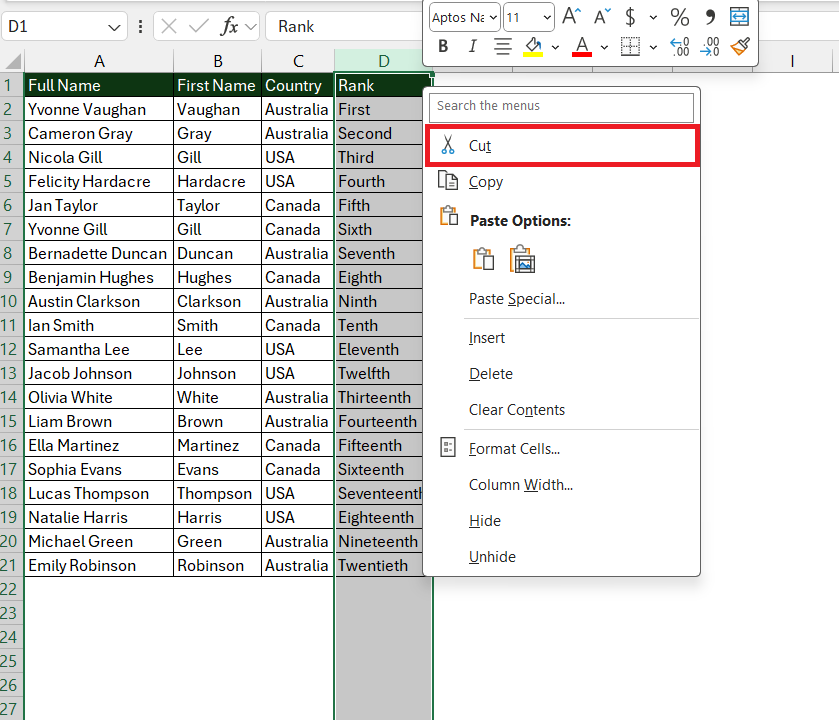
STEP 1: Choose the column you desire to move. You can do this by clicking on the column header.
STEP 2: Cut the data by pressing CTRL + X, or you can right-click and choose ‘Cut’.
STEP 3: Click on the destination column where you want the data to land. This is where you’ll paste the cut column.
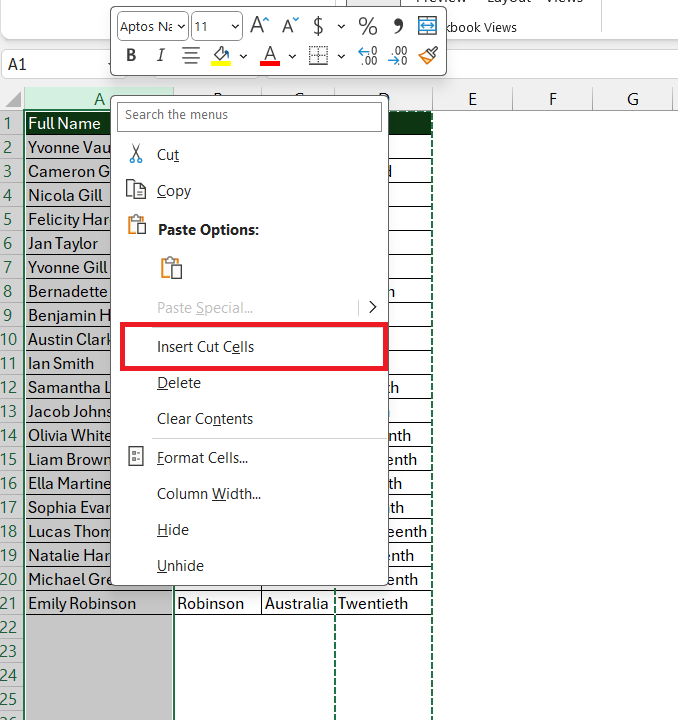
STEP 4: Paste the cut data using right-click and select ‘Insert Cut Cells’.
The last column is now moved to the first column.
While simple, this method can provide a quick swap that maintains the integrity of your data. Remember that using ‘Cut’ instead of ‘Copy’ ensures you don’t leave behind duplicate data.
Utilizing the ‘Drag-and-Drop’ Mechanism
The ‘Drag-and-Drop’ method is a hands-on approach to adjusting your Excel columns with the simplicity of your mouse. Here’s the lowdown on how to effortlessly reposition your columns:
STEP 1: Identify the column you wish to move. Click on its heading.
STEP 2: Press and hold the SHIFT key and simultaneously move your cursor to the edge of the column. Look out for the cursor to change to a ‘move’ icon, typically a cross with arrows.
STEP 3: With the SHIFT key still pressed, drag the column to your desired location. A bordered outline will show where the column will be placed.
STEP 4: Release your mouse button before letting go of the SHIFT key to drop the column into place.
This intuitive method is not only quick but helps to maintain cell formatting and relationships. And just like that, you’ve swapped without a hitch!
Automate Repetitive Swaps with VBA Scripting
Excel’s Visual Basic for Applications (VBA) is a stalwart ally in automating repetitive tasks, like swapping columns. VBA can seem intimidating, but it’s a game-changer once you start leveraging its power. Here’s a simplified guide to automating column swaps with VBA:
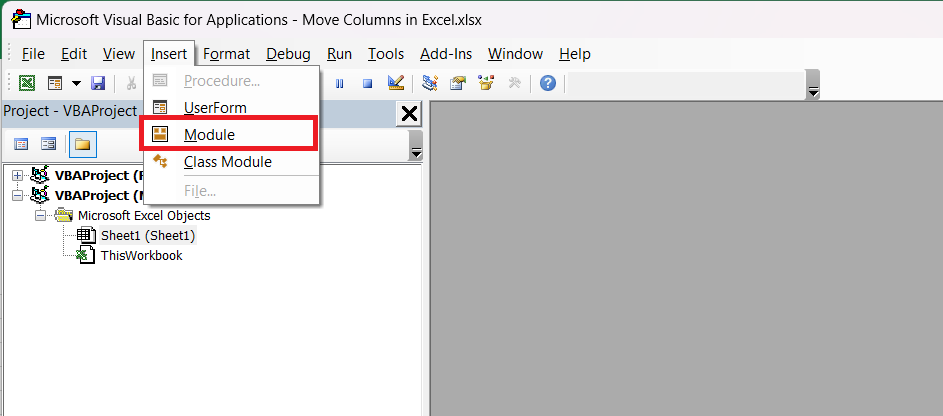
STEP 1: Press ‘ALT + F11’, then choose ‘Insert’ and select ‘Module’ to open a coding space.
STEP 2: Copy and paste a pre-written VBA code tailored for swapping columns.
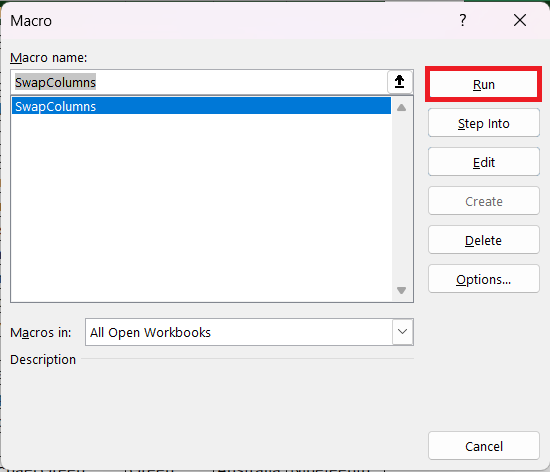
STEP 3: Close the VBA editor, go back to Excel, and run your macro when needed.
Here’s a basic example of such a VBA function:
Sub SwapColumns()
Dim FirstColumn As Range, SecondColumn As Range
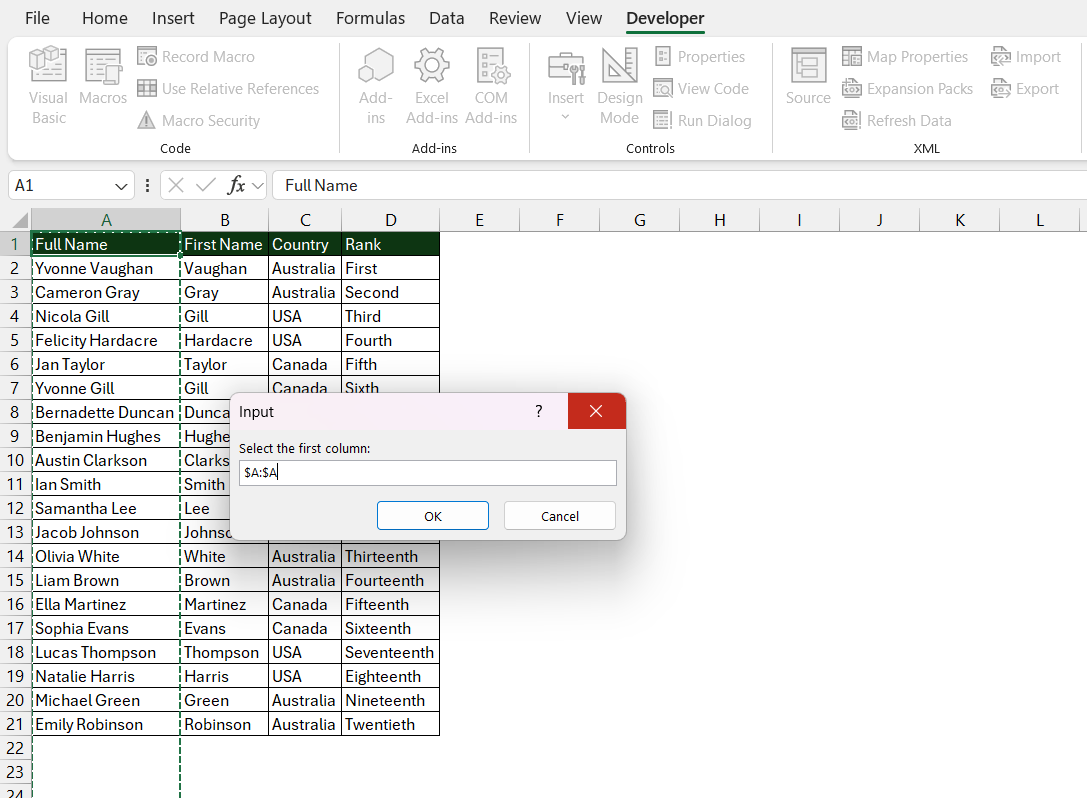
Set FirstColumn = Application.InputBox("Select the first column:", Type:=8)
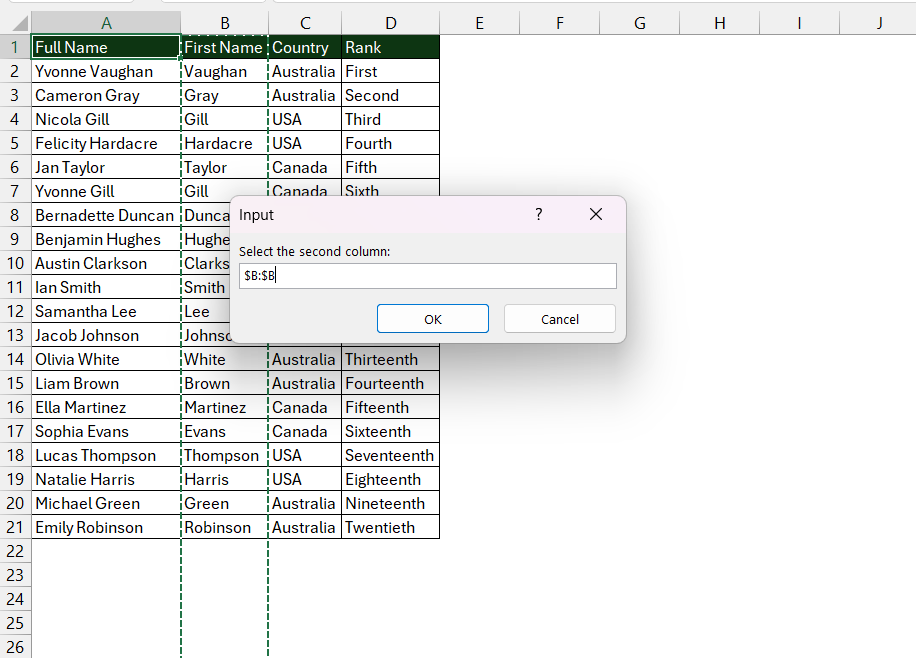
Set SecondColumn = Application.InputBox("Select the second column:", Type:=8)
Application.ScreenUpdating = False
Dim buffer As Variant
buffer = FirstColumn.Value
FirstColumn.Value = SecondColumn.Value
SecondColumn.Value = buffer
Application.ScreenUpdating = True
End Sub
After setting this up, swapping becomes a matter of running the macro, selecting the columns, and letting VBA do the work.
The columns will be swapped.
Using VBA scripts not only saves time but also reduces the risk of human error, ensuring consistent results each time.
Using Excel’s ‘Transpose’ Feature for Versatility
Unleash the versatility of Excel with the ‘Transpose’ feature, a powerful tool that transforms columns into rows, and vice versa. Transposing is ideal when facing lengthy lists that would be better as horizontal spreads or when preparing data for distinctive analysis. Here’s how to use it:
STEP 1: Select and copy the range of data you want to transpose with Ctrl + C.
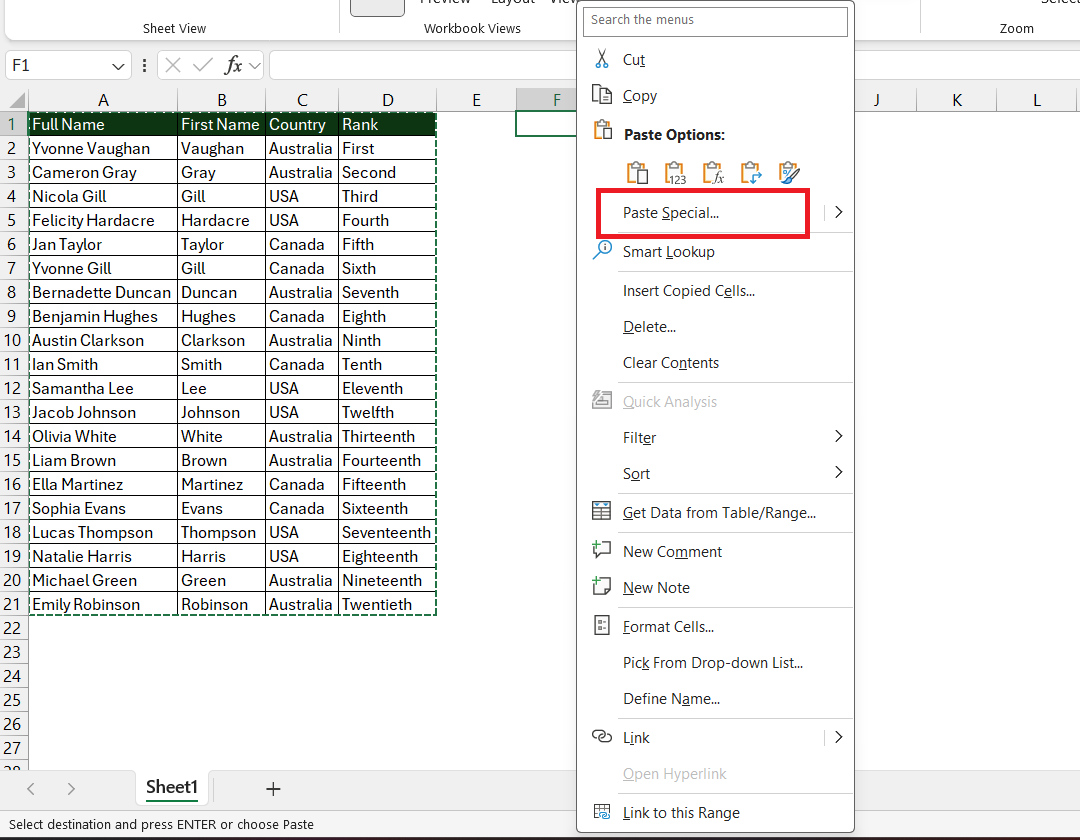
STEP 2: Right-click on a new, sufficiently large area where you want to place the transposed data. From the context menu, hover over the ‘Paste Special’ submenu.
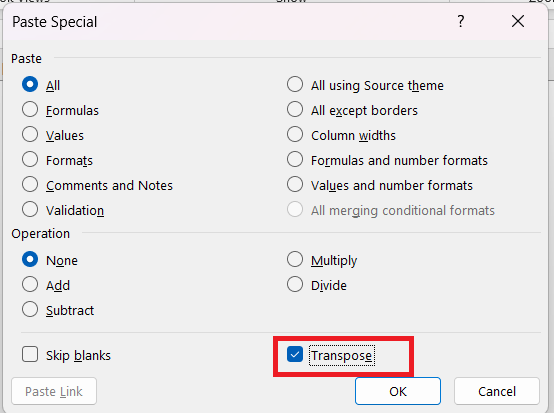
STEP 3: Look for and select the ‘Transpose’ option.
And voilà, your data has been seamlessly rearranged into its new orientation!
Remember, however, that the ‘Transpose’ feature creates a static copy; any edits made to the original cells won’t be reflected in the transposed ones.
Safeguard Your Data: Error-Proofing Your Swaps
Double-Check Formulas and References Post-Swap
After engaging in column swaps within Excel, it’s essential to play the role of a vigilant data custodian. Double-check that all your formulas and references are still correctly aligned with your new column positions. Swapping columns without caution can lead to inaccurate data analysis, erroneous reporting, or worse, decision-making based on flawed information.
Here’s a quick post-swap checklist:
- Review formulas: Check for broken references where the wrong cells may now be referenced due to the swap.
- Validate data: Ensure that any data meant to be linked still correlates with the appropriate columns.
- Test functions: Make sure that functions or summaries that depend on specific column ranges still return correct values.
Excel’s Trace Precedents and Trace Dependents tools are perfect for this, giving you a clear visual guide on the connections between cells and formulas.
Should any issues arise, Excel’s ‘Undo’ function (Ctrl + Z) is your safety net, letting you revert back to the pre-swap state.
Minimizing Data Loss with Undo and History Features
Protecting your data in Excel is a top priority, especially when performing delicate operations like swapping columns. Mistakes happen, but Excel has strong safety nets in place: the ‘Undo’ feature and the Version History.
Immediately after a misstep, invoke the trusty ‘Undo’ lifeline by pressing ‘Ctrl + Z.’ It’s like a time machine for your actions, reverting changes one step at a time, so your data is restored to its former state before the error.
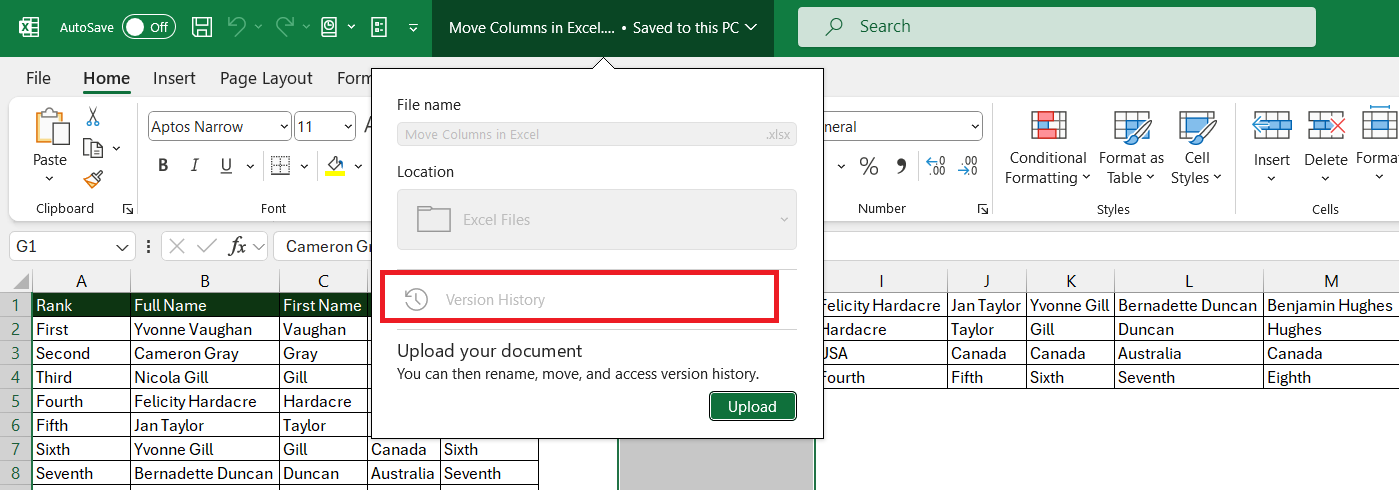
And for a broader look back, delve into Excel’s Version History. It’s like an archive of your workbook’s previous states, allowing you to recover from more substantial mishaps or to simply revisit earlier versions of your work.
By familiarizing yourself with both ‘Undo’ and Version History, you can minimize the risk of data loss during column swaps or any other Excel activity.
FAQs
Can I swap columns without affecting the rows in Excel?
Yes, you can swap columns in Excel without affecting the rows. Utilize the drag-and-drop method while holding down the Shift key, or cut and paste the columns to their new positions. This ensures only the columns move while the rows stay intact.
Is there a way to rearrange columns in Excel?
Absolutely! Excel offers several methods to rearrange columns, such as cut and paste, drag-and-drop while holding the Shift key, and using the ‘Sort’ feature with a helper row for custom arrangements.
How do you switch the columns and rows in Excel?
To switch columns and rows in Excel, use the ‘Transpose’ feature. Copy the selected cells, right-click on the destination, choose ‘Paste Special,’ and then select ‘Transpose’. This changes columns to rows and vice versa.
How do I swap a single cell?
To swap a single cell in Excel, select the cell, then drag and drop using the mouse and the Shift key, or cut (Ctrl + X) and paste (Ctrl + V) the cell into the new location, ensuring the content is swapped.
What are the risks associated with swapping columns in Excel?
Swapping columns in Excel can lead to data misalignment, broken formulas, or incorrect data references if not done carefully. Always check dependencies and save your work before making changes to mitigate these risks.


John Michaloudis is a former accountant and finance analyst at General Electric, a Microsoft MVP since 2020, an Amazon #1 bestselling author of 4 Microsoft Excel books and teacher of Microsoft Excel & Office over at his flagship MyExcelOnline Academy Online Course.


