Key Takeaways
- Locate the meeting you have previously canceled in your Outlook calendar by navigating to the date it was scheduled for. Find the specific event, which will be marked as “Canceled,” and open it.
- Once you have opened the canceled meeting, you can find the option to “Uncancel” or “Reinstate” the meeting in the Meeting tab at the top of the window. Click on this option, which will effectively undo the cancellation, and the meeting will be restored to the calendars of all original attendees.
- Remember to send out an update to all attendees after uncancelling the meeting. This action ensures that everyone is informed about the meeting being back on schedule. The update allows you to modify the details of the meeting if necessary and prompts recipients to re-accept the meeting invitation. Studies have shown that clear and timely communication significantly improves meeting attendance and productivity.
Table of Contents
Common Reasons for Restoring Meetings
Accidental Cancellations
Accidental cancellations can occur for various reasons – perhaps a misclick in a busy inbox, or confusion between multiple meetings. These mistakes are not uncommon and can have cascading effects, particularly if the meeting was set with clients or essential team members. Recognizing these accidental cancellations quickly is essential as it minimizes the disruption to participants’ schedules and maintains the flow of business operations.
Changed Schedules and Lost Invitations
Sometimes, meeting cancellations are a result of shifting priorities and schedules that require immediate attention. Important stakeholders might have conflicts that crop up unexpectedly, necessitating a reschedule. In other cases, meeting invitations may get lost in transit – whether through email filtering snafus or simply getting buried under an avalanche of other messages. Both scenarios can lead to the need for recovering or rescheduling the original meeting to ensure continuity of planning and collaboration.
How to Retrieve a Canceled Meeting in Outlook
Using the ‘Deleted Items’ or ‘Trash’ Folder
Restoring a meeting in Outlook can often be quickly resolved by checking the ‘Deleted Items’ or ‘Trash’ folder. Here are the steps to retrieve a meeting from these folders:
STEP 1: Open the Microsoft Outlook application.
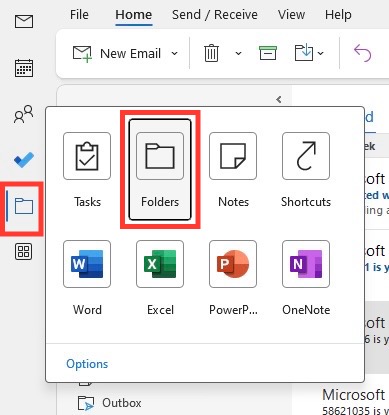
STEP 2: Navigate to the folder list and click on ‘Deleted Items’ or ‘Trash.’
STEP 3: Scroll through the contents to find the deleted meeting.
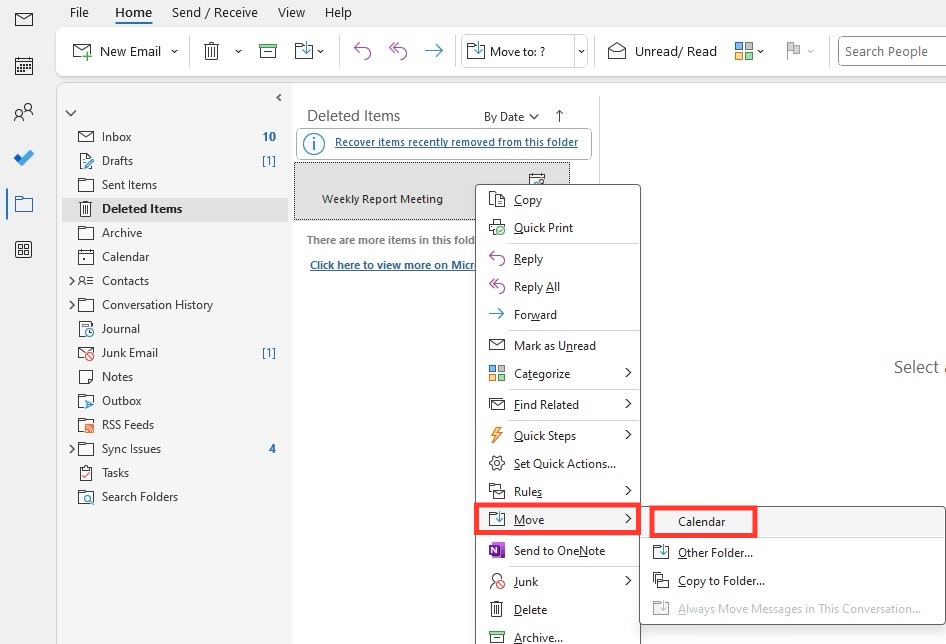
STEP 4: Right-click on the item you wish to restore.
STEP 5: Select ‘Move’ then choose the ‘Calendar.’ The meeting will be relocated back to your Outlook calendar.
This simple process can usually reverse an accidental cancellation effortlessly, allowing you to continue with your planned agenda with minimal disruption.
Employing the ‘Recover Deleted Items From Server’ Option
For instances where you’ve permanently deleted a meeting from the ‘Deleted Items’ or ‘Trash’ folder, Outlook provides the ‘Recover Deleted Items From Server’ feature that allows you to restore it during a specific retention period set by your server administrator. Here is how to use this option:
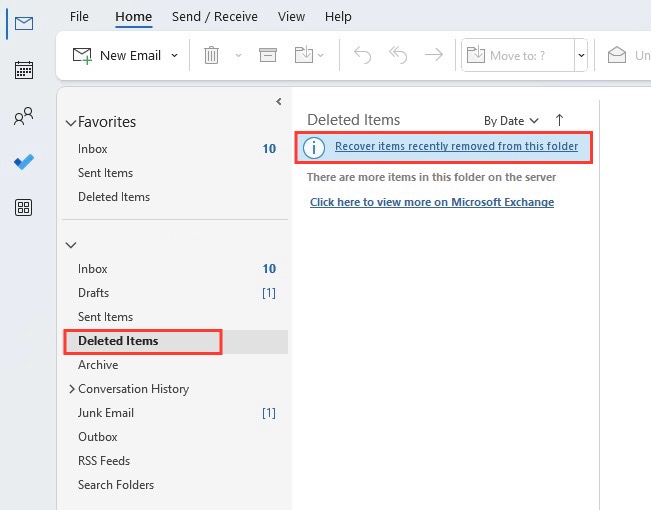
STEP 1: Within Outlook, go to the folder list and select ‘Deleted Items.’
STEP 2: On the Home tab, find and click on ‘Recover items recently removed from this folder.’ This is usually found within the “Clean Up” group.
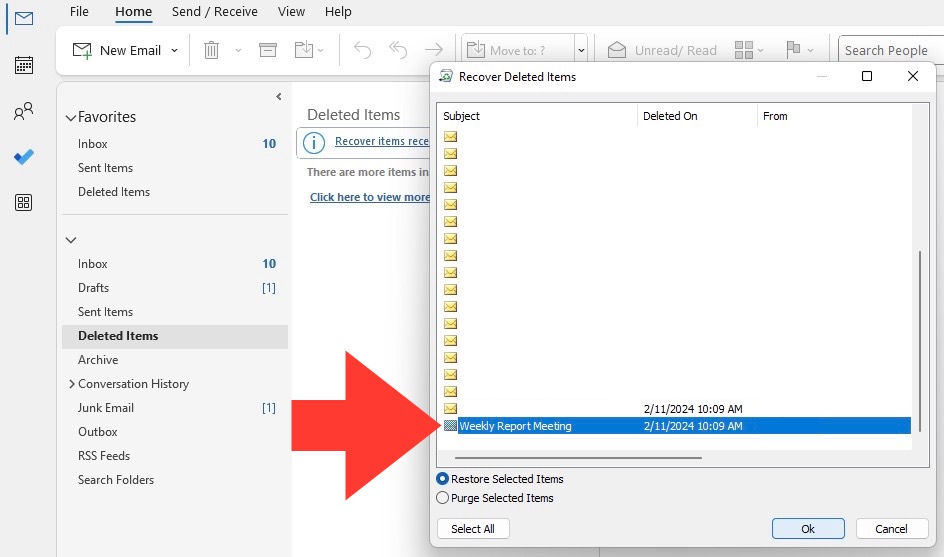
STEP 3: A dialog box will open, displaying a list of items that can be recovered.
STEP 4: Select the meeting you want to restore by clicking on it.
STEP 5: Once the desired meeting is highlighted, click on the ‘Restore Selected Items’ button.
STEP 6: Press ‘OK’ to confirm and the meeting will be placed back into your Calendar.
Do note that this action doesn’t uncancel the meeting. The status of the meeting will still be marked as canceled, and you will have to resend the invites to the participants.
Remember that this feature is available only if your Outlook account is connected to a Microsoft Exchange server and the retention settings allow for recovery. Always check your server’s specific settings and policies for detailed information on the retention period and recovery capabilities.
Preventing Future Meeting Mishaps
Strategies for Avoiding Accidental Meeting Cancellations
Having the know-how to recover a canceled meeting is crucial, but prevention is often the best strategy. To avoid accidental meeting cancellations, consider the following strategies:
- Confirmation Prompts: Always enable confirmation prompts in Outlook settings. This way, if you hit ‘Delete’ or ‘Cancel Meeting,’ a dialog box will ask you to confirm the action, providing a safety check against accidental deletions.
- Double-Booking Alerts: Use Outlook’s features that warn you of scheduling conflicts. This can prevent overbooking and the subsequent need to cancel.
- Focused Inbox Management: Keep a tidy and organized inbox so that meeting invites and updates do not get lost amid clutter. Regularly clean your inbox and utilize folders and flags to keep track of important items.
- Clear Scheduling: Visualize your calendar often and make use of color coding for different types of appointments. A clear visual representation can help prevent mistakes.
- Drafts and Templates: If you are prone to sending out the wrong details, prepare meeting templates. Use drafts to double-check details before sending out the invite.
- Delegation and Permissions: If you work with an assistant or a team, set appropriate permissions and guidelines on who can manage calendar events to prevent crossed wires.
- Training and Familiarity: Regularly take time to familiarize yourself with the full functionality of Outlook. Understanding how to use calendar and meeting features effectively can minimize errors.
By implementing these strategies, you can reduce the likelihood of accidental cancellations and avoid the need to restore meetings. This proactive approach can save time and ensure that your meeting schedules remain reliable and intact.
Tips on Effective Meeting Scheduling in Outlook
Effective meeting scheduling in Outlook not only ensures that meetings are well-organized but also reduces the risk of cancellations and miscommunications. Here are some tips for efficient meeting scheduling:
- Plan in Advance: Scheduling meetings well in advance allows participants to prepare adequately and reduces the likelihood of last-minute changes or cancellations.
- Use Scheduling Assistant: Utilize Outlook’s Scheduling Assistant feature to find times when all participants are available. This tool can help avoid conflicts and the need for rescheduling.
- Customize Reminder Times: Set reminders at appropriate intervals before the meeting. This ensures attendees have enough time to prepare and reduces the chance of no-shows.
- Set Agendas: Always include a clear and concise agenda with your meeting invitation. This clarifies the meeting’s purpose and makes it easier for invitees to prioritize their attendance.
- Recurring Meetings: When scheduling regular meetings, use the recurring meeting option but also review the series periodically to adjust for any changes in availability or relevance.
- Buffer Time: Allow for buffer time between meetings, especially if attendees need to physically move between locations. This reduces the need to rush or cancel if the previous meeting overruns.
- Confirmation Messages: Send out confirmation messages or emails a day before the meeting to remind attendees and confirm their availability.
- Transparent Communication: Be clear about the importance of the meeting and if attendance is obligatory or optional. This helps participants to prioritize their schedules accordingly.
By following these tips, you can schedule meetings in Outlook that run smoothly, respect participants’ time, and ultimately contribute to a more productive and organized work environment.
Advanced Solutions for Meeting Restoration
Utilizing Third-Party Recovery Tools
In cases where Outlook’s built-in recovery options are not sufficient, you can resort to third-party recovery tools. These tools often offer advanced recovery features that can help retrieve items that are no longer accessible via standard methods. When selecting a third-party recovery tool, here’s what to consider:
- Compatibility: Ensure the tool is compatible with the version of Outlook you are using, whether it’s Outlook 2010, 2013, or another version.
- Security: Choose tools with strong security measures to avoid data breaches. The software should not compromise the integrity of your data.
- Features: Look for features like the ability to perform a RAW scan, which entails a bit-by-bit search of Outlook files (.pst, .ost, .bak) to recover items.
- Reliability: Select a tool with a proven track record of success. Look for testimonials or reviews from other users to gauge the tool’s effectiveness.
- Ease of Use: Opt for a user-friendly interface that doesn’t require extensive technical knowledge. It should make the recovery process straightforward.
For instance, a product like ‘Outlook Deleted Items Recovery’ is built to enhance the recovery process. Such software performs deep scans to locate permanently deleted items and often allows for bulk file handling, and secure recovery of deleted Outlook calendar events and other items. Furthermore, these tools sometimes come with the option to export recovered data into various formats, adding an extra layer of utility.
While using any third-party software, it is important to always have a recent backup of your Outlook data. This minimizes the risk of data loss should any issues arise during the recovery process. If you are uncertain about using a third-party tool, consulting with IT support is advisable to ensure the safety and security of your data.
When to Contact IT Support for Assistance
There are instances where self-recovery methods and third-party tools might not suffice to uncancel a meeting. In such situations, reaching out to IT support is the advisable course of action. Contact your IT support when:
- Server Issues: If the problem is server-side or if you suspect a synchronization error between your Outlook client and the Exchange server.
- Recovery Tool Complexity: When utilizing a third-party recovery tool seems too complex or risky, and you’re concerned about potential data loss.
- Data Corruption: If the calendar or mailbox data is corrupted, IT support can employ more sophisticated recovery methods that are beyond the capabilities of standard user tools.
- Persistent Errors: When you face persistent errors in Outlook that prevent you from effectively managing your calendar or retrieving deleted items.
IT support teams have access to administrative tools and expertise to handle a variety of technical issues. They may also be able to restore items from backups that are typically not accessible to end-users. Involving them early can save time and prevent further complications, ensuring that your schedule is restored to its correct state as swiftly as possible.
In any case, before reaching out for help, it’s essential to gather all relevant information about the issue, including any error messages and the steps you’ve already taken. This enables the support team to understand the problem better and expedites the resolution process.
Best Practices for Meeting Management in Outlook
Regularly Checking Calendar and Reminders
For optimal meeting management, it is critical to make a habit of regularly checking your Outlook calendar and ensuring that reminders are set up correctly. This not only helps in staying on top of your schedule but also in avoiding accidental cancellations and missed meetings. Here are some best practices:
- Daily Review: Begin your day by reviewing your calendar to be aware of scheduled meetings, their times, and their locations. This practice helps you plan your day effectively.
- Reminder Notifications: Outlook allows customization of reminder times for each meeting. Set reminders that give you enough time to prepare or travel to the meeting venue.
- Update Notifications: Turn on update notifications so you are immediately aware when a meeting time or location has been changed.
- Mobile Sync: Make sure your mobile devices are synced with your Outlook calendar. This provides an additional layer of reminder, as most smartphones send out push notifications for calendar events.
- Calendar Clearance: Regularly clear outdated or canceled meetings from your calendar. This reduces clutter and the chances of confusion arising from non-relevant entries.
By following these steps, you maintain a clean, updated calendar and ensure that you are fully aware of your commitments, which in turn enhances your productivity and time management.
Managing Notifications to Avoid Missing Changes
Staying on top of notifications in Outlook is vital to ensure that you do not miss important changes to meeting schedules. Properly managing notifications will help you to respond promptly to meeting updates, cancellations, and other important communications. Here are some tips to manage notifications effectively:
- Customize Alert Sounds: Differentiate meeting notifications from other alerts with specific sounds. This way, you’ll immediately recognize the importance of a prompt review.
- Email Rules: Set up email rules to prioritize and organize meeting-related messages into a designated folder. This filters out the noise so you don’t miss critical updates.
- Desktop Alerts: Make use of desktop alerts in Outlook for immediate pop-up notifications when changes occur.
- Follow-up Flags: In cases where immediate action isn’t possible, use follow-up flags to remind yourself to revisit the invite or notification later.
- Notification Preview: Enable notification previews to quickly see the essence of updates without having to open the email.
- Calendar Views: Use different calendar views to keep an overview of the daily, weekly, and monthly schedules. This can help you visualize potential conflicts or changes.
- Disable Non-Essential Alerts: Minimize distractions by turning off non-essential alerts, thus allowing you to focus on important meeting notifications.
By employing these strategies, you will be less likely to overlook critical changes in your meeting schedule. It’s about creating a system that aligns with your workflow, enabling you to respond to changes efficiently and keeping your schedule in sync with your plans.
FAQ About Uncanceling Meetings in Outlook
How can I prevent meetings from being canceled accidentally?
To prevent meetings from being canceled accidentally in Outlook, consider the following preventive measures:
- Double-Check Before Sending Cancellations: Always review the details of the meeting before sending out a cancellation notice. Outlook typically asks for confirmation before finalizing the cancellation; ensure you read the prompts carefully.
- Utilize Outlook’s Permissions: Configure permissions to limit who can cancel meetings. For instance, if you have delegates managing your calendar, ensure they understand the importance of cross-verification before canceling any meetings.
- Create a Confirmation Step: Implement a policy where major changes to meetings, including cancellations, must be confirmed with a second party, such as an assistant or a team member, before being executed.
- Use Categories and Flags: Assign categories and flags to important meetings. This additional visual cue can serve as a reminder to be cautious when handling such items.
- Avoid Multitasking with Calendar Management: When managing your calendar, avoid multitasking. This focused approach reduces the risk of accidental clicks that may cancel meetings.
By incorporating these practices into your routine, you can greatly reduce the risk of accidental meeting cancellations in Outlook.
What should I do if the ‘Recover Deleted Items From Server’ option does not work?
If the ‘Recover Deleted Items From Server’ option does not work in Outlook, there are a few steps you can take to attempt a recovery or to address the issue:
- Check the Retention Policy: Verify the retention policies set by your organization on the Exchange server. There could be a limitation on the duration for which deleted items are recoverable.
- Use ‘Recoverable Items’ Folder: If you are on an Exchange server and have hard-deleted the item using Shift + Delete, check the ‘Recoverable Items’ folder (formerly known as ‘Dumpster’) in the ‘Folder’ view in Outlook on the web (formerly Outlook Web App or OWA).
- Outlook Backup: If you have a backup of your PST or OST file, you can use it to restore your deleted meetings or other items.
- Third-Party Recovery Tools: Consider using third-party recovery tools which may provide more advanced recovery options compared to Outlook’s native features.
- Contact IT Support: If you have tried the above options and the meeting is still not recoverable, contact your IT support or administrator. They have access to additional tools and may be able to recover the deleted meeting from server backups.
- Review Audit Logs: In some cases, it’s useful to review audit logs, if available, to determine if the item was deleted and by whom. This might require administrative privileges.
- Recreate the Meeting: As a last resort, if none of the recovery options work, manually recreate the meeting and resend invitations to the participants.
Always ensure that any intervention complies with your organization’s IT policies and guidelines. It’s better to prevent data loss by frequently backing up your data and being mindful while managing your Outlook items.
John Michaloudis is a former accountant and finance analyst at General Electric, a Microsoft MVP since 2020, an Amazon #1 bestselling author of 4 Microsoft Excel books and teacher of Microsoft Excel & Office over at his flagship MyExcelOnline Academy Online Course.


