Meeting invites are like mini contracts: the mere act of accepting your invitation means someone is committing their time and focus to your agenda. If your invites don’t have a clear schedule and purpose, you risk breeding an atmosphere where there’s no accountability or sense of importance regarding attendance. More than just coordinating schedules, detailed meeting invite templates help bring your team’s daily activities to light, nourishing a sense of responsibility and organization within the group.
Learn about Excel with our Free Microsoft Excel Online Course!
Key Takeaways
- Utilize the recurring meeting feature in Outlook to set up a meeting template for events like weekly meetings, ensuring consistency in subjects, participants, and locations. This helps in avoiding repetitive tasks and saves time.
- Draft a concise and clear meeting invitation template with a distinct purpose and agenda to communicate effectively with invitees, streamlining your communication and reducing the time spent on composing individual invites.
- Implement personalization in the greeting and ensure to include essential details such as date, time, location, and RSVP requests within the template to maintain professionalism and clarity in the meeting invites.
Enhancing Your Productivity with Outlook Templates
Ready to make your work life a touch easier? Microsoft Outlook is not just for checking email; it’s a productivity powerhouse if you harness its full capabilities. Imagine creating a meeting invite with only a few clicks, all thanks to Outlook templates.
Outlook invites often contain the same elements: a greeting, meeting agenda, date, time, and call-to-action. Rather than typing this out for every single meeting, templates save you that time, allowing you to pour energy into what matters most. With templates, your Outlook transforms into a personal assistant, streamlining your invitation process and slashing the time that you used to spend on drafting emails.
Remember, every minute you save with an invitation template could be spent closing deals, crafting strategies, or simply enjoying that well-deserved coffee break.
Table of Contents
Crafting Perfect Email Meeting Invites
Essential Elements of an Effective Invitation
Crafting the ultimate email meeting invitation is like making the perfect espresso – each element must be carefully measured and executed for that satisfying result. And in the busy world of emails, you want your invite to be the espresso shot that stands out in a sea of instant coffee! Here’s the blend for an effective invitation:
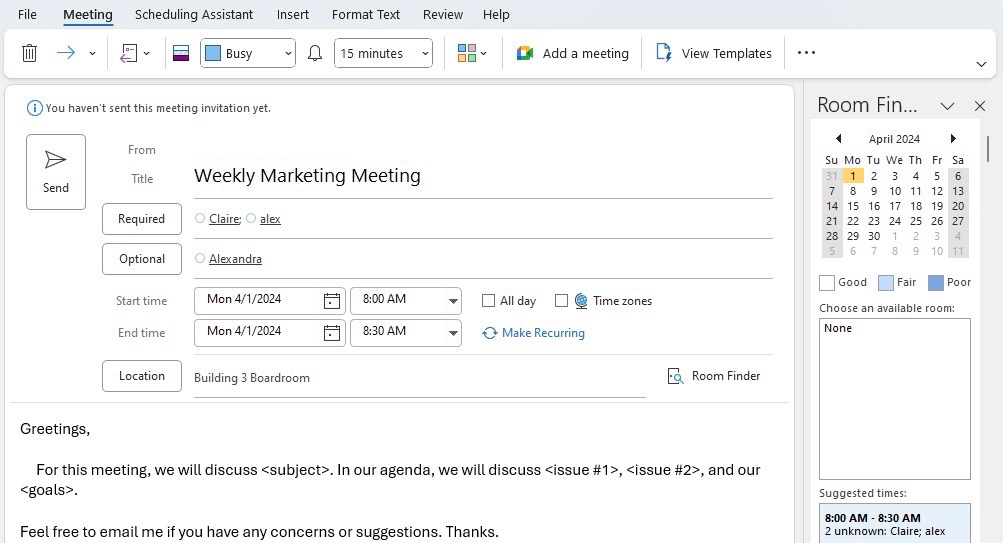
STEP 1: Open Outlook and navigate to the Calendar view>Click on “New Meeting.”
STEP 2: Start with a Zesty Subject Line: Like the aroma of coffee to your nose, a subject line is the first thing that lures them in. Make it short, enticing and clear – think “Q3 Sales Strategy – March 15, 10 AM EST.”
STEP 3: Personalized, Friendly Greeting: It’s like a warm smile as they open the door. A bit of personalization can transform a mundane task into a pleasant interaction. Add a dash of warmth – “Hi Team” for groups, or “Hello [First Name]” for individuals.
STEP 4: Precise Date and Time: Just as in baking, specificity is key here. “Tuesday at 10” could mean any Tuesday ever, while “Tuesday, March 15, at 10 AM EST” has the precision that avoids confusion and no-shows.
STEP 5: Locate, Locate, Locate: Virtual meeting or in-office, a clear location is imperative—the digital equivalent of “second coffee shop on the left.” Include a room name or a clickable link.
STEP 6: State Your Purpose With Clarity: Why are you here? What’s brewing? An ambiguous purpose leads to a watered-down meeting. Be explicit: “Discuss Q3 Sales Strategies and Set Targets.”
STEP 7: Agenda and Expectations: Everyone appreciates knowing the menu before they sit down. Outline discussion topics or presentation items clearly for your attendees.
STEP 8: RSVP, Please: It’s the headcount for your event planning. Encourage an RSVP by a specific date for a proper tally of attendees.
STEP 9: Professional Closure: Sign off with a touch of formality and all the necessary contact information. A signature template in Outlook can take care of this every time.
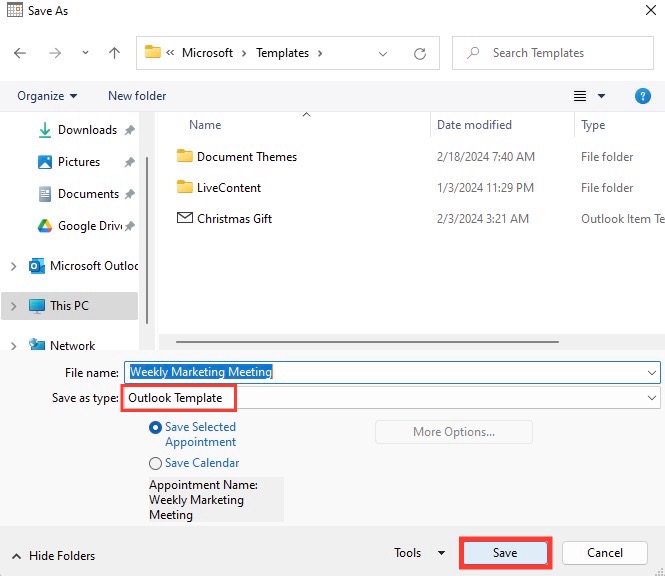
STEP 10: Click on “File” in the menu bar and select “Save As.”
STEP 11: Choose “Outlook Template (*.oft)” as the file type.
STEP 12: Click “Save” to finalize the creation of your meeting template.
To use your freshly-made template:
STEP 1: Navigate to the Calendar view in Outlook.
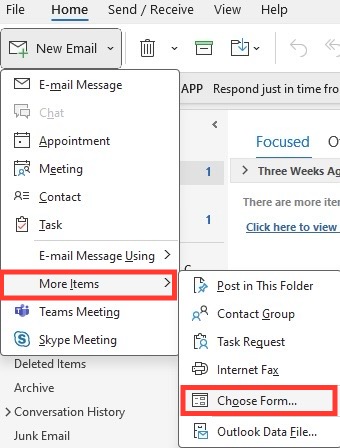
STEP 2: Click on “New Items” in the menu bar.
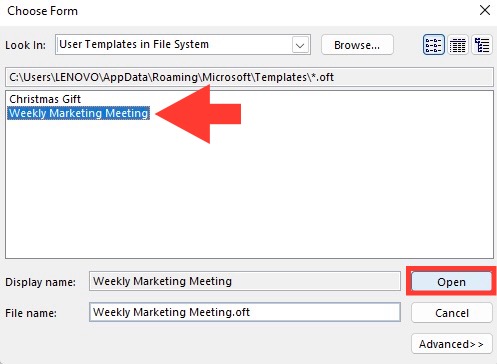
STEP 3: Select “Choose Form” and then “User Templates in File System.”
STEP 4: Browse and select the meeting template you previously saved.
STEP 5: Fill in any additional details or make changes if necessary.
STEP 6: Click “Send” to schedule the meeting using the template.
With this recipe, your meetings are bound to become the kind that people look forward to, attend on time, and contribute to effectively, each and every time.
Customizing Outlook’s Quick Step Feature for Faster Invites
If you’re looking to make your email routine faster than a morning espresso shot, let’s introduce you to Outlook’s Quick Steps. This feature is like having a personal assistant dedicated to your emails, one that doesn’t require a paycheck. With Quick Steps, you’re empowering yourself to send out meeting invites with the finesse and speed of a pro.
Here’s how to put this magic to work in your day-to-day:
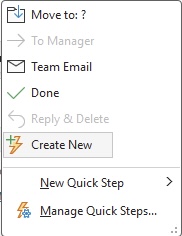
STEP 1: Open Outlook and navigate to the Quick Steps box, then click “Create New.”
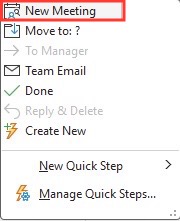
STEP 2: Click on “New Meeting”.
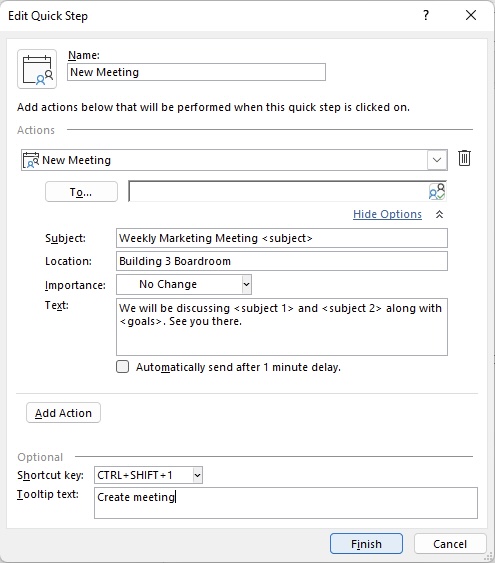
STEP 3: Fill in the required details such as subject, date, time, and attendees.
STEP 4: Customize the meeting agenda or description as needed.
STEP 5: Under “Name”, assign an appropriate one for the template.
STEP 6: Choose one of the shortcut keys and assign it to your template.
STEP 7: Click “Finish” to save your Quick Step.
To use your Quick Steps template:
STEP 1: Click on the “Quick Steps” menu.
STEP 2: Select the Quick Step you created (“Meeting Template”). Or simply use the shortcut you assigned, “CTRL+SHIFT+1.”
STEP 3: Click “Finish” to schedule the meeting using the template.
The beauty of Quick Steps is that they adapt to your needs. Whether you’re organizing weekly team check-ins or client presentations, Quick Steps affords you the efficiency to not just work hard, but smart.
Remember, in a world where time is precious, customizing Quick Steps in Outlook is like giving yourself a gift of minutes, if not hours back. Every. Single. Day.
Creating Your Personalized Meeting Template
Step-by-Step Guide to Designing a Form in Outlook
Creating a personalized meeting template in Outlook can seem like origami at first—detailed and precise—but once you’ve mastered the folds, it becomes second nature. Let’s walk through step-by-step how you can design an Outlook form that streamlines your scheduling process and adds a professional touch to your invites.
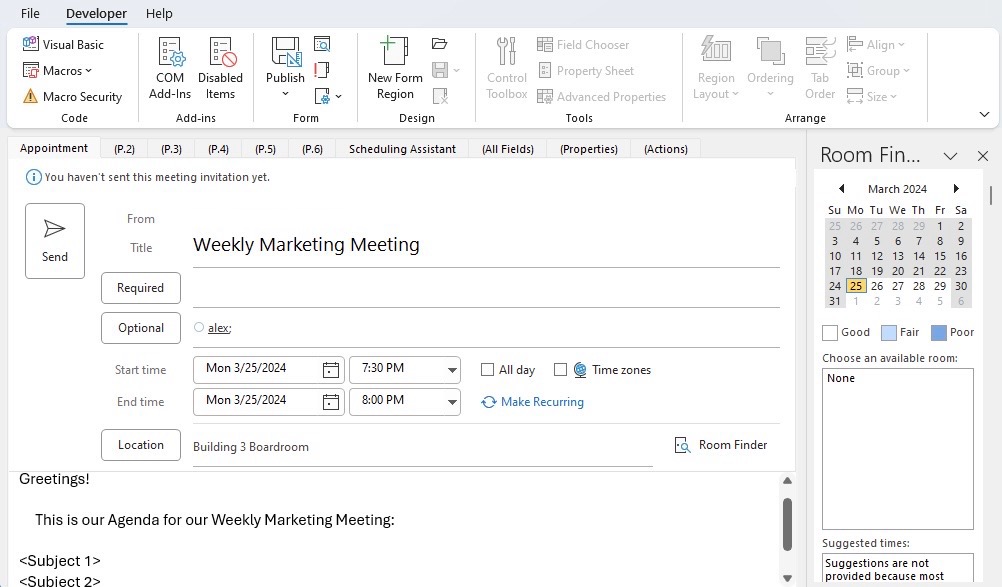
STEP 1: Initiate Outlook and Calendar: Jump into Outlook and hop over to the Calendar pane.
STEP 2: New Appointment or Meeting: Click to create a new appointment or meeting.
STEP 3: Fill In the Details: Add your subject, location, and any other pertinent information (think agendas, reminders, categories).
STEP 4: Access the Developer Tab: If this tab is playing hide and seek, fear not. Go to “File” > “Options” > “Customize Ribbon” to coax it out.
STEP 5: Design This Form: In the Developer tab, click “Design This Form” to begin customizing.
STEP 6: Fine-Tuning: Make your form attractive and functional—set it up exactly how you’d like each invite to appear.
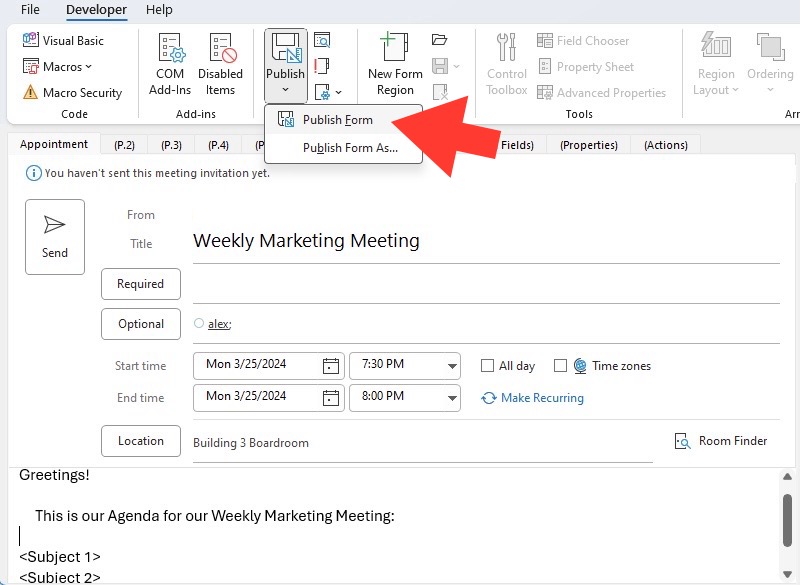
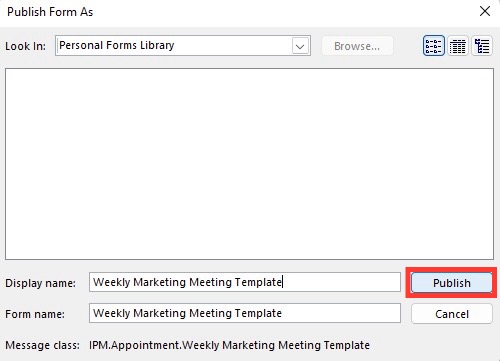
STEP 7: Publish Your Masterpiece: Click “Publish”, choose “Publish Form As”, select “Personal Forms Library” for location, name your form, and presto – it’s ready!
Close Without Saving: No need to save changes in the new appointment/meeting window – your form is waiting safely in the library.
To use your newly designed Form:
STEP 1: Return to the Calendar view in Outlook.
STEP 2: Click on “New Meeting” to create a new meeting invitation.
STEP 3: Fill in any required details.
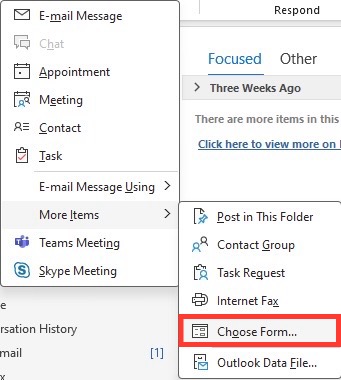
STEP 4: Go to the “Developer” tab in the ribbon.
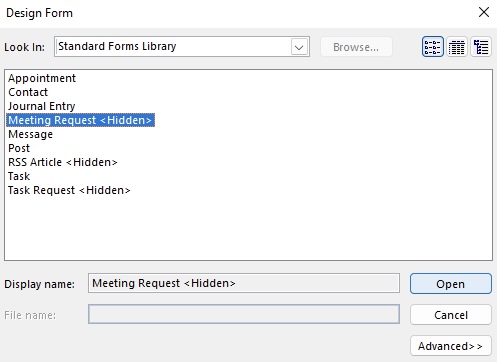
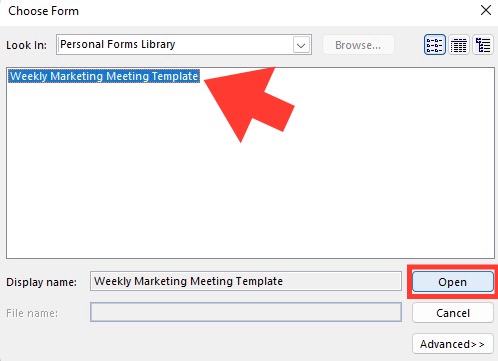
STEP 5: Click on “Choose Form” to open the Choose Form dialog box.
STEP 6: Select “Personal Forms Library” from the “Look In” dropdown menu.
STEP 7: Navigate to the folder where you saved your meeting template.
STEP 8: Choose the template you created and click “Open.”
STEP 9: Fill in any additional information if needed.
STEP 10: Click “Send” to schedule the meeting using the template.
Now, whenever you need to send an invite, you’re mere clicks away from an elegantly crafted, professional-looking email that takes no time at all.
Remember, with Outlook forms, you’re not just sending out invites; you’re sending a statement of your efficiency and attention to detail.
Tips for Making Templates That Stand Out
In the realm of email clutter, your meeting invite must be a shining knight – noticeable, memorable, and actionable. Here are some pro tips to ensure your templates cut through the noise and stand out:
- Embrace Branding: Infuse your company’s color scheme, logo, and fonts. A template that aligns with your brand prevents your invite from looking like another generic email.
- Inject Personality: Incorporate a tone that matches your team’s culture. A dash of humor or a warm message can transform the reading experience.
- Use Bullet Points & Headings: No one wants to decipher a wall of text. Structural elements like bullet points, headings, and numbered lists make your content digestible.
- Include Visuals: Where appropriate, add relevant images, icons, or even emojis to break the monotony of text and add a visual hook.
- Opt for Readability: Choose fonts and layouts that are easy on the eyes. Consistency in font sizes and styles gives off an aura of professionalism.
- Hyperlink Resources: If you reference documents or agendas, hyperlink them to make accessing information a breeze for the invitee.
- Mobile Responsiveness: Remember, a chunk of your recipients will open their mail on mobile devices. A mobile-friendly design ensures everyone sees your invite as intended.
With these tips, you can craft an Outlook template that’s not just another email, but a portal to productive, anticipatory, and engaging meetings.
Streamlining Your Meeting Process
Automating Invites with Default Templates
Get ready to free yourself from the repetitive chore of typing out invites for your standard meetings. By automating invites with default templates, you’ve got the golden ticket to increased productivity. Outlook shines in this arena, allowing you to utilize default templates for meetings that occur regularly.
Here’s how to automate invites to maximize your scheduling efficiency:
- Set Up Your Template: Craft an inviting template with all the regular details of your recurring meetings.
- Make it Your Default: In the Outlook Calendar, create a new meeting, fill in your template details, and save it as a custom appointment form.
- Automate Recurrence: Set up the meeting recurrence—daily, weekly, monthly, you name it—and Outlook will automatically send your invites according to schedule.
By having a ready-made template, you’re cutting down on the manual input each time you arrange these meetings. The key here is to ensure that the recurring details are spot on, so you won’t have to fret about minor changes or updates each time an invitation is sent out.
With automated invites, you’re left with more breathing room to prepare for the meetings themselves or to tackle other vital tasks. It’s like setting a reliable course and watching your ship sail smoothly towards the horizon.
Leveraging Fillable Templates for Dynamic Agendas
If meeting agendas were stones, then fillable templates would be the sling – the simple yet powerful tool you need to target success precisely. Leveraging fillable templates turns the process of concocting dynamic agendas into an almost effortless task.
Here’s your playbook for utilizing fillable templates effectively:
- Create a Template with Fillable Fields: Design a template with designated fields like “Discussion Topics,” “Action Items,” and “Objectives” where content can be tailored for each meeting.
- Use Macros to Your Advantage: Outlook allows you to integrate macros that pull in relevant information automatically, such as attendee names or the current date.
- Keep Content Fresh and Relevant: Modify the fillable fields with the appropriate content before dispatch. The structure stays the same while the content dances to the tune of the meeting’s purpose.
- Streamline the Briefing Process: Send these agendas out ahead of time so attendees can come prepared, ensuring the meeting runs like clockwork.
- Save Versions for Different Meeting Types: Have variations for one-on-ones, team check-ins, and client pitches. This ensures customization while maintaining a consistent workflow.
By leveraging these adaptable outlines, you’re not only trimming down time spent on creating agendas but also enhancing participant engagement with crisp, clear, and customized content. Fillable templates act like chameleons, blending into the needs of every unique meeting with elegant simplicity.
Advanced Strategies for Pro-Level Invites
Incorporating Calls to Action for Increased Response Rates
A call to action (CTA) isn’t just a marketing gimmick; when it comes to meeting invites, it’s the hook that draws attention and prompts a response. Like a siren’s call, the right CTA can increase your response rates significantly, ensuring that your invite doesn’t sink in the sea of unread emails.
To incorporate effective CTAs in your invites:
- Be Clear and Concise: Your CTA should shout what you want the recipient to do. “Confirm your attendance by Friday!” is far more direct than a vague “please reply.”
- Inject Urgency: Just like a limited-time offer, a sense of urgency can spur recipients into action. “Slots filling fast – reserve your seat!” can make clicking RSVP feel imperative.
- Offer Value: Let attendees know what’s in it for them. “Join our brainstorming session and leave with actionable strategies!” highlights the appeal.
- Empower with Simplicity: Ensure the action step is easy to take. A single click to RSVP or calendar add-on can make all the difference.
- Get Creative: Use engaging language to make mundane tasks sound exciting. Instead of “schedule a meeting,” try “book your brainstorm session!”
By weaving these persuasive elements into your meeting invites, you’re not just requesting attendance; you’re offering an enticing opportunity that’s hard to pass up.
Remember, a compelling CTA is the gentle nudge that can transform passive readers into active participants, lifting your meeting’s success to new heights.
Utilizing Time Zone Awareness for Global Teams
In our increasingly connected world, your team might be just as likely to be sipping a latte in London as they are a smoothie in San Francisco. For global teams, time zone awareness in meeting invites isn’t a courtesy—it’s a critical necessity to keep everyone in sync.
Embrace Tech Savvy: Ensure your meeting platform, be it Outlook or any other, is equipped to handle time zone conversions. When you schedule a meeting in, say, Eastern Standard Time (EST), Outlook will kindly convert it to the respective local time zones of your colleagues, avoiding any 4 AM surprise wake-up calls.
Mention Time Zones Explicitly: State the primary time zone of the meeting when sending invites, and consider including a couple of major time zone conversions. For example: “Project Sync – 2 PM EST (11 AM PST / 7 PM GMT).”
Be Culturally Considerate: Remember that time zones also come with cultural nuances. An after-hours meeting for you might mean breaking bread time for someone else.
Use World Clock Features: Take advantage of Outlook’s world clock feature to line up potential meeting times without the mental gymnastics of time zone math.
Utilize Scheduling Assistants: Tools like Outlook’s Scheduling Assistant or external apps can help find the sweet spot where everyone’s schedule aligns.
By being time zone aware, you’re not just scheduling a meeting; you’re crafting a global experience that respects the valuable time of your team members, wherever the sun may find them.
Execution Matters: Send Out Your Invites Properly
Setting Deadlines and Following Up With Attendees
Setting deadlines for RSVPs and following up with your attendees is like the stage management behind a hit show—it ensures everyone’s on cue for a stellar performance. When you send out your meeting invite, the deadline is the figurative drum roll that garners prompt decisions from your potential attendees.
Establish RSVP Deadlines: Be crystal clear about the deadline for responses. Attach a date that provides you with enough lead time to adjust plans as needed. “Please confirm your attendance by March 10th,” leaves no room for doubt.
Friendly Follow-ups: If responses lag, a gentle reminder can work wonders. Light nudges sent with good humor can turn what is easily forgotten into an action item ticked off the list.
Monitor the Headcount: Keep a close eye on the number of responses. As the deadline approaches, assess if you need a plan B for low turnout or adjust the meeting setup according to interest.
Utilize Automated Reminders: Save yourself some legwork by automating reminder emails through Outlook. A little pre-planning here means one less to-do later.
Personal Touch Works Wonders: For key participants, a personal follow-up might be more appropriate. Quick calls or personalized emails show you value their input and presence.
By setting a firm yet reasonable RSVP deadline and following up as the date draws near, you’re carefully orchestrating participation. And by doing so, you drastically up the chances of a full house when the curtains lift on your meeting.
Remember, the goal is not to hassle but to facilitate smooth planning. With deadlines and thoughtful follow-ups, you’re setting the stage for a meeting that’s well-attended, productive, and valued by all involved.
Distributing Invitations Across Platforms Efficiently
In the digital age, ensuring your meeting invitations reach everyone can resemble guiding ships through a bustling port—every vessel has a different route. Efficiently distributing invitations across various platforms guarantees that each invitee receives the memo via their preferred channel.
Consider the strategies below to maximize your invitation distribution:
- Integrate with Calendly: If you’re an Outlook user who schedules myriad meetings, Calendly can be a lifesaver. This tool syncs with your Outlook calendar, automates scheduling, and once integrated, distributes your invites effortlessly. The bonus is that it also aligns with Google Calendar, which means invitees will find the invite right where they need it.
- Use Dedicated Email Marketing Tools: For a more advanced approach, especially when addressing large crowds, leverage services like Mailchimp or Constant Contact. These services offer formatted invitations, tracking, and efficient management of attendee lists.
- Cross-Platform Consistency: Ensure that your invitation’s essential information is consistent across all platforms. Whether it’s distributed via email, Slack, or a Facebook event, the details must align.
- Link with Video Conferencing Platforms: If your meeting is remote, make sure that platforms like Zoom, Webex, Microsoft Teams, or Google Meet are properly linked and that the invite includes all necessary joining instructions.
- PDF Invitations for Formality: When dealing with more formal or larger scale events, creating a PDF invitation on company letterhead and attaching it to an email adds a classy touch.
Remember, each platform has its strengths, and utilizing them in harmony can cast a wide net that brings in all your attendees effectively and effortlessly.
Using a combination of integration and awareness of platform strengths you ensure smooth sailing for your invitations across the digital sea, from one inbox harbor to another.
Frequently Asked Questions
What Should Every Meeting Invitation Email Include?
Every meeting invitation email should include:
- A clear subject line that summarizes the meeting’s purpose.
- A personalized greeting.
- The date and time of the meeting, with the time zone specified.
- The location of the meeting or a link to join if it’s virtual.
- An explicit statement of the meeting’s purpose.
- A brief agenda and expectations or objectives for the meeting.
- A request for RSVP to confirm attendance.
- A professional sign-off with your name and contact information.
Keep it concise to respect the recipients’ time and ensure clarity.
How Do You Ensure a High Response Rate to Meeting Invites?
To ensure a high response rate to meeting invites:
- Send clear, succinct invites outlining the meeting’s value.
- Include a straightforward call to action for RSVPs.
- Set a firm deadline for responses.
- Follow up with polite reminders as the deadline approaches.
- Make responding easy, for instance, through one-click RSVP links.
A thoughtfully constructed invite with these elements encourages promptness and respect for the meeting’s purpose.
John Michaloudis is a former accountant and finance analyst at General Electric, a Microsoft MVP since 2020, an Amazon #1 bestselling author of 4 Microsoft Excel books and teacher of Microsoft Excel & Office over at his flagship MyExcelOnline Academy Online Course.

