
The Value of Efficient Meeting Arrangements
Alright, let’s make organizing your professional life as easy as pie. If you’ve got Outlook at your fingertips, you’re halfway to seamless meeting management. This guide will be your companion, transforming you into a meeting scheduling ninja. So let’s dive right in!
Download our 141 Free Excel Templates and Spreadsheets!
Table of Contents
Key Takeaways
- To schedule a meeting in Outlook, begin by clicking on the Calendar icon, then select “New Event” where you can add the meeting title, choose the date and time, and invite attendees.
- Use the “Scheduling Assistant” in Outlook to view all invitees’ availability at a glance, which aids in selecting a time that accommodates everyone, indicated by green for available attendees and red for those who are unavailable.
- After the meeting details are set and attendees selected, clicking “Send” finalizes the invitation process and schedules the meeting on your Outlook calendar.
Getting Started with Outlook Meetings
Opening Your Personal Calendar in Outlook
Opening your personal calendar in Outlook is the gateway to mastering your schedule. This feature provides an at-a-glance view of your time commitments, ensuring that you won’t double-book or overschedule yourself. Here’s how you swing into action:
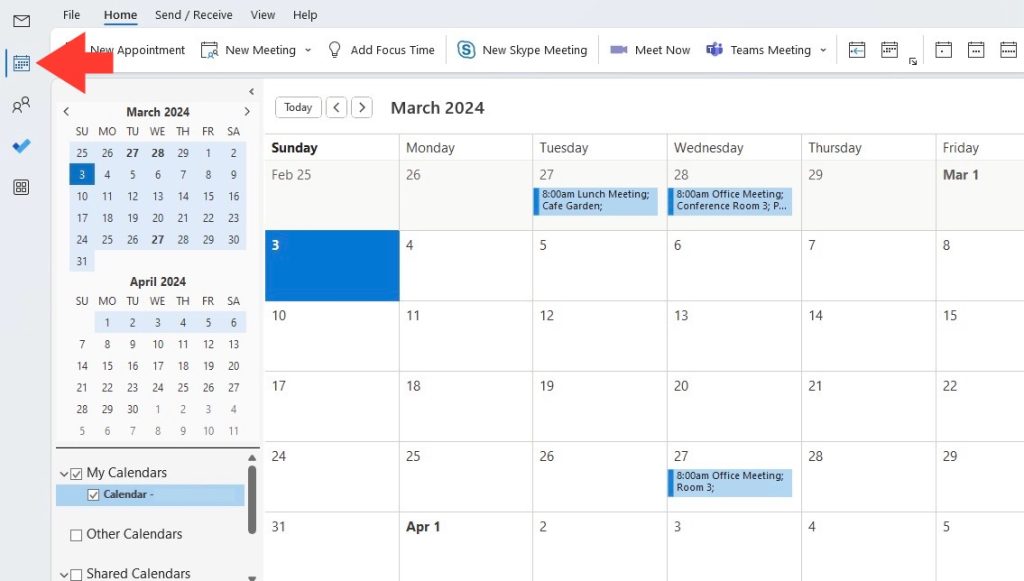
STEP 1: Look to the navigation pane on the left of Outlook and click on the “Calendar” icon.
STEP 2: Greeted by your personal calendar, you’ll see all your meetings and appointments laid out.
Imagine this space as mission control for your daily, weekly, and monthly agenda, ready to help you navigate the busy seas of professional commitments.
By keeping your calendar open, you’ll be able to move through the steps of setting up a meeting with grace and ease. Now, let’s take the next step and turn those open time slots into productive get-togethers.
New Event Versus Appointment: Defining the Difference
Grasping the nuances between a new event and an appointment in Outlook can save you plenty of confusion. It’s all about understanding who is involved and the level of interactivity required:
- An Appointment is your time block, meant for you to remember personal reminders or solo tasks. Think of it as a note to self on your Outlook calendar, visible only to you by default.
- A New Event, or what we often call a Meeting, steps it up a notch. This is when you’re bringing other people into the mix and possibly reserving shared resources, like a conference room. Once they accept your invitation, it pops up on their calendars, too.
Let’s slice it down further: Appointments are solo missions; meetings are team efforts. Keep this in mind, and you’ll choose the right option every time without a hitch.
Remember, every time you schedule a meeting instead of an appointment, you’re opening a channel of communication. That’s what makes Outlook such a powerhouse for collaboration. Now, let’s set the stage for creating your meeting request.
Crafting Your Meeting Invitation Perfectly
Creating a New Meeting Request with Ease
No need to fret over setting up a meeting in Outlook; they’ve made it super straightforward. Simply follow these steps, and you’ll have a meeting invite zipped off in no time!
From your Inbox view in Outlook:
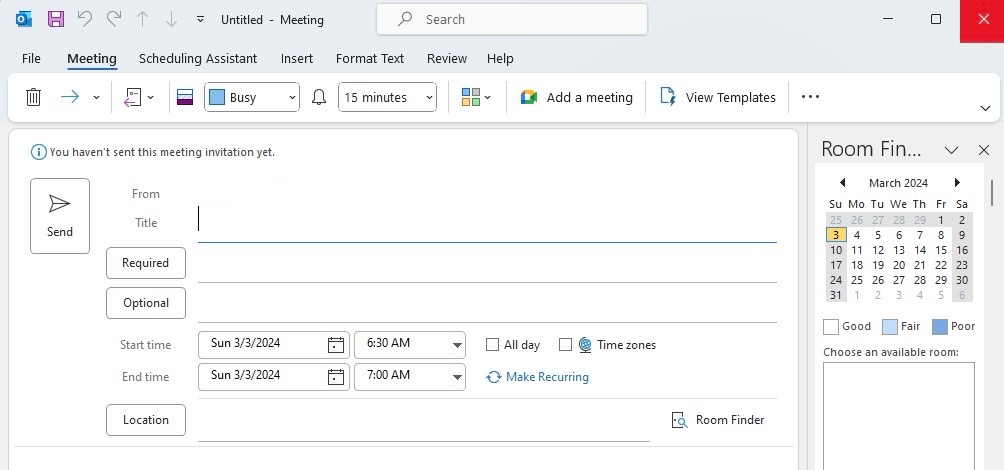
STEP 1: Click on the “New Email” and select “Meeting” from the dropdown menu or use the snappy keyboard shortcut Ctrl + Shift + Q.
It’s like drafting a new email, but specifically designed for gatherings. All that’s left is to populate it with details (we’ll cover that shortly).
This is your starting canvas to craft an invitation that gets everyone in the right place, at the right time, prepared for the agenda. Stay tuned as we delve into adding in those essential details.
Adding Essential Details – Date, Time, and Location
When it comes to crafting that perfect meeting invitation, the devil is in the details. Here’s how to ensure your meeting details are crystal clear:
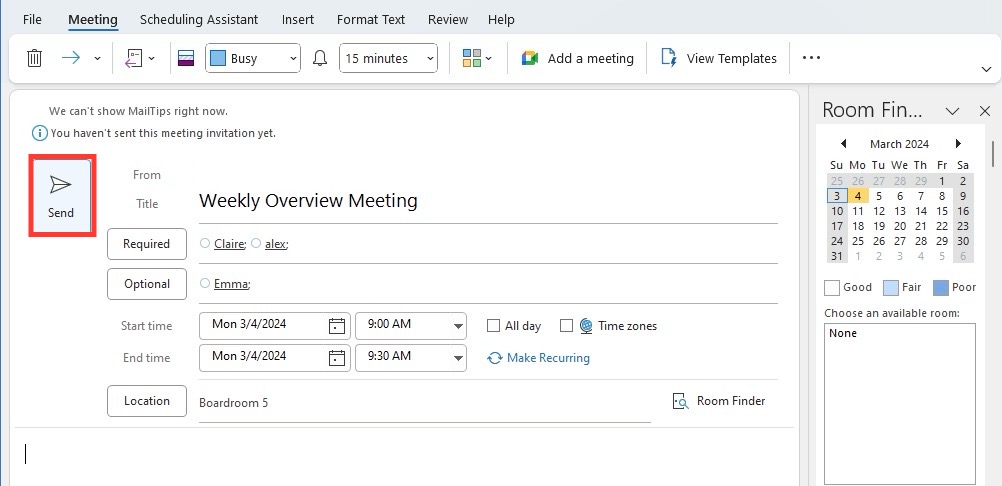
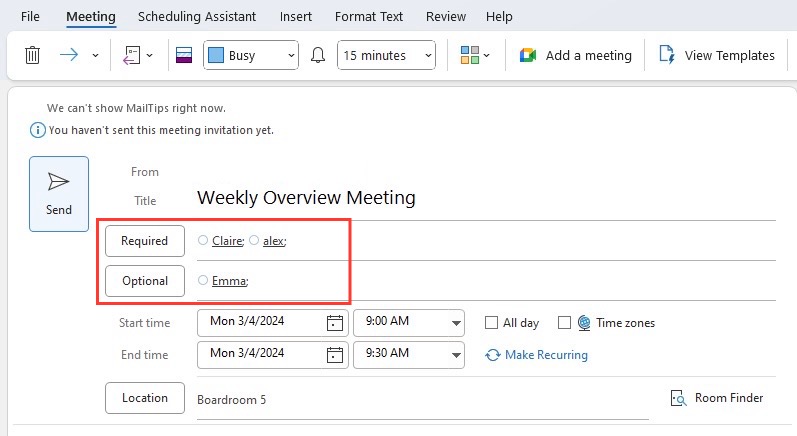
STEP 1: Title: Crown your meeting with a descriptive title. It’s the first thing your invitees will see. If you skip this, Outlook will kindly nudge you with a reminder.
STEP 2: Required: List the must-be-there attendees in the Required field. They’re the engine of your meeting.
STEP 3: Optional: Got some maybes? Tuck them into the Optional field. It’s a courteous way to extend an invite without the pressure.
STEP 4: Start and End time: Pin down the timeframe with a start and end time. Precision here helps everyone plan their day.
STEP 5: Location: Whether it’s a conference room or a virtual hangout, put the where clearly in the Location field. And if you’re using a room booking system, you can pick from available rooms right there. Don’t let Outlook’s default Microsoft Teams Meeting location throw you off; customize it if you need to.
STEP 6: Press “Send”, and your meeting flies off into the digital realm, signaling attendees to mark their calendars.
Stay tuned as we continue to tailor your Outlook meeting experience. Next up, let’s talk about making those recurring meetings a breeze.
Customizing Your Outlook Meeting Experience
Setting Up Recurring Meetings for Regular Engagements
Recurring meetings are like the steady drumbeat of your work rhythm—consistent, predictable, and they keep everyone in sync. Let’s get them set up in Outlook:
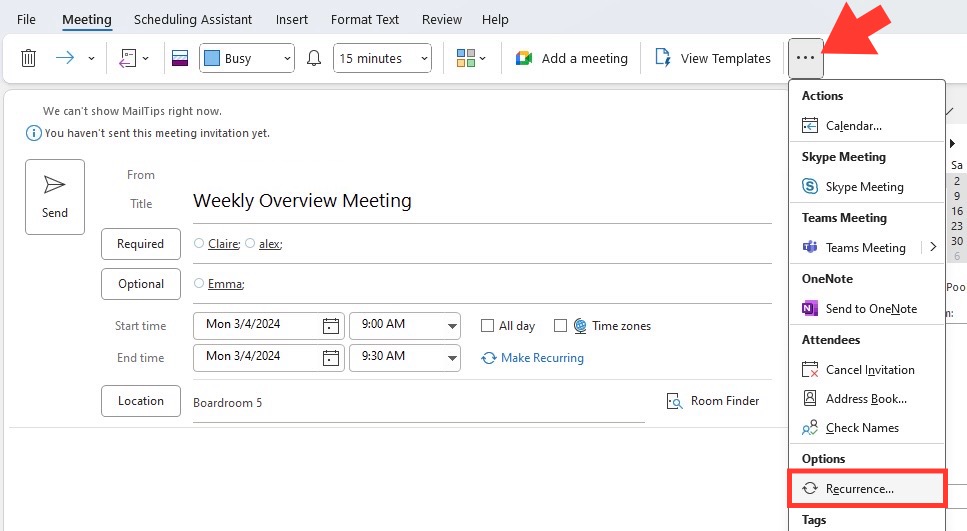
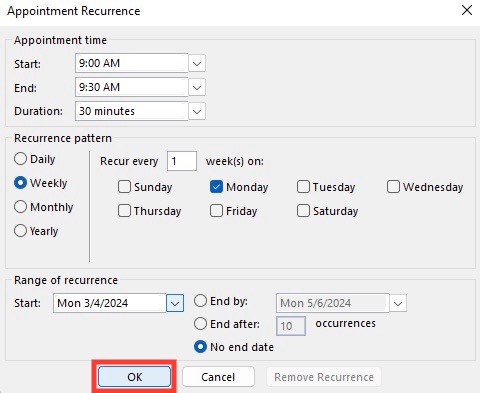
STEP 1: In your new meeting request, find the “Recurrence” button in the ribbon to pop open the recurrence pattern options.
STEP 2: Decide on the tempo of your meeting: Is it a daily, weekly, monthly, or annual gathering? Choose your frequency.
STEP 3: Customize further by selecting the days of the week and times if needed, perfect for that every-second-Tuesday team sync.
STEP 4: Set the range: when does this recurring meeting kick off, and when should it conclude?
STEP 5: Once you’re done, your recurring meetings will march along in your calendar, reducing the fuss of scheduling each session manually. Just remember, Outlook won’t play referee for double-bookings, especially in room reservations, so have a quick peek for conflicts before finalizing.
Up next: Let’s talk about putting everyone on the same page with the right attachments and agendas.
Attaching Files and Agendas to Keep Everyone on the Same Page
Having all the materials needed for a meeting beforehand can turn a good meeting into a great one. Here’s how you ensure everyone’s on the same page in Outlook:
Scheduling Assistance – Making Sure Everyone Can Attend
Ensuring that everyone can attend your meeting is like finding the sweet spot that aligns all the stars. Thankfully, Outlook’s Scheduling Assistant has your back. Let’s dig into how you can wield this tool effectively:
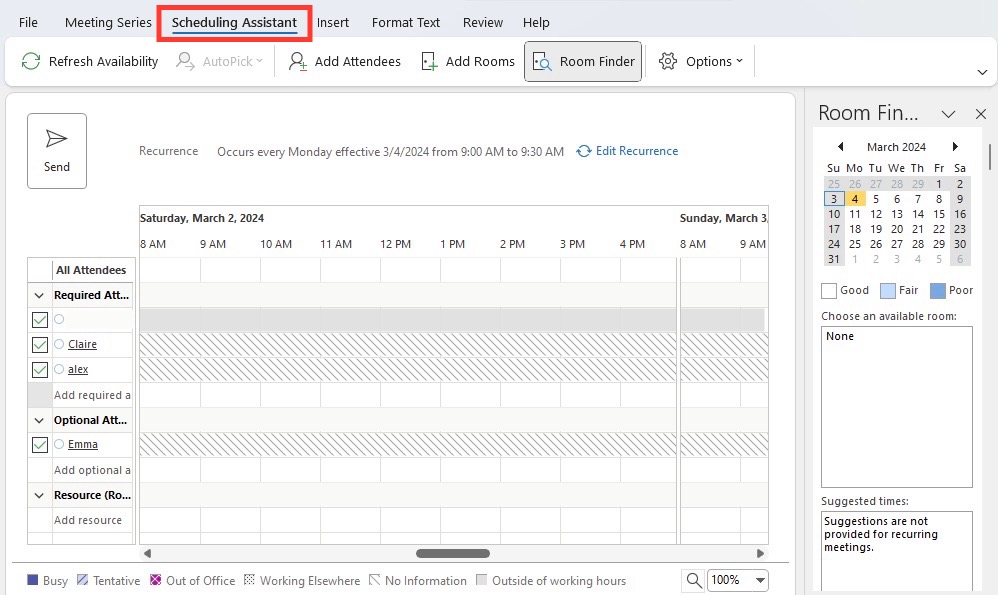
STEP 1: Open your meeting request and switch to the “Scheduling Assistant” tab.
STEP 2: Begin adding attendees’ names or emails. Outlook gets smart here, suggesting contacts as you type. Neat, right?
STEP 3: Once added, you’ll see a grid showing their availability. Look for the white space that indicates everyone is free.
STEP 4: If your attendees keep their calendars up to date, you’ll dodge the time-consuming back-and-forth typically involved in finding a suitable slot.
STEP 5: Fine-tune by setting your meeting date and time. Use the dropdowns or just drag and drop within the grid.
STEP 6: If the stars still don’t align, hit “AutoPick” and let Outlook find the next best slot.
And now, with the perfect time slot locked in, you’re just a click away from sending out that polished invite. Stay tuned as we step into next-level tips to elevate your Outlook meeting invites even further.
Next-Level Tips for Outlook Meeting Invitations
Adding Conference Calls or Video Links to Stay Connected Virtually
In today’s hybrid work environment, adding virtual meeting elements is essential. With Outlook, intertwining the digital thread to connect participants virtually is straightforward:
- In your meeting invite, look for the “Teams Meeting” button on the ribbon. One click, and Outlook will automatically craft and insert your Microsoft Teams meeting link. It’s easy-peasy and oh-so-smooth.
- If you’re more of a Skype for Business aficionado, the process is just as simple. Find the “Skype Meeting” button, give it a tap, and behold as the URL for your Skype meeting materializes in the invite.
Remember, the magic here is consistency. Whichever option you carry forward, it renders a lifeline for virtual attendees to join with just one click, reinforcing inclusivity and collaboration.
Coming up, let’s navigate through the RSVP feature in Outlook that gives you the low-down on who’s ready to roll and who might miss out.
Checking RSVPs: Who’s In and Who’s Out?
Knowing who will attend your meeting can be as important as the meeting itself. With Outlook, tracking RSVPs is a breeze:
STEP 1: After you send out the meeting invitation, you can keep an eye on who’s coming straight from your Inbox.
STEP 2: Look for the meeting in question, and under the “Meeting” tab, there’s the “Tracking” button. A simple click reveals who’s accepted, declined, or hasn’t responded yet.
It’s like your own little command center for gauging the attendance pulse. You’ll find that keeping track of responses in Outlook is an effortless affair, helping you fine-tune your meeting preparations accordingly.
Armed with this knowledge, you’re all set to manage your attendee list like a pro. Next, we’ll roll out some quick answers to frequently asked questions about scheduling meetings in Outlook. Stay tuned!
FAQs about How to Schedule a Meeting in Outlook
Can I schedule a meeting for multiple dates and times?
Yes, in Outlook, you can schedule a meeting across multiple dates and times. To do this, create a meeting request, click on the “Recurrence” option, and select the frequency and range of dates you want the meeting to recur. This feature is perfect for those events that need to happen regularly but perhaps not on a traditional weekly or monthly schedule.
Next up, let’s tackle how to cancel or reschedule a meeting when your plans change.
How can I cancel or reschedule a meeting in Outlook?
To cancel a meeting in Outlook, simply open the meeting from your calendar, click the “Cancel Meeting” button, and send the cancellation notice. This removes it from your calendar and notifies all attendees.
For rescheduling, open the meeting, click “Reschedule,” tweak the date, time, or other details, and then send the update. Attendees will be alerted to the new details.
Let’s discover how to invite people to your Outlook meeting next for seamless coordination.
How do I invite people to my Outlook meeting?
Inviting folks to a meeting in Outlook is as simple as pie:
STEP 1: While creating your meeting, just type names or email addresses into the “To…” field.
STEP 2: For a broader invite list, tap the “To…” button to select contacts from your address book.
STEP 3: Assign them as Required or Optional, then click “OK.”
With that done, you’ve cast your net, just sit back and wait for the RSVPs to roll in!
And if you’re ready to take a peek at your full meeting schedule, let’s look at how to view it in calendar format next.
Can I view my entire meeting schedule in a calendar format?
Absolutely! Outlook’s calendar format lets you visualize your entire meeting schedule with ease:
- Click on the “Calendar” button on the navigation pane in Outlook.
- You’ll see your meetings and appointments displayed as colorful blocks. Different icons or colors often denote meetings versus appointments.
With your calendar view, you can effortlessly spot where your time is going and tailor your schedule like a pro.
Now you’re equipped with the know-how to navigate meetings in Outlook like a boss! If there’s more you wonder about, just know — we’re here for all your Outlook queries.


John Michaloudis is a former accountant and finance analyst at General Electric, a Microsoft MVP since 2020, an Amazon #1 bestselling author of 4 Microsoft Excel books and teacher of Microsoft Excel & Office over at his flagship MyExcelOnline Academy Online Course.


