In today’s fast-paced, interconnected world, efficient email management is key to productivity. With endless streams of messages and meeting invites flooding inboxes, it’s essential to streamline your process. For professionals using Outlook, mastering how to forward meeting invites can be a game-changer, ensuring that no one is left out and that your team remains synchronized, wherever they may be.
Learn our Top 7 Excel Interview Questions to Land Your Dream Job!
Key Takeaways
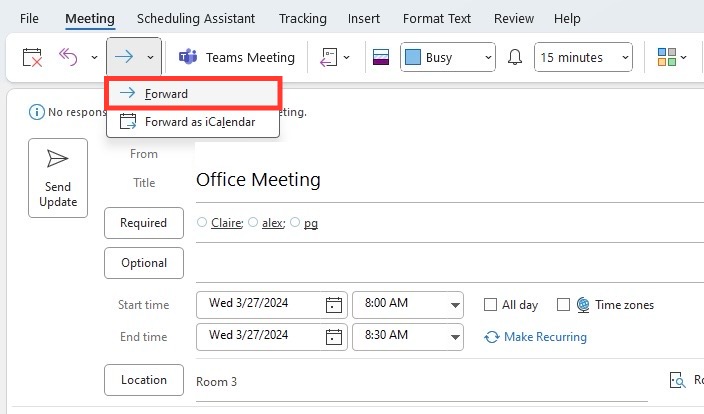
- To forward a meeting invite in Outlook, start by opening the specific meeting invite, then go to the “Meeting” or “Meeting Series” tab and click “Forward” in the Actions group.
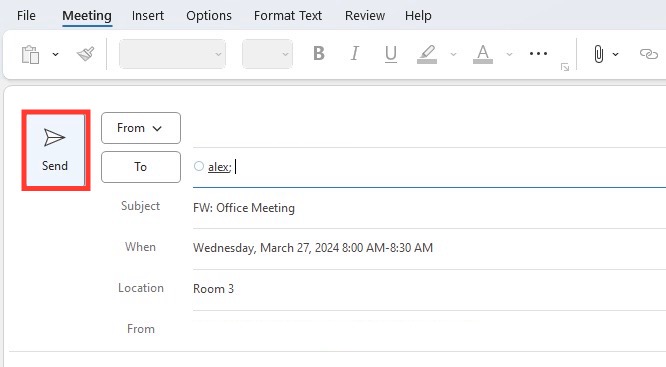
- After clicking “Forward,” type the email addresses of the recipients you wish to include in the “To” box and finalize the process by clicking “Send.”
- Remember, you have the ability to forward a meeting invite to someone even if you are not the original meeting organizer, allowing you to add attendees who may have been initially missed.
How Forwarding Works within Outlook Environment
Within the Outlook environment, forwarding a meeting invite is an intuitive process, designed to extend collaboration beyond the initial recipients. It functions seamlessly, allowing you to easily bring additional colleagues into the loop on scheduled discussions or important events. When you forward an invite, you do so from within the familiar interface of your calendar or inbox, where Outlook generates a new message with the original meeting details, ready for you to share with others.
Table of Contents
Getting Started with Forwarding Invites
Locating the Meeting Request in Your Calendar
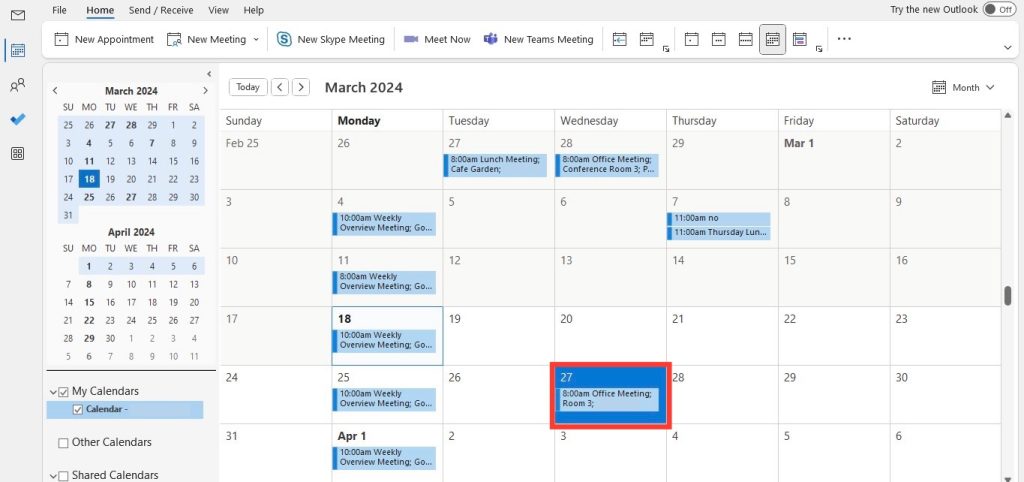
Navigating to the meeting you need to forward in Outlook is straightforward. Simply switch to the “Calendar” section and skim through your schedule to find the correct meeting. Don’t forget, the meeting might be filed under different calendar folders, so double-check if it’s not immediately visible. Once located, the meeting invite is just a few clicks away from being forwarded to the intended recipient.
Different Methods to Forward a Meeting in Outlook
Outlook offers several methods to forward a meeting, catering to different preferences and situations. You can opt for the direct approach using the Forward button or use the drag-and-drop method for a quicker alternative. Additionally, for those who prefer a more customizable option, you can leverage the Meeting Request feature to do the task.
- Forward Button Method: Simply open the meeting and click the Forward button. (Ideal for quick forwarding actions.)
- Drag-and-Drop Method: Select the meeting, drag it to the mail icon, and drop it to create a new email with the meeting details embedded. (Useful for those who manage emails and meetings simultaneously.)
- Meeting Request Tool: Choose this for a detailed approach that allows modifications before forwarding.
Method 1: Simple Forward from the Meeting Request
Step-by-Step Instructions on Using the Forward Button
To use the Forward button in Outlook to share a meeting invite, follow these simple steps:
STEP 1: Open Outlook: Begin by launching the Outlook application.
STEP 2: Access Your Calendar: Navigate to the “Calendar” in the navigation pane or use the shortcut “Ctrl-2” to view your scheduled meetings.
STEP 3: Find the Meeting: Locate the meeting you wish to forward. Double-click to open it.
STEP 4: Forward the Invite: Look for the “Forward” button, often found in the ribbon or “Actions” tab at the top.
STEP 5: Choose Recipients: In the new window that opens, add the email addresses of those you want to include.
STEP 6: Optional Personal Note: Here, you can include a message or additional information.
STEP 7: Send: Review your details and hit “Send” to forward the invite.
While these steps make forwarding invites a breeze, remember that some meetings may have specific permissions set by the organizer.
Tips for Adding Personal Notes while Forwarding
When adding a personal note while forwarding a meeting invite, it’s a delicate balance between providing context and maintaining brevity. Here are tips to make sure your message hits the right note:
- Keep it Short: Your note should be a quick pointer or comment, not a detailed message.
- Be Clear: State the reason for forwarding to avoid confusion for the recipient.
- Maintain Privacy: If the original invite includes sensitive information, avoid discussing it in your note.
- Professional Tone: Even if forwarding informally, maintain a professional demeanor.
- Double-Check Recipients: Ensure you’re sending the note to the correct people to avoid information leaks.
By weaving in a concise and purposeful note, you can help recipients understand why they’re being included and what’s expected.
Method 2: Advanced Forwarding Options
Using The ‘Forward as iCalendar’ Feature
The ‘Forward as iCalendar’ feature in Outlook presents a versatile way to share meeting information. It packages the invite as an .ics file, which can be opened in various calendar applications. Here’s how to use it:
STEP 1: Open the Relevant Meeting: Start by launching Outlook, switch to your calendar, and double-click the meeting you want to forward.
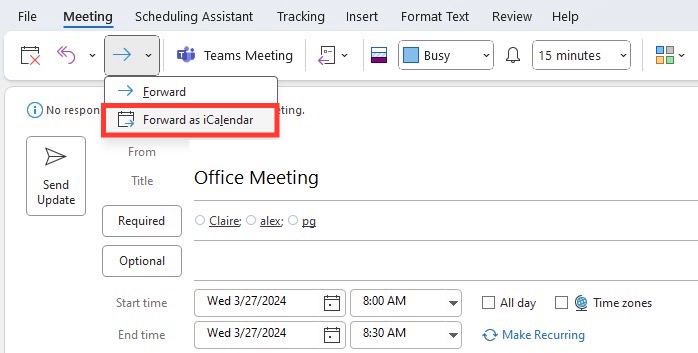
STEP 2: Choose Forward Option: Within the meeting window, navigate to the “Actions” group and click on “Forward.” From the drop-down menu, select “Forward as iCalendar.”
STEP 3: Prepare the Email: Outlook will create a new email message with the meeting attached as an .ics file. You can add recipients, a personal note, or additional information as needed.
STEP 4: Send Your Email: Once you’re ready, hit “Send” to share the meeting details.
This method ensures compatibility across different calendar systems, making it ideal when recipients are using different email services.
Customizing the Meeting Details Before Sending
Personalizing the details before you forward a meeting can provide clarity and context. Outlook allows customization of the invite in a few simple steps:
- Edit Before Forwarding: Open the invite and click the “Edit” button to add or change details.
- Make Revisions: Adjust the time, location, or description. Keep original agenda items intact unless you’re the organizer.
- Note the Changes: Clearly note any alterations you’ve made for the new recipients to avoid confusion.
- Save Your Edits: Once you’re finished editing, select “Save”.
- Send the Invite: Click “Send” to share the revised meeting invite.
Remember that editing the invite content should be done thoughtfully to respect the intentions of the original organizer.
Special Considerations When Forwarding Invites
What Happens When You Forward a Meeting?
When you forward a meeting in Outlook, a couple of things happen:
- Notification Sent: The original organizer receives a notification that the meeting has been forwarded. This ensures transparency and allows the organizer to keep track of attendees.
- Invite Extension: The person you forward the meeting to receives an invitation that they can accept, tentatively accept, or decline, just as they would from a direct invite.
- Calendar Update: If the new invitee accepts, the meeting gets added to their calendar, helping them stay organized and aware of upcoming commitments.
It’s a simple yet powerful way to ensure that the right people have the information they need, while keeping the organizer informed.
Etiquette and Best Practices for Forwarding Meeting Invites
When forwarding meeting invites, etiquette can be as important as the technical steps. Here are some guidelines:
- Ask Prior Permission: Ideally, get a nod from the organizer before adding new people to a meeting.
- Be Selective: Only forward to those who will add value to or benefit from the meeting.
- Inform the Recipient: Give context as to why they’re receiving the invite, so they understand their role or contribution.
- No Last Minute Adds: Avoid forwarding invites close to the meeting time, as it can disrupt planning.
- Confidentiality Awareness: Be cautious when forwarding sensitive meetings. Not all information is meant for wider distribution.
Following these best practices can facilitate smooth communication and maintain professional courtesy.
Troubleshooting Common Issues
Resolving Errors in Forwarding Meeting Requests
Errors while forwarding meeting requests in Outlook can crop up from time to time. Here’s what you can do to troubleshoot:
- Check Permissions: Ensure you have the necessary permissions to forward the meeting or that the meeting isn’t locked to additional invitees.
- Update Outlook: Running an outdated version can cause issues, so make sure your application is up to date.
- Review Delegate Settings: If you have delegates assigned to manage your calendar, verify their settings to ensure they didn’t inadvertently alter your forwarding capabilities.
- Inspect Recipient Addresses: A typo in an email address can result in errors. Double-check the accuracy of all recipients’ details.
If problems persist, consider seeking help from your IT department or consulting Outlook’s support resources.
Ensuring RSVP Responses Go to the Original Organizer
To make sure RSVP responses are directed to the original meeting organizer and not to you after forwarding an invite, follow these steps:
- Do Not Alter the Organizer Field: When forwarding the invite, ensure you don’t accidentally change any details in the ‘Organizer’ field to keep the response path clear.
- Use Standard Forwarding Methods: Stick to using the Forward button or the ‘Forward as iCalendar’ feature which inherently keeps the original organizer in the loop.
- Advise Recipients: Consider mentioning in your forwarding note that any responses should be directed to the original organizer, should there be any confusion.
This approach helps to maintain the meeting’s administrative integrity and avoids any miscommunication.
Forwarding beyond the Desktop: Mobile Devices and Web Access
How to Forward a Meeting Invite on Mobile
Forwarding a meeting invite from your mobile device is just as simple as from your desktop. Whether you’re away from your desk or on the move, follow these steps:
- Open Outlook App: Tap the Outlook app icon on your mobile device to open it.
- Navigate to Calendar: Scroll to the meeting invite you wish to forward.
- Tap to View Details: Open the meeting invite and look for the ‘Forward’ option, typically an arrow icon.
- Add Recipients: Enter the email addresses of the individuals you’d like to forward the invite to.
- Send the Invite: Once ready, tap ‘Send’ to forward the meeting to the selected attendees.
The mobile app ensures you can act swiftly and keep your team in sync no matter where you are.
Outlook Web App (OWA) Forwarding Functionality
Forwarding a meeting invite through the Outlook Web App (OWA) offers flexibility for those who prefer to work within a browser. Here’s how it’s done:
- Log In to OWA: Go to the Outlook Web App and sign in with your credentials.
- Access Calendar: From the sidebar, select the calendar icon to view your appointments.
- Open the Meeting: Click on the meeting you want to forward, to open its details.
- Find the Forward Button: Look for the forward icon or the “Forward” option within the meeting details.
- Add Recipients & Note: Insert the email addresses of the new invitees and add a personal note if necessary.
- Send the Meeting Invite: Click “Send” and your forwarded invite will be on its way.
OWA’s intuitive interface makes forwarding invites an effortless part of managing your online calendar.
FAQs
Can I Edit the Invite before Forwarding It?
Yes, you can edit the meeting invite before forwarding it. Open the invite, click the “Edit” button, make your changes, then select “Save” and finally “Send” to forward the edited invite with your adjustments.
Can I Forward a Meeting Invite to Multiple People?
Absolutely, you can forward a meeting invite to multiple people. Simply add their email addresses, separated by semicolons, in the “To” field when forwarding the meeting through Outlook.
What Should I Do If I Need to Cancel a Meeting That I Forwarded?
If you need to cancel a meeting you’ve forwarded, you should first cancel it in Outlook, which will send a cancellation email to all invitees. Then, send a follow-up email explaining the cancellation and apologizing for any inconvenience.
How Do I Forward a Meeting Invite Without Informing the Organizer?
To forward a meeting invite without notifying the organizer, drag the meeting onto the mail icon for a new email, add the recipient, and send. The original organizer won’t be alerted.
John Michaloudis is a former accountant and finance analyst at General Electric, a Microsoft MVP since 2020, an Amazon #1 bestselling author of 4 Microsoft Excel books and teacher of Microsoft Excel & Office over at his flagship MyExcelOnline Academy Online Course.


