Picture this: Your entire week’s lineup of meetings, perfectly organized, with everyone on the same page about when and where to meet. That’s the advantage of using Outlook for scheduling. Not only does it keep you on track, but it allows you to extend that organization to others. They can see at a glance what you have planned and coordinate accordingly. Outlook’s interface is user-friendly, giving you the power to drag and drop appointments, color-code your events for quick identification, and sync across devices so you’re always in the know, no matter where you are.
Learn about Excel with our Free Microsoft Excel Online Course!
Key Takeaways
- To send a calendar invites in Outlook, users should start by going to Outlook.com, signing in, and clicking the calendar icon to open their calendar. They can then create a new event and input event details and participant information.
- Participants for the calendar event are added by clicking on the “Invite attendees” field and entering their email addresses. Users will finalize the invitation process by clicking “Send” to distribute the invites.
- If the attendees are frequent contacts, creating a group in Outlook can streamline the process of sending future invites, saving time and effort.
Essential Preparations Before Sending Invites
Before hitting that send button for a calendar invite, ensure you’ve crossed off the essential tasks on your prep list. First, confirm the event’s time, date, and venue to ensure accuracy. Next, gather all the email addresses of your attendees; it’s a small step that prevents any lapses in communication. It’s also crucial to have a clear agenda or outline for the meeting—it helps attendees prepare and sets expectations right from the get-go. If there are pertinent documents or pre-reading materials, have them ready to attach, and think about including a message in the invite that highlights their importance.
Table of Contents
Step-by-Step Process to Send an Invite
Step 1: Accessing the Calendar Feature in Outlook
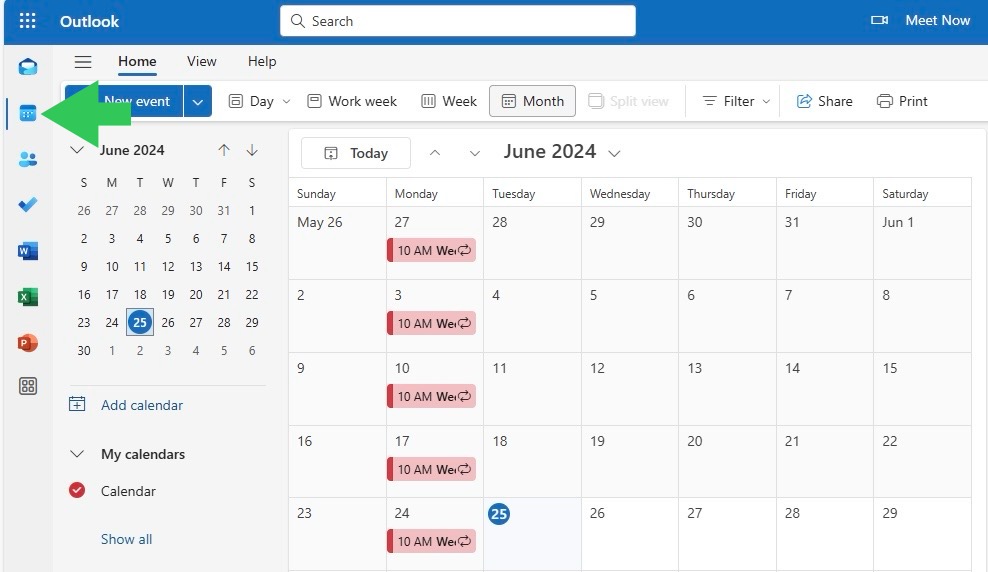
Accessing your calendar in Outlook is a breeze. If you’re navigating from the inbox, simply look for the calendar icon—often found in the bottom left corner. One click and your Outlook calendar springs to life in front of you, laying out your day, week, or month ahead. However, if you’re using a newer version, the calendar might be playing hide and seek under the ‘New Items’ drop-down menu at the top. Whichever path you take, once you’re in, you’re one step closer to bringing people together at your next event.
Step 2: Creating a New Meeting Request
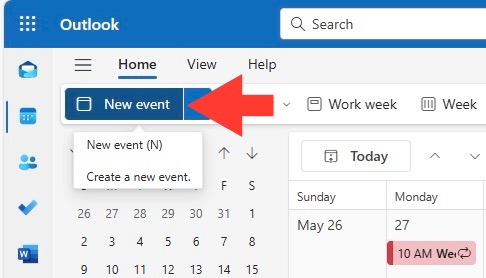
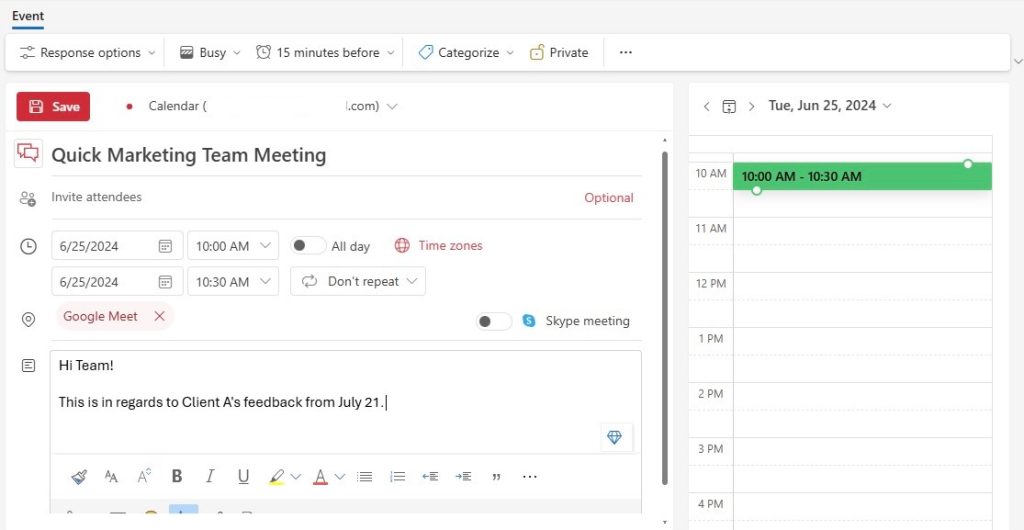
Creating a new meeting request is like crafting a personalized invitation to collaborate. Start by clicking on the “New Meeting” or “New Event” button—each version of Outlook might label it slightly differently, but they all serve the same function. A window pops up, ready for you to pour in the essential details: type in an enticing subject line to grab attention, decide on a location that’s convenient, and set the start and end times to respect everyone’s busy schedules. When you’re done, you have a blueprint of your meeting, ready to be shared with potential attendees.
Customizing Your Calendar Invites
Adding Attendees and Necessary Details
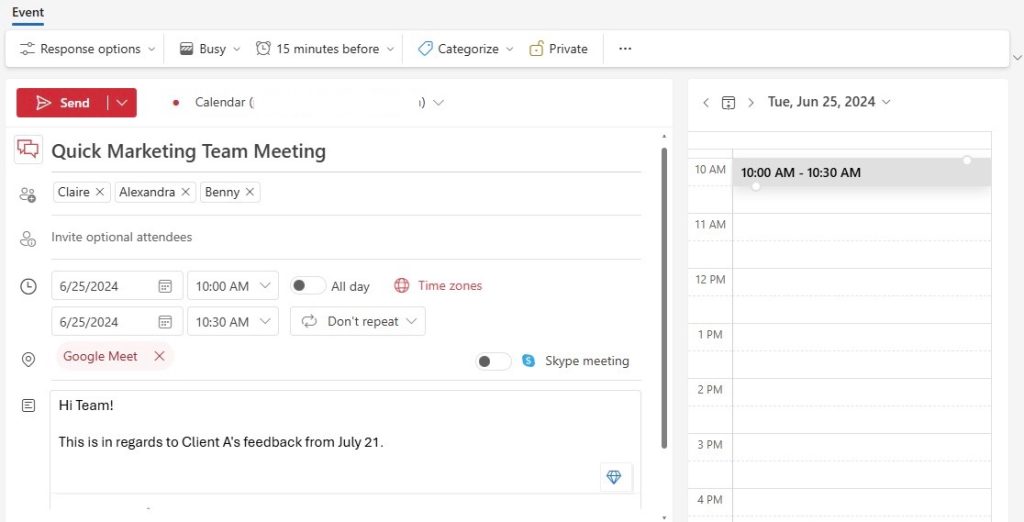
Adding people to your meeting is as simple as typing their names or email addresses into the ‘Add attendees’ field. As you type, Outlook’s autocomplete feature will suggest contacts, making the process even quicker. You want to make sure everyone has context, so in the meeting details section, be specific: include objectives, an agenda, and any supporting material like files or links. Clarity here goes a long, long way toward a productive meeting. And don’t forget to use the ‘Required’ or ‘Optional’ tags accordingly to indicate the importance of each attendee’s presence.
Setting Up Recurring Meetings and Reminders
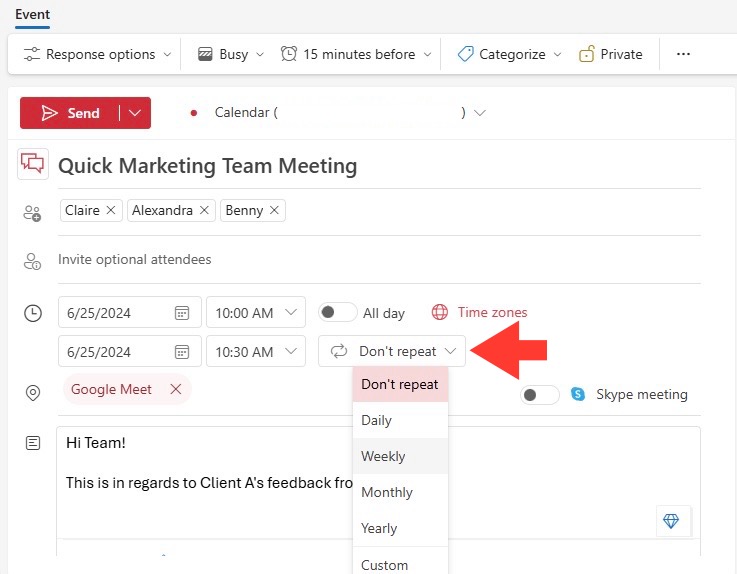
When you have a gathering that’s more than a one-off—maybe a weekly team huddle or a monthly wrap-up—setting up a recurring meeting in Outlook is a real time-saver. Choose the ‘Don’t Repeat’ dropdown and swap it for your desired recurrence pattern. Specify how often it should repeat, on what days, and when this repetition should end. Don’t forget to set reminders for your attendees so that no one misses out. You can tailor these reminders to go out minutes, hours, or even days before your meeting, ensuring ample heads-up for all involved.
Best Practices for Outlook Invitations
Avoiding Common Mistakes When Sending Invites
To steer clear of the pitfalls that can plague your Outlook invites, double-check your recipient list—no one likes an inbox surprise. Also, ensure you’ve set the correct meeting time zone, especially if you’re dealing with an international team. It’s an often-overlooked detail that can cause significant confusion. Remember to keep the subject line of your invite brief yet descriptive; it helps attendees prioritize and understand the focus of the meeting at a glance. Lastly, avoid overloading your invite with attachments—instead, consider sharing documents via a link to a cloud storage service.
Tips for Smarter Outlook Scheduling
For smarter scheduling in Outlook, embrace the power of the Scheduling Assistant to find the elusive time slot that suits everyone. Input the details, and let this clever tool highlight the best options. Regularly check for any calendar updates from your invitees and adjust accordingly to stay in sync. Employing templates for regular meeting types can streamline the invite process, ensuring that you don’t miss out on crucial information each time. And never forget the value of a well-crafted out-of-office reply during your downtime to keep your colleagues informed and your calendar conflict-free.
Advanced Options for Calendar Invitations
Utilizing Bcc for Private Invites
When discretion is key, and you want to keep the guest list confidential, you might be looking for a Bcc option. While Outlook doesn’t offer a direct Bcc field for meeting requests, there’s a workaround. Create the invite, add your own email to the To field, and then hit ‘Save’ but don’t send it just yet. After that, go to your calendar, open the meeting, and forward it individually to your participants. This way, recipients can’t see who else is invited, keeping things on a need-to-know basis for your stealthily arranged gatherings.
Click here for the full tutorial on BCC in Outlook.
Managing Meeting Forwarding Options
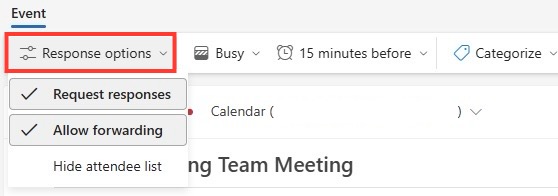
Having control over your meeting can be crucial, and managing who can forward your invitation is part of that. To lock it down, create your invite and then hit ‘Response Options’. From there, uncheck the ‘Allow Forwarding’ option before sending it off. This means your carefully crafted invite isn’t going to wander off into unexpected inboxes. But remember, if someone misses out on your initial invite, you can always personally forward it to additional attendees by opening the meeting and selecting ‘Forward’. Do keep in mind, though, that some calendar apps might not honor these settings, so consider this when dealing with external attendees.
Troubleshooting Common Issues
Resolving Compatibility Problems with Different Platforms
When you’re mixing and mingling with various calendar platforms, compatibility issues may arise. If an invitee can’t open your Outlook invitation, ensure you send it as an iCalendar (.ics) file—a universal format that most calendar programs can understand. Encourage them to check their spam or junk folder since invites sometimes land there. If participants are still having trouble, advise them to add your email address to their safe senders list or to check with their IT department to see if any filters are preventing the invitation from getting through.
What to Do If Invites Are Not Received
When invites are lost in the digital void, first ensure that the correct email addresses were used, and then verify that there are no typos. If the invite was sent to a group, confirm that all intended recipients are indeed part of the distribution list. It’s wise to ask recipients to check their junk or spam folders, as filters occasionally misjudge an invite as unwanted mail. If problems persist, make a quick call or send an email to confirm receipt manually. For recurring issues, consider requesting IT support to ensure invites navigate smoothly through email gateways and filters in the future.
FAQs
Can You Convert an Email to a Calendar Invite?
Yes, you can transform an email into a meeting request in Outlook. Simply open the email, click ‘Meeting’ or ‘Reply with Meeting’, and a meeting request window will open, filled with the email’s content. Add the meeting details, like time and attendees, then send it off as a calendar invite. This seamless transition helps you make the best use of existing email threads and swiftly turn discussions into actionable items.
How to Add Skype or Other Video Conferencing to Outlook Invites?
To integrate Skype or another video conferencing tool with your Outlook invites, ensure you have the respective add-in installed. Then, while creating or editing a meeting invite, look for the video conferencing option, such as ‘Skype Meeting. Click this button, and the meeting link, along with any necessary conferencing details, will be automatically inserted into your invite. Now, with just a glance, attendees have all they need to join the virtual meeting space right from the Outlook invite itself.
What Is the Best Way to Follow Up After Sending a Calendar Invite?
The best way to follow up after sending a calendar invite is to wait at least 24 hours before reaching out, allowing attendees ample time to respond. If there’s no answer, a gentle reminder email can nudge them to RSVP. For those who have already confirmed or tentatively accepted, send a reminder with meeting details about 24 hours before the event to ensure it stays top-of-mind. Making your subject lines clear, such as including ‘RSVP’ or ‘Response Required’, can boost the chances of a timely reply.
How to Prevent Attendees from Forwarding Your Invite?
To prevent attendees from forwarding your invite in Outlook, access the ‘Response Options’ while setting up your meeting and deselect the ‘Allow Forwarding’ checkbox. This will restrict attendees from sending your invitation to others. However, note that if essential participants are missed in the original invite, you would need to forward the meeting to them yourself. Remember, not all email platforms may adhere to these settings; it’s a good idea to include a note about not forwarding the invite as a gentle reminder of the meeting etiquette.
John Michaloudis is a former accountant and finance analyst at General Electric, a Microsoft MVP since 2020, an Amazon #1 bestselling author of 4 Microsoft Excel books and teacher of Microsoft Excel & Office over at his flagship MyExcelOnline Academy Online Course.

