
Understanding PowerPoint’s Capabilities for Image Enhancement
When you dive into the world of presentations, PowerPoint is your canvas and images are your paint. Enhancing those images can transform a mundane slide into a striking visual masterpiece. Luckily, PowerPoint is equipped with an array of options to refine your images—think of adding frames as giving your artwork the perfect finishing touch. In this guide, you’ll discover how effortless it is to add style and professionalism to your slides by inserting elegant borders around your images.
Learn about Excel with our Free Microsoft Excel Online Course!
Key Takeaways
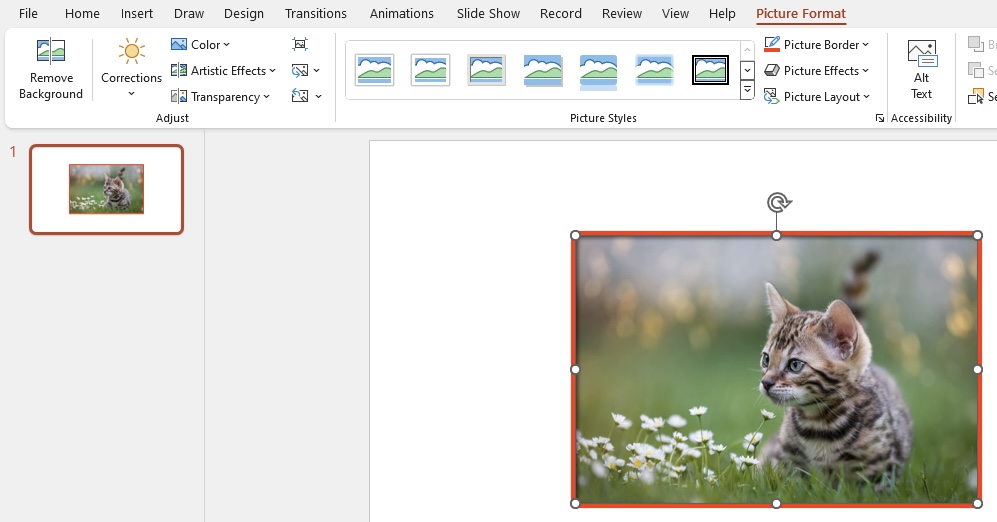
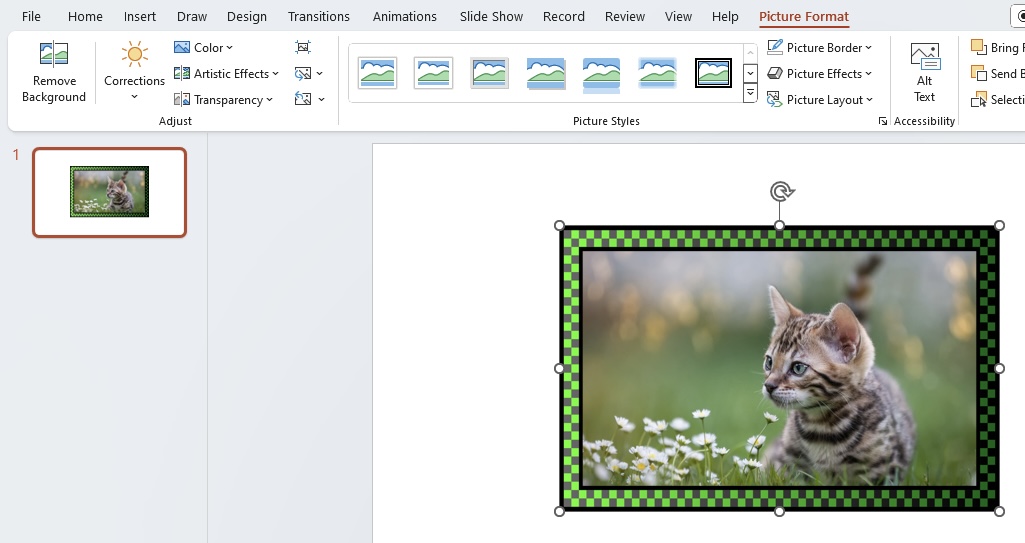
- To quickly add borders to images in PowerPoint, select the desired image, navigate to the “Picture Format” tab, select “Picture Styles,” and choose a pre-made design that fits your presentation.
- For a custom image border, after selecting the image, go to “Picture Format” → “Picture Border,” where you can personalize the border by selecting its color, width, and line style, allowing for creative control over the border’s appearance.
- Enhance image borders further by using the “Picture Effects” option under the “Picture Format” tab, where effects such as shadows, glows, reflections, and dotted lines can be applied to create a standout visual impact.
Table of Contents
Step-by-Step Instructions to Add Borders
Inserting Your Image into a Slide
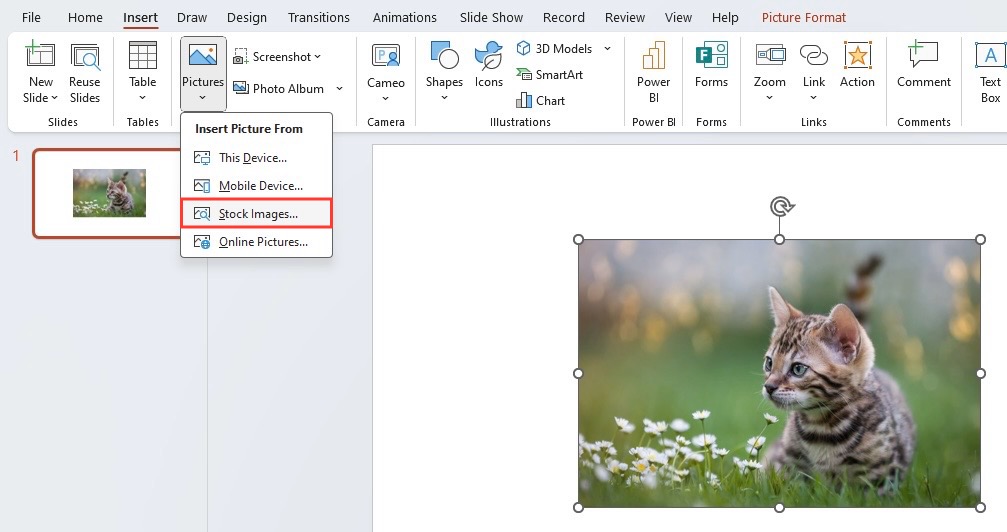
Starting off with the basics, inserting an image onto your PowerPoint slide is as simple as a few clicks. Navigate to the slide where you want to add the visual flair and head to the top of the menu. Click on “Insert” > “Pictures”. Select the image that best suits your slide. Once you click “Insert,” your chosen photo will pop onto the slide, ready for the next creative step. If the image doesn’t land exactly where you envisioned it, don’t worry—you can drag it around and resize it until it’s just right.
Selecting and Applying a Preset Border Style
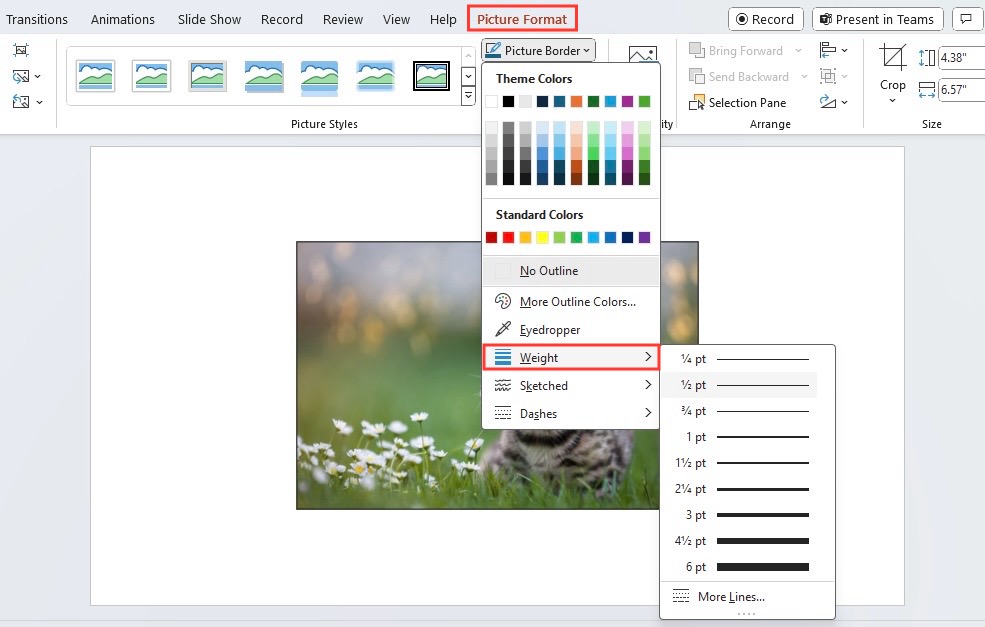
Enhancing your image with a border couldn’t be more straightforward. PowerPoint’s Picture Styles gallery is like a treasure chest of preset styles that add borders and effects to your selected image—literally at the click of a button. Just click on the image, and the Picture Format tab will appear. Click on “Picture Border” > “Weight” > choose your desired thickness to get started.
Customizing Your Picture Borders
Adjusting Border Thickness and Color
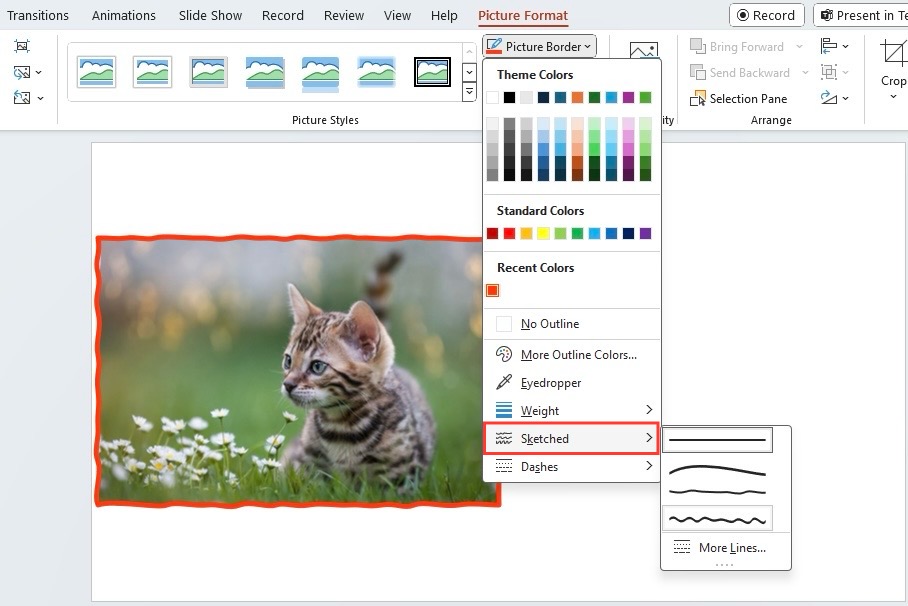
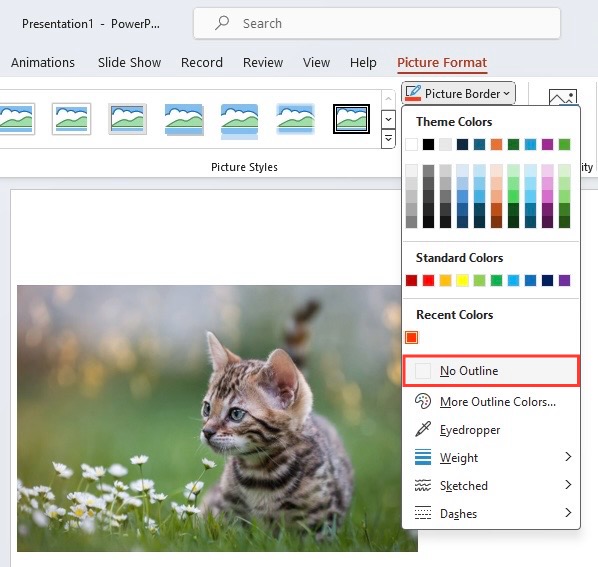
Once you’ve placed a border around your image, you may find that you want to tweak its thickness or color to better complement your slide. This level of customization is just a few clicks away. Select the image with the border you wish to adjust, then click “Picture Format” > “Picture Border” dropdown. Select “Weight” or choose “More Lines” for even finer control.
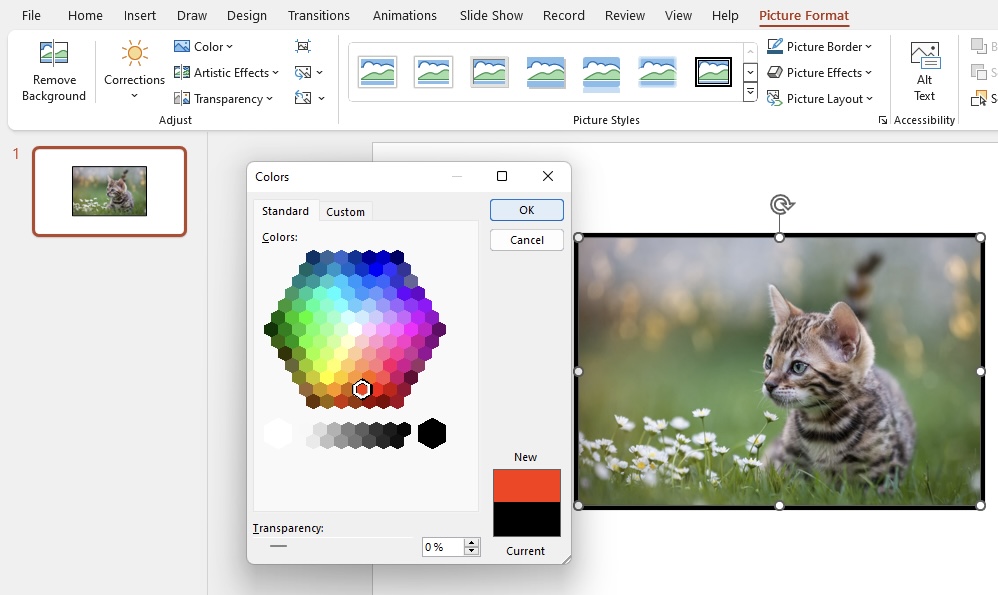
Color is just as easy to alter. Under the same “Picture Border,” select one of the displayed colors or for a more tailored palette, click “More Outline Colors”. This opens a world of possibilities with a color mixer and allows you to enter specific color codes for brand consistency. A perfectly weighted and colored border can frame your image like a piece of art, so feel free to experiment!
Exploring Advanced Border Effects and Styles
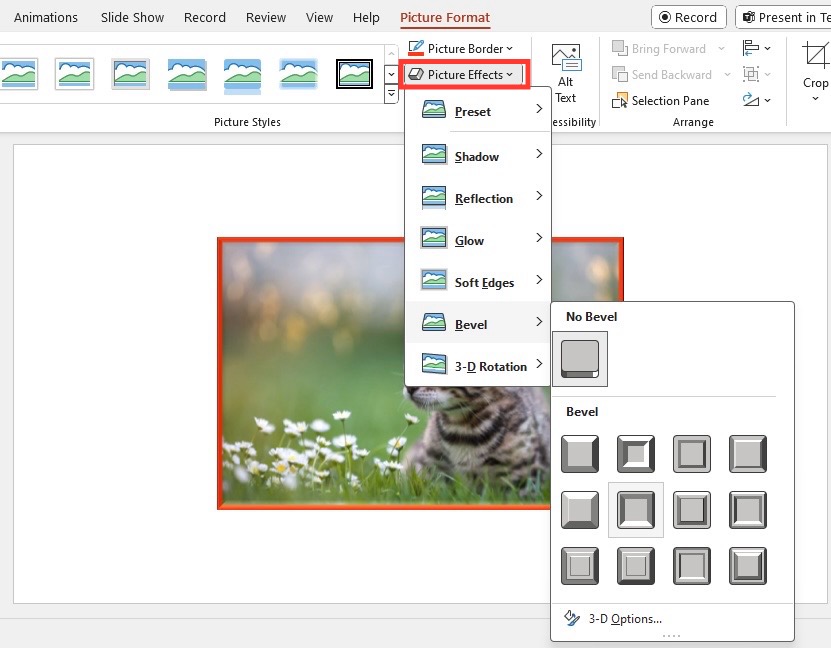
For those with a creative spark itching to craft something truly unique, PowerPoint offers a suite of advanced border effects and styles under the “Picture Effects” dropdown. Here, your images can earn their halos with options like Shadows, Reflections, and Glow, or you can soften their edges for a gentler approach. The Bevel and 3-D effects are especially popular for adding a punch of dimension to your visuals.
As you explore, try out various combinations to see how they play off your image and slide content. Maybe a soft shadow adds the subtle depth you’re after, or perhaps a 3-D bevel makes your image pop with an almost tangible texture. Remember, these advanced effects can turn a simple image border into an eye-catching feature that can capture and keep your audience’s attention.
Creative Border Ideas for Your Slides
Using the ‘Sketched’ Outline for a Hand-drawn Look
For an artistic touch that can make your slides stand out, the ‘Sketched’ outline effect is a game-changer, giving your shapes and images a casual, hand-drawn feel. To use this on a Mac or as a Microsoft 365 subscriber, simply select your image. In the “Picture Format” tab, click on “Picture Border” and then on “Sketched” to choose a style that suits your content. With options ranging from a slight wobble to a more emphatic squiggle, you can dial up the handcrafted charm as much as you like. This feature puts a spin on conventional presentation visuals and can help humanize your slides, making them more relatable and engaging.
Incorporating Bing Image Search for Unique Borders
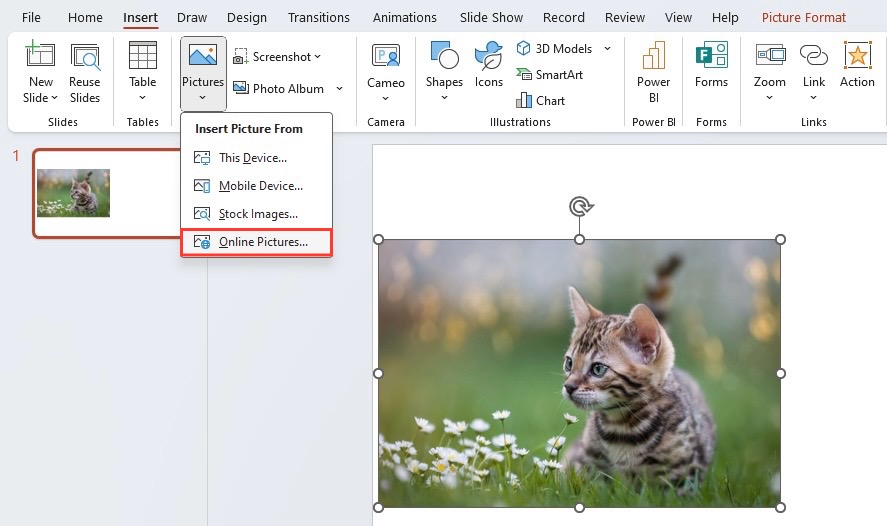
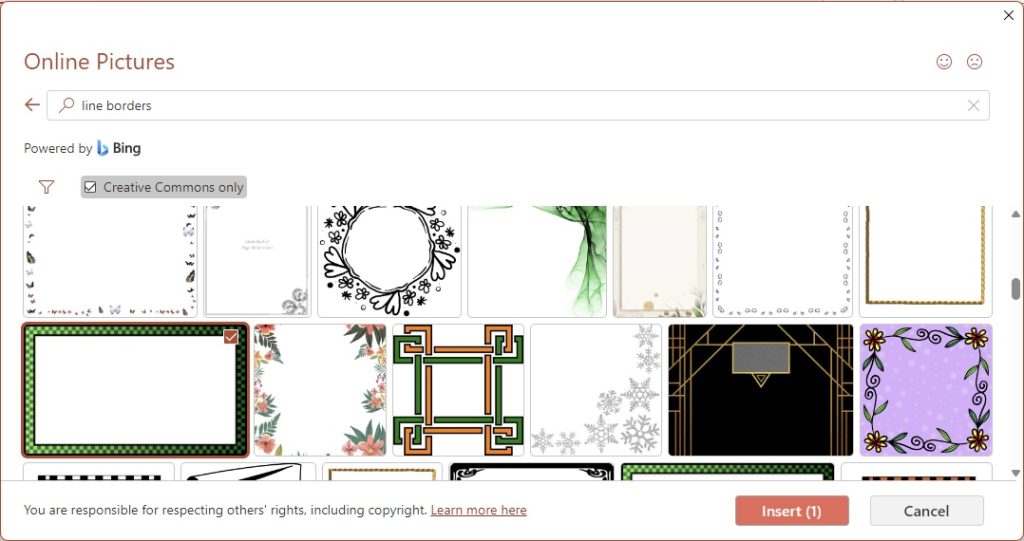
If the preset options leave you yearning for more flair, you can use Bing Image Search to find unique borders that add a personal touch to your slides. Just head over to the slide you want to spruce up, click on “Insert” > “Online Pictures.” Search phrases like “line borders” or “flower borders” and let Bing work its magic. Once you’ve found a border that catches your eye, click “Insert” to add it to your slide. These images from Bing Image Search are typically licensed under Creative Commons, so be sure to check the usage rights.
This integration not only grants you access to a vast library of border designs but also introduces the opportunity to match your branding or theme with precision. The beauty of this method? Your presentations are infused with a sense of uniqueness and creativity that can’t be found in the standard libraries.
Troubleshooting Common Issues
Removing or Changing an Existing Border
If you decide that a border no longer suits your slide or simply needs a change, don’t fret—it’s an easy fix. Click on your image and go to the “Picture Format” tab. If the border was applied using the Picture Styles feature, you can scroll through and choose another style, or opt for “No Outline” for a clean, borderless look. This removes your current border instantly.
For more intricate adjustments, such as removing a specific portion or altering just the color or weight, select “Shape Outline.” Here you can individually tweak these elements without starting over. It’s about flexibility and control in your creative process. This way, they can ensure their images blend seamlessly into the rest of their slide without any unwanted stylistic distractions.
Managing Complex Images and Overlapping Elements
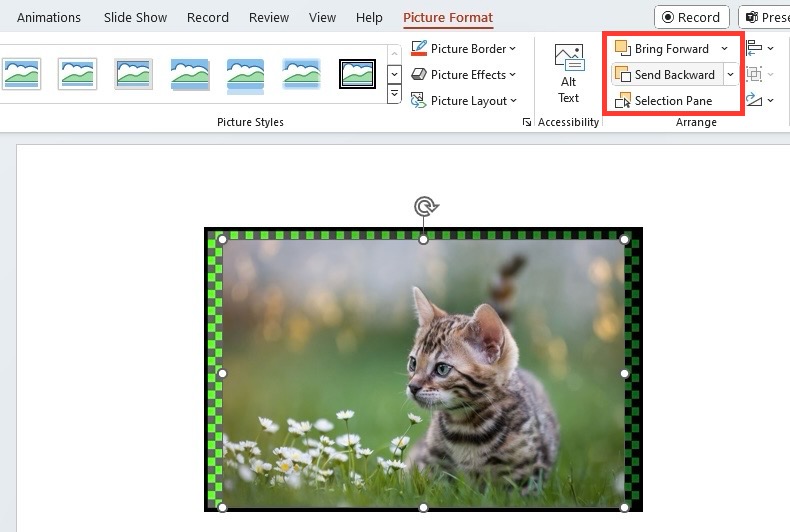
Dealing with complex images and overlapping elements in PowerPoint can sometimes feel like a delicate juggling act. To manage these gracefully, remember to use the “Send to Back” or “Bring to Front” options. These controls allow you to layer objects in a way that makes sense for your design. You can find these options under the “Picture Format” tab by selecting the image and clicking on “Arrange.”
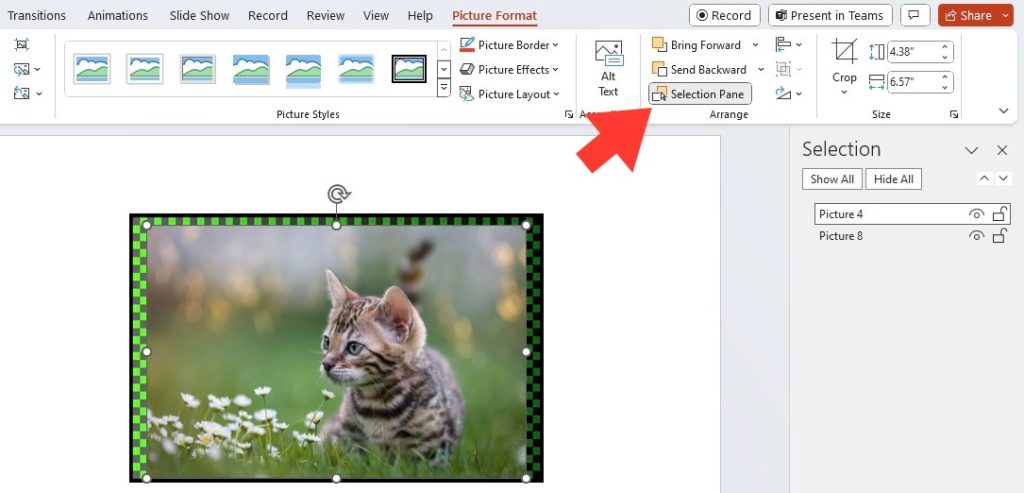
Additionally, consider using the “Selection Pane” to isolate and manage individual elements more effectively. The pane lists all the objects on your slide, making it easier to select and adjust them—even those tricky ones hidden behind others. This tool is invaluable when customizing borders on images that are part of a complex visual narrative on your slides.
FAQ: Mastering Borders in PowerPoint
How do I add a custom border to a picture?
To add a custom border, first, select the image on your slide. Then, go to the “Picture Format” tab, click on “Picture Border,” and choose a color. If you want to tailor the thickness or style, point to “Weight” or “Dashes” respectively, and make your selection. For a broader palette or specific RGB values, select “More Outline Colors.” This way, you can personalize your image borders down to the last detail.
Can I use picture styles to create a unique border?
Absolutely! Picture styles in PowerPoint are perfect for creating unique borders with just a single click. Simply select your image and click on the “Picture Format” tab. From there, explore the “Picture Styles” gallery to pick from an array of distinctive borders and effects. If you don’t see the exact style you’re looking for, click “More” to expand the gallery for additional options. This feature enables you to quickly wrap your image in a border that’s as unique as your presentation.


John Michaloudis is a former accountant and finance analyst at General Electric, a Microsoft MVP since 2020, an Amazon #1 bestselling author of 4 Microsoft Excel books and teacher of Microsoft Excel & Office over at his flagship MyExcelOnline Academy Online Course.


