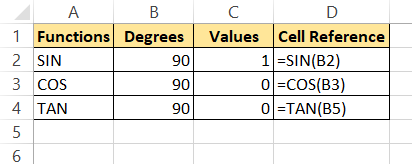
The COS function in Microsoft Excel is a powerful tool for performing trigonometric calculations, specifically used to find the cosine of an angle. It’s particularly useful for engineers, scientists, and financial analysts who need to analyze data involving angles and periodic trends. To use the COS function accurately, angles must be converted from degrees to radians, making it a versatile component in complex data analysis tasks. In this guide, we will cover all about cos function and cos 90 degrees in Excel.
Key Takeaways:
- COS Function in Excel: The COS function calculates the cosine of an angle provided in radians, essential for trigonometric calculations in Excel.
- Conversion to Radians: To use degrees in Excel’s COS function, you must convert them to radians using the RADIANS function. For example, =COS(RADIANS(90)).
- Common Errors: An error like =COS(90) gives incorrect results because it interprets 90 as radians. Always convert degrees to radians first.
- Expected Results for Cos 90 Degrees: Calculating =COS(RADIANS(90)) yields a result very close to 0, due to floating-point arithmetic limitations.
- Using Degrees Directly: You cannot use degrees directly in Excel’s trigonometric functions. Always use the RADIANS function to convert degrees to radians before applying the COS function.
Table of Contents
Unveiling the Mystery of Cos 90 Degrees in Excel
Understanding the Significance of Trigonometry in Spreadsheets
Trigonometry isn’t just for mathematicians or engineers; it’s pretty handy in spreadsheets too! When you’re working with Excel, using trigonometric functions can be crucial, especially when dealing with various statistical analyses, scientific data, or financial models. Think of it as a secret weapon to solve complex problems involving angles and dimensions!
Excel and Its Trigonometric Capacity
Excel boasts a robust suite of trigonometric functions that can easily perform complex calculations, translating mathematical theory into practical application. From architects plotting coordinates to economists modeling curves, Excel’s capacity to crunch trigonometric numbers is a testament to its versatility.
Pivot between sine, cosine, and tangent functions or push boundaries with hyperbolic variations—all within the confines of your spreadsheet.
The Journey to Calculate Cosine Values
Breaking Down the COS Function in Excel
The COS function is a little powerhouse in Excel, aimed at computing the cosine of an angle provided in radians. If you’re scratching your head over radians, fear not, it’s essentially how angles are measured in the language of Excel.
When you feed an angle into the COS function, it returns the ratio of the adjacent side to the hypotenuse in a right-angled triangle. It’s an indispensable tool in trigonometry, helping you sail smoothly through calculations involving circles, waves, and oscillations.
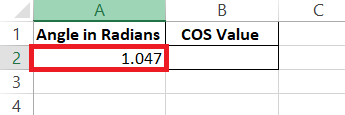
STEP 1: Begin by entering the angle in radians. For instance, if the angle is π/3 (approximately 1.047), input 1.047 in a cell.
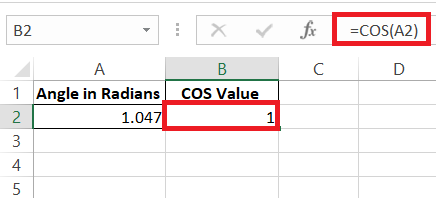
STEP 2: In another cell, type “=COS(” and then reference the cell containing the angle value. For our example, input “=COS(A2)” if the angle is in cell A2. Excel will compute the cosine of the angle, providing the ratio of the adjacent side to the hypotenuse.
Why Cos 90 Degrees Is Exceptional
You might wonder what’s so special about cos 90 degrees. Well, it’s a unique angle because its cosine value hits the zero mark—a rarity in the world of trigonometry. This occurs because at 90 degrees, the angle points straight up, lying on the y-axis, and has no horizontal component.
Remember, cosine relates to the x-coordinate on a unit circle, and at 90 degrees, that’s a straight-up zero!
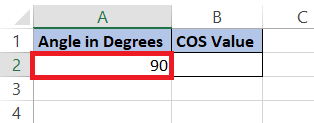
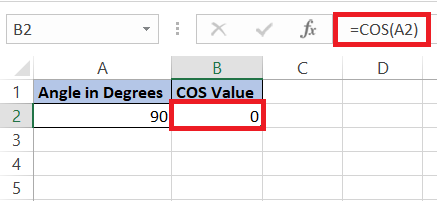
STEP 1: Enter the angle in degrees. For instance, input “90” in a cell to represent 90 degrees.
STEP 2: In another cell, type “=COS(” and then reference the cell containing the angle value. For our example, input “=COS(A2)” if the angle is in cell A2. Excel will calculate the cosine of 90 degrees, which should yield zero due to the unique position of the angle on the unit circle.
Step-by-Step Guide to Excel’s Easy Formula for Cos 90 Degrees
Entering the COS Function Correctly
Getting the COS function right in Excel is like nailing a perfect landing in gymnastics—it’s all about precision. When aiming for the cosine of a 90-degree angle, you need to transform degrees into radians because that’s the language Excel understands best.
Just wrap your degrees with the RADIANS function or multiply by PI()/180, and you’re set. It’s like telling Excel, “Hey, translate this for me, will you?” And Excel does just that, giving you the cosine value you seek.
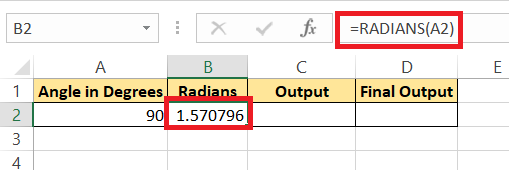
STEP 1: Translate a Degree to Radians.
Let’s begin by utilizing the RADIANS function to convert the numerical value to a radian. To put it simply, choose cell C5 and enter the following formula: =RADIANS(A2). Next, press Enter to convert the numerical number to an angle.
STEP 2: Use Excel to Determine the Value of Cos 90
Here, we’ll use Excel’s COS function to calculate the Cos90 result. In the same manner, choose cell (C2) and use the formula- COS(B2). When you press Enter, the output—”6.12574E-17″—which is not what we were expecting—will appear.
STEP 3: Integrate the RADIANS, COS, and ROUND functions to get the accurate value of Cos 90.
We must round the number to eliminate its error in order to obtain the actual output. So, let’s begin by selecting a cell (E5) and entering the following formula: =ROUND(COS(RADIANS(A2)),12). When we press Enter, the predicted rounding result will appear in our hands.
Handling Common Missteps and Errors
Navigating through Excel’s COS function can sometimes feel like walking through a minefield of potential errors. One of the most common slip-ups occurs when users forget to convert degrees to radians, leading Excel to give a result that seems off-kilter.
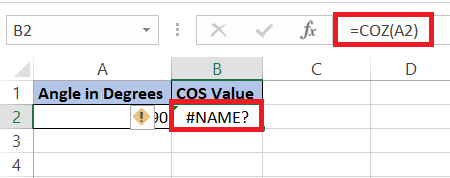
Also, make sure you’re entering the function correctly—missing an equal sign or mistyping ‘COS’ as ‘COZ’ can send your formula into a tailspin. Double-check those formulas to sidestep the frustration of error messages or incorrect results.
- Incorrect Argument: Check for correct radians conversion; for 90 degrees use
=COS(RADIANS(90)). - Typo in Function Name: Verify the spelling; it should be ‘COS’, not ‘COZ’ or ‘COT’.
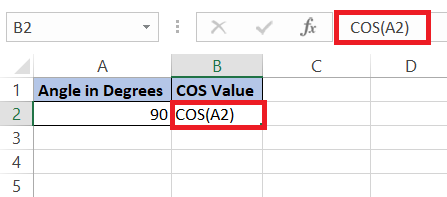
- Missing Equal Sign: Ensure your formula starts with ‘=’ to activate the COS function.
- Misunderstanding Results: Remember that cos 90 degrees is zero; expect a result close to zero but due to rounding, it may not be exactly zero in Excel.
Real-World Application: Utilizing Cos 90 Degrees in Excel Processes
Scenario-Based Examples for Better Comprehension
To fully grasp the usefulness of cos 90 degrees in Excel, let’s walk through some practical situations. Imagine you’re an engineer analyzing the stability of a structure with forces acting at different angles — here, the COS function helps determine the horizontal force components. Or maybe you’re a graphic designer working with rotations and need precise angle calculations; cos 90 degrees becomes your go-to reference point for vertical alignments. Through these real-world examples, you begin to see the magic of how trigonometry in Excel makes data more approachable and decisions more informed.
Enhancing Analytical Functions with Trigonometry
Trigonometry in Excel isn’t just about solving for x; it’s a behind-the-scenes hero in data analysis. By harnessing the COS function, you can refine analytical models with periodic trends, like monitoring seasonal sales cycles in business or assessing biological rhythms in healthcare. This trigonometry twist can transform raw data into a rhythmic dance of insights, helping predict future patterns and understand cyclical changes. It’s like giving your data a mathematical telescope, offering a clearer view of the landscape ahead.
Pro Tips for Perfecting Your Excel Trigonometry Skills
Shortcuts and Tricks for Faster Calculations
Dive into Excel’s treasure trove of keyboard shortcuts and tricks to speed up your trigonometric calculations. You can use quick key combinations to insert functions or add the AutoSum feature to swiftly total sine or cosine values.
Another savvy trick is to copy and paste the formula across cells when you have to calculate cosines for a series of angles – Excel is smart enough to adjust references automatically. And for those who live by the keyboard, memorize the ALT+= shortcut to summon the AutoSum and breeze through your calculations.
- ALT + = : Quick insertion of the AutoSum function.
- CTRL + C, CTRL + V: Copy and paste functions across cells.
- F4: Toggle between absolute and relative references in formulas for dynamic calculations.
Troubleshooting Unexpected Results in Trigonometric Formulas
When Excel serves up a slice of unexpected results in your trigonometric formulas, don’t let it bend your spirit. Start by scrutinizing your degree-to-radian conversions — a single misstep here could derail your entire formula. Also, check for rounding errors, especially with functions like cos(90) degrees that should return zero; consider using the ROUND function if necessary. A keen eye on these details paired with Excel’s auditing tools can often reveal where things went sideways, guiding you back to the right trigonometric track.
- Check your degree-to-radian conversion for accuracy.
- Consider using
=ROUND(COS(RADIANS(90)), number_of_digits)to mitigate rounding errors. - Use Excel’s ‘Evaluate Formula’ feature to step through complex calculations.
FAQ
What is the cos function in Excel?
The COS function in Excel returns the cosine of a given angle specified in radians. The syntax is =COS(number), where number is the angle in radians. For degrees, use =COS(RADIANS(degrees)).
How to do COS degrees in Excel?
To calculate the cosine of an angle in degrees in Excel, first convert the degrees to radians using the RADIANS function, then use the COS function. For example, =COS(RADIANS(45)) calculates the cosine of 45 degrees.
Why is COS 90 not 0 in Excel?
In Excel, the COS function expects the angle to be in radians, not degrees. Therefore, =COS(90) gives the cosine of 90 radians, not 90 degrees. To get the correct result for 90 degrees, use =COS(RADIANS(90)).
What Result Should I Expect When Calculating Cos 90 Degrees in Excel?
When calculating the cosine of 90 degrees in Excel using =COS(RADIANS(90)), you should expect a result very close to 0, specifically 6.12323E-17, which is effectively zero due to floating-point arithmetic limitations.
Can I Use Degrees Directly in Excel Without Converting to Radians?
No, Excel’s trigonometric functions like COS require the angle to be in radians. You need to convert degrees to radians using the RADIANS function, as in =COS(RADIANS(degrees)).
John Michaloudis is a former accountant and finance analyst at General Electric, a Microsoft MVP since 2020, an Amazon #1 bestselling author of 4 Microsoft Excel books and teacher of Microsoft Excel & Office over at his flagship MyExcelOnline Academy Online Course.

