Key Takeaways:
- To insert a checkbox in Excel, access the “Developer” tab, then from the “Insert” dropdown in the “Controls” group, select “Checkbox” under “Form Controls.” Click on the specific cell where you want to place the checkbox to insert it into your worksheet, allowing you to create interactive elements such as task lists and surveys.
- After insertion, checkboxes can be customized by editing the name for clarity and by formatting for better visual appeal; their position can also be fixed to cells to ensure alignment and consistency. Linking checkboxes to cells is a crucial step for creating interactive functions, such as to-do lists with conditional formatting that respond to the checkbox’s state.
- For worksheets that require multiple checkboxes, such as checklists or interactive reports, you can efficiently insert them using the Developer Tab, or expedite the process by copying and pasting a checkbox or using the drag and fill feature to populate adjacent cells with checkboxes automatically.
Table of Contents
Activate a Developer Tab
The only way to create a checkbox is by using the Developer tab option. If it is not visible on your ribbon, follow the steps below to add it –
STEP 1: Right-click anywhere on your Ribbon and select Customize the Ribbon.

STEP 2: Make sure the Customize Ribbon is selected. Then select the Developer option under Main Tabs.

STEP 3: Click OK.

The Developer tab will now show up on the ribbon.

Insert a Checkbox in Excel
Once you have the Developer tab visible on your ribbon, you can follow the steps below to insert a Checkbox in Excel –
STEP 1: Click on Developer Tab.
STEP 2: Under the Controls, Click on Insert.

STEP 3: Click on the Checkbox icon under Form Controls (small box with a blue tick).

STEP 4: Click anywhere on the sheet, and the checkbox will be inserted there.

STEP 5: Right-click and select Edit Text. You can edit or remove text as needed.

The checkbox is now ready!

Insert Multiple Checkboxes in Excel
Now that you have added a checkbox to cell B2 – How do you insert them for the remaining cells?
If you try to add the checkboxes one by one using the method shown above it will be a time-consuming process. There are 2 ways in which you can quickly add multiple checkboxes to your Excel worksheet.
Let’s look at them.
You can simply copy the checkbox added in cell B2 and paste them into the required range.
- Select the cell containing the checkbox

- Press Ctrl + C to copy it.

- Select the cells where you want to paste and then press Ctrl + V.


You can also highlight all the cells and use the keyboard shortcut Ctrl + D to achieve the same result!
In this method, you can select the cell containing the checkbox and then move your cursor to the bottom right corner of the cell. The arrow will convert into a thin black cross icon.
Now, simply drag and fill the checkboxes to the cells below.

Link Checkbox to a Cell
You can link the value of the checkbox to a cell address in your worksheet. When you select the checkbox, the value in the linked cell will display TRUE otherwise it will display FALSE.
You can use this value in the cell to perform various actions like conditional formatting, creating interactive charts or reports, hiding or unhiding rows/columns, etc. Let’s see how you can link a checkbox to a cell:
STEP 1: Right-click on the checkbox and select Format Control.

STEP 2: In the Format Object window, go to Control Tab.

STEP 3: Under the Cell link, select the cell where you want the value to be displayed. Here, it is cell C2.

STEP 4: Click OK.

You can see that since the checkbox is not selected, the value in cell C2 is showing FALSE.

Once you select the checkbox, the value will change to TRUE.

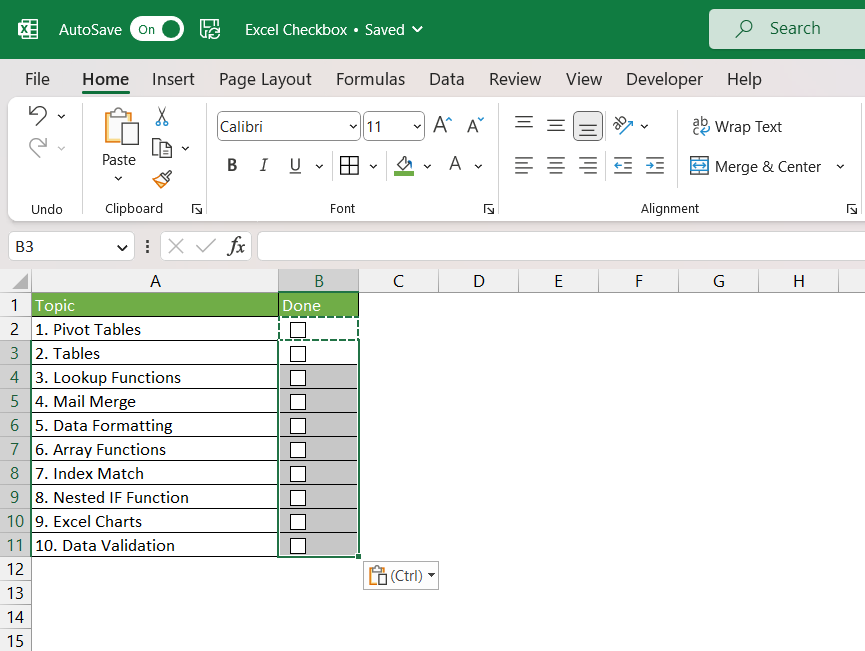
Example of Using Checkbox in Excel
In this example, you have a list of topics that needs to be covered by a student. You need to use the checkboxes in Excel to track the progress and provide a summary for the same.
You also have to strikethrough the topics that have been completed and add a green color fill to them. This can be achieved using the Conditional Formatting option in Excel.

STEP 1: Go to Developer Tab > Insert > Checkbox.

STEP 2: Click on cell B2 to insert the checkbox in that cell.

STEP 3: Right-click and select Edit Text. Clear the text.

STEP 4: Drag and fill the checkboxes in range B3:B11.

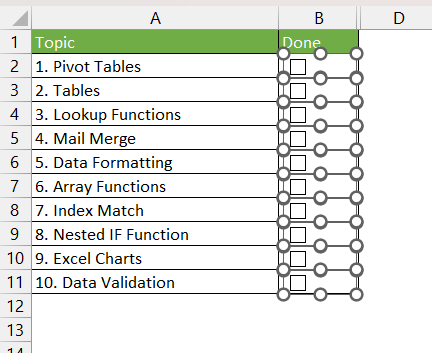
STEP 5: Right-click on the checkbox and select Format Control.

STEP 6: Select cell C2 in the cell link option.
STEP 7: Do this for all the checkboxes.

STEP 8: In cell B13, insert the COUNTA formula to get the total number of topics covered.
=COUNTA(A2:A11)

STEP 9: In cell B14, insert the COUNTIF function to get the total number of TRUE in range C2:C11. These cells will display TRUE only when the checkbox is selected indicating that the topic has been covered.
=COUNTIF(C2:C11,”TRUE”)

STEP 10: In cell B15, to get the percentage of topics covered simply divide B14 by B13.
=B14/B13

STEP 11: To add conditional formatting, select the cell range where you want the formatting to be shown. Here, it is cell A2:A11.

STEP 12: Go to Home > Condition Formatting > New Rule.

STEP 13: In the New Formatting Rule dialog box, select Use a formula to determine which cells to format.

STEP 14: Type the formula stated below –
=$C2=TRUE

STEP 15: Click on the Format button.

STEP 16: Under the Fill tab, select the light green color.

STEP 17: Under the Font tab, select Strikethrough.

STEP 18: Double-check the result under Preview and then click OK.

And Voila, you will see that the desired result has been achieved. The topics that have been marked as completed in the checkbox are strikethrough and highlighted in green as well.
Delete Checkbox in Excel
Deleting a single checkbox is a straightforward task but deleting multiple checkboxes in your worksheet can become tedious. You can follow any of the following methods below to delete multiple checkboxes at once:
- Press and hold the Ctrl key on your keyboard and select all checkboxes.

- Press the Delete button on your keyboard.
All the selected checkboxes will be deleted.

Method 2: Use the Selection Pane
- Go to Home > Find & Select.

- In the dropdown, click on Selection Pane.

- In the Selection Pane, select the checkboxes you want to delete.

- Press the Delete button on your keyboard.


All the selected checkboxes will be deleted.
Method 3: Use the Go To Special option
- Press Ctrl + G to open the Go To dialog box. Select Special.

- In the Go to Special dialog box, select Objects. Click OK.

- All the checkboxes will be selected.

- Press Delete.


All the selected checkboxes will be deleted.
The only limitation of this method is that all objects in the active worksheet including shapes, charts, dropdowns, etc. will be deleted.
Advanced Checkbox Tips and Tricks
Creating Interactive To-Do Lists or Dashboards
Embrace the power of checkboxes to transform your static lists into fully interactive to-do lists or dashboards. To create one, insert checkboxes next to each item on your list. Next, link each checkbox to a specific cell to track your progress. As you click a checkbox, the linked cell reflects the changes, enabling automated status updates or visual cues.
Consider crafting a progress bar by utilizing conditional formatting that lights up as you tick off tasks, providing a satisfying visual representation of your progress. This can be a motivating factor to keep you pushing through your checklist.
For dashboards, checkboxes can filter what data is shown. Say you have a sales dashboard; checkboxes could be used to toggle between different regions or product categories.
Managing Checkboxes Effectively: How to Add, Modify, and Delete
Mastering the management of checkboxes can significantly streamline your tasks in Excel. To add a checkbox, go to the Developer tab, click ‘Insert,’ then choose the checkbox option. Click where you’d like to add it in your spreadsheet. Remember, you can rename your checkbox by right-clicking and selecting ‘Edit Text’ to make it more descriptive of its purpose.
Modifying multiple checkboxes all at once is no Herculean task. You can uniformly change properties such as size, format, or text for all selected checkboxes. To pick several, hold down CTRL while you click on each checkbox, and any changes you make in the format control will apply to them all in one fell swoop.
Accidentally added too many or just don’t need a particular checkbox anymore? Getting rid of it is super straightforward: select the checkbox by clicking it and tap your DELETE key. Remove many at once by CTRL-clicking to select them and pressing DELETE.
FAQs
Can I Use Checkboxes for Multiple Selections in Excel?
Absolutely! Unlike option buttons, which restrict you to a single choice, checkboxes in Excel allow for multiple selections. They’re perfect for lists where more than one option may apply. Just insert a checkbox for each option you want to provide, and users can check as many as they like to indicate their choices.
How Do I Control the Size and Position of a Checkbox?
To control the size and position of a checkbox in Excel, first, ensure it’s unlocked by right-clicking and choosing ‘Format Control’. Then, adjust the size by dragging the handles that appear around the checkbox. Need it to stay put? Head over to the ‘Properties’ tab and select ‘Don’t move or size with cells’. Now, your checkbox will neither dance around your sheet nor change size when you alter rows or columns.
What are the Steps to Link a Checkbox to a Cell in Excel?
Linking a checkbox to a cell in Excel is a neat trick to capture its status. First, add the checkbox by selecting it from the Form Controls in the Developer tab. Once placed, right-click the checkbox and pick ‘Format Control’. In the dialog that pops up, move to the ‘Control’ tab and in the ‘Cell link’ box, input the reference of the cell you want to link or use the spreadsheet icon to select it directly. Hit ‘OK’, and voilà! Your checkbox’s state will be represented as TRUE or FALSE in the linked cell, depending on whether it’s checked or not.
How Do You Remove Checkboxes While Retaining Their Values?
To remove checkboxes but keep the values (TRUE or FALSE) indicating their checked status, you have to separate the two actions: first, unlink the checkbox from its corresponding cell by clearing the cell link under ‘Format Control’. Once done, just select the checkbox or checkboxes – yes, you can select multiple at once by holding CTRL – and press the DELETE key. This removes the checkboxes without affecting the cell values, which remain in the spreadsheet.
Conclusion
A Checkbox is a very useful feature in Excel that allows users to select or deselect an option. It is helpful as it prevents users from manually entering data hence reducing the scope of error. It can be used for creating forms, checklists, interactive charts, reports, etc.
In this article, we have covered how to insert single or multiple checkboxes in Excel, link the value to a cell, and delete them as well.

John Michaloudis is a former accountant and finance analyst at General Electric, a Microsoft MVP since 2020, an Amazon #1 bestselling author of 4 Microsoft Excel books and teacher of Microsoft Excel & Office over at his flagship MyExcelOnline Academy Online Course.


