Pivot tables are one of Excel’s most powerful features, allowing you to summarize data dynamically and extract meaningful insights effortlessly. If you’re looking to elevate your data analysis game, mastering calculated fields within pivot tables is a game-changer. Calculated fields enable you to perform arithmetic operations on your pivot table’s underlying data, providing a versatile tool for more in-depth analysis. This guide will walk you through the essentials of adding calculated fields and illustrate advanced techniques for maximizing their potential.
Key Takeaways:
- Calculated fields let you perform dynamic arithmetic on pivot table data without altering the original dataset.
- They update automatically with changes in pivot table data, enabling real-time analysis.
- Correct field referencing is essential; use exact names and single quotes if needed.
- Editing and managing formulas is simple through the PivotTable Tools ribbon.
- Adapting calculated fields to multiple data sources ensures accuracy and flexibility.
Table of Contents
Unlock the Power of Calculated Fields
What Are Pivot Table Calculated Fields?
Pivot table calculated fields are formulas that perform operations on fields in your pivot table’s data. Unlike regular Excel formulas, which refer to specific cell ranges, calculated fields work with the data source behind the pivot table, offering a dynamic way to create custom calculations. These fields are added directly to your pivot table, enabling you to derive new insights by simply using existing data fields. Think of them as on-the-fly calculations tailor-made for your datasets. This makes calculated fields particularly valuable for reporting and decision-making processes.
Reaping the Benefits of Calculated Fields
Calculated fields significantly enhance your data analysis capabilities, offering several key benefits. They allow you to customize calculations without altering the original dataset, maintaining data integrity. You can quickly generate metrics such as profit margins or growth percentages, enabling more focused insights into your data. Additionally, because these fields update automatically with changes in pivot data, they provide real-time analysis. This adaptability makes calculated fields crucial for dynamic, data-driven decision-making. Their ease of use encourages wide adoption, even among those new to Excel, ensuring accessibility to everyone engaged in data analysis.
Creating Pivot Table Calculated Field
Step-by-Step Guide to Insertion
Here is our Pivot Table:

STEP 1: Click on the Pivot Table and go to Options > Fields, Items, & Sets > Calculated Field

STEP 2: Set the Name to Cost of Goods Sold

STEP 3: Set the Formula to COSTS/SALES. This is the formula to be used for our calculated field.

STEP 4: The formatting is still not correct. Right-click on the new column and select Number Format.

STEP 5: Select Percentage and click OK.

Your new calculated field is now ready in percentage format!

Common Mistakes to Avoid
When working with calculated fields in pivot tables, it’s essential to be mindful of several common pitfalls.
- One frequent mistake is referencing field names incorrectly; always use the exact field name displayed in the pivot table and enclose it in single quotes if necessary.
- Another error is assuming calculated fields will respect filters, whereas they operate on the entire data set within the pivot table context.
- Also, complex formulas can make calculations error-prone; it’s safer to verify each component’s accuracy before combining them.
- Additionally, avoid using calculated fields when more powerful functions or data models could achieve the desired result, as they offer more flexibility.
Customizing and Managing Your Calculations
Editing Existing Formulas Efficiently
Editing existing formulas in your calculated fields is a breeze once you know the proper steps. Start by selecting your pivot table to activate the PivotTable Tools on the ribbon. Then, go to the ‘Analyze’ or ‘Options’ tab, select ‘Fields, Items, & Sets,’ and choose ‘Calculated Field’ from the dropdown menu.
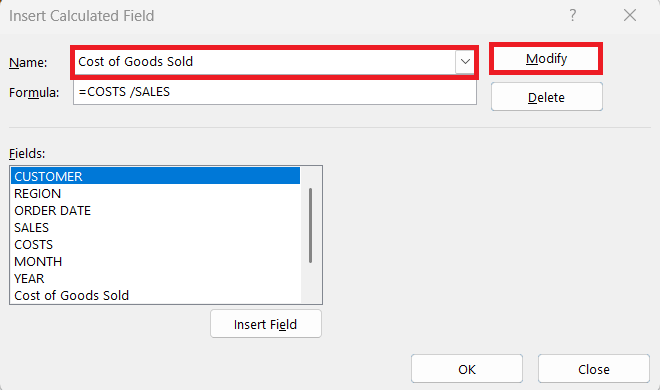
In the ‘Insert Calculated Field’ dialog box, select the field you wish to edit from the ‘Name’ dropdown. Modify the formula as needed in the ‘Formula’ box, ensuring you maintain the correct syntax and field references. Click ‘Modify’ to save your changes.
For efficiency, document each formula change outside of Excel, perhaps in a log or documentation file. This not only aids in tracking adjustments but also serves as a reliable reference for future modifications.
Adapting to Different Data Sources
Adapting calculated fields to various data sources is crucial for maintaining data integrity and analytical flexibility. When working with multiple data sources, ensure your pivot table is set to refresh data connections regularly; this keeps the calculated fields updated with the latest information.
Each data source may have unique field names and structures, so check compatibility and consistency. Using Excel’s Power Query can facilitate this process by allowing you to merge, clean, and shape diverse datasets into a unified format that pivot tables can easily interpret.
Moreover, for databases like SQL or CSV files, establish clear connections so that your pivot table can seamlessly pull data and recalculate fields as needed. Adjust formulas to reflect any changes in source nomenclature or data types, ensuring accuracy in analysis.
FAQs
How do I create a calculated field in a PivotTable?
To create a calculated field in a PivotTable, select the pivot table and navigate to the ‘Analyze’ or ‘Options’ tab on the ribbon. Click on ‘Fields, Items, & Sets’ and choose ‘Calculated Field.’ Enter a name for your new field, define the formula using existing fields, and click ‘Add’ to include it in the pivot table.
Can I use IF functions in Pivot Table calculations?
Yes, you can use IF functions in Pivot Table calculated fields. Simply incorporate the IF logic within your formula to perform conditional analysis. Ensure the fields involved are compatible with the desired logical test to avoid errors.
What’s the difference between calculated fields and items?
Calculated fields perform operations on entire fields across rows in a Pivot Table, creating new data from existing fields. In contrast, calculated items work within a singular field, allowing you to conduct sub-level calculations among the field’s different entries.
How do I edit an existing calculated field?
Select the pivot table, go to ‘Analyze’ or ‘Options’ > ‘Fields, Items, & Sets’ > ‘Calculated Field.’ Choose the field from the ‘Name’ dropdown, modify the formula in the box, and click ‘Modify.’ Save changes, and your pivot table will recalculate automatically. Keep a log of formula changes for easy reference.
How do you delete an unwanted calculated field?
To delete an unwanted calculated field, select your Pivot Table and go to the ‘Analyze’ or ‘Options’ tab. Click on ‘Fields, Items, & Sets’, then choose ‘Calculated Field.’ In the dialog box, pick the field you wish to remove from the ‘Name’ dropdown and click ‘Delete.’

John Michaloudis is a former accountant and finance analyst at General Electric, a Microsoft MVP since 2020, an Amazon #1 bestselling author of 4 Microsoft Excel books and teacher of Microsoft Excel & Office over at his flagship MyExcelOnline Academy Online Course.


