
Key Takeaways
- Excel’s DATE function acts as the foundation for date arithmetic, essential for custom date creation and manipulation.
- Excel’s unique date system treats dates as serial numbers, starting from January 1, 1900, facilitating smooth date operations.
- Adding or subtracting six months is streamlined with the EDATE function, showcasing Excel’s capacity for straightforward date adjustments.
- The DATE function allows for precise control over year, month, and day components, catering to more intricate date calculations.
Table of Contents
Introduction
The Power of Excel in Date Management
Excel goes beyond handling numbers and financial information; it excels in managing dates too. With just a few clicks, you can monitor time, set alerts, and organize schedules efficiently.
Navigating Today’s Topic: Adding or Subtracting Six Months
Whether you’re looking to project future dates or reminisce past ones, adding or subtracting six months from a given date is a breeze in Excel. Today, dive into how you can perform this time-traveling feat with simple functions.
Understanding Excel Dates
The Building Blocks of Excel Date Functions
To get started with date arithmetic in Excel, you should familiarize yourself with some core functions. The DATE function is your cornerstone, allowing you to weave day, month, and year into a date Excel can work with.
Imagine merging separate day, month, and year data into a coherent date format; that’s exactly what DATE function does. But, this is just the beginning. Let’s explore further.
How Excel Handles and Processes Dates
Excel has a peculiar way of dealing with dates; it stores them as serial numbers. January 1, 1900, is considered day 1, and every day after that is one more than the previous. This unique method is why operating on dates requires some behind-the-scenes magic.
Here’s a jaw-dropping fact: Did you know January 1, 2009, is serial number 39814 in Excel’s eyes? It’s a lot of days after January 1, 1900! Now that you have an idea of this system, let’s use it to add or subtract six months with finesse.
The Quick Method: Using EDATE Function
Syntax of EDATE to Add Six Months
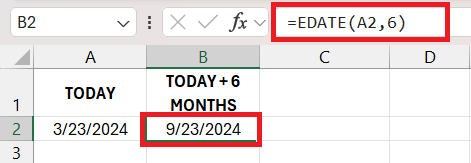
The EDATE function is your go-to tool for traveling through time. To leap forwards by six months, use =EDATE(start_date, 6). This simple formula takes your specified start_date and shuttles it half a year into the future.
Let’s break it down:
start_date: The date you’re starting from (can be a cell reference or a DATE function)6: The number of months you want to add (use-6for subtracting)
Thereafter, hitting Enter gets you a glimpse into the future, or a look in the past if you’re subtracting. It’s that straightforward!
Reverse the Clock: Subtracting Six Months with EDATE
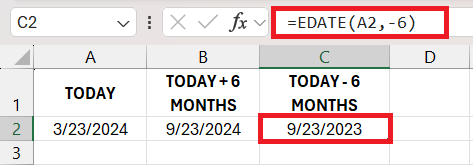
Subtracting six months is just as easy as adding them with Excel’s EDATE function. To turn back the clock, input =EDATE(start_date, -6). This tells Excel to rewind the date in your start_date by six whole months.
Imagine you have a date in cell A1 and you want to know what the date was half a year before. Just type in =EDATE(A1,-6) and press Enter. The resulting date is a six months prior blast from the past. Simple, right?
The Detailed Approach: DATE Function Combination
Breaking Down DATE Function for Complex Calculations
For more intricate date manipulations, DATE function in Excel comes into play. By breaking down a date into its components—year, month, and day—Excel affords you the precise control needed for complex calculations.
Consider the formula =DATE(YEAR(A2), MONTH(A2)+6, DAY(A2)). Here’s the breakdown:
YEAR(A2): Retrieves the year from your starting date.- 6: Add or subtract 6 months.
DATE(...): Reassembles the altered date parts into a new, desired date.
This formula adjusts each part of your date individually and then combines them again. Perfect for when you need pinpoint accuracy for your date alterations!
Practical Applications
Project Deadlines: Setting Semiannual Reminders
Managing project deadlines can be made much easier with semiannual reminders. By using the EDATE function (=EDATE(TODAY(),6)), you can set alerts for 6 months in advance. This serves as a perfect checkpoint for project milestones or to ensure you’re on track with long-term deadlines.
This formula ensures that you never lose sight of that critical half-year mark. With each reminder, you get a chance to review progress, make necessary adjustments, and prepare for the next steps. Efficient and proactive – that’s how you stay ahead in project management!
Pitfalls and Tips
Common Mistakes to Avoid with Excel Date Functions
When wielding the powers of Excel’s date functions, a few common pitfalls to sidestep are:
- Entering dates as text: Excel may not recognize
"February 2, 2023"; it’s safer to useDATE(2023,2,2). - Overlooking Leap Years: Adding a year to February 29th can be tricky; Excel’s date functions account for that automatically.
- Confusing Month Endings: Remember some months have 30 days, others 31, and February is in a league of its own. Excel manages this, but be mindful when manually inputting dates.
Expert Tips for Flawless Date Calculations
To achieve mastery in Excel date calculations, consider these expert tips:
- Use
TODAY()for dynamic dates: This function always returns the current date, keeping your calculations up-to-date. - Leverage
WORKDAYfor business dates: Skip weekends or holidays by using this function in tandem withEDATE. - Stay format savvy: Ensure the cell format matches the expected outcome—date formats can change how functions interpret data.
FAQs
How do I calculate six months from today?
To add 6 months to the current date in Excel, utilize the EDATE function: =EDATE(TODAY(), 6). This formula computes a date that is 6 months ahead of today’s date.
How can I determine the number of months from today to a specific date in Excel?
To calculate months between today and a specific date, use the DATEDIF function: =DATEDIF(TODAY(), A1, "m"), assuming A1 has the end date.
How to add 1 month to date ?
To add a month to a date in Excel, use the EDATE function: =EDATE(A1, 1), where A1 contains the initial date.
How do I ensure the date format stays consistent?
Ensure consistent date formats by setting your cells to the ‘Date’ format before inputting or calculating dates. Right-click the cell, choose ‘Format Cells’, select ‘Date’, and choose your preferred format.
Can I use these methods to calculate dates beyond just months?
Yes, you can use EDATE for months and DATE function to add or subtract days and years as well. The DATE function provides flexibility for various time intervals.
John Michaloudis is a former accountant and finance analyst at General Electric, a Microsoft MVP since 2020, an Amazon #1 bestselling author of 4 Microsoft Excel books and teacher of Microsoft Excel & Office over at his flagship MyExcelOnline Academy Online Course.


