
Key Takeaways
- Line breaks can fragment data, leading to visual inconsistencies and issues with formulas, thereby affecting the integrity and presentation of your spreadsheets.
- Utilize Excel functions such as LEN, FIND, and SEARCH to detect line breaks and carriage returns within your cells, helping to maintain a clean dataset.
- Use Excel’s Find and Replace function (Ctrl + H) to eliminate line breaks efficiently. Input Ctrl + J in the ‘Find what’ box and leave ‘Replace with’ empty to remove breaks.
- Leverage Excel’s CLEAN and TRIM functions to remove non-printable characters and excess spaces, ensuring text is neat and consistent.
- Employ VBA macros to automate the removal of line breaks for large datasets, or use functions like TEXTJOIN for controlled concatenation of text with or without line breaks.
Table of Contents
Introduction to Line Break Challenges in Excel
When and Why Line Breaks Become a Problem
Line breaks in Excel may appear as a boon for organizing text within a cell, but they can quickly become a source of frustration when compiling or analyzing data. Imagine you’re trying to sort a list of customer feedback or addresses, and you find that the sorting process is compromised due to unexpected line breaks. These breaks can disrupt the flow of data, making it harder to process and interpret your spreadsheets efficiently.
The Impact of Line Breaks on Data Integrity and Presentation
Line breaks can have a considerable impact on both the integrity and presentation of data within Excel. When data gets unintentionally fragmented across multiple lines due to these breaks, it may lead not only to visual inconsistency but also to issues with formulas that expect a certain structure in the dataset.
Visualization tools like pivot tables and charts may also interpret the split data incorrectly, skewing results and leading to potential misrepresentations. Ensuring a clean dataset without unexpected line breaks fosters better analysis, accurate reporting, and a professional appearance of your spreadsheets.
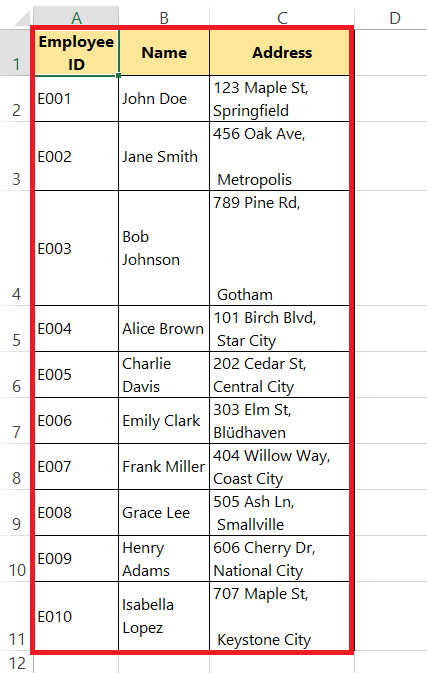
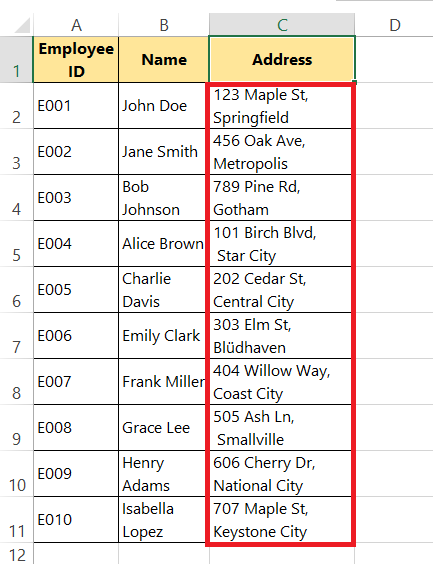
- With Line Breaks-
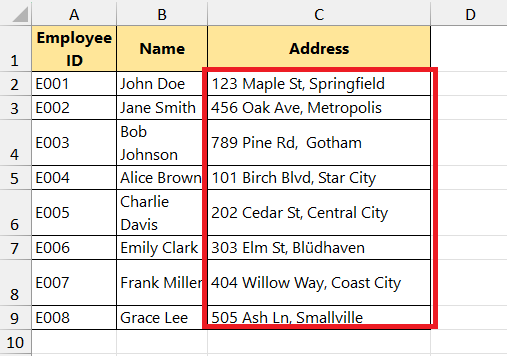
- Without Line Breaks-
Identifying Line Breaks in Your Spreadsheet
Tools and Functions to Detect Line Breaks in Cells
To keep your data clean and well-organized, you’ll want to get a handle on any line breaks lurking within your cells. Excel doesn’t leave you high and dry here; it provides a few tools and functions to help you detect these breaks. You can start with the LEN function to determine the length of text in a cell; discrepancies in expected lengths can indicate the presence of line breaks.
Another effective method is using the FIND or SEARCH function to locate the CHAR(10) or CHAR(13) characters, which represent line breaks and carriage returns, respectively. This can help you pinpoint the exact location of these breaks.
Step-by-Step Guide to Remove Line Breaks
Using Excel’s Find and Replace Function to Eliminate Line Breaks
When it’s time to give those pesky line breaks the boot, Excel’s Find and Replace function is like your digital eraser.
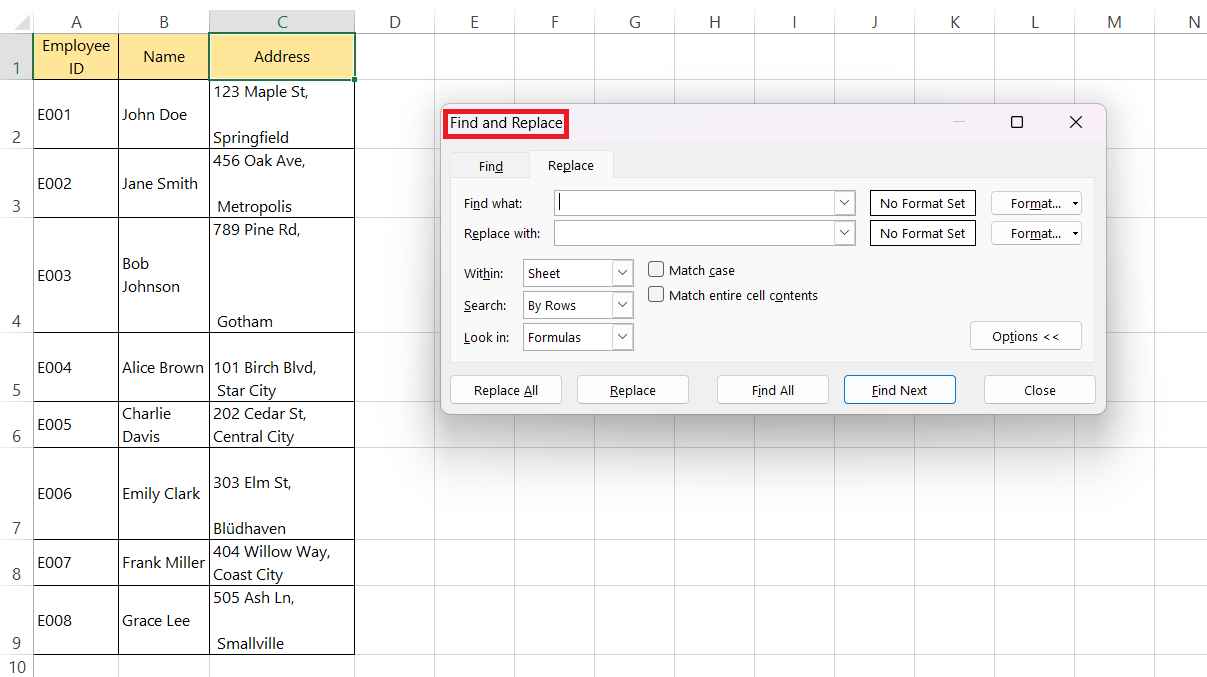
STEP 1: You’ll simply need to open up the Find and Replace dialog box by hitting Ctrl + H on your keyboard.
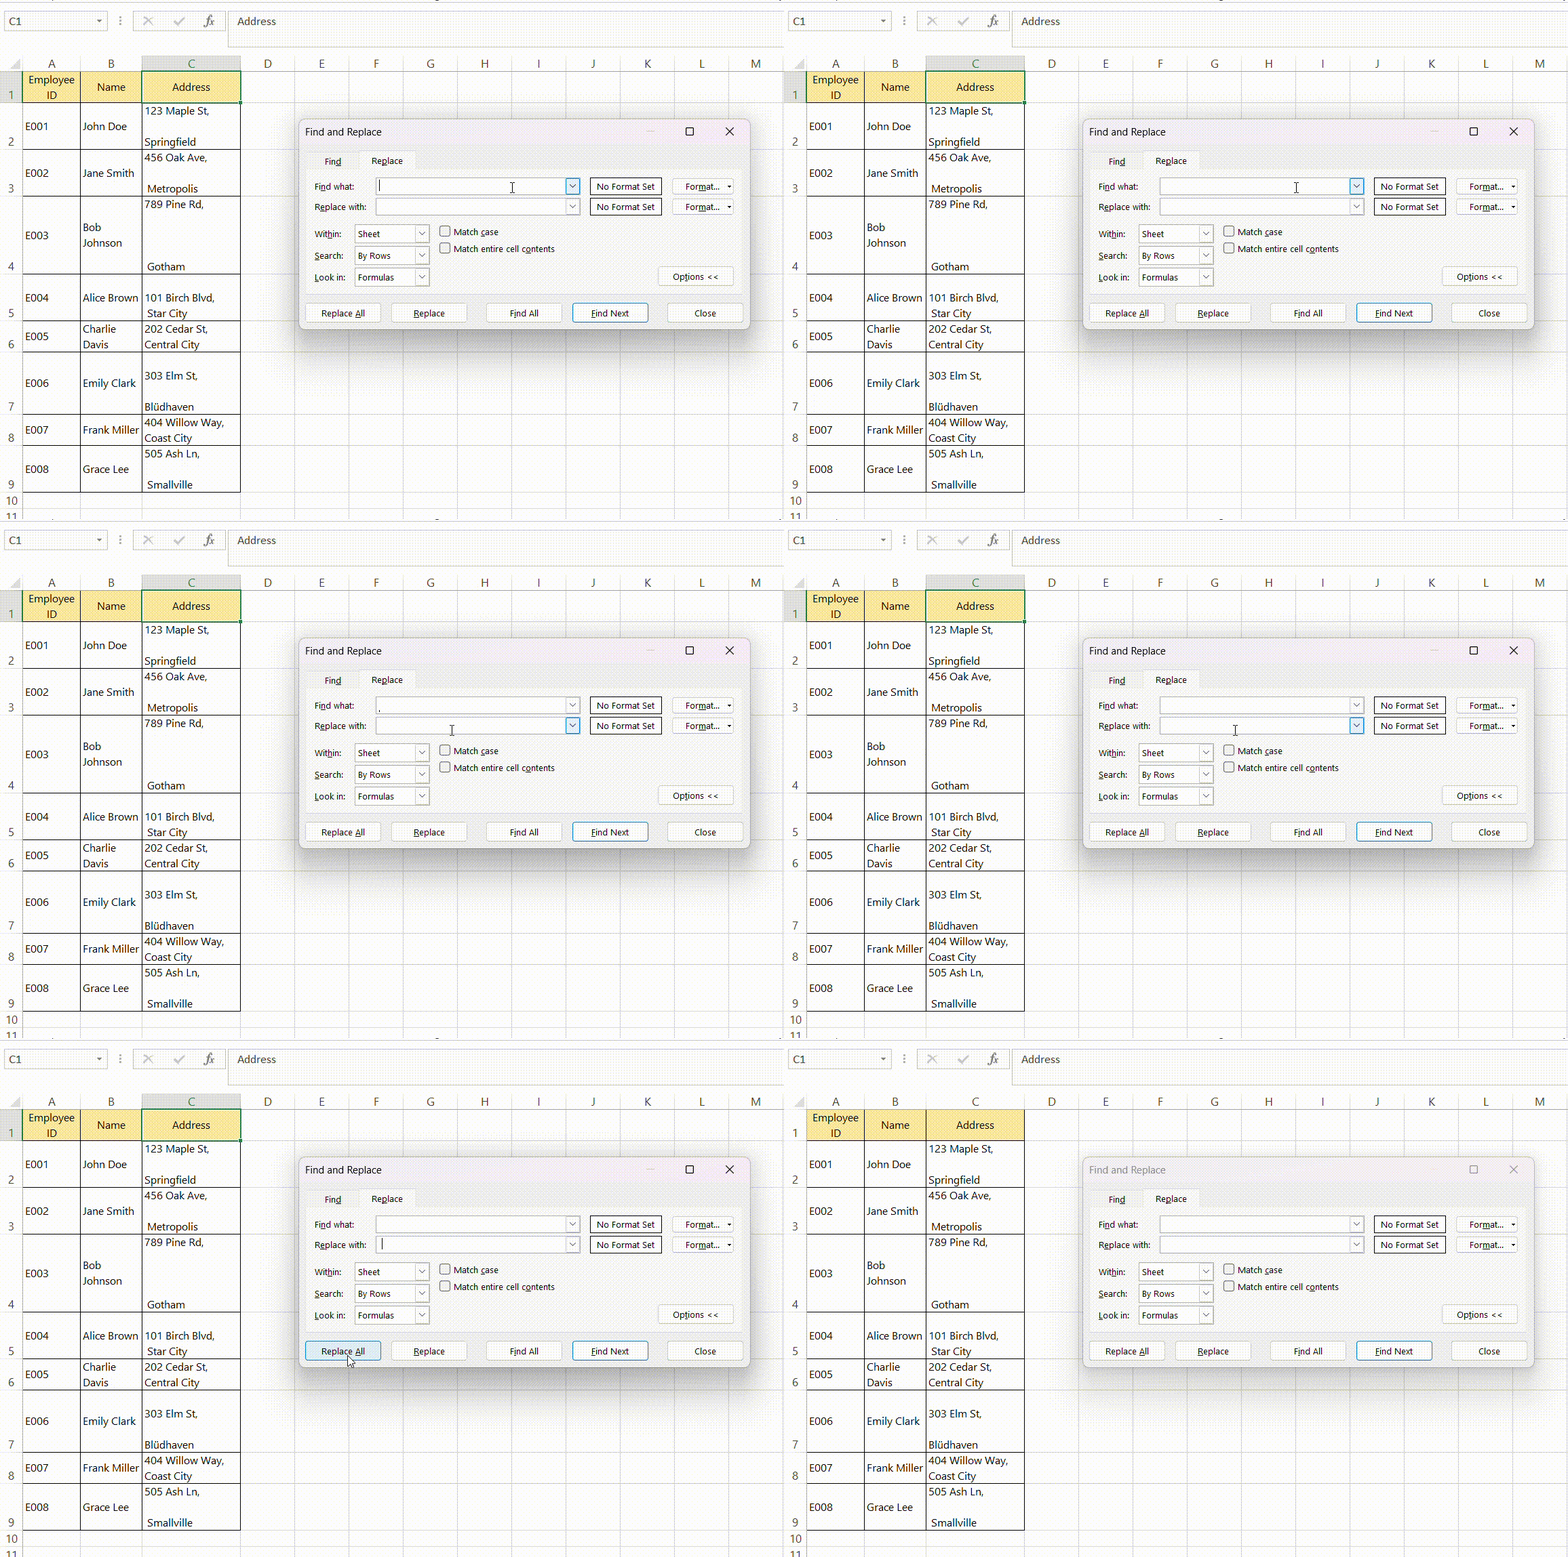
STEP 2: Once there, you’ll input Ctrl + J in the ‘Find what’ box to target line breaks, leave the ‘Replace with’ box empty for complete removal, or place your preferred delimiter (here in the example space is will be taken as the delimiter) for a smart replacement, and then hit ‘Replace All’.
The beauty of this method is its simplicity and directness. It allows for efficient cleaning of selected cells, columns, or even entire worksheets with just a couple of clicks.
RESULT:
Just remember that this is a static edit, meaning that once you replace or delete those line breaks, any new data will have to go through the same process.
The Power of Excel Formulas: CLEAN and TRIM for Tidying up Text
Excel formulas are like a Swiss Army knife for data manipulation, and with the CLEAN and TRIM functions, you’re well-equipped to tidy up text that’s been marred by non-printable characters and excessive spacing. The CLEAN function serves as a textual scrubber, wiping away all non-printable characters from your strings—think of it as a bath for your text. Just put =CLEAN(C2) in a cell, and voilà, it returns a squeaky-clean version of the text in A1, free of any line breaks.
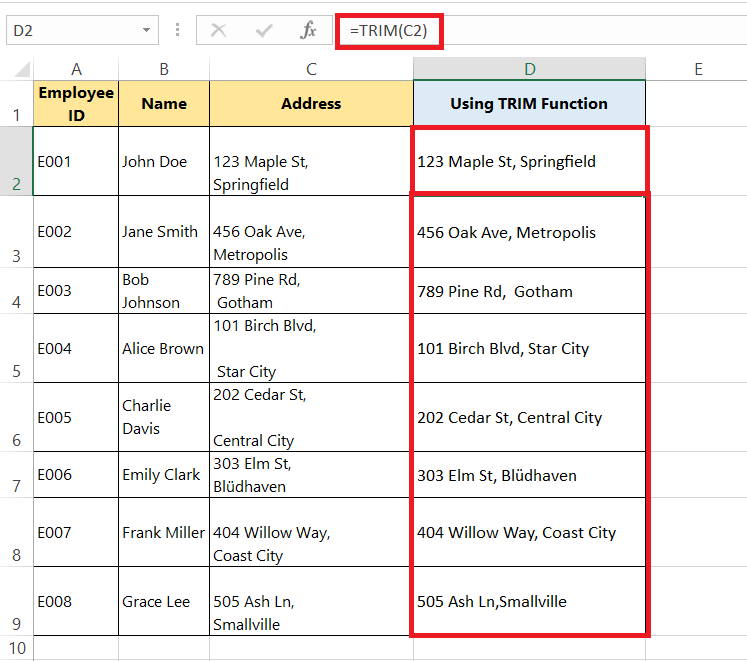
However, in some cases, you might find extra spaces still lingering. That’s where the TRIM function comes in to take care of any surplus spaces leading, trailing, or within the text, except for single spaces between words. For instance, =TRIM(C2) will streamline the spacing in your string, ensuring that it looks neat and is consistent.
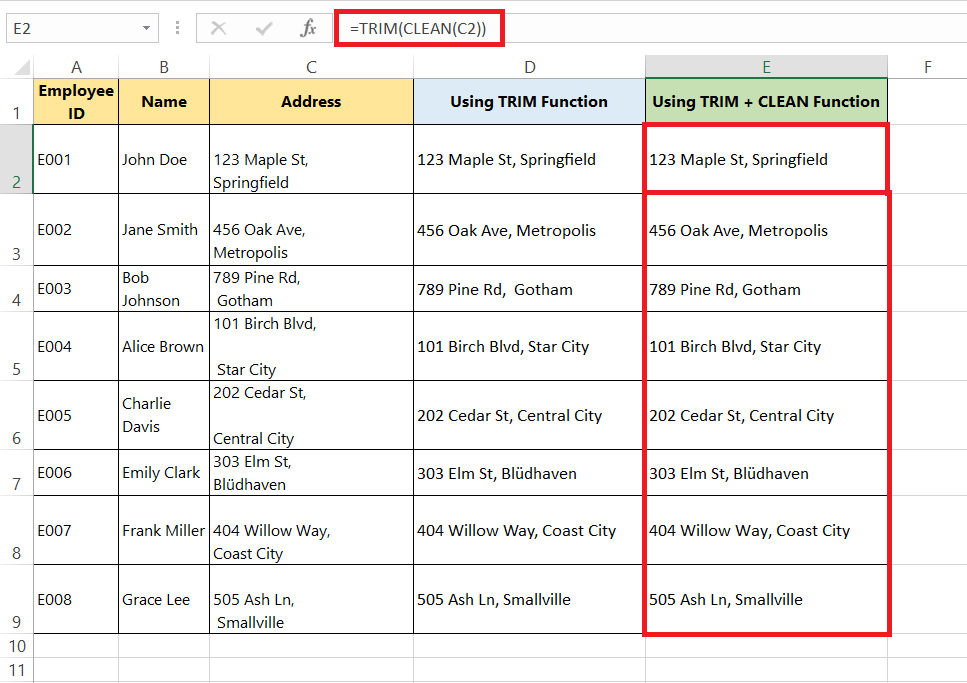
For the ultimate clean-up combo, you can combine these two formulas: =TRIM(CLEAN(C2)) will both remove non-printable characters and tidy up the spaces, leaving your text in prime condition for whatever task you have at hand.
Advanced Techniques for Handling Line Breaks
TEXTJOIN Function: A Clever Way to Deal with Line Breaks in Concatenation
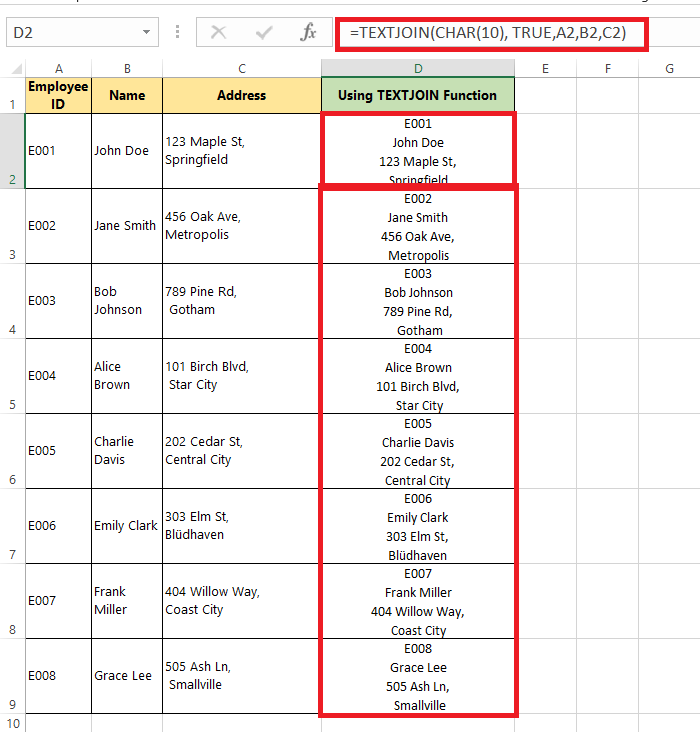
If you’re merging text from different cells and need to control line breaks in the process, Excel’s TEXTJOIN function is your go-to tool. It’s a modern alternative to the traditional concatenation techniques and avoids the pitfalls of unwanted breaks in the joined text. With TEXTJOIN, you can specify a delimiter of your choice, even opting for a line break (CHAR(10)) if you wish to neatly stack text from adjacent cells.
For instance, =TEXTJOIN(CHAR(10), TRUE, A2, B2, C2) combines the text from cells A2, B2, and C2 with a line break in between each cell’s content. The TRUE argument tells Excel to ignore any empty cells, ensuring your concatenated text isn’t interrupted by unwanted spaces.
TEXTJOIN is versatile and provides you with more control over the results of your concatenation. It can handle arrays efficiently, too, meaning you can concatenate ranges without needing to reference each cell individually.
Crafting VBA Macros to Automate the Removal of Line Breaks
Diving into the realm of VBA macros can bring automation to your fingertips, and crafting a VBA script to remove line breaks is a perfect example of this power. Macros do the heavy lifting for you, especially when dealing with large datasets where manual cleaning is impractical.
You might start by creating a simple script, like the ones provided earlier, to eliminate all instances of line breaks from the active sheet or selected cells. With a macro, you can streamline the process to a one-click operation after initial setup. Just remember that any action taken by the macro is usually irreversible, so it’s wise to keep a backup of your data.
STEP 1: Press Alt + F11 to open the VBA editor.
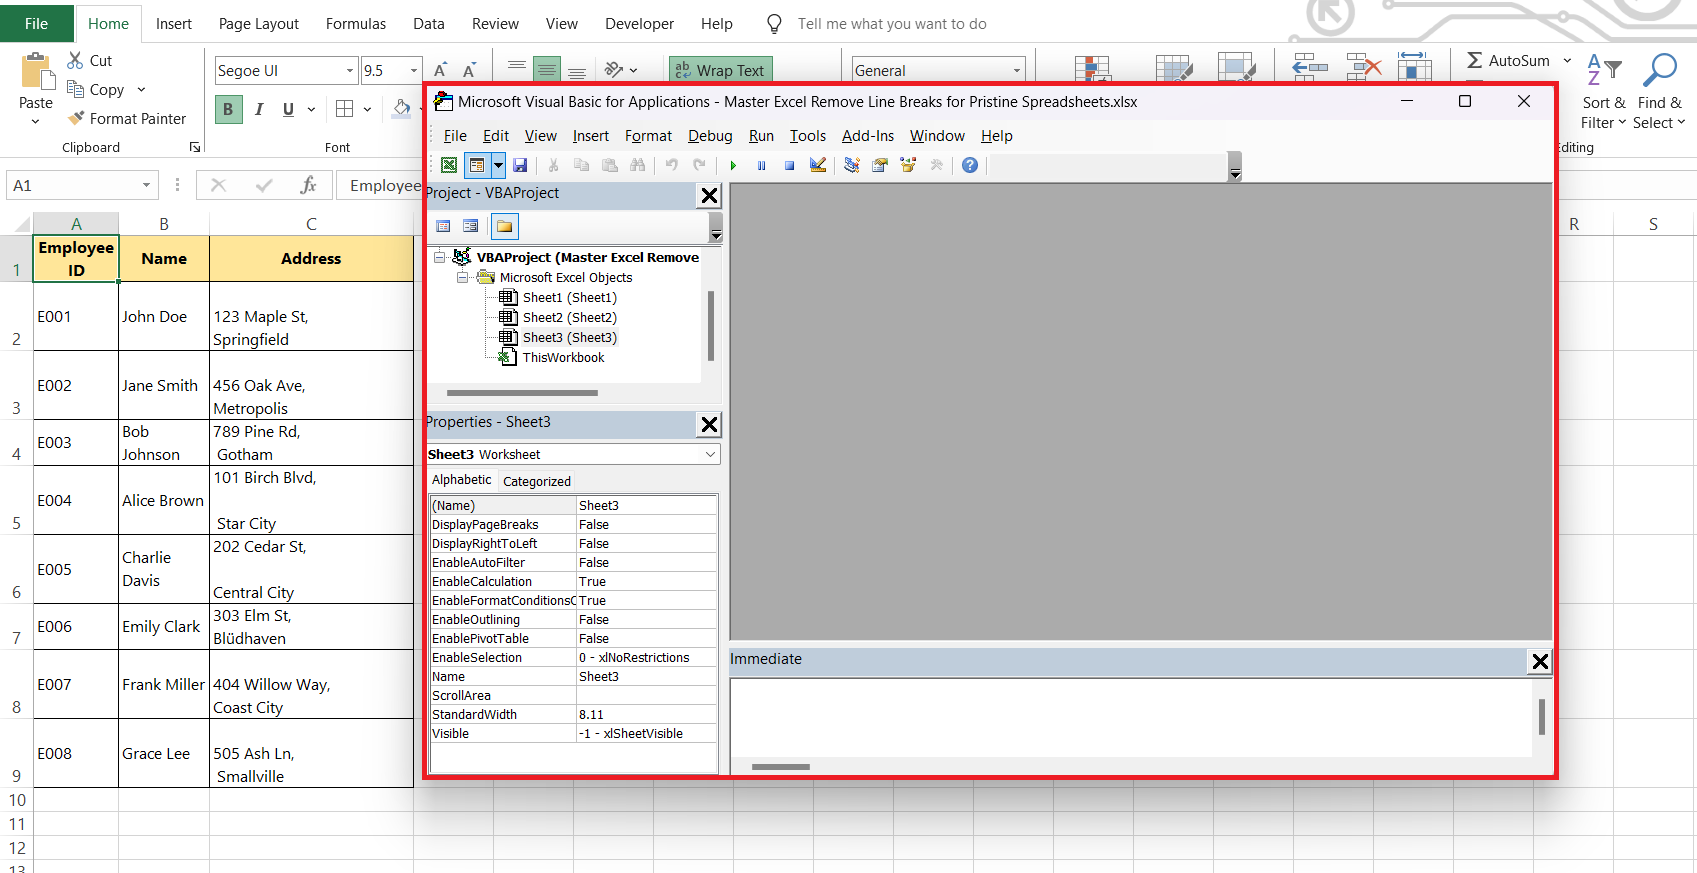
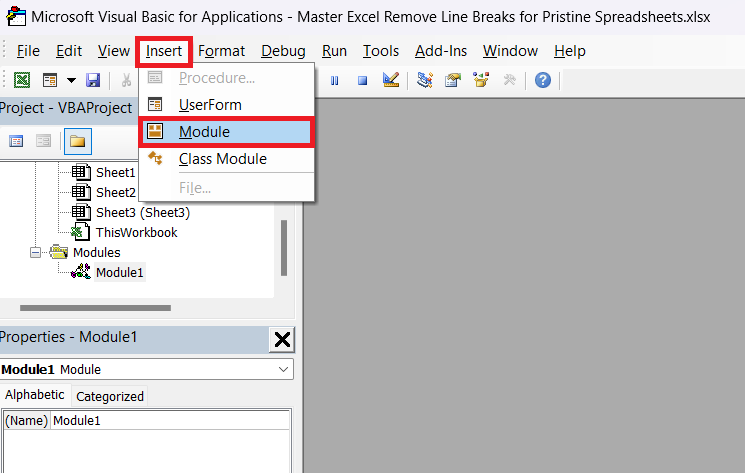
STEP 2: Go to Insert > Module.
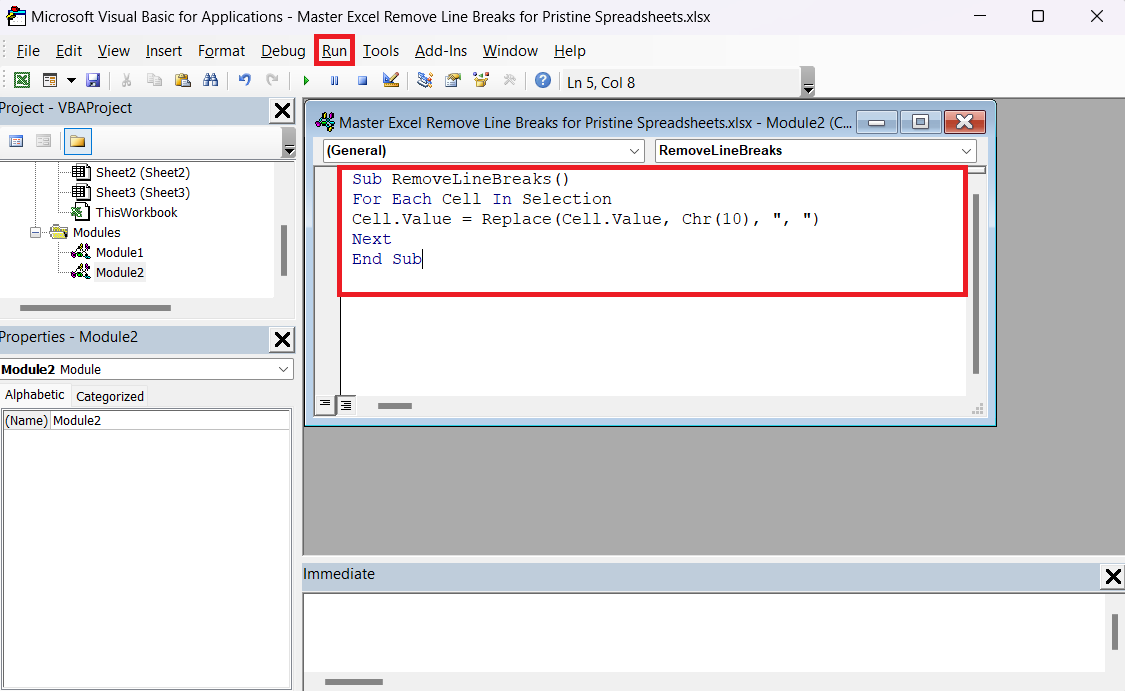
STEP 3: Copy and Paste the Code: Copy the following code and paste it into the module. Close the VBA editor, then press Alt + F8 to open the “Macro” dialog box. Select RemoveLineBreaks and click Run.
Sub RemoveLineBreaks()<br /> For Each Cell In Selection<br /> Cell.Value = Replace(Cell.Value, Chr(10), ", ")<br /> Next<br /> End Sub
RESULT:
This macro ensures that all line breaks in the specified range are replaced, resulting in cleaner and more consistent data.
By placing such a macro in your Personal Macro Workbook or as an Excel Add-in, the functionality follows you across all workbooks. If you frequently need to clean up line breaks, adding a button to the Quick Access Toolbar can make this task a breeze – just select your dataset, click the button, and watch the magic happen.
For experts and those eager to learn, VBA presents an invaluable opportunity to customize Excel’s capabilities to fit their workflow needs. However, if coding isn’t your cup of tea, there are pre-built solutions like the Ultimate Suite for Excel that can offer similar functionalities without requiring you to write a single line of code.
Preserving Data Format While Cleaning up Line Breaks
Adjusting Cell Alignment and Text Wrapping After Removing Line Breaks
Once you’ve tidied up your data and ousted those unwanted line breaks, your cells might look a bit off. The text may be clinging to the bottom of the cell or overflowing into adjacent cells, disrupting the uniformity of your spreadsheet. This is where adjusting cell alignment and text wrapping steps onto the stage.
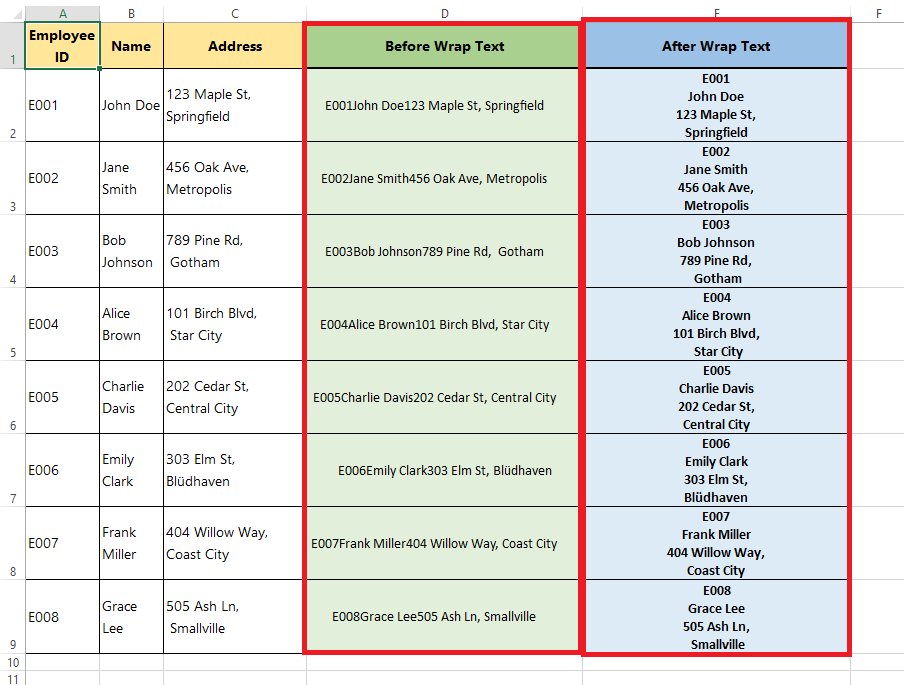
To create a consistent and readable data presentation, you might need to toggle the Wrap Text feature. This feature is a neat trick when you intentionally have line breaks and want them to display properly. You just need to select your cells, head to the Home tab, and click on the Wrap Text button, bringing your intentional line breaks back into view.
Aligning your text to the top of the cell is another good practice. It aligns your data in a way that makes reading horizontally across rows much more comfortable. Just select your desired cells, browse to the Home tab once more, and in the Alignment group, click on the Top Align button. These two adjustments can have a significant impact on the visual accessibility of your data, leading to a spreadsheet that’s both clean and user-friendly.
Look at the example picture below to mark the difference between wrapped text and unwrapped text.
Frequently Asked Questions (FAQ)
What is the quickest way to remove all line breaks in Excel?
The quickest way to remove all line breaks in Excel is by using the Find and Replace feature. Press Ctrl + H to open the dialog box, type Ctrl + J in the ‘Find what’ field to select line breaks, leave the ‘Replace with’ field empty for removal, and click ‘Replace All’. This method is fast and effective for large datasets.
Can I remove line breaks from multiple cells at once?
Yes, you can remove line breaks from multiple cells at once in Excel. Use the Find and Replace feature to remove them in bulk. Select the cells you want to edit, open the Find and Replace dialog by pressing Ctrl + H, enter Ctrl + J in the ‘Find what’ field, and then click ‘Replace All’. This will remove line breaks from all selected cells simultaneously.
How can I ensure that removing line breaks doesn’t alter my data?
To ensure data integrity when removing line breaks in Excel, first copy and paste your data into a new column or sheet as a backup. Use the Find and Replace function to target only line breaks without removing other content. Post-removal, verify your data to ensure that no unintended alterations occurred.
Are there any functions specifically designed to remove line breaks in Excel?
In Excel, while there’s no function created solely to remove line breaks, you can use the SUBSTITUTE function in combination with CHAR(10) to replace line breaks. For example, =SUBSTITUTE(A2,CHAR(10),"") will remove all line breaks from the text in cell A2.
How to remove line breaks in excel with find & replace?
To remove line breaks using Find & Replace in Excel, press Ctrl + H to open the dialog box, enter Ctrl + J in the ‘Find what’ field, which inputs the line break character, leave the ‘Replace with’ field empty if you want to remove breaks or insert a space or comma, and click ‘Replace All’. This will remove or replace line breaks throughout your selection.
John Michaloudis is a former accountant and finance analyst at General Electric, a Microsoft MVP since 2020, an Amazon #1 bestselling author of 4 Microsoft Excel books and teacher of Microsoft Excel & Office over at his flagship MyExcelOnline Academy Online Course.

