Combining first and last names in Microsoft Excel is an essential skill for creating professional-looking data. This guide covers the fundamentals of name concatenation, from preparing your Excel sheet to employing advanced techniques and automation, ensuring that your data is clean, organized, and ready for any task.
Key Takeaways
- Prepare Your Excel Sheet Properly: Ensure first and last names are in separate columns, labeled clearly, and free from extra spaces for efficient merging.
- Use CONCATENATE or Ampersand (&) for Basic Merging: Both methods are simple yet effective to combine first and last names, with CONCATENATE being traditional and ampersand offering a shortcut.
- Leverage TEXTJOIN for Advanced Merging: TEXTJOIN offers flexibility in handling varying data scenarios, including the option to skip empty cells, making it ideal for complex lists.
- Automate with Flash Fill: Flash Fill simplifies the name combination process, recognizing patterns and filling in data automatically without formulas.
- Address Common Challenges: Manage extra spaces and inconsistent capitalization using TRIM and PROPER functions, and consider Power Query for bulk data handling and customization.
Table of Contents
Getting Started with Name Concatenation in Excel
The Essentials of Combining Names
Combining first and last names in Excel might seem straightforward, but it’s a pivotal skill in ensuring your data looks professional and is easily accessible. Whether you’re prepping for mail merges, organizing contact lists, or generating reports, properly merged names make all the difference.
Preparing Your Excel Sheet
Before diving into name concatenation, ensure your Excel sheet is set up correctly. Start by organizing your data with the first names in one column and the last names in another. Make sure each column is labeled clearly to avoid confusion. Here’s a quick checklist to help you prepare:
- Label your columns, for instance, ‘First Name’ and ‘Last Name’.
- Check for blank cells and fill in any missing data.
- Remove any unnecessary spaces using the TRIM function.
- Ensure consistent text formatting across all name cells.
Having a neat Excel sheet will simplify the name combination process and minimize errors.
Proven Methods to Combine First and Last Names in Excel
Use the CONCATENATE () Function for Quick Merges
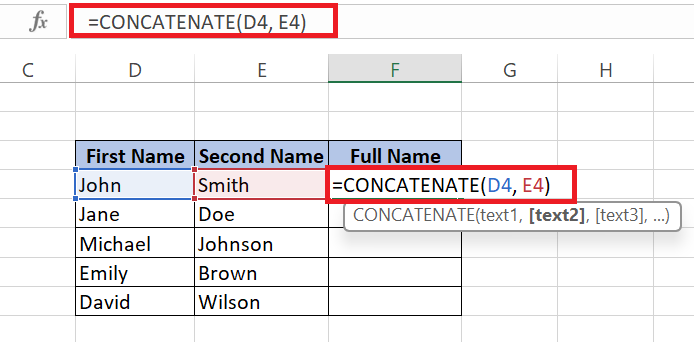
The CONCATENATE function in Excel is a tried-and-true method for quickly merging first and last names. It joins up to 30 text items, including numbers, cell references, and strings.
To combine first and last names using CONCATENATE, here’s a simple step-by-step guide:
- Replace
first_name_cellandlast_name_cellwith the actual cell references.
Despite its functionality, remember that CONCATENATE may eventually be phased out, as Excel has introduced more flexible functions like CONCAT and TEXTJOIN. However, it’s still valuable for quick merges, especially if you’re accustomed to it.
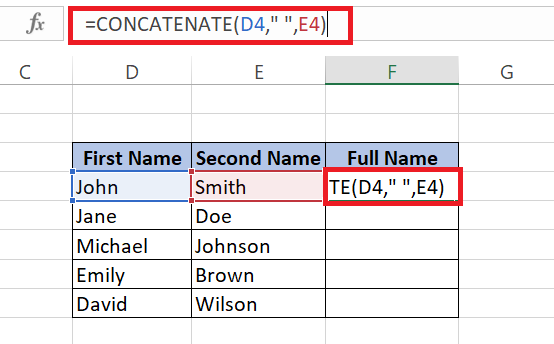
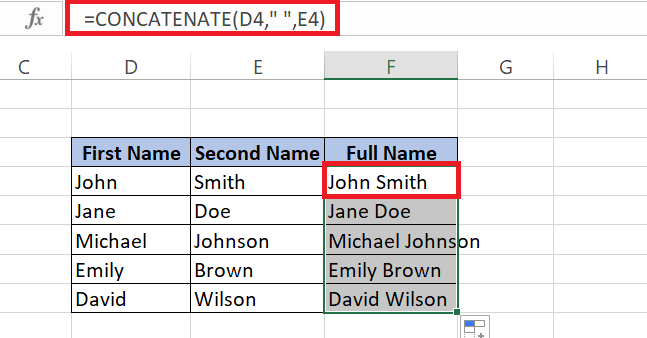
Example of CONCATENATE in action: =CONCATENATE(D4," ",E4) combines the contents of cell D4 and E4 with a space in between, yielding ‘John Smith’ if D4 contained ‘John’ and E4 contained ‘Smith’.
Similarly, press enter then drag the corner of the cell downward to copy this formula to the rest of your cells for the desired output.
Employ the Ampersand (&) for Simple Name Combinations
If you fancy a more streamlined approach, using the ampersand (&) in Excel is a nifty trick for merging text without wrapping your head around functions and formulas.
Here’s how to combine first and last names using the ampersand:
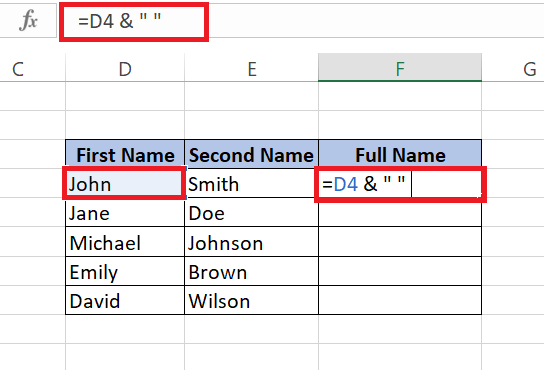
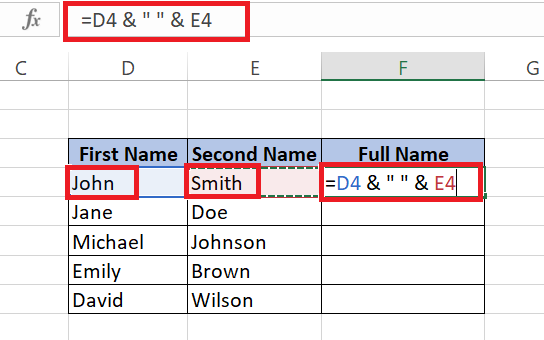
STEP 1: Select the cell where you want your combined name to appear.
STEP 2: Type = into the formula bar to begin your expression.
STEP 3: Click the cell with the first name, type &, then add a pair of quotation marks " " with a space in between for the necessary space.
STEP 4: Type & again and select the cell with the last name.
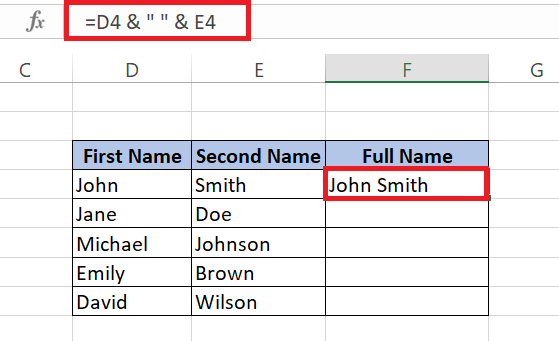
STEP 5: Hit Enter, and like magic, the names blend into one.
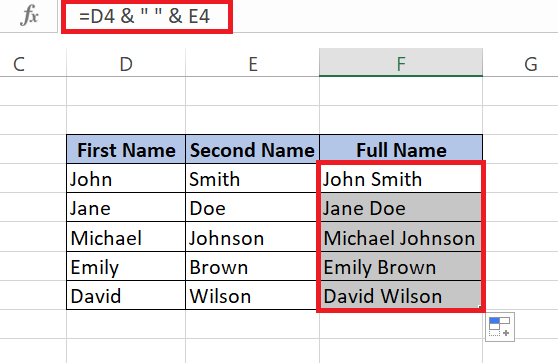
STEP 6: Drag the corner of the cell downward to copy this formula to the rest of your cells.
It’s elegant in its simplicity. And guess what? No extra functions!
Example of ampersand-operation: =D4 & " " & E4 instantly meshes the first and last names in cells D4 and E4 with a space in the middle.
Whether CONCATENATE or ampersand, you can pick whichever tool suits your fancy—or the task at hand. Sometimes, simplicity wins, and the ampersand is as simple as it gets.
Advanced Techniques for Combining Names in Excel
Mastering the TEXTJOIN Function
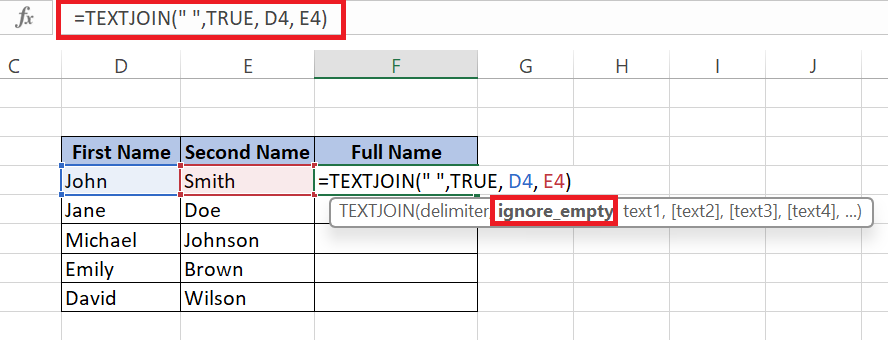
Unlocking the full potential of Excel’s TEXTJOIN function can make name merging not just easy but also incredibly flexible. TEXTJOIN allows you to concatenate a range of cells using a delimiter of your choice, and it even includes an option to ignore empty cells, making it a robust choice for various data sets.
Here’s the scoop on employing TEXTJOIN for name combinations:
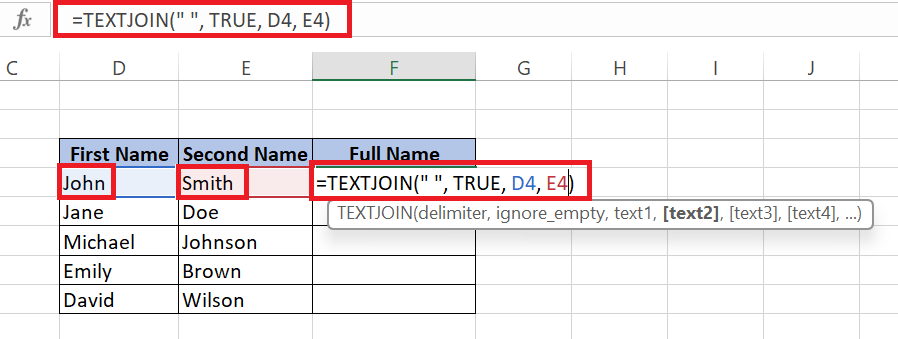
STEP 1: Input the TEXTJOIN formula: =TEXTJOIN(" ", TRUE, first_name_cell, last_name_cell)The " " specifies the space between names. Here First Name Cell is B4 and Last Name is E4
STEP 2: TRUE tells Excel to skip any empty cells.
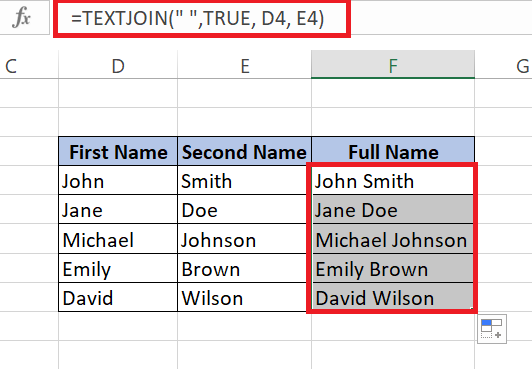
STEP 3: Press enter and drag the corner of the cell down to copy the same for other cells
With TEXTJOIN, even if you have missing middle names or varying data, the formula remains unscathed, and your lists stay clean.
This advanced technique is all about giving you control while eliminating common data nuisances. Harness TEXTJOIN, and turn those rows of names into a neatly woven tapestry of data.
Automating with Flash Fill
Excel’s Flash Fill is akin to a mind reader—it predicts and fills out data for you. When you need to combine first and last names, Flash Fill is like your trusty sidekick, doing the heavy lifting with minimal input.
Here’s how to become an automation whiz with Flash Fill:
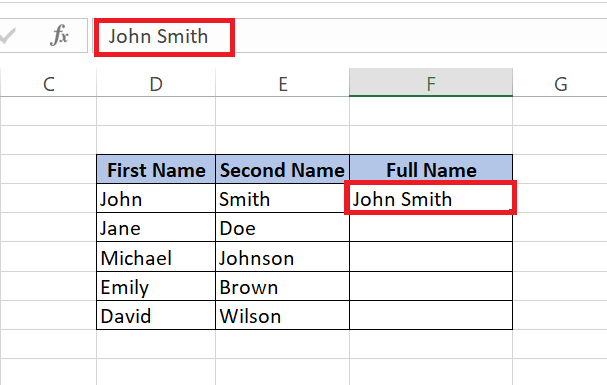
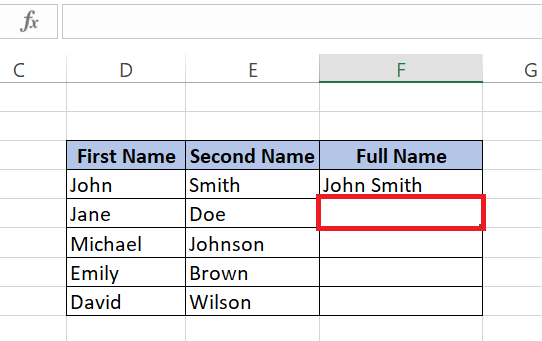
STEP 1: In the cell adjacent to your data, manually combine the first and last names of the first entry as an example.
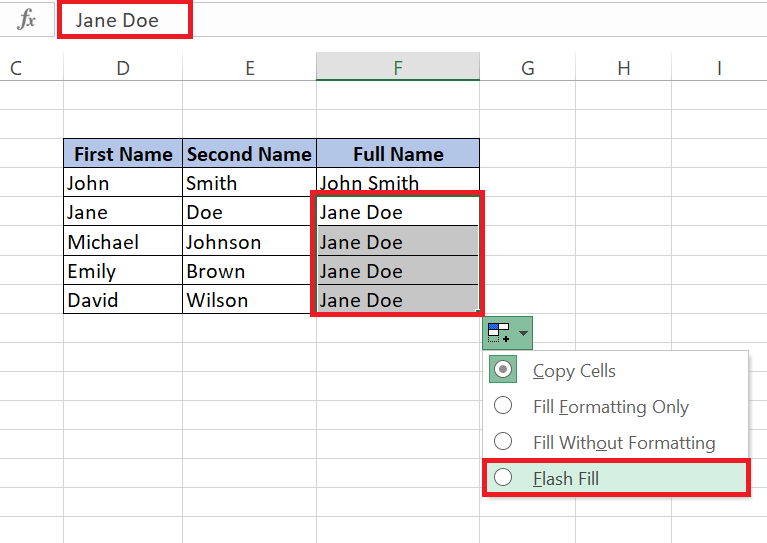
STEP 2: Press Enter and move down to the next cell. Start typing the combined name for the second entry, and watch Flash Fill offer to complete the task. The suggestions appear in gray.
STEP 4: If the magic happens, press Enter to accept Flash Fill’s wisdom.
Had no luck with the automatic trigger? Don’t fret:
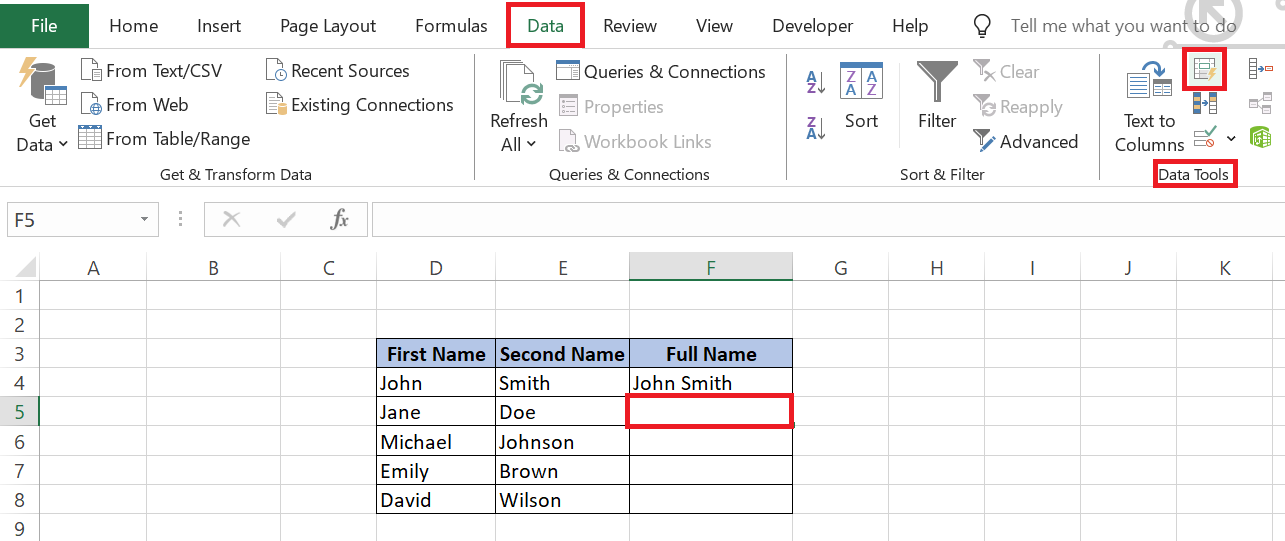
STEP 1: Select the first empty cell below your example full name.
STEP 2: Jump to the Data tab. Click on the Flash Fill command, found in the Data Tools section, or simply press Ctrl + E.
The combined names for the other cells will be displayed automatically.
Tip: Flash Fill is sensitive to patterns, so ensure your example is accurate to guide it correctly.
Excel’s Flash Fill isn’t just smart; it’s also a time-saver. Master this feature, and you’ll zip through name combining chores with ease. No formulas, no fuss—just Flash Fill to the rescue.
If Flash Fill doesn’t work as expected, double-check for inconsistencies in your data formatting or outliers in your example patterns. But once you get the hang of it, Flash Fill could become your go-to for quick Excel tasks.
Tackling Common Challenges When Merging Names
Dealing with Extra Spaces and Inconsistent Capitalization
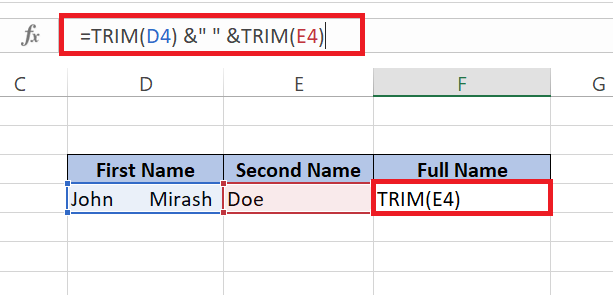
When combining names in Excel, you might encounter pesky extra spaces and haphazard capitalization. These issues can mar the tidiness of your data, but don’t worry, they can be managed with a few quick tricks.
Take control of unwelcome spaces with the TRIM function: Use TRIM to lop off unnecessary spaces, ensuring a clean join: =TRIM(D4) & " " & TRIM(E4)
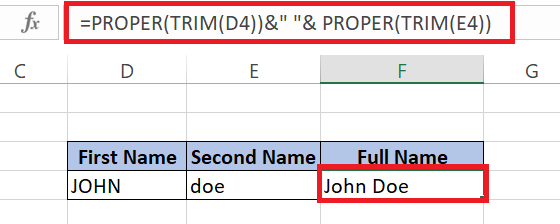
Rectify inconsistent capitalization with PROPER, UPPER, or LOWER: If names are in all caps or all lowercase, Excel can standardize the format: =PROPER(TRIM(A2)) & " " & PROPER(TRIM(B2)) turns “JOHN doe” into “John Doe”.
By incorporating these tools, you’re polishing your data to perfection, leaving no room for errors that can come from extra spaces and odd capitalization.
Remember, mastering these small yet significant details will ensure your data not only looks professional but is also reliable and consistent for any processing needs.
The Power of Automation and Customization
Streamlining Name Combination with Power Query
Excel’s Power Query is your go-to tool for streamlining the process of combining names. It’s particularly handy when you work with large datasets that need to be transformed and shaped before analysis.
Let’s dive into streamlining name combination with Power Query:
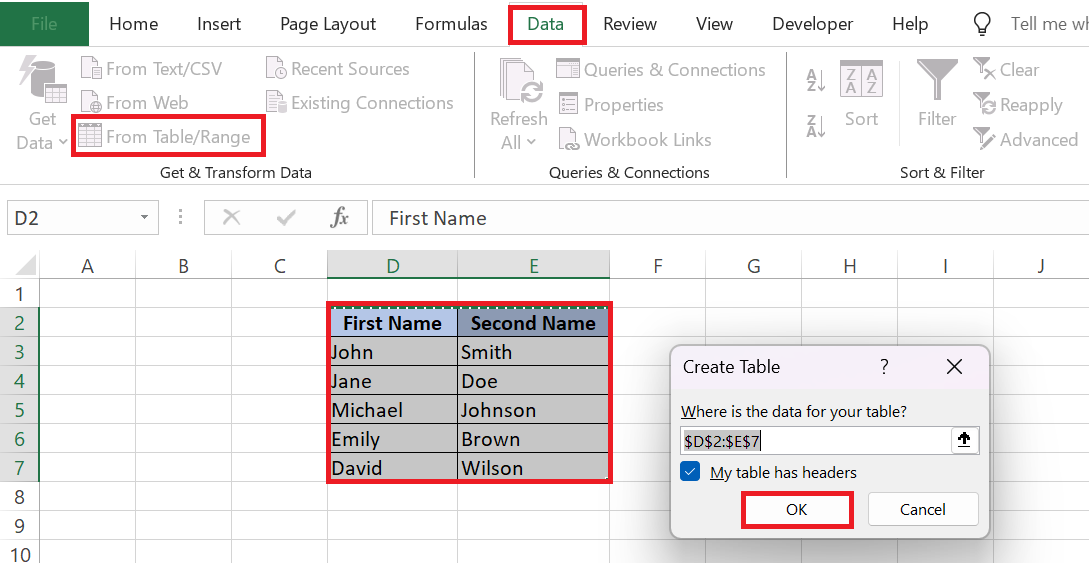
STEP 1: Highlight your data and head over to the Data tab.
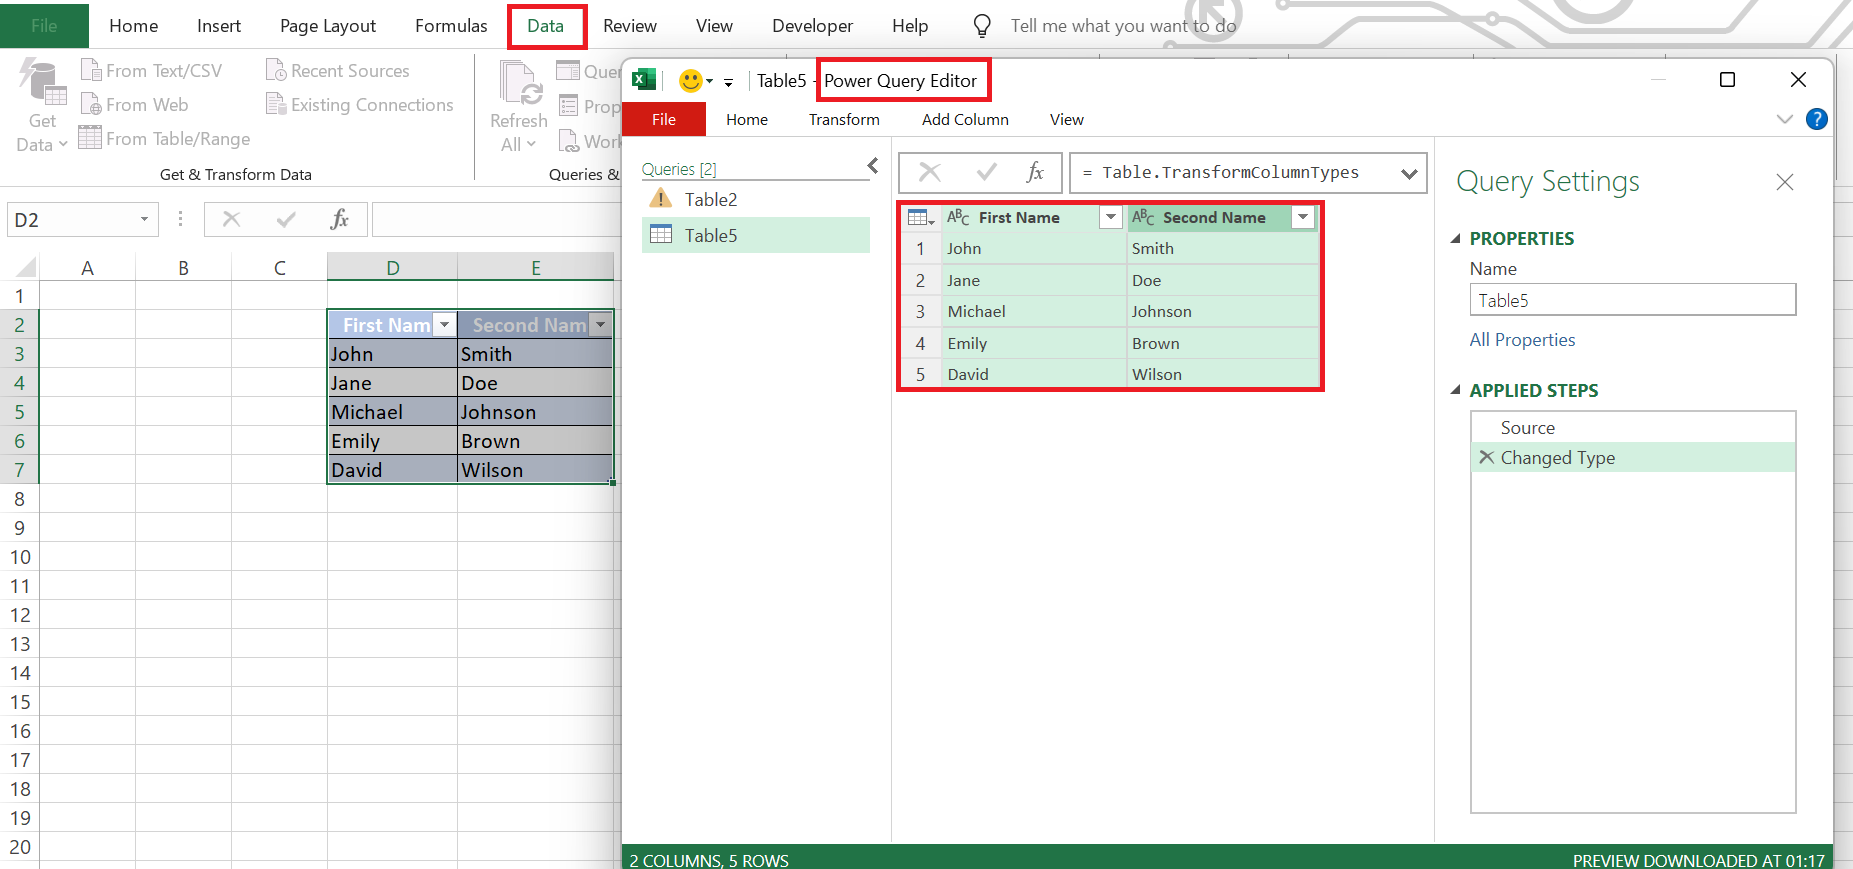
STEP 2: Select ‘From Table/Range’ to pull your data into Power Query. If it’s not already formatted as a table, Excel will prompt you to create one. Then click ‘Ok’
STEP 3: Once in the Power Query Editor, select the columns with first and last names.
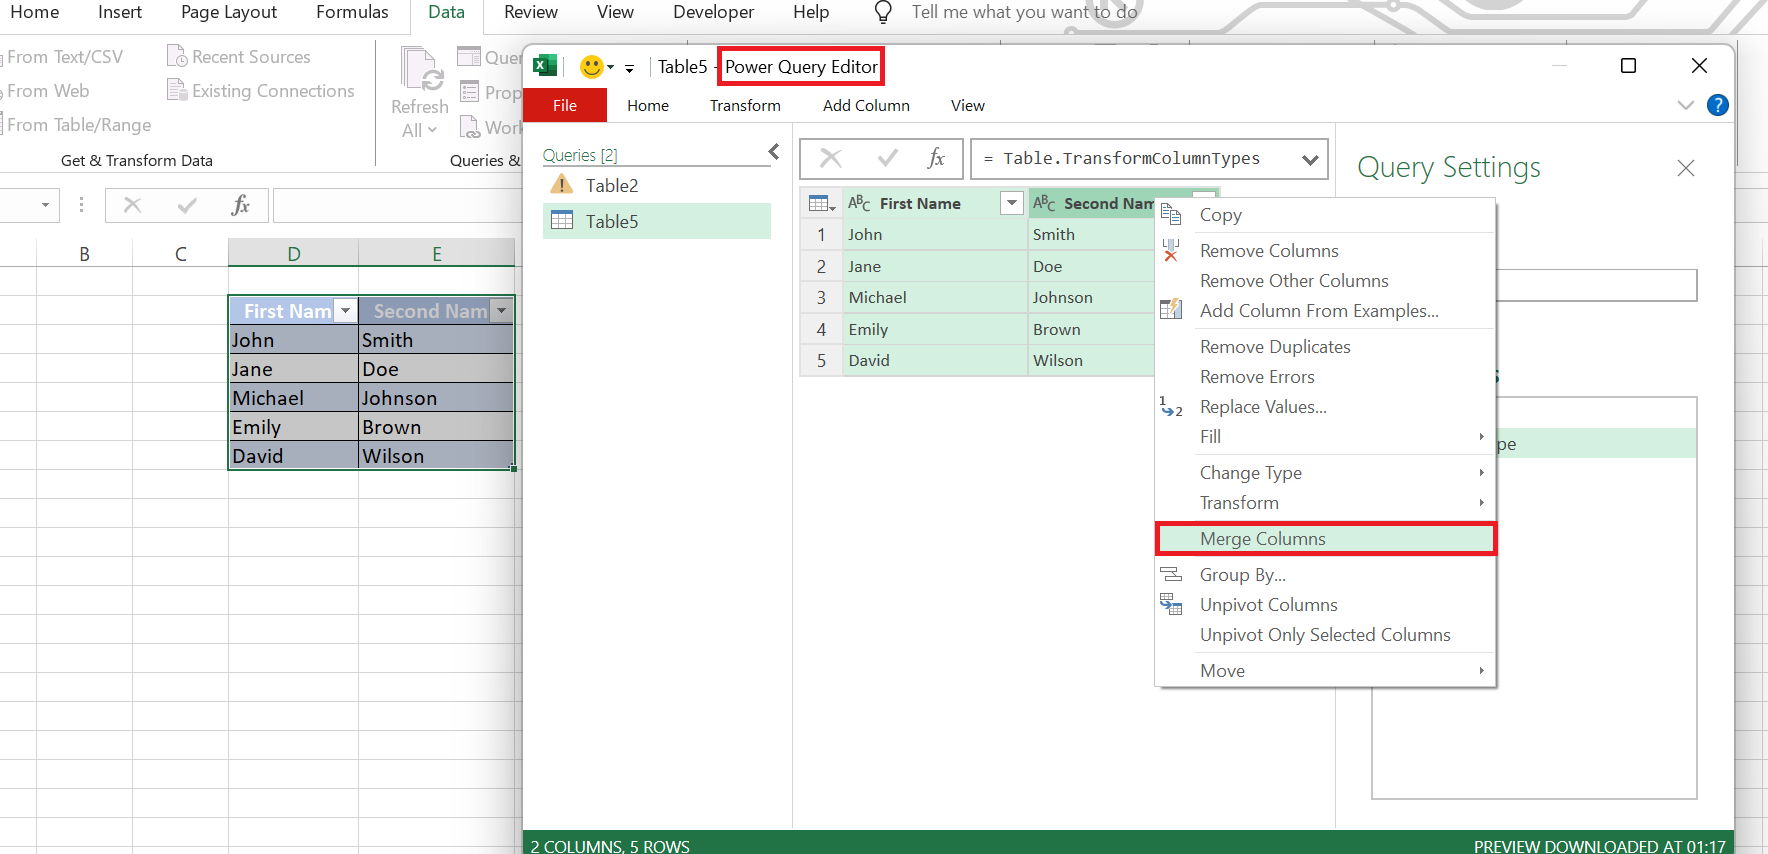
STEP 4: Right-click on the column headings and choose ‘Merge Columns’.
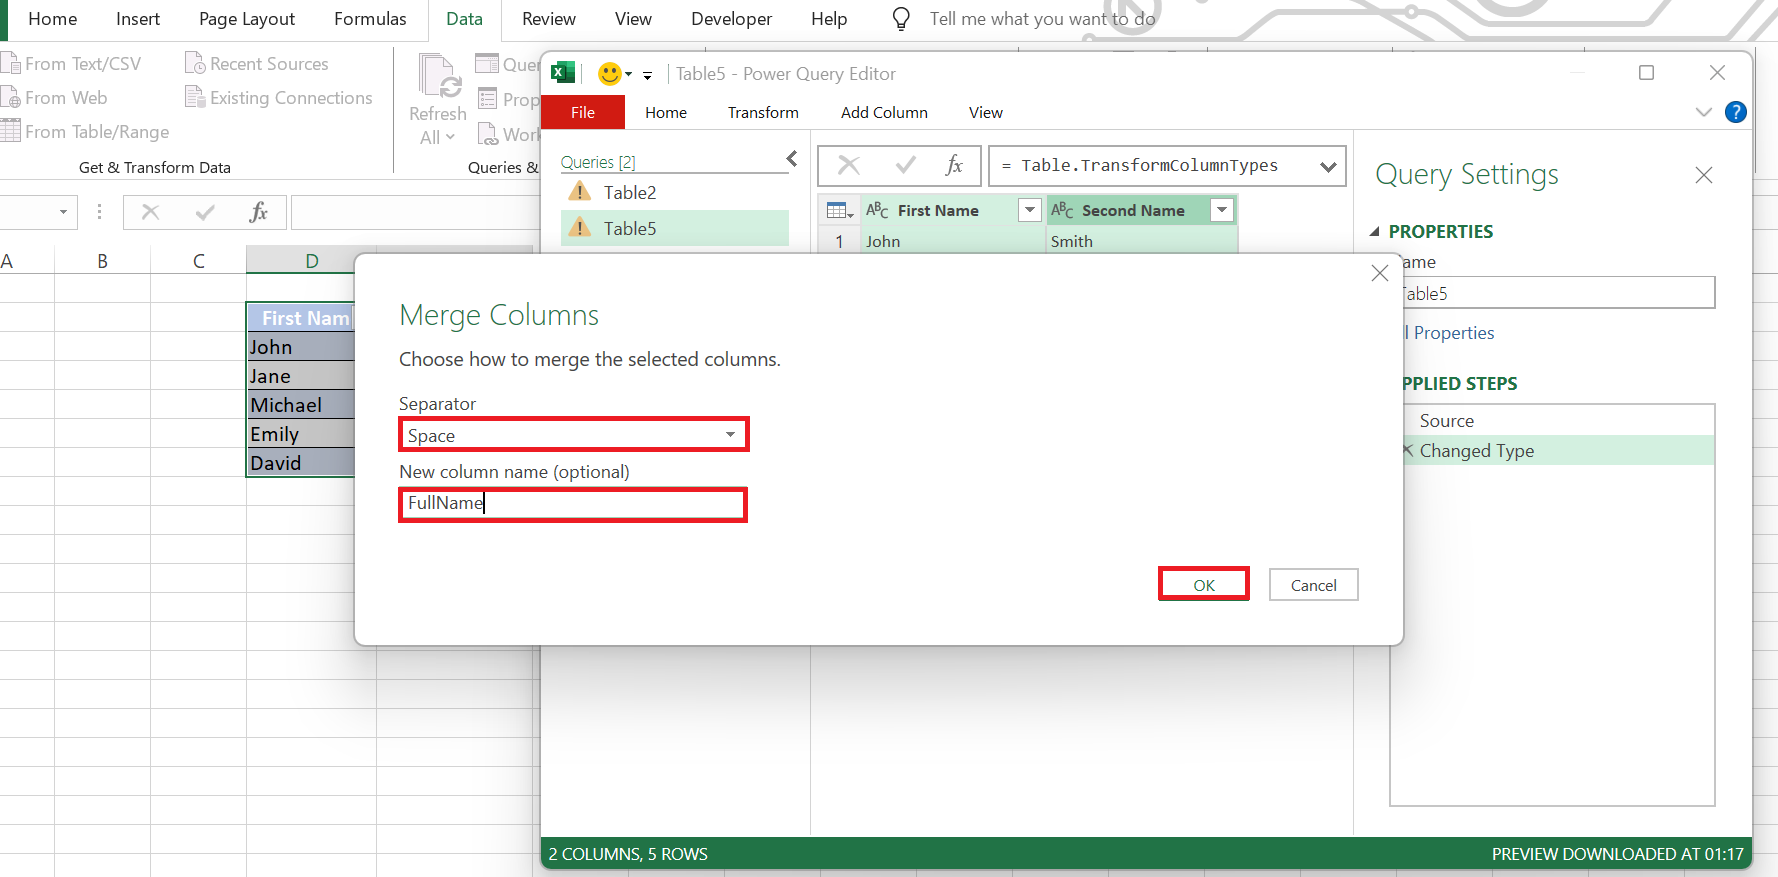
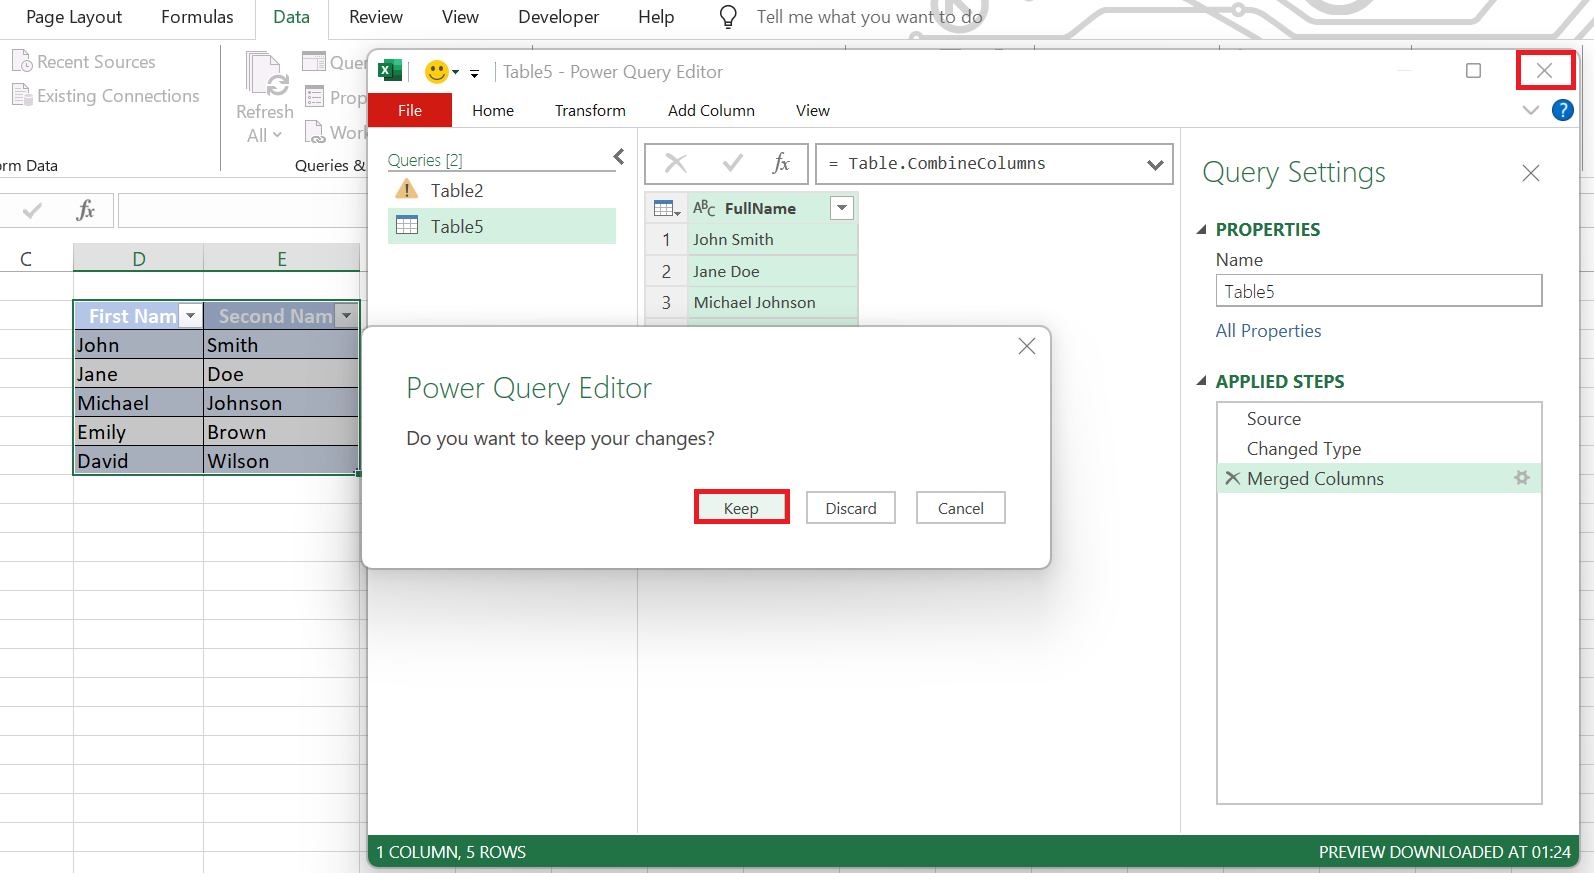
STEP 5: In the ‘Merge Columns’ dialog box, select ‘Space’ as the separator and give your new column a name, like ‘FullName’.
STEP 6: Click ‘OK’, and Power Query will meld the names into one, adding the necessary space.
STEP 7: Finally, select ‘Close & Load’ to send your newly minted data back into Excel.
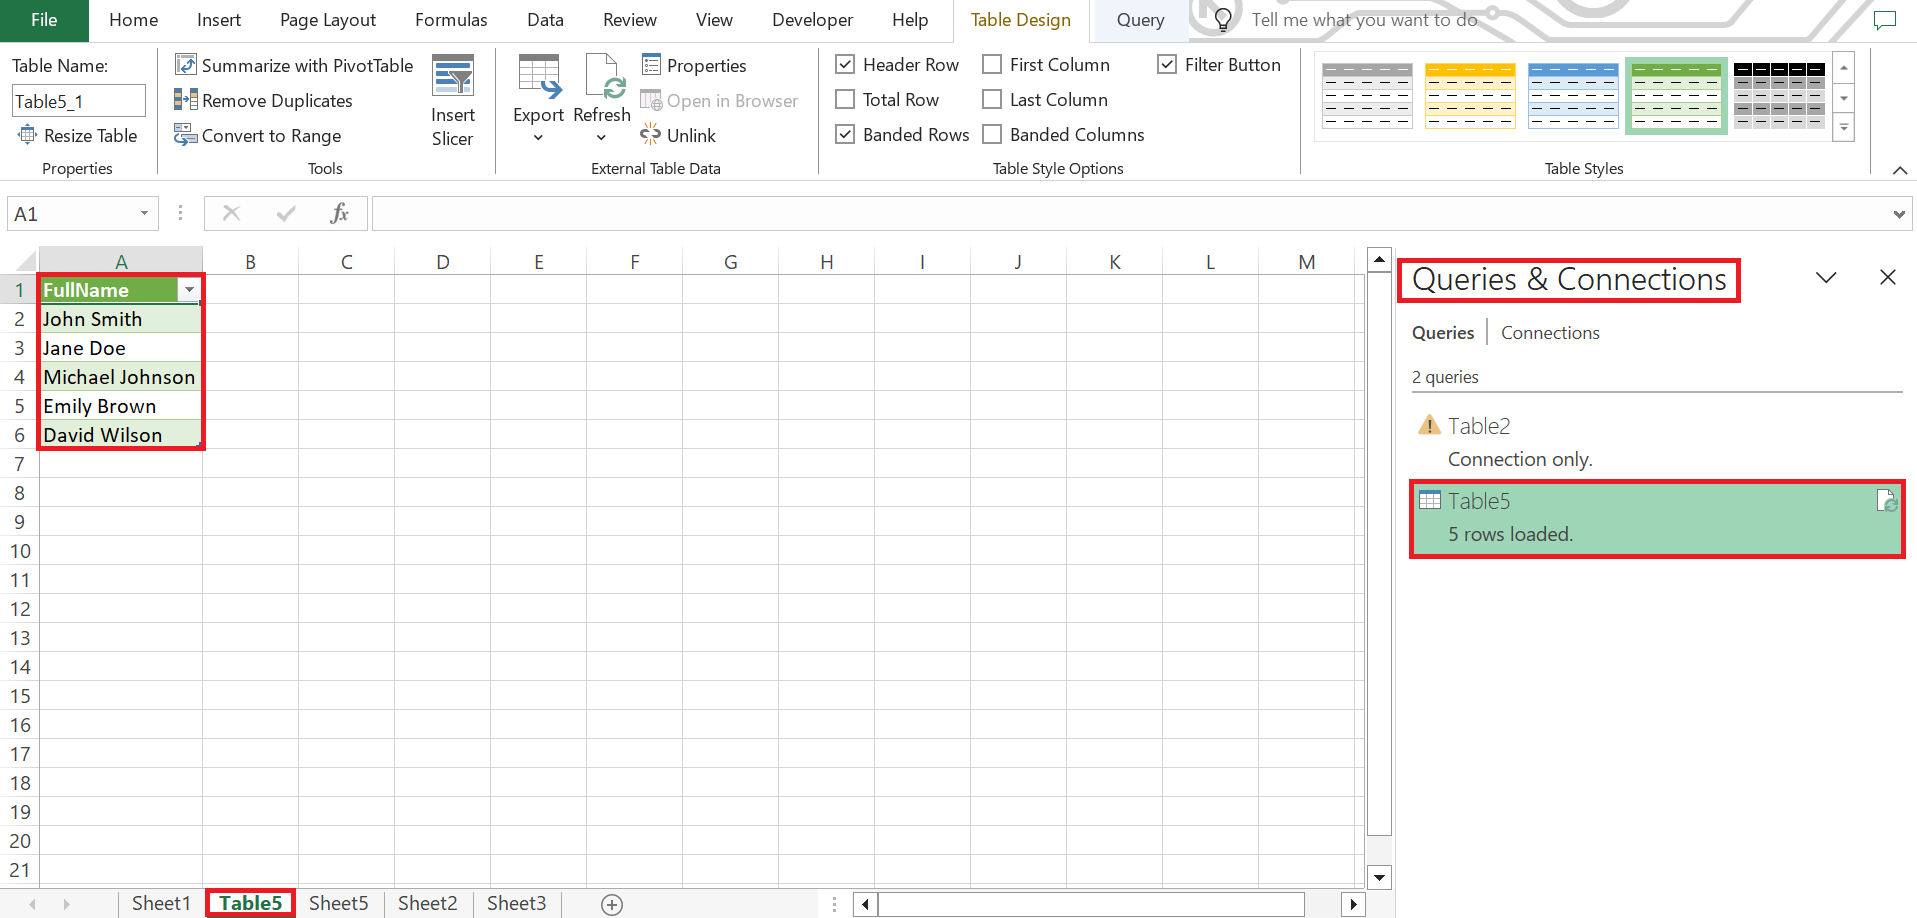
STEP 8: After clicking on ‘Keep’, a new sheet is added by the name here, ‘Table5’ which shows the table as on the Power Query Editor.
With Power Query, not only can you merge names, but you’re also equipped to perform a multitude of data manipulations—filtering, pivoting, and whatever else your data might need.
Power Query Perks:
- Seamlessly merge columns with total control over the delimiter.
- Transform data in bulk, which is especially useful for large projects.
When it’s time to wrangle data and names, let Power Query shoulder the load. It’s your golden ticket to automation and customization, tailored for the savvy Excel user who craves efficiency and precision.
Frequently Asked Questions (FAQs)
How to combine first and last name in Excel using Flash Fill?
To combine first and last name in Excel using Flash Fill:
- Type the combined name how you’d like it to appear in the adjacent cell to your data.
- Press
Enter, move to the next cell, and start typing the next combined name. - Excel’s Flash Fill should recognize the pattern and suggest filling the remaining cells.
- Press
Enterto accept the suggestion or use the shortcutCtrl + Efor Windows orCommand + Efor Mac to trigger Flash Fill manually if it doesn’t autosuggest.
Can Excel Automatically Combine Newly Added Names?
Excel can automatically combine newly added names if you’re using formulas. When you add new names, the formula will instantly merge them. For dynamic updating without formulas, combine initial entries using Flash Fill and for new data, reapply Flash Fill or activate it after typing a few examples of the new patterns you want it to follow.
What If Names Have Multiple Parts or Special Characters?
If names have multiple parts or special characters, adjust your Excel formula to accommodate them. For example, use the CONCAT or TEXTJOIN function to include middle names or additional name parts, specifying the separator as needed. Special characters can be included directly within the formula’s text. Make sure to also account for any potential encoding issues with special characters to ensure proper display and functionality.
How do you CONCATENATE names in Excel?
To CONCATENATE names in Excel, use the CONCATENATE function in a formula like =CONCATENATE(A2, " ", B2), where A2 contains the first name and B2 contains the last name. The quotation marks with a space in between add a separator. Press Enter to apply the formula and merge the names.
What if there are leading or trailing spaces in the individual name cells?
If there are leading or trailing spaces in the individual name cells, use the TRIM function in your formula to remove them. Apply =TRIM(A2) & " " & TRIM(B2) where A2 and B2 are the cells with the first and last names, respectively. This ensures a clean combination without extra spaces.
John Michaloudis is a former accountant and finance analyst at General Electric, a Microsoft MVP since 2020, an Amazon #1 bestselling author of 4 Microsoft Excel books and teacher of Microsoft Excel & Office over at his flagship MyExcelOnline Academy Online Course.

