
Key Takeaways:
- Proper formatting in Excel helps ensure data is presented clearly, aiding in better understanding and decision-making.
- Converting numbers to text is essential for data that shouldn’t be manipulated mathematically, like phone numbers or zip codes, and for preserving leading zeros.
- Adding an apostrophe before a number converts it to text quickly, making it ideal for small-scale adjustments.
- The TEXT function allows for detailed formatting of numbers into text, applying specific formats for dates, percentages, currencies, and more.
- Excel’s ‘Text to Columns’ feature enables efficient bulk conversion of numbers to text, streamlining the process for large datasets.
Table of Contents
Introduction to Formatting in Excel
The Essentials of Number Formats
In the world of Excel, getting the format right can be just as crucial as the data itself. After all, how your numbers are displayed can dramatically impact understanding and decision-making. Excel offers a plethora of formatting options, ranging from basic to custom, allowing you to present your data clearly and effectively.
Imagine you enter a number into a cell, and Excel mechanically applies the General format, showing the value exactly as typed—unless it’s a large number that gets displayed in scientific notation or a tiny cell that cuts off some digits.
When and Why to Format Numbers as Text
You might wonder why anyone would trade the computational power of numbers for text in Excel. Let’s shed some light on this: formatting numbers as text is essential when you’re dealing with data that shouldn’t be manipulated mathematically, like phone numbers or zip codes. It’s also vital for preserving leading zeros, which are critical in product codes. Imagine typing a phone number that starts with zero, only to have Excel strip it away — frustrating, right?
Furthermore, when you want to splice numbers into strings of text — perhaps for a report or a custom message — maintaining the number’s format is key. Take, for example, saying “Sales last year increased by over 15%”; you need that percentage sign to stick with the 15, and formatting it as text is the way to go. Additionally, if you intend to use wildcards for lookups or want to ensure that data imports and exports carry over seamlessly without altering the data’s nature, text formatting becomes your ally.
Simple Techniques to Convert Numbers to Text
Adding an Apostrophe: The Quickest Trick
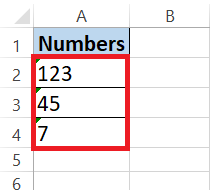
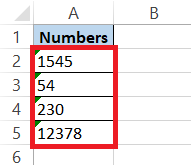
When you’re dealing with just a handful of cells and speed is of the essence, adding an apostrophe before the number is the fastest, no-fuss method you can employ. It’s as simple as double-clicking into a cell and typing an apostrophe before your numeric entry, effectively preserving any leading zeros or specific number sequences as text. A green triangle will then appear in the corner of the cell, indicating that the number is now treated as text.
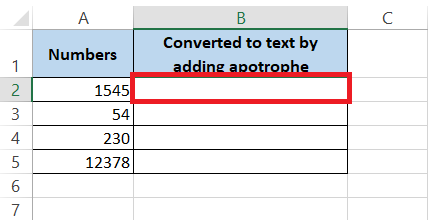
To add an apostrophe to change a number to text format in Excel, follow these steps:
STEP 1: Select the Cell: Click on the cell where you want to enter the number as text.
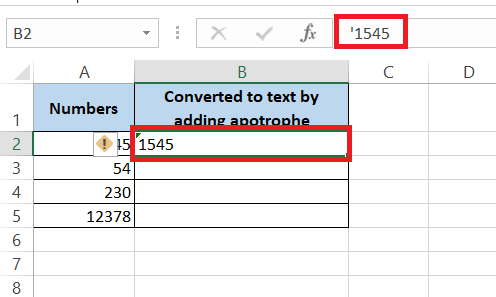
STEP 2: Add Apostrophe: Type an apostrophe (') before the number (e.g., '1545). Press Enter to confirm.
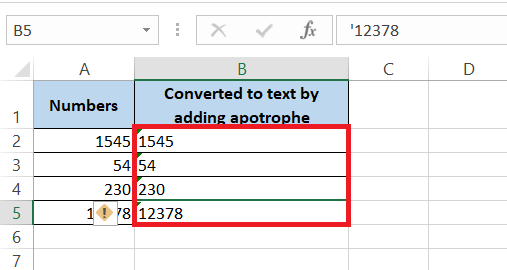
RESULT: Complete the same for the remaining values. The numbers are now stored as text, indicated by the leading apostrophe which will not be displayed in the cell.
Do remember, this method is perfect for those times when you’re in a dash and only need to adjust a cell or two. However, should you require converting numbers to text in bulk, there are more efficient methods at your disposal, designed to tackle data on a larger scale.
Using the TEXT Function for Detailed Formatting
Excel’s TEXT function comes to the rescue when you wish to sprinkle a dash of specificity in your data formatting endeavors. With this function, you can transform numbers into text while applying the formatting touch you desire. This leverages Excel’s in-depth format options, encapsulating dates, percentages, currencies, and more within a text string.
You’d typically use the formula: =TEXT(Value you want to format, "Format code you want to apply"), and Excel does the rest, applying your specified format.
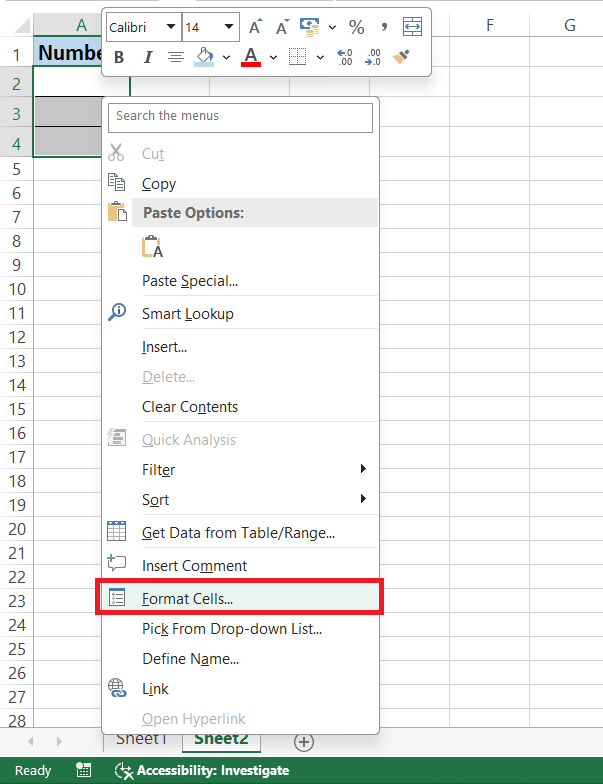
STEP 1: Select the Cell: Click on the cell or range of cells you want to format as text.
STEP 2: Format Cells Dialog: Right-click the selected cell(s) and choose “Format Cells“.
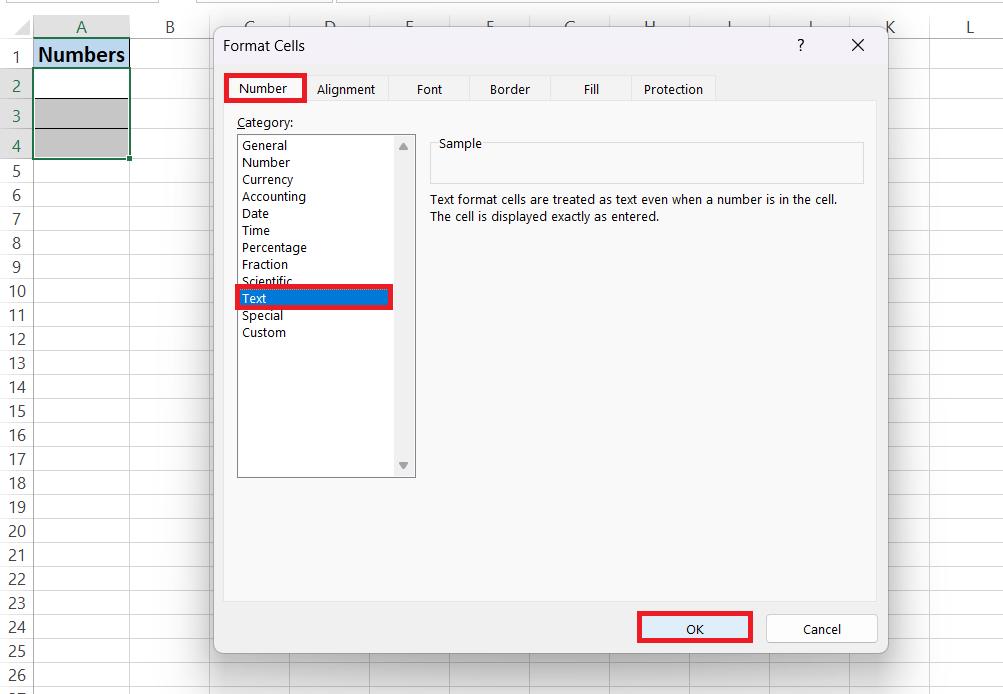
STEP 3: Select Text Format: In the Format Cells dialog box, go to the “Number” tab, select “Text,” and then click “OK.”
STEP 4: Enter the Number: Type the number in the cell. It will now be treated as text.
The TEXT function is perfect when you need to display data in a uniform format, or when concatenating numbers with text to make the information more understandable. With the various format codes available, ranging from simple number separators to complex date structures, the opportunities are extensive.
Working Smarter with Excel’s Tools
Utilizing ‘Text to Columns’ for Bulk Conversions
If you’re facing a mountain of numbers that need to be converted to text, roll up your sleeves and bring out Excel’s ‘Text to Columns‘ wizard. It’s a powerful feature designed for dealing with data en masse, letting you swiftly convert multiple cells without breaking a sweat. Even better, it’s formula-free, taking you through a series of simple steps to perform the conversion for an entire column or selection of cells.
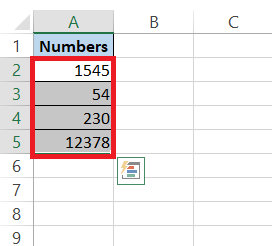
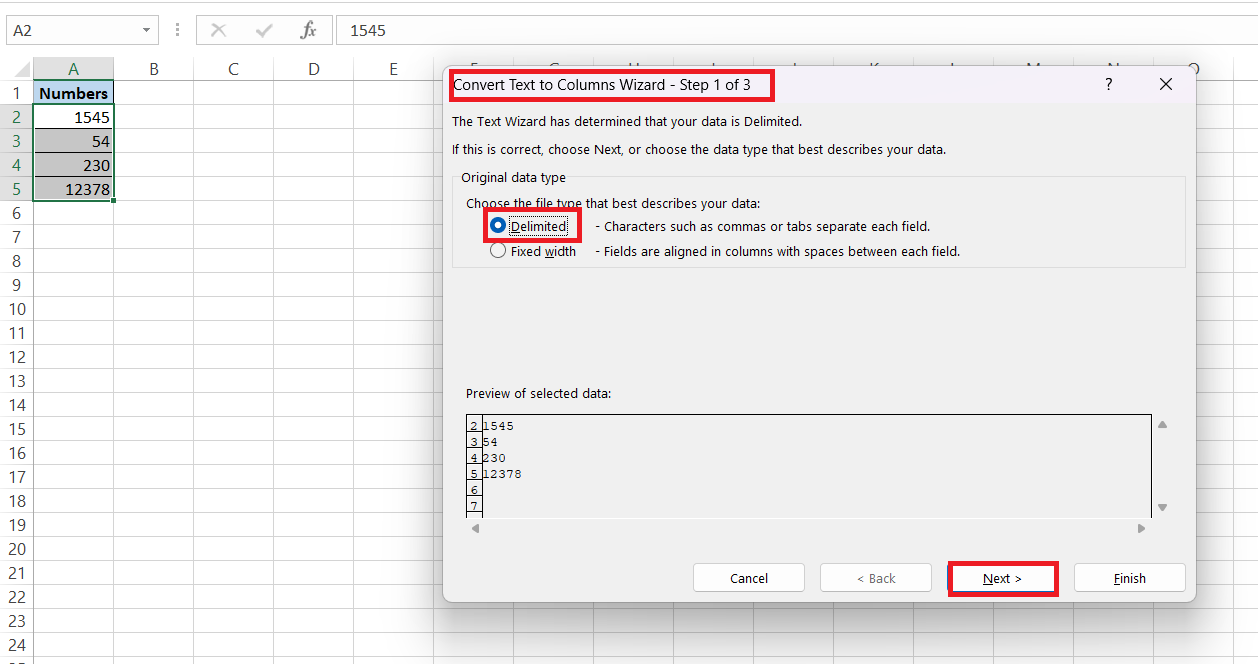
STEP 1: Start by selecting the cells you want to convert.
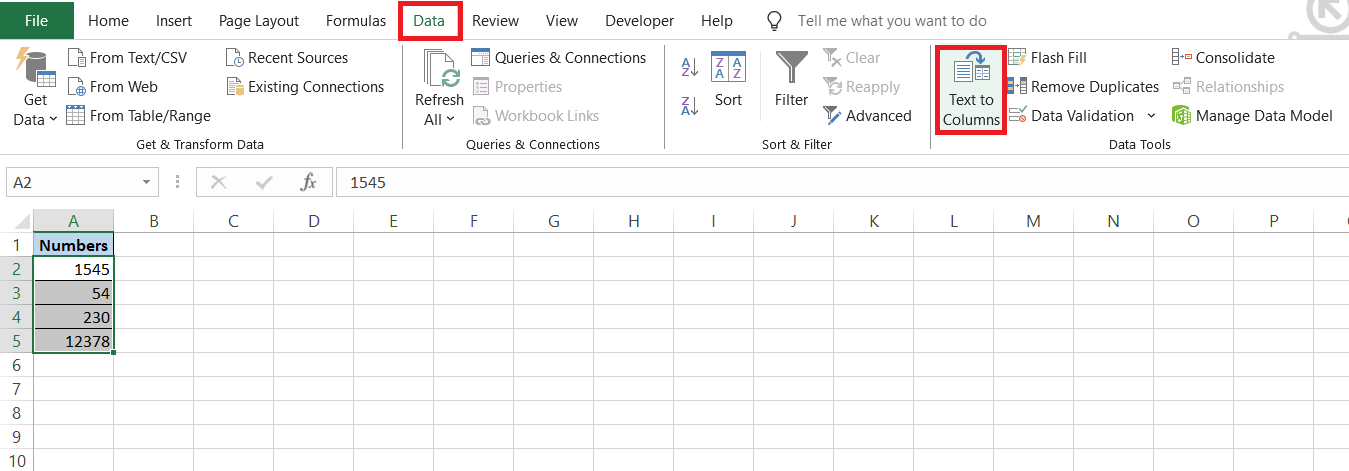
STEP 2: Navigate to the Data tab, and in there you will find ‘Text to Columns’.
STEP 3: Select ‘Delimited’ even though your data isn’t so, and click on ‘Next’.
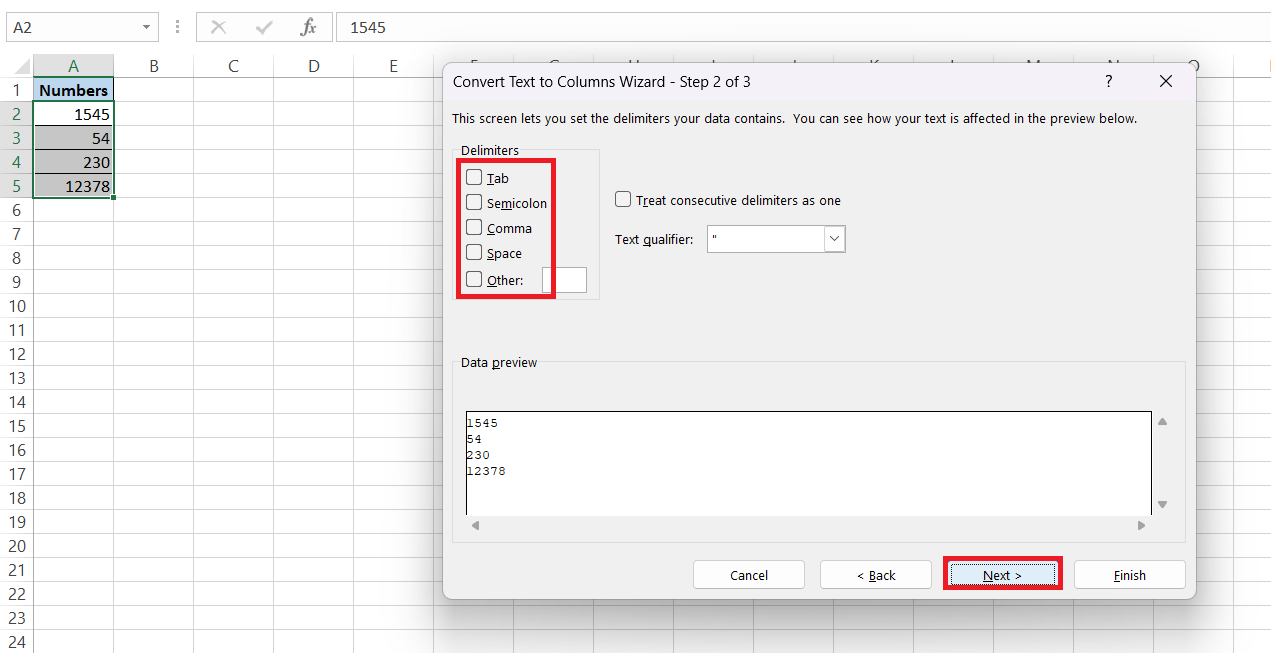
STEP 4: Then simply uncheck all delimiter options, then click on ‘Next’.
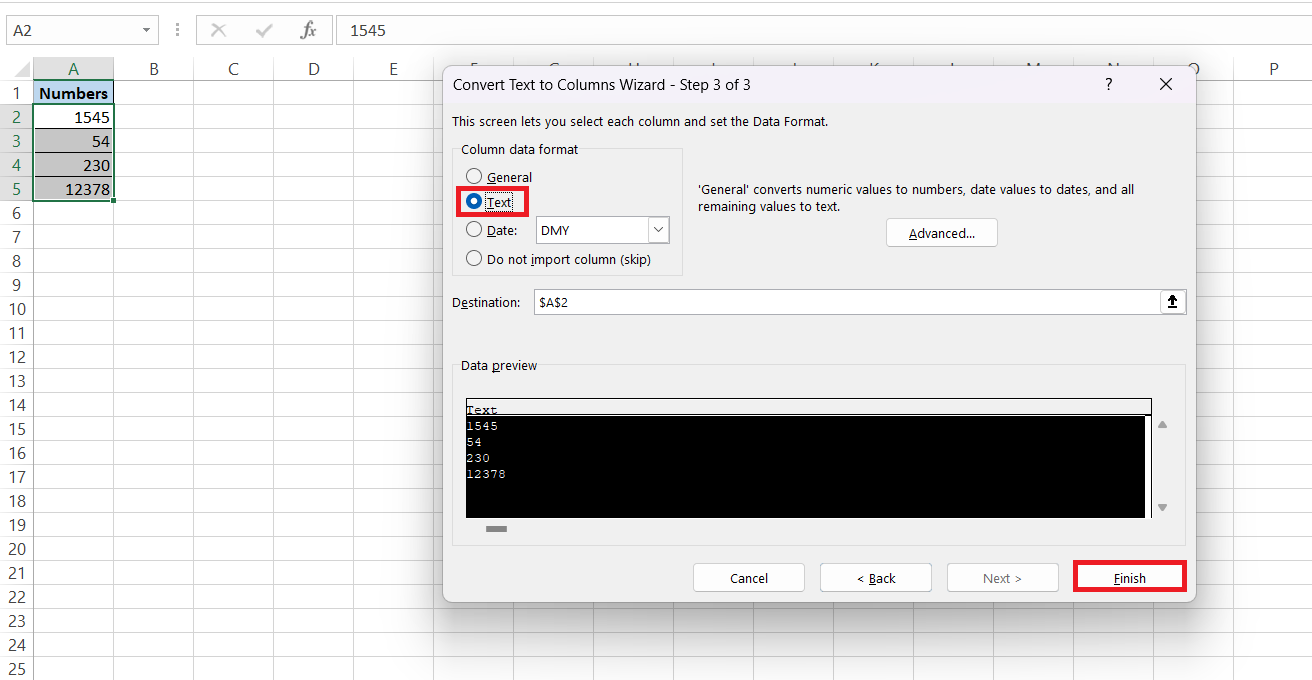
STEP 5: Select the column data format as ‘Text’, then click on ‘Finish’.
RESULT: And voila! Like magic, you’ve converted those pesky numbers to text in no time.
It’s a method favored by many due to its simplicity and rapid execution; especially when compared with other conversion methods, it stands out for its ease and efficiency.
FAQs: All About Number-to-Text Conversion in Excel
What is the Excel text function?
The Excel TEXT function is a game-changer that lets you convert numbers to text with specific formatting. Just type =TEXT(value, "format_text"), and it will deliver the number as a text string in the format you’ve specified. Whether you need currency, dates, or any other custom number format, the TEXT function has got you covered, ensuring your data looks exactly the way you want it to.
Can I convert a whole column of numbers to text quickly?
Absolutely! To convert a whole column of numbers to text swiftly, the ‘Text to Columns’ wizard in Excel is the tool to use. It’s a straightforward process: select your column, head over to the Data tab, pick ‘Text to Columns’, and click through the steps. Choose ‘Text’ in the last step, and you’re done. This will change your entire column to text format in mere moments.
How do I prevent Excel from automatically formatting numbers as text?
To stop Excel from auto-formatting numbers as text, first ensure you’re entering data into cells set to the ‘General’ or specific numeric format. Watch out for start-of-cell apostrophes or spaces that trigger text formatting. If you import data, use the ‘Text to Columns’ wizard or Paste Special options to control the format upon entry. Double-check import settings, and consider using Excel’s Data Validation feature to restrict the data type allowed in each cell.
How to convert numbers into text in Excel?
To convert numbers into text, you’ve got a few tricks up your sleeve in Excel. Use the ‘TEXT’ formula for custom text formatting, or add an apostrophe before the number for a quick fix. For larger datasets, the ‘Text to Columns’ wizard within the Data tab works wonders, or copy the cells and use ‘Paste Special’ as ‘Values’ with a text format. These methods will keep your numbers looking exactly as you need them—ensuring every digit is treated as text.
How do you convert to numbers stored as text in Excel?
To convert a number stored as text back to a number in Excel, you can utilize the ‘Convert to Number’ option. Simply select the cells with the text-formatted numbers, look for the warning icon (an exclamation mark in a yellow triangle), and choose ‘Convert to Number’ from the dropdown menu. If this isn’t available, select the cells, go to the ‘Home’ tab, find the ‘Number’ group, and select ‘General’ or ‘Number’ from the format options. Your text-formatted numbers will align right, signifying a successful conversion to number format.
John Michaloudis is a former accountant and finance analyst at General Electric, a Microsoft MVP since 2020, an Amazon #1 bestselling author of 4 Microsoft Excel books and teacher of Microsoft Excel & Office over at his flagship MyExcelOnline Academy Online Course.

