
Data validation in Microsoft Excel is an essential tool for anyone looking to maintain high data quality standards in their spreadsheets. By setting up specific rules, users can control the type of data entered, ensuring it adheres to predetermined criteria and thus preserving the accuracy and consistency of the dataset. This feature not only streamlines data entry but also fortifies the reliability of your Excel models.
Key Takeaways
- Data validation in Excel ensures that entered information adheres to set criteria, enhancing accuracy and consistency.
- Excel allows for a variety of validation criteria, including numeric ranges, date ranges, drop-down lists from a set of entries, and custom formulas.
- It enforces rules for data entry, reducing errors and maintaining integrity in spreadsheets.
- The feature includes options for custom input messages and error alerts to guide users during data input.
Table of Contents
Getting Started with Excel Data Validation
Understanding the Basics of Data Validation
Data validation in Excel lets you control and restrict the types of data or the values that others can enter into a spreadsheet. With data validation, you can maintain data integrity and reduce the chances of input error by only allowing specific inputs, such as predefined lists or numerical ranges.
Importance and Benefits for Your Spreadsheets
Excel data validation plays a critical role in managing and analyzing data. It helps ensure the accuracy, consistency, and reliability of information, which is particularly vital when using functions like IF, SUMIF, and VLOOKUP to drive important decisions. By mitigating the risk of incorrect data entry, you can confidently use your spreadsheets for reporting, forecasting, and analysis, all of which rely on quality data. Here’s what you stand to gain with Excel data validation:
- Error Reduction: Minimize mistakes by constraining user inputs to appropriate values or formats.
- Consistency: Standardize data entry across the entire worksheet, which is extremely useful when collaborating with a team.
- Efficiency: Save time spent on data cleaning and corrections by getting the input right from the start.
- Data Integrity: Protect the integrity of your datasets by eliminating the chance of erroneous or out-of-range inputs that can throw off your analysis.
- User Guidance: Help users input data correctly by displaying helpful instructions or error messages.
Implementing Essential Data Validations
Setting Up a Drop Down List
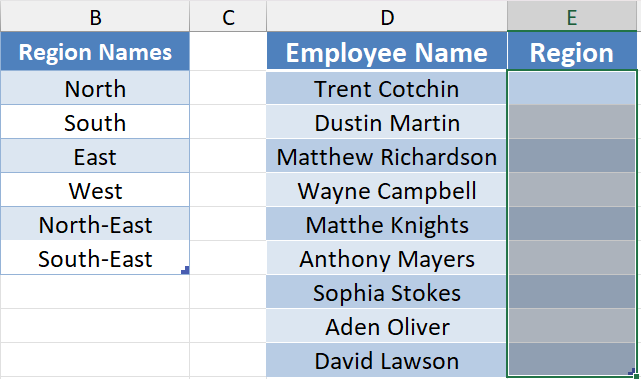
Creating a drop-down list in Excel effectively streamlines data entry and minimizes room for error. You ensure that users of your spreadsheet select from a predefined set of options, thus enhancing consistency and accuracy. Here’s a quick step-by-step guide to set up a drop-down list:
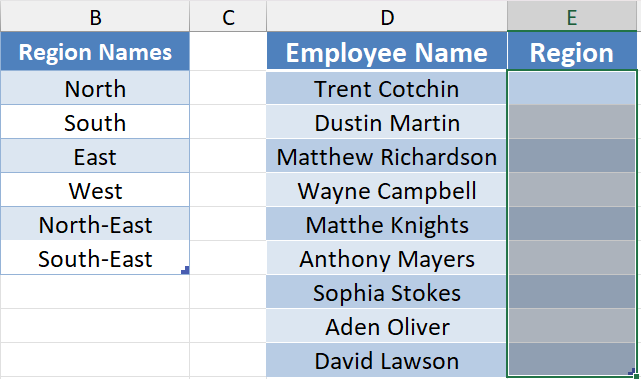
STEP 1: Select the cells where you want your list to appear.
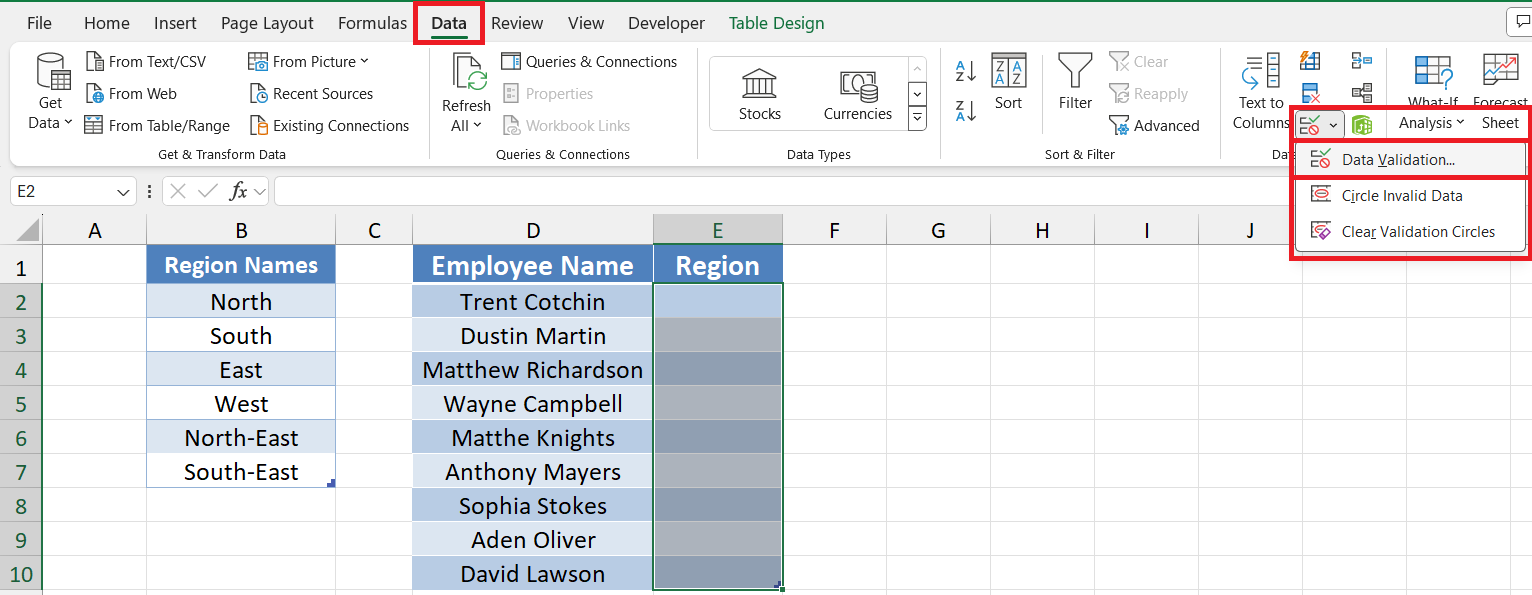
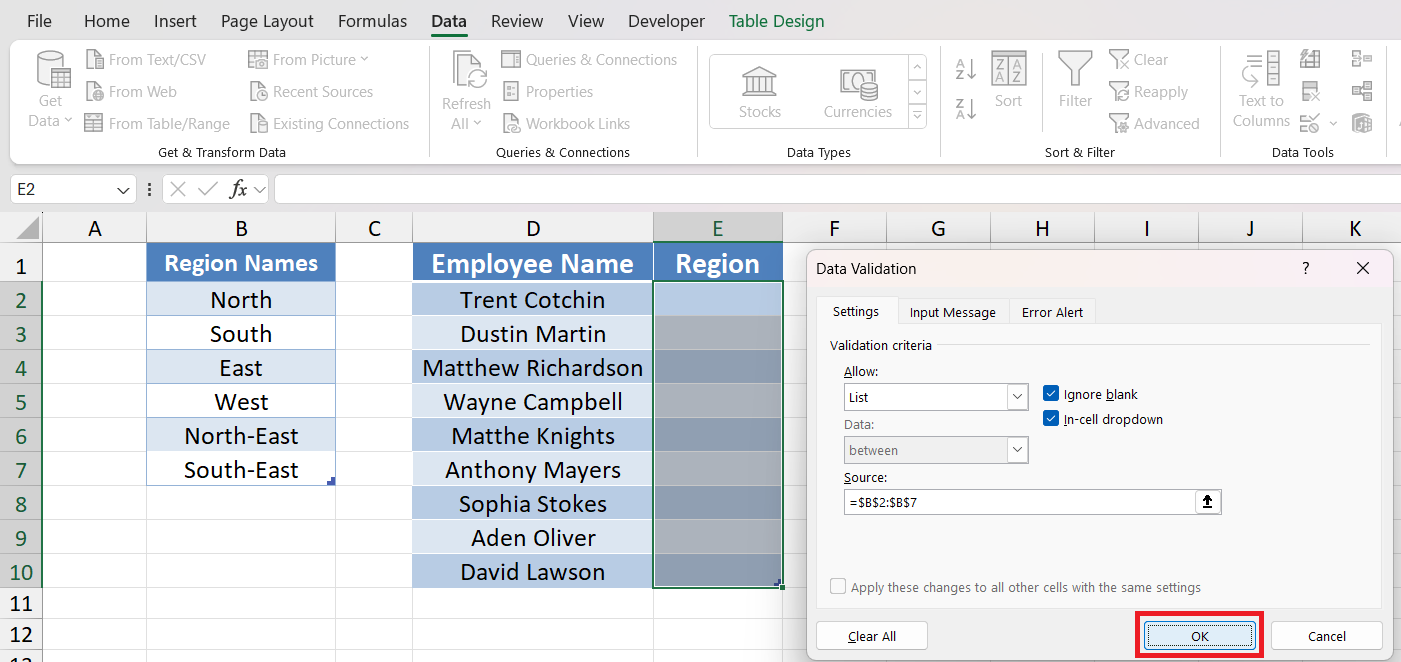
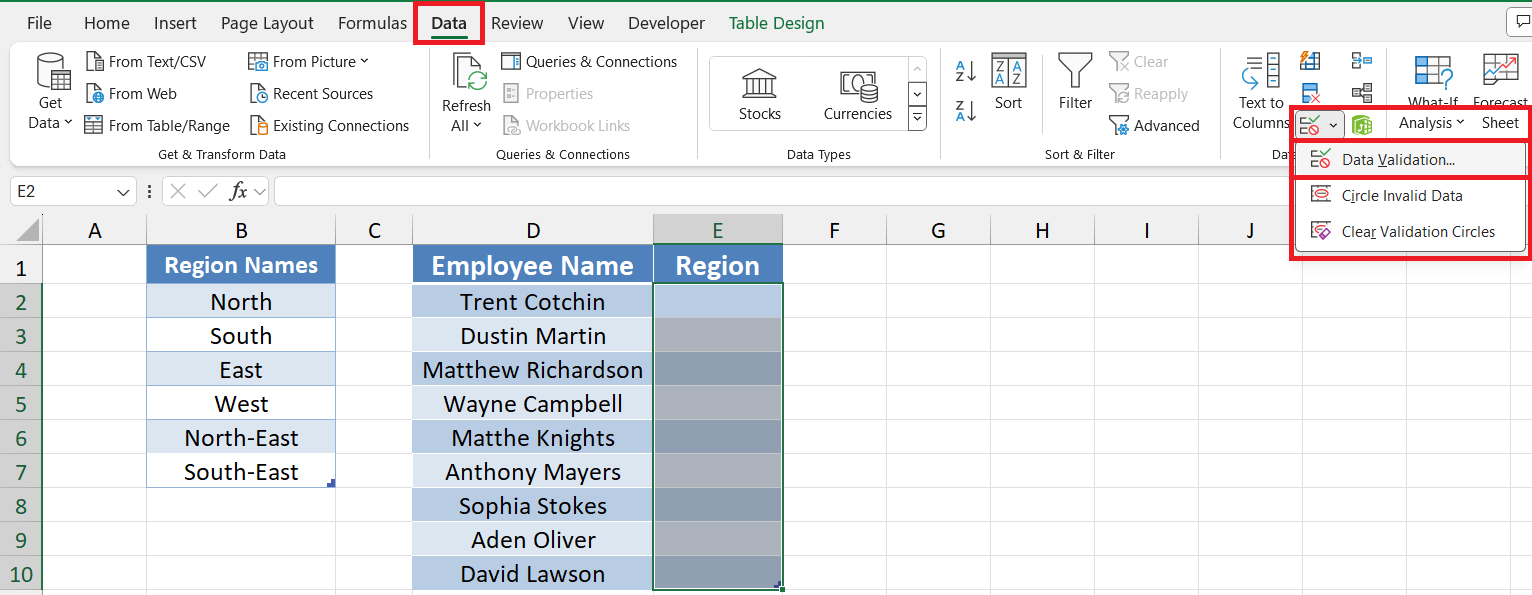
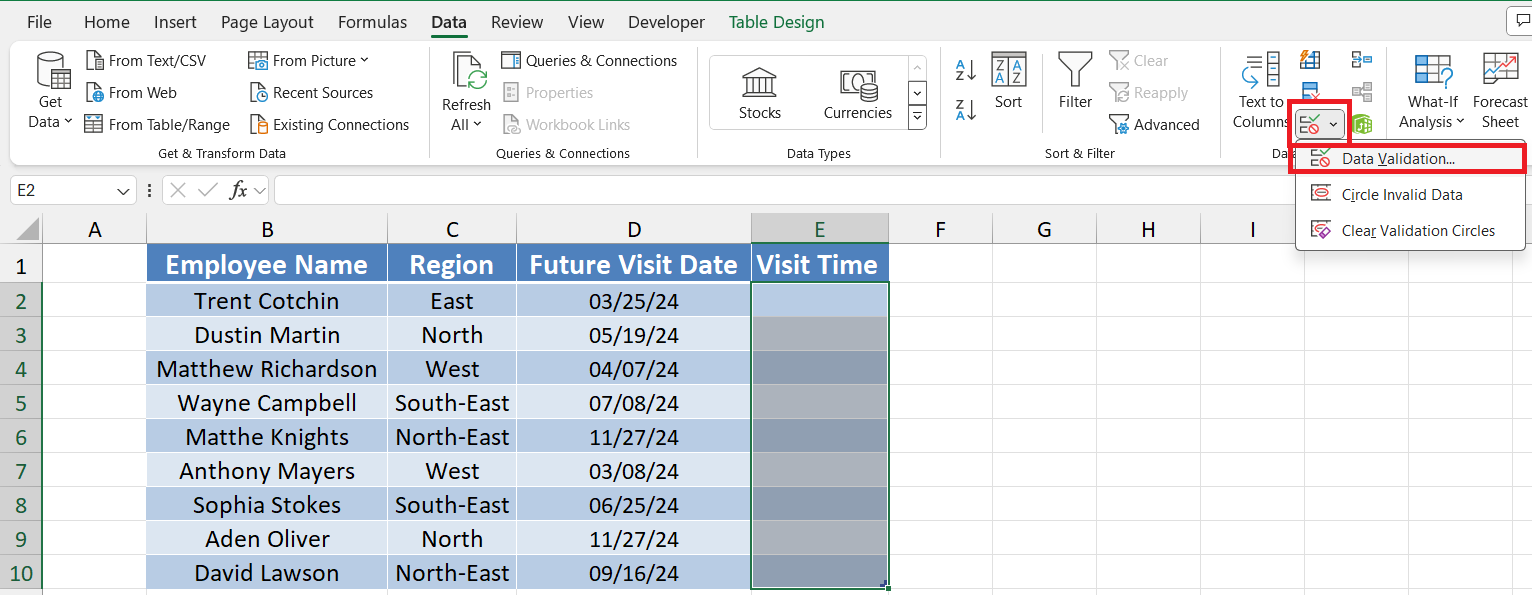
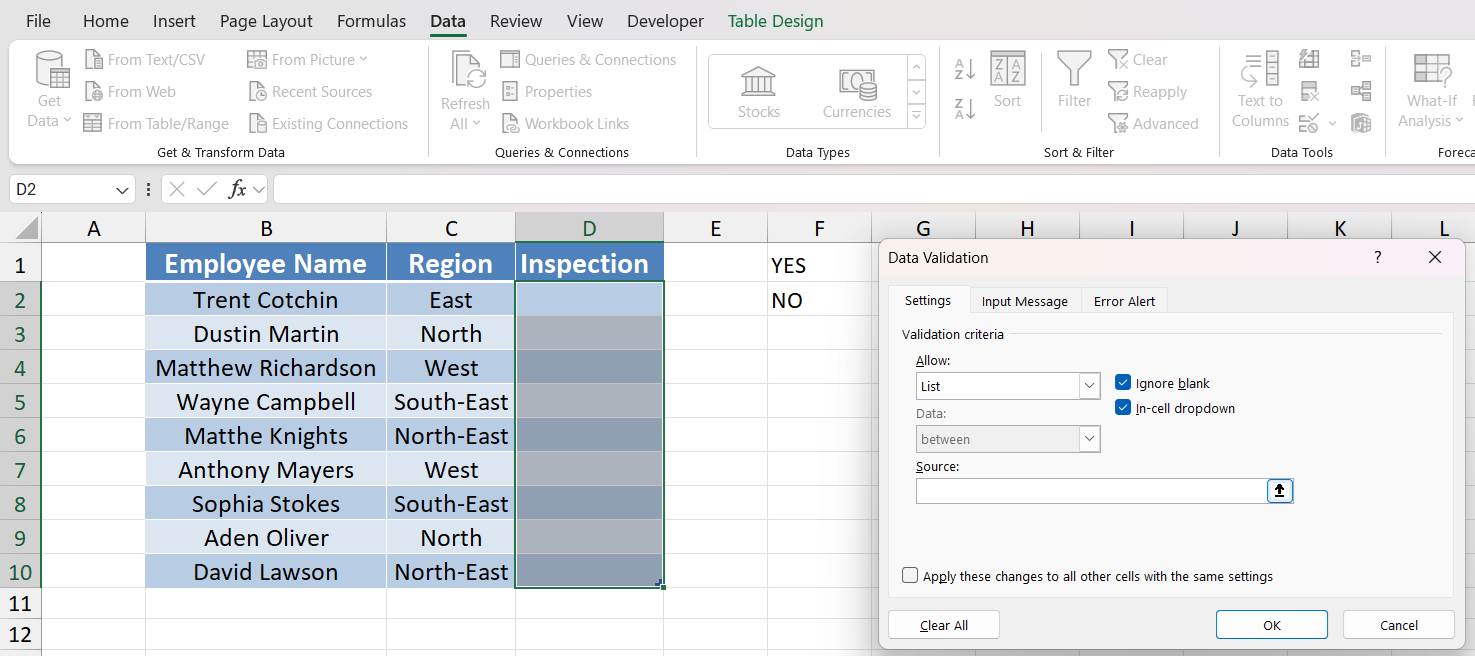
STEP 2: Open the ‘Data Validation’ dialog box from the ‘DATA’ tab.
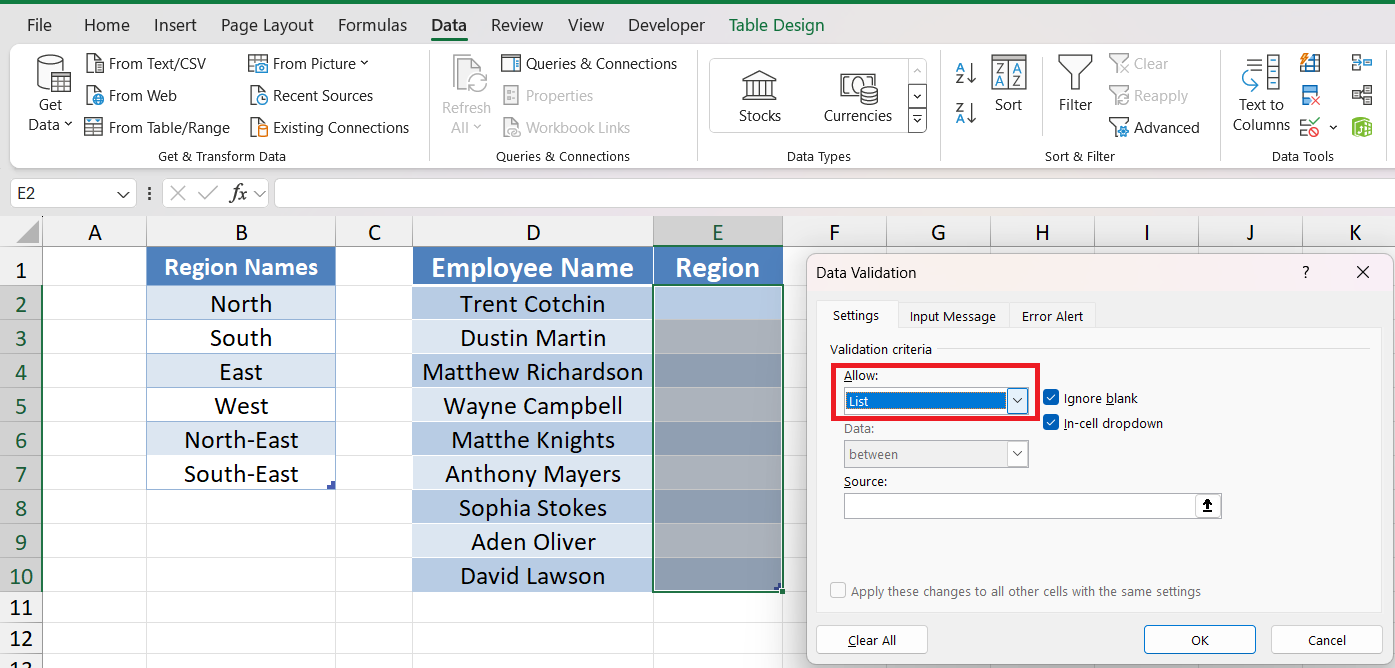
STEP 3: In the dialog box, set Allow to ‘List’.
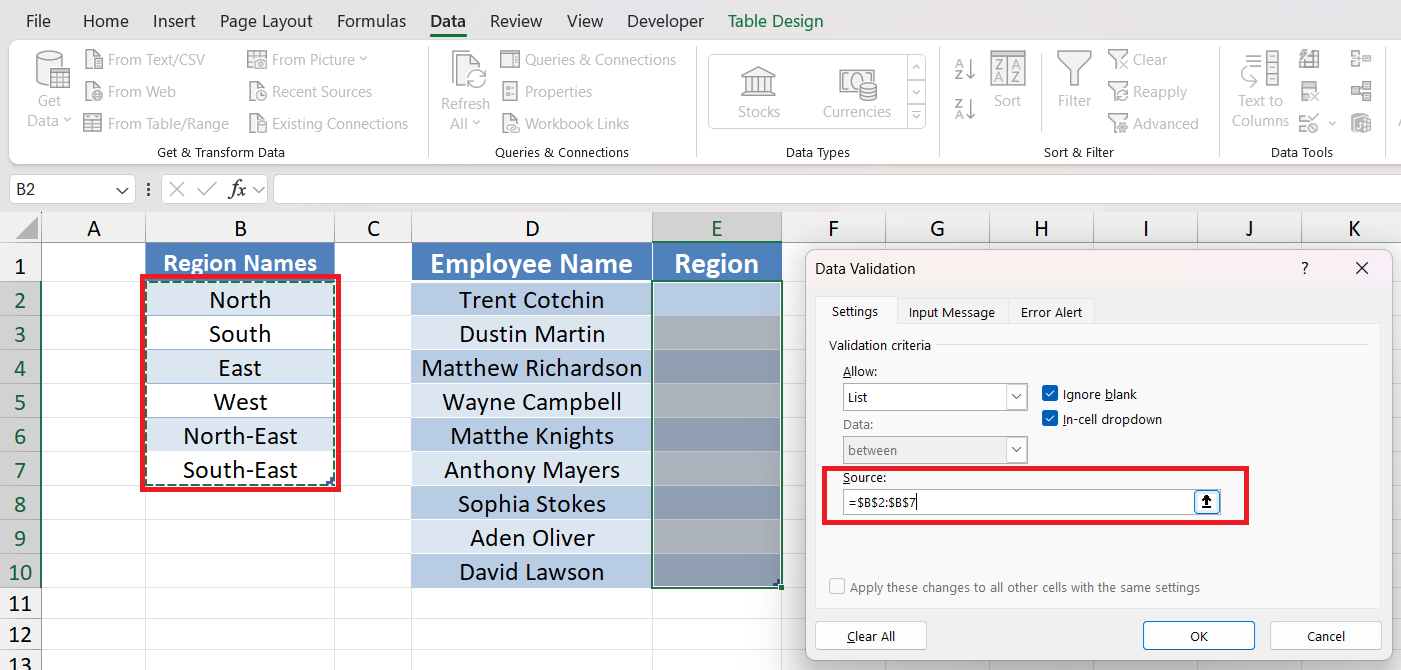
STEP 4: Click in the ‘Source’ box and enter your list items separated by commas for direct input or select the range on the spreadsheet where your list resides.
STEP 5: Click ‘OK’ to finalize your settings.
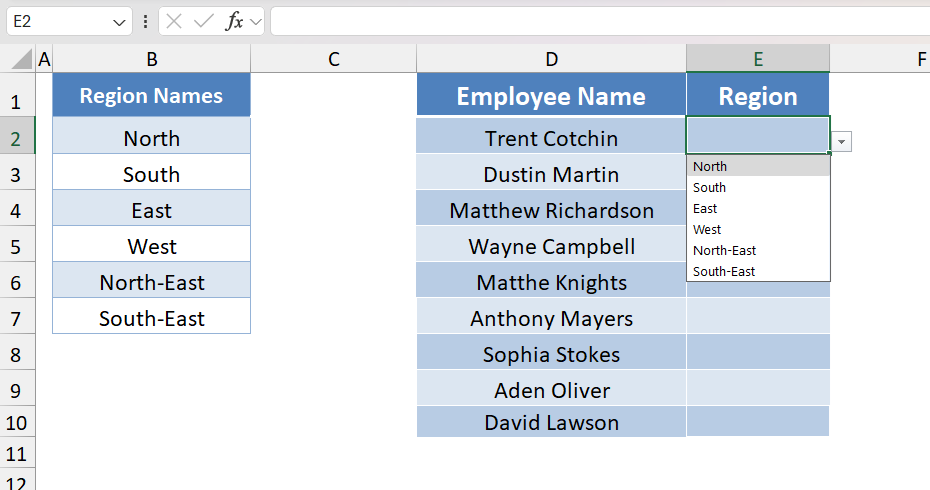
Now, your selected cells will feature a drop-down arrow, letting users view and choose from your list.
Pros:
- Simplifies the input process for users.
- Ensures the accuracy of the data collected.
Cons:
- Limited to preselected options, which might be restrictive in some scenarios.
- Users can’t enter data that isn’t on the list unless you allow for it in the settings.
Who would benefit most: Anyone who manages databases, survey data, or reports where consistency in responses is key will find drop-down lists exceptionally useful. It’s beneficial for tasks like inventory management, scheduling, and standardized form filling.
Working with Checkboxes for User Interaction
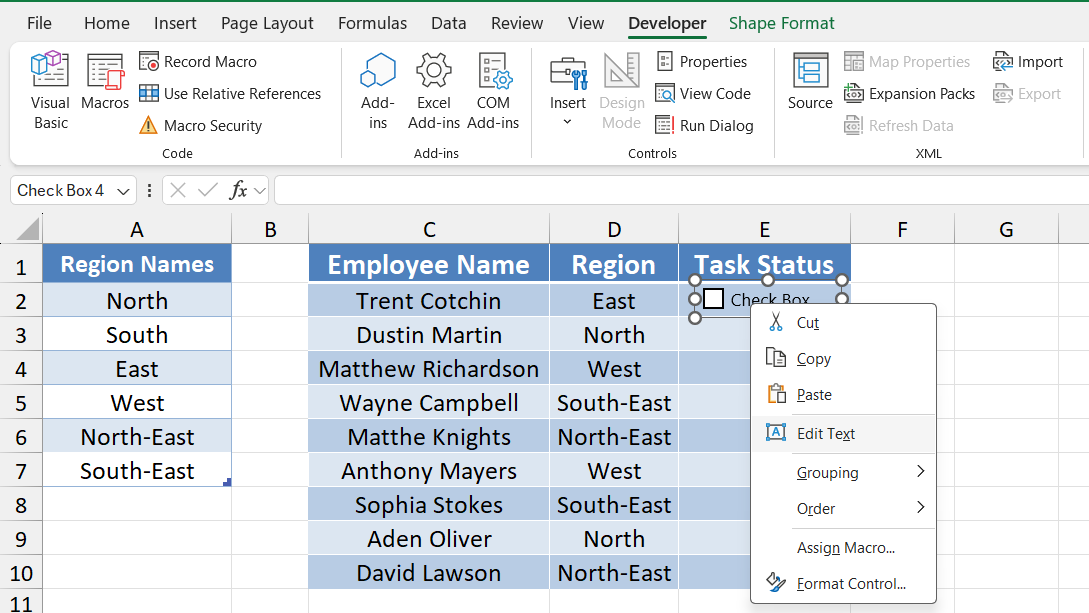
Checkboxes in Excel allow for intuitive interaction with your spreadsheet, transforming a static table into an interactive experience. They’re perfect for binary choices such as yes/no, true/false, or any situation where you need to toggle between two options. Here’s a straightforward guide on incorporating checkboxes:
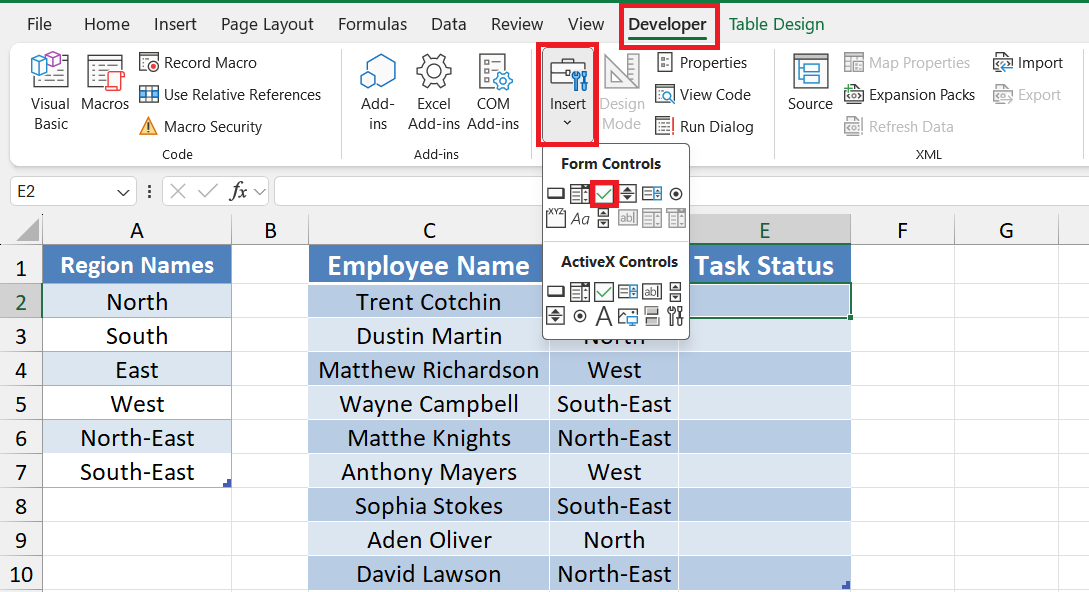
STEP 1: Go to the ‘Developer‘ tab – if it’s not visible, you’ll need to enable it from Excel’s options
STEP 2: Click on ‘Insert’, then under ‘Form Controls’, choose ‘Checkbox’.
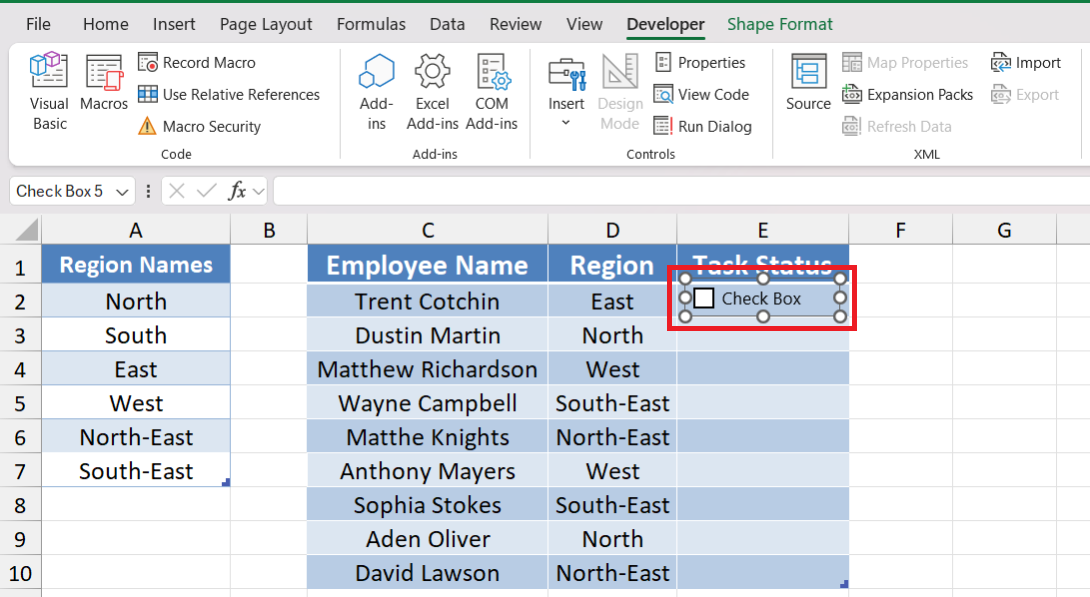
STEP 3: Click on the cell where you want to add the checkbox.
STEP 4: Right-click the checkbox to edit its text and adjust its size and placement.
Pros:
- Adds interactivity, making your spreadsheet more engaging.
- Visually represents active choices, making them easy to spot.
Cons:
- Can clutter a spreadsheet if overused or poorly organized.
- Requires the ‘Developer’ tab, which is not always enabled by default and may confuse novice users.
Advanced Data Validation Techniques
Customizing Formulas for Dynamic Validation Rules
Custom formulas in Excel data validation provide powerful flexibility to enforce dynamic validation rules. These rules allow you to create bespoke criteria tailored to your specific data needs, which can be especially helpful when standard validation settings don’t suffice. Here’s how you can leverage custom formulas:
STEP 1: Select the cells where you need custom validation.
STEP 2: Open the ‘Data Validation’ dialog box from the ‘DATA’ tab.
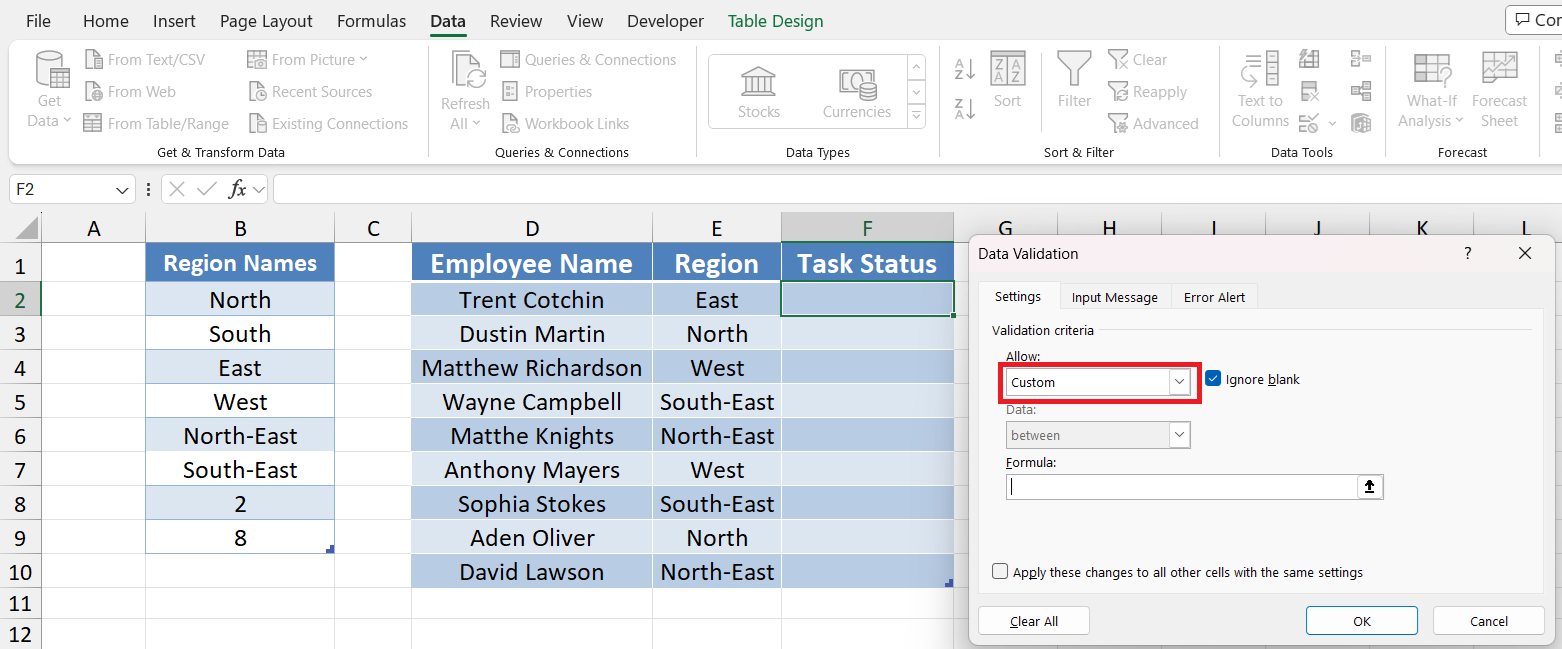
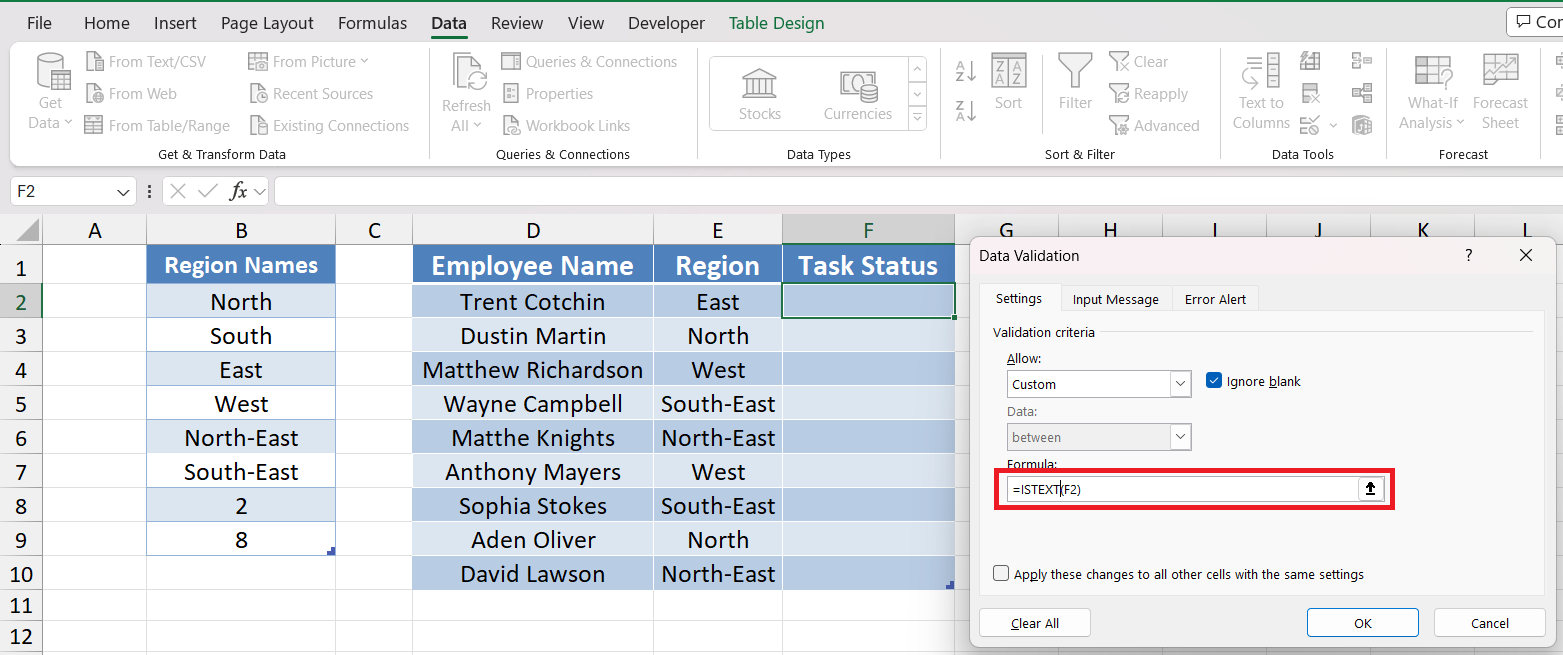
STEP 3: Choose ‘Custom’ in the ‘Allow’ list.
STEP 4: Enter your validation formula in the formula box.
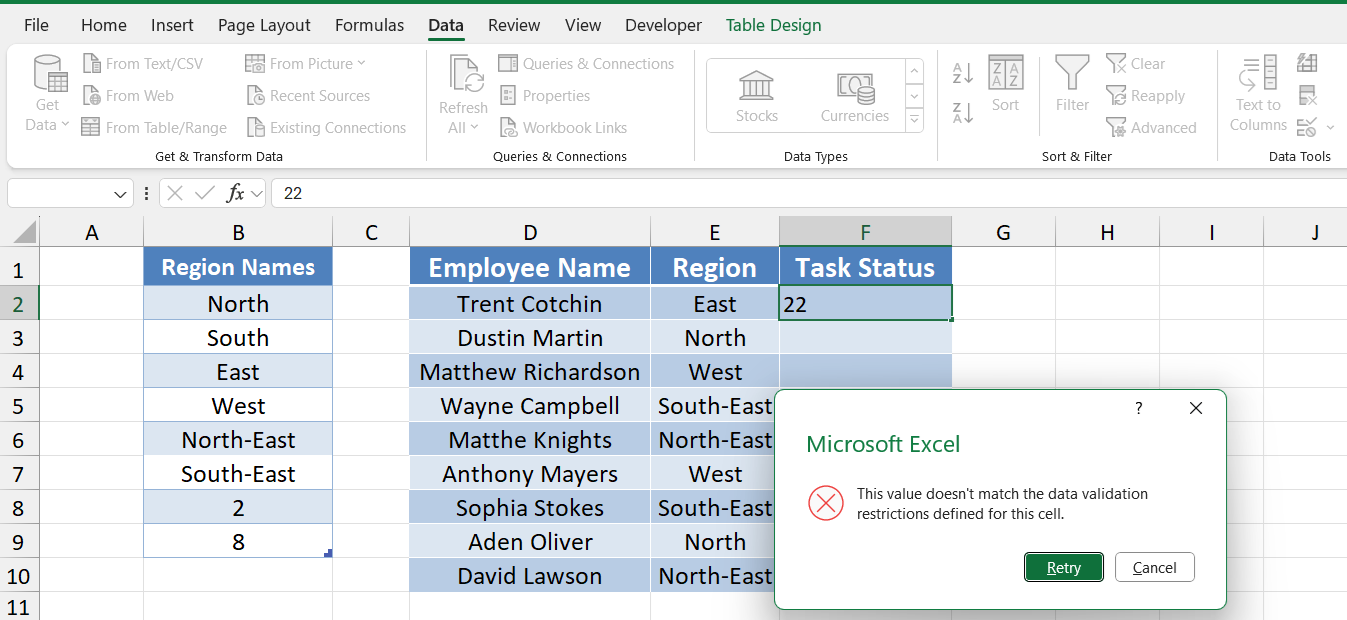
STEP 5: Enter a number in cell F2 to check data validation. If all steps are followed correctly for data validation using the ISTEXT function then an error message will show up in the result.
For example, a custom formula using ISNUMBER and SEARCH could ensure an entry begins with a specific character followed by numbers. Here are other common custom formulas:
ISNUMBER(value)to validate numeric entries.ISTEXT(value)to ensure that the data entered is text.EXACT(text1, text2)to check for case-sensitive exact matches.
Employing Date and Time Constraints
Excel’s data validation feature can enforce date and time constraints, ensuring that only valid and meaningful entries are made. This is essential when scheduling appointments, projecting timelines, or entering historical data. Let’s understand how one might put these constraints to use:
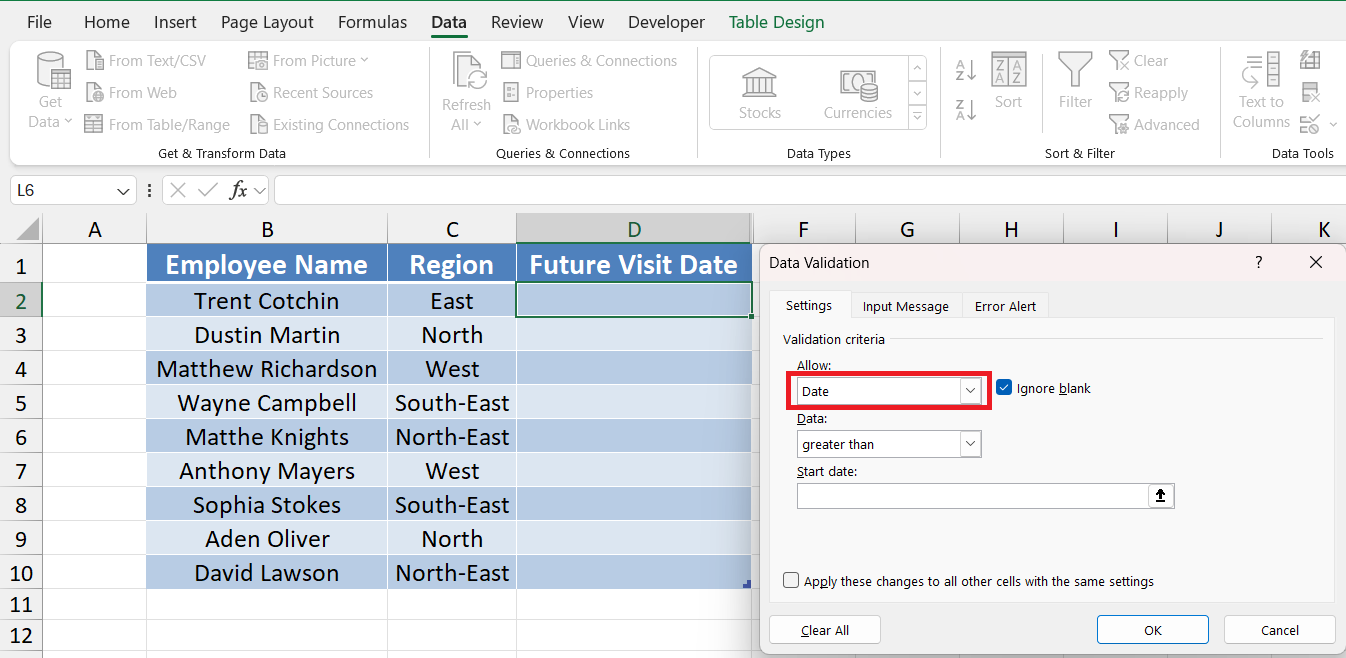
STEP 1: To restrict entries to future dates (useful for appointment scheduling), select the cell range and open the ‘Data Validation’ settings.
STEP 2: From the ‘Allow’ box, select ‘Date’.
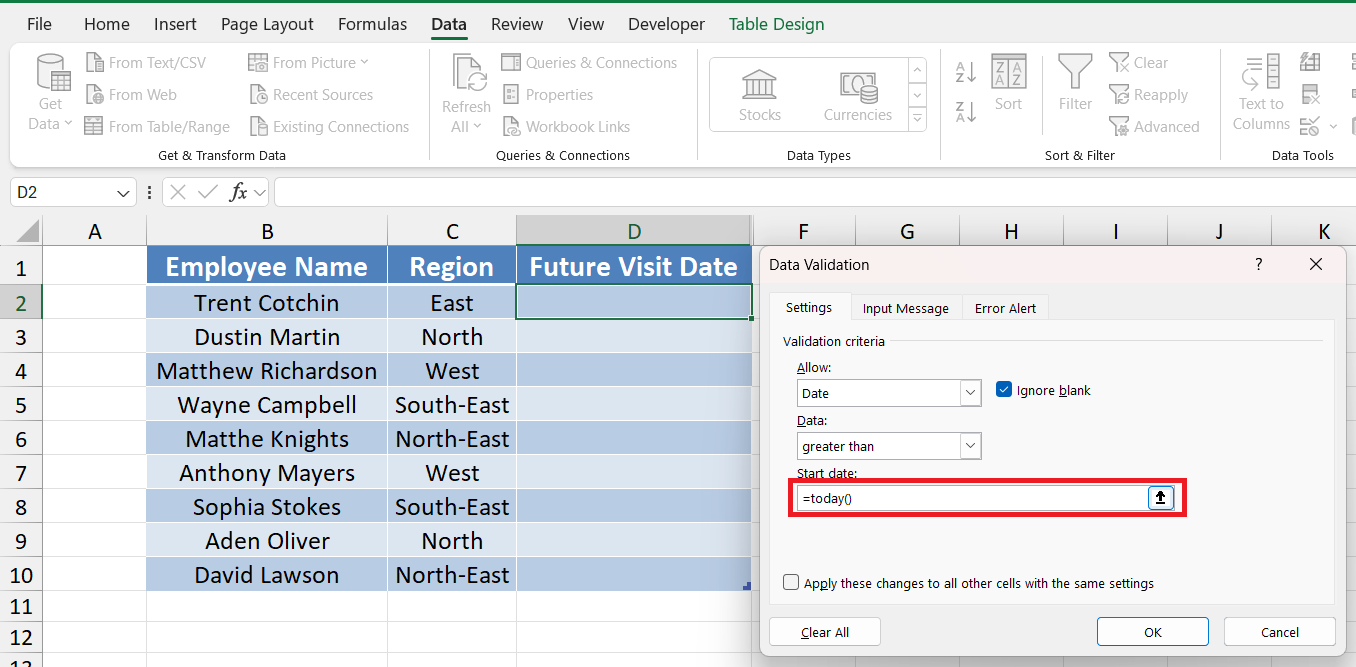
STEP 3: In the ‘Data’ drop-down, choose a suitable condition like ‘greater than’ and reference today’s date using =TODAY() function.
For time constraints, such as restricting appointment times to business hours:
STEP 1: Again, select the cells and open the ‘Data Validation’ settings.
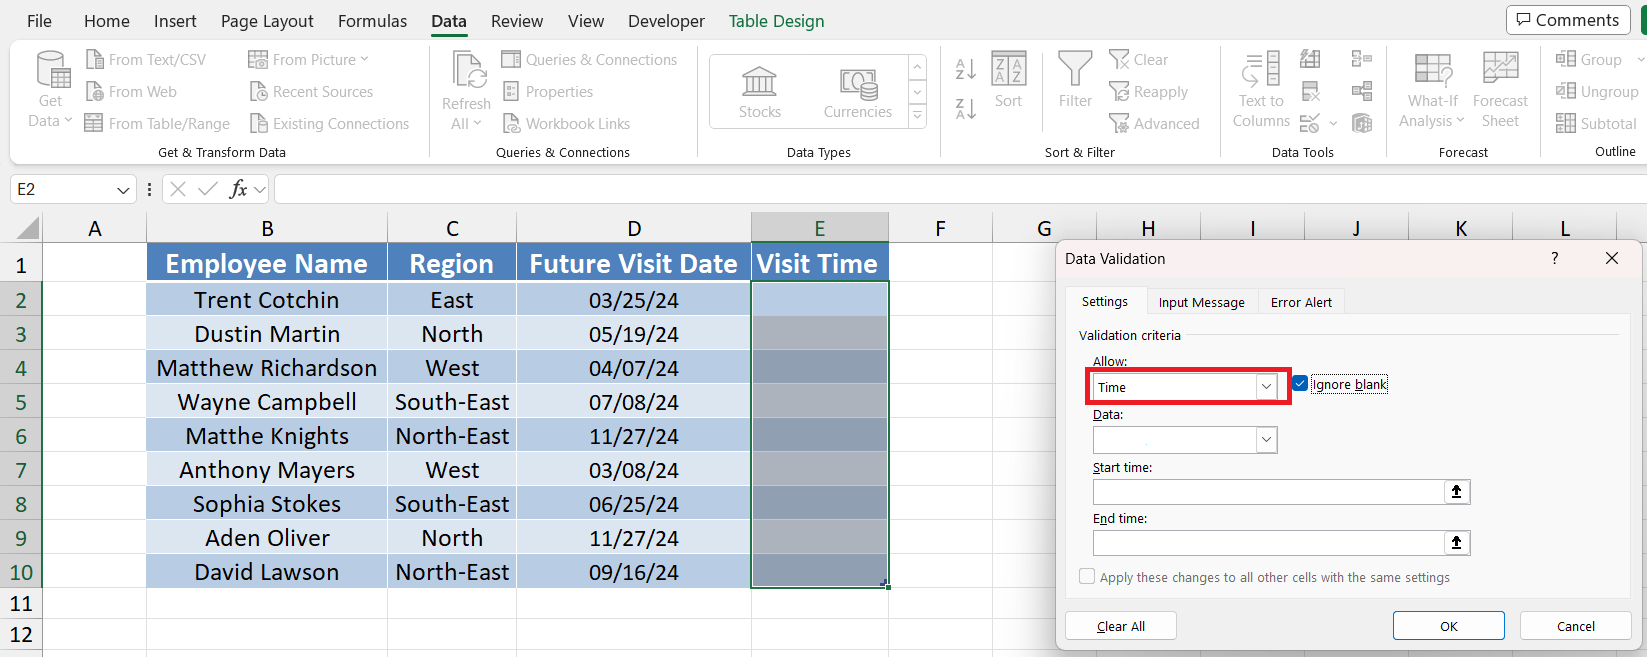
STEP 2: Choose ‘Time’ under the ‘Allow’ list.
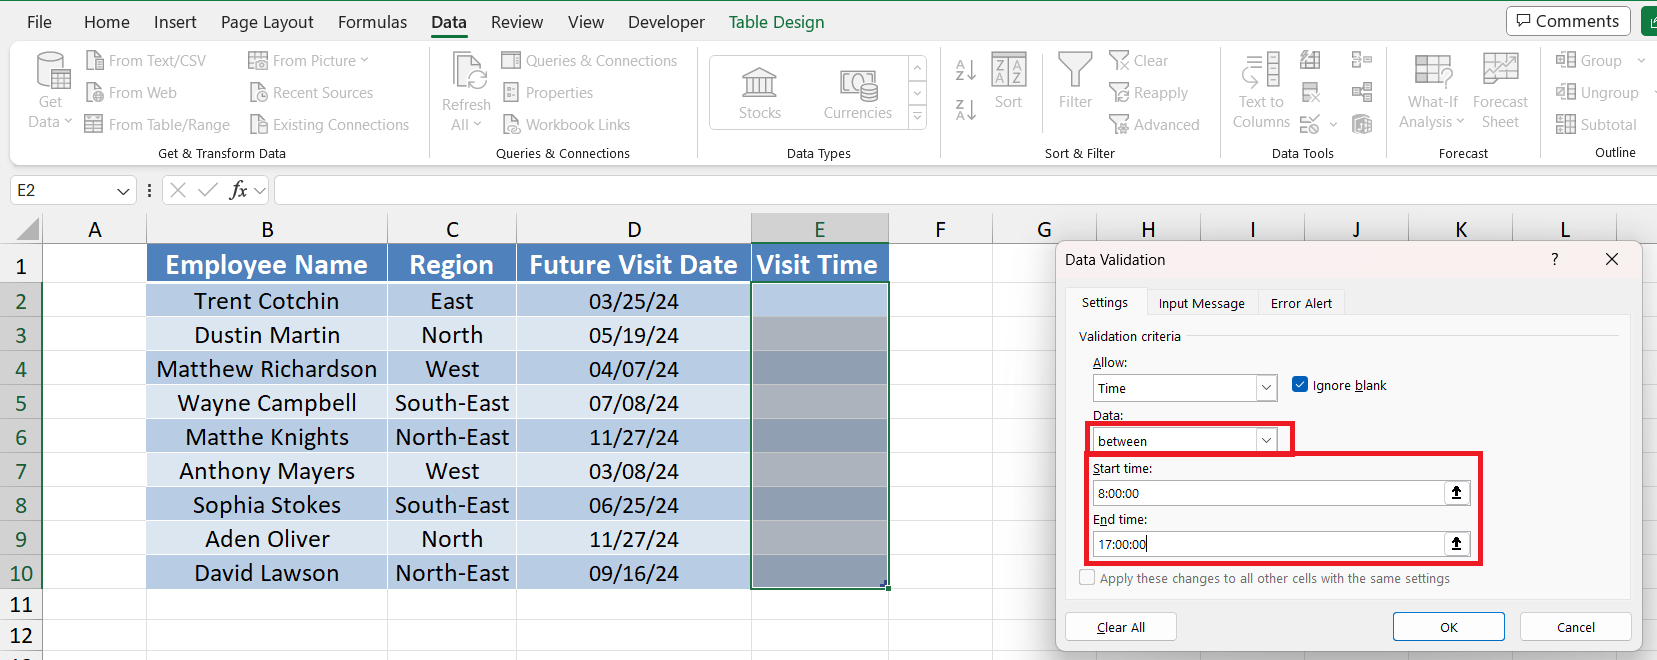
STEP 3: Set the ‘Data’ drop-down to ‘between’ and specify the start time (8 a.m.) and end time (5 p.m.) for your appointments.
Enhancing User Experience and Accuracy
Adding Input and Error Messages to Guide Users
Input and error messages in Excel act as an interactive guide and prompt to ensure users understand the type and format of data required in each cell. Here’s how to add these helpful messages:
Adding Input Messages:
STEP 1: Select the cells where you want the message to appear.
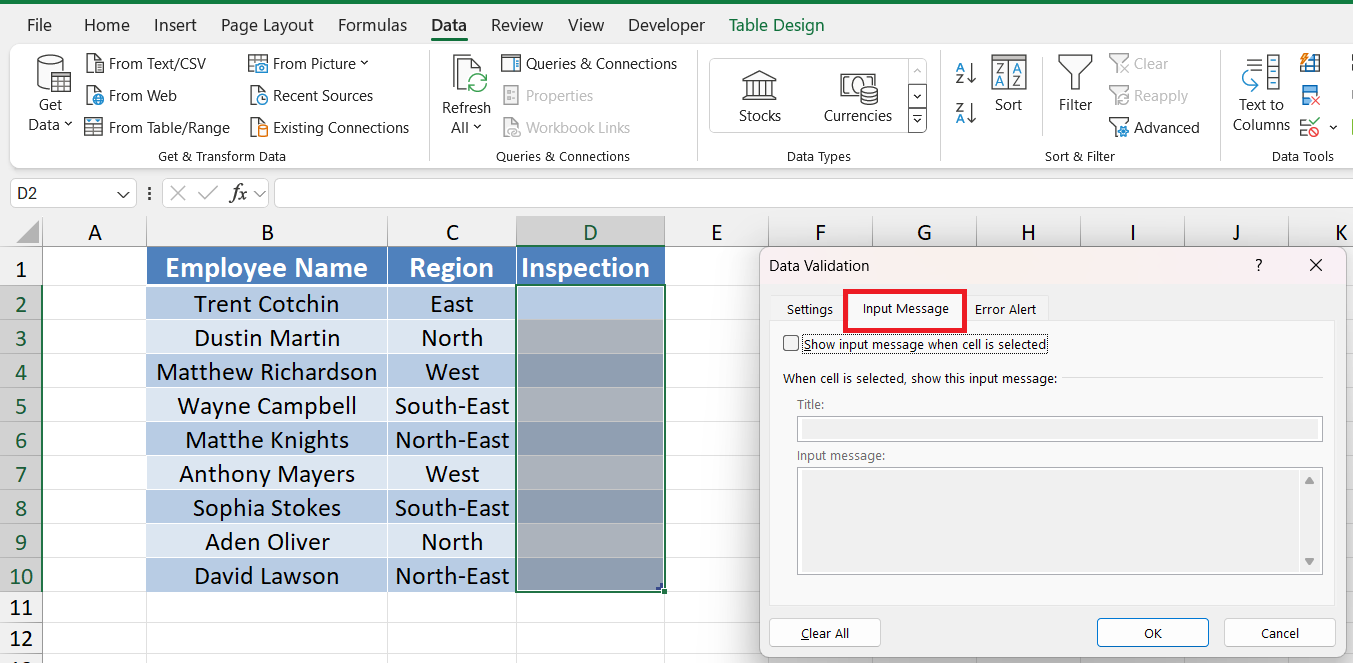
STEP 2: Go to the ‘Data’ tab, click ‘Data Validation’, and move to the ‘Input Message’ tab.
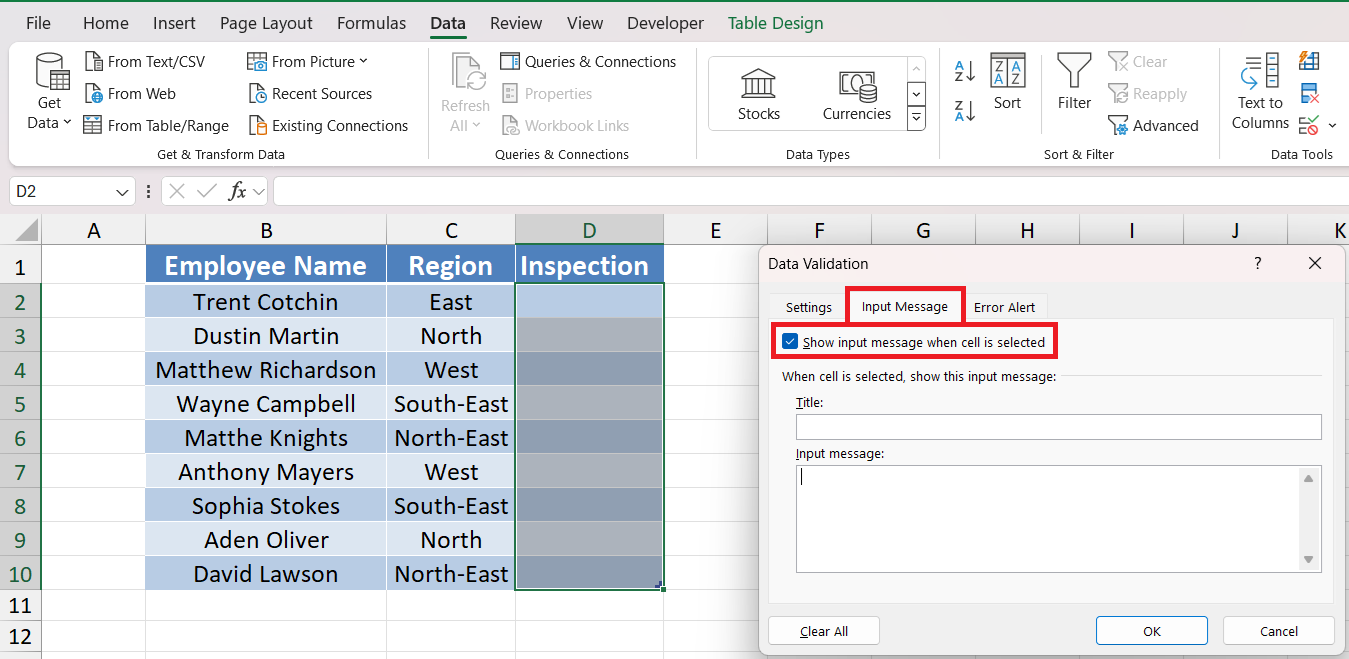
STEP 3: Make sure the ‘Show input message when the cell is selected’ box is checked.
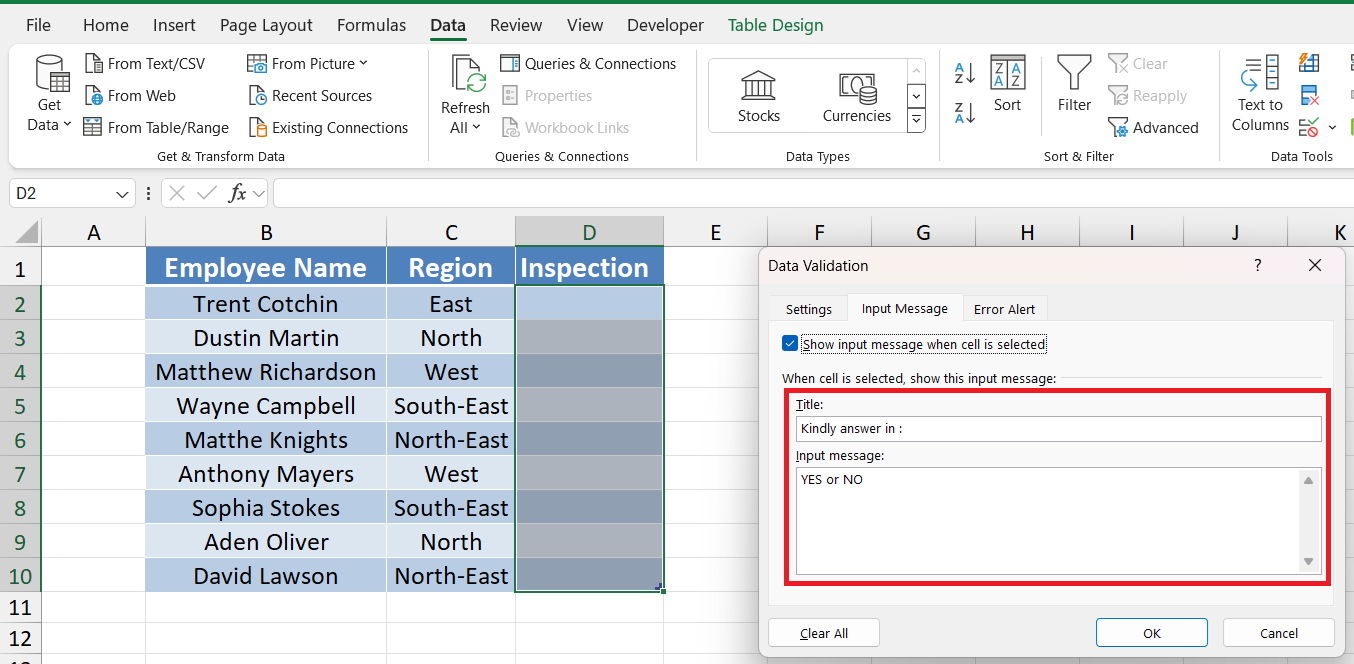
STEP 4: Enter a title and input message that will serve as instructions for the selected cells.
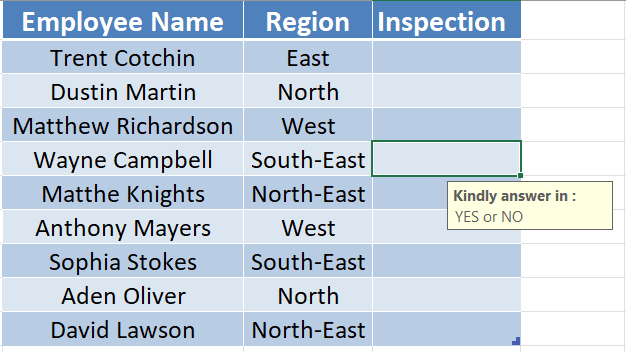
STEP 5: Check the result.
Adding Error Messages:
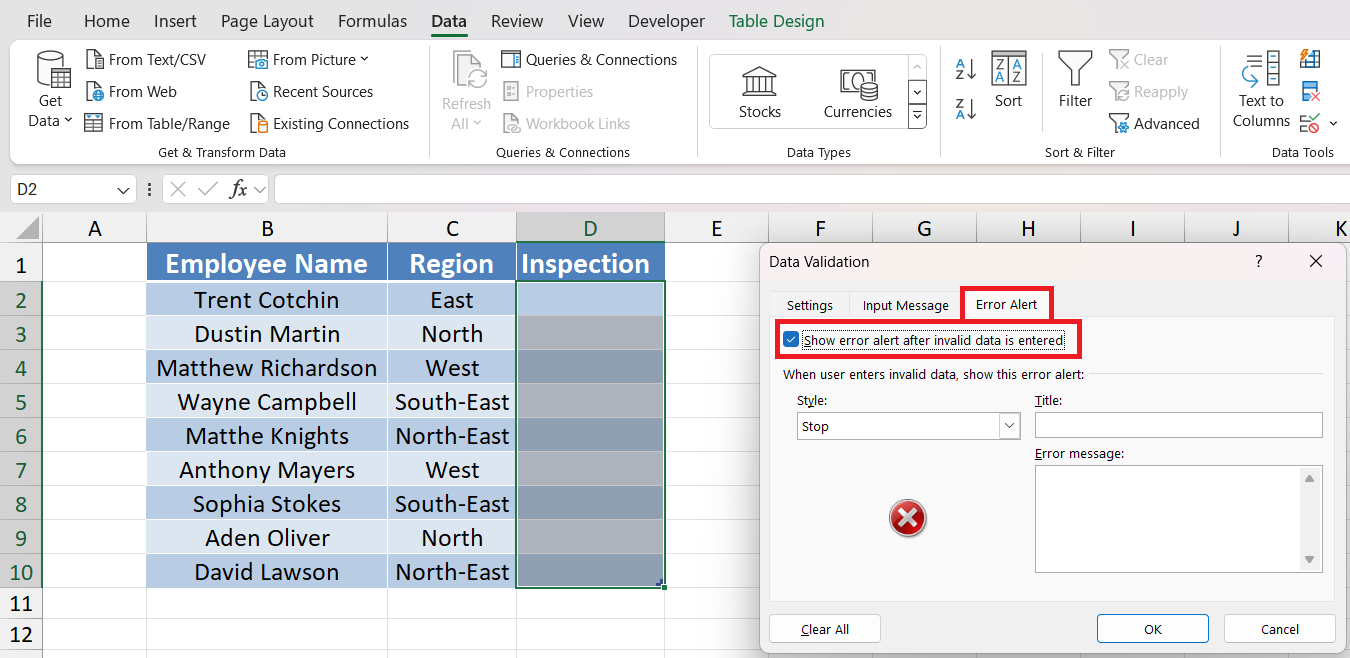
STEP 1: Stay on the same ‘Data Validation’ dialog but navigate to the ‘Error Alert’ tab. Enable ‘Show error alert after invalid data is entered’.
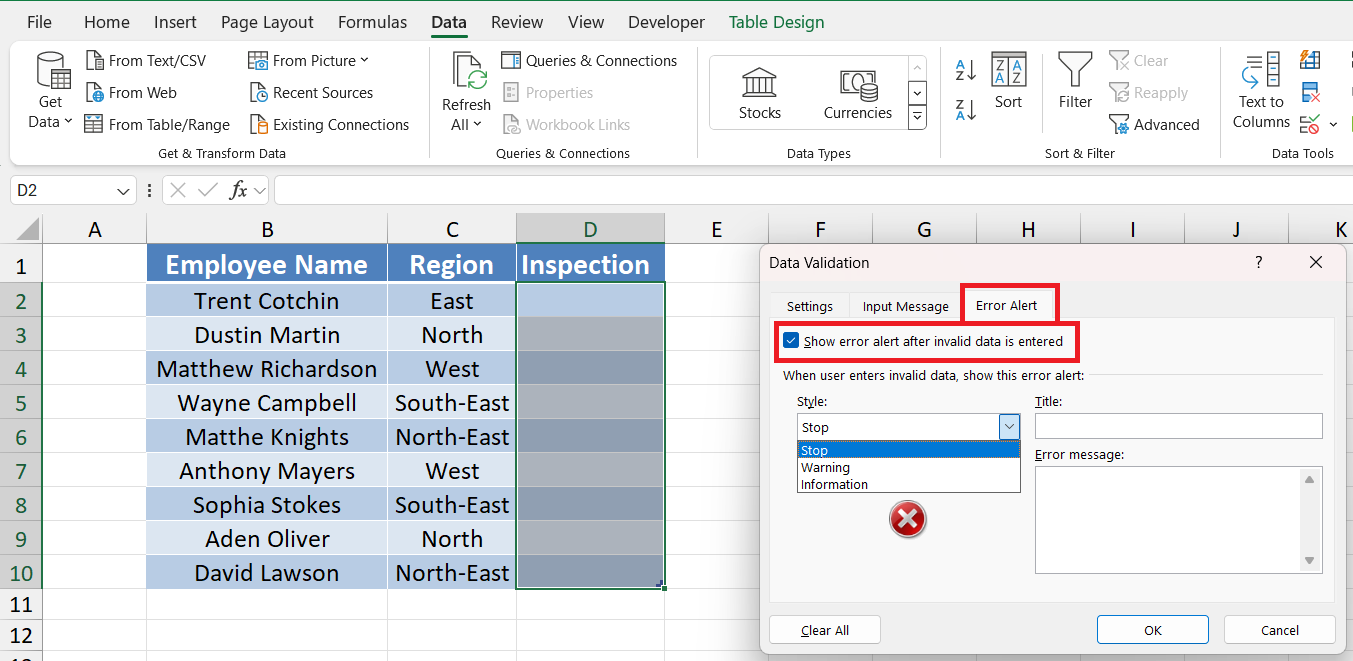
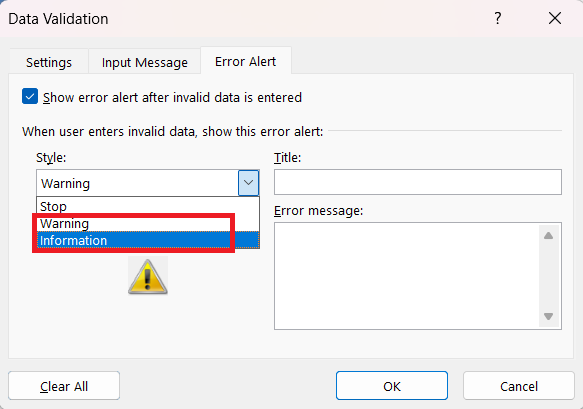
STEP 2: Choose the style of the alert: Stop, Warning, or Information.
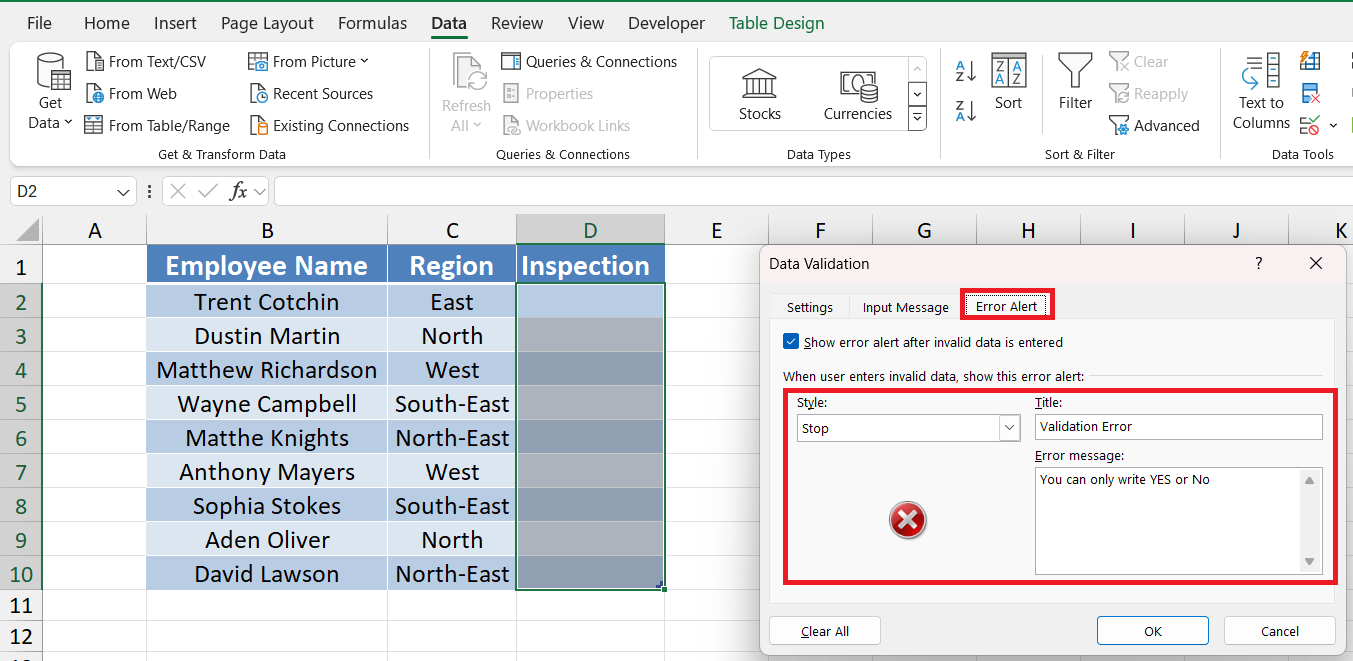
STEP 3: Write a title and error message that users will see if they enter invalid data.
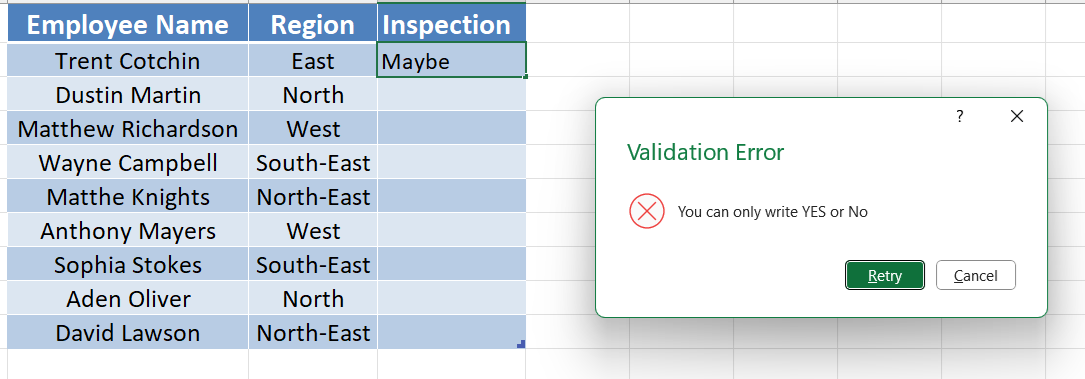
STEP 4: Check the result.
These messages are not only a form of virtual assistance that makes data entry more user-friendly but they also contribute to data integrity.
Maintaining and Updating Data Validation Rules
Copying Validation Rules Across Cells
Copying validation rules across cells is a significant time-saver. Once you have a validation rule set up, you can quickly apply it to other cells in your spreadsheet. Here’s how to reproduce an existing rule without creating it from scratch each time:
STEP 1: Click on a cell with the desired validation rule and press Ctrl + C to copy it.
STEP 2: Select the target cells for applying the rule. To select non-adjacent cells, press and hold Ctrl while clicking them.
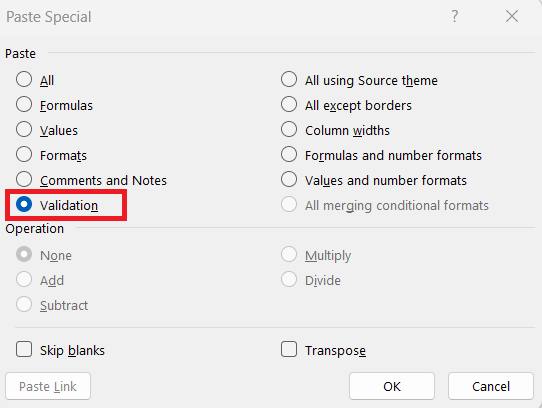
STEP 3: Right-click the selection, click ‘Paste Special‘, then choose ‘Validation.
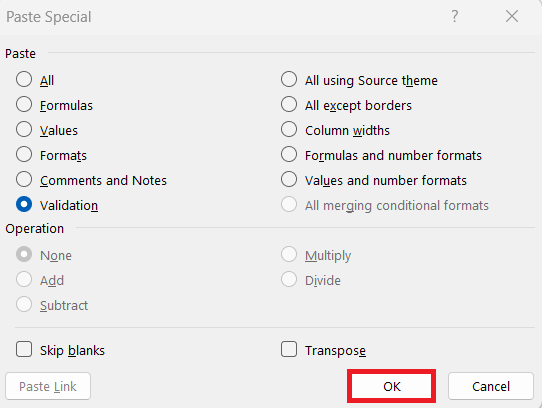
STEP 4: Click ‘OK’ to finalize.
Alternatively, use the shortcut Ctrl + Alt + V, then press N to paste validation.
Allowing Entries Not Predefined in Drop Down Lists
Sometimes, you may want to give users the flexibility to enter data that isn’t included in your predefined drop-down list. This hybrid approach can be quite useful. Here’s how to allow entries not specified in the drop-down list:
STEP 1: After creating your drop-down list following the steps outlined earlier, go back to ‘Data Validation’.
STEP 2: On the ‘Settings’ tab, ensure that the ‘Allow’ field is set to ‘List’.
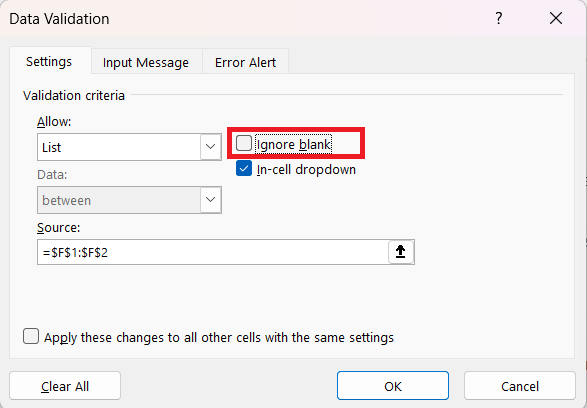
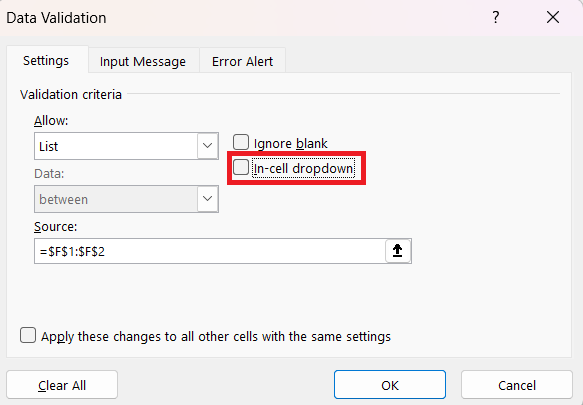
STEP 3: Uncheck the box that says ‘Ignore blank’ if it’s not necessary for your data needs.
STEP 4: The crucial step: Uncheck the ‘In-cell dropdown’ box if you want users to be able to enter values manually that aren’t in the list.
STEP 5: Optionally, set up an Error Alert with a ‘Warning’ or ‘Information’ style to tell users they’re entering data not on the list but still allow them to proceed.
Troubleshooting Common Data Validation Problems
When a data validation formula isn’t working correctly, it can lead to confusion and inaccurate data entry. Fixing these formulas is crucial in maintaining the spreadsheet’s purpose. Take these actions to rectify incorrect data validation formulas and references:
- Check Formula Syntax: Ensure that the formula entered in the data validation rule follows the correct Excel syntax and logic.
- Validate Cell References: Confirm that all cell references are accurate and adjust any relative references that may have shifted if the cell was copied or moved.
- Use Absolute References: If the formula is meant to refer to specific cells, use absolute references (‘$’ before the column letter and/or row number) to prevent changes when copying the validation to other cells.
- Test Your Formula Separately: Try the validation formula in a separate cell to make sure it returns the expected result.
- Eliminate Errors in Source Data: Ensure the source data used in your validation formula doesn’t contain errors or inconsistencies that might affect the result.
- Refresh the Workbook: If the validation depends on a volatile function, like TODAY(), consider refreshing the workbook (Press
Ctrl + Alt + F9) to recalculate.
Following these steps can help you restore correct functionality to your data validations and ensure your spreadsheet remains a reliable tool.
Leveraging Data Validation Across Shared Workbooks
Protecting Sheets While Keeping Validation Intact
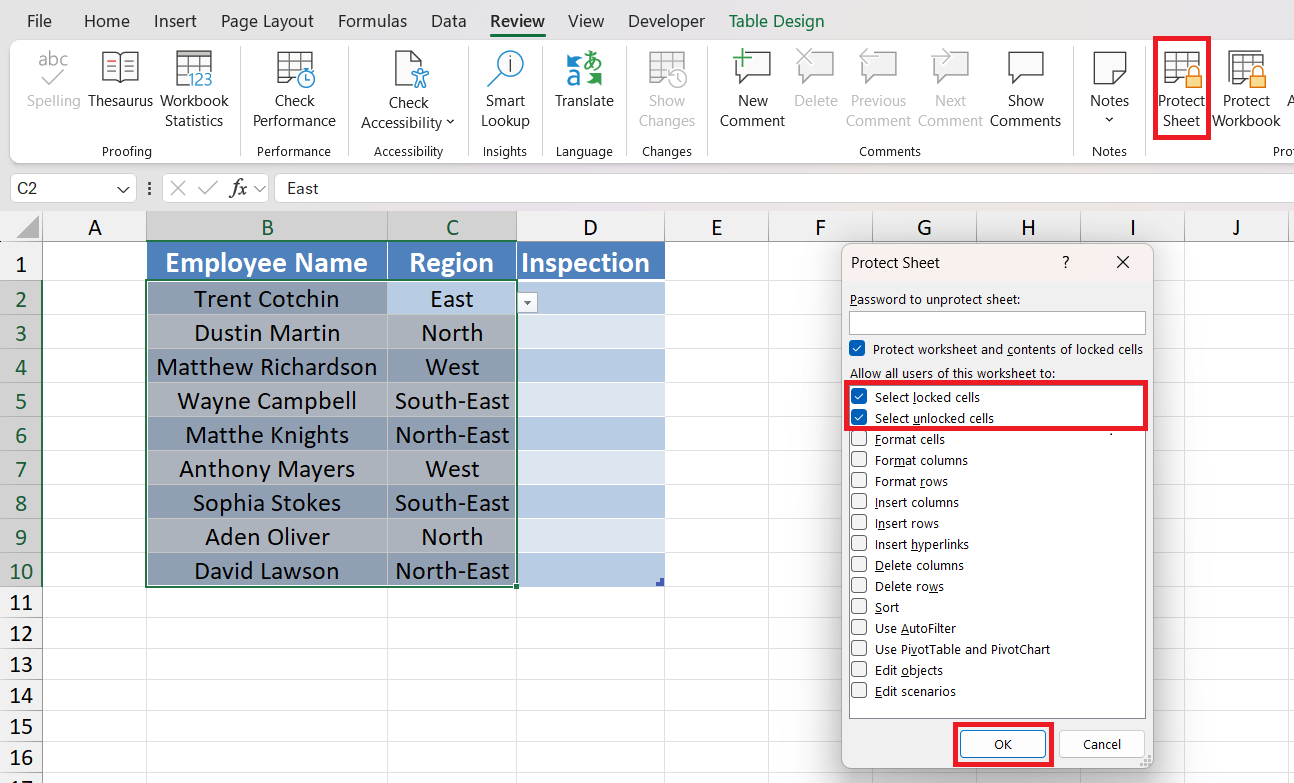
Protecting your Excel sheets is vital to safeguard your data validation setup, particularly if multiple users access the document. However, protecting the sheet shouldn’t limit the ability to enter data as per the validation rules. Here’s how to protect your sheets while keeping data validation intact:
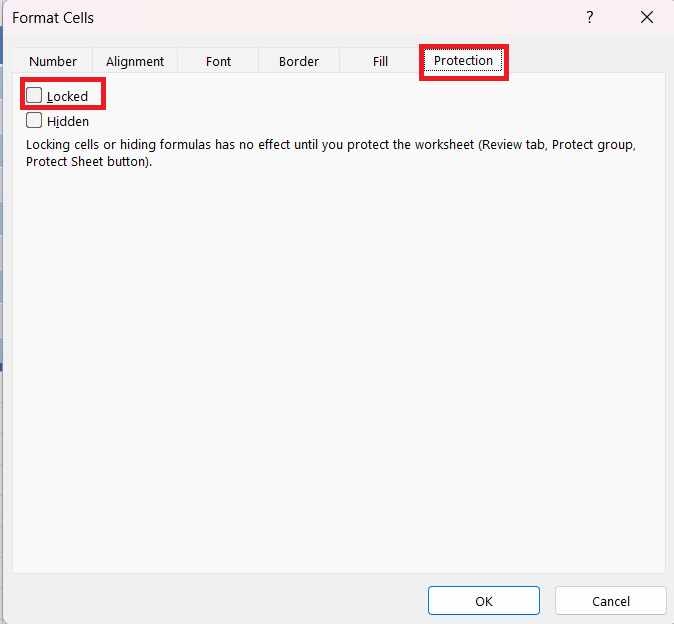
STEP 1: Begin by selecting the cells with data validation and opening the ‘Format Cells’ dialog (Ctrl + 1).
STEP 2: Go to the ‘Protection’ tab and uncheck ‘Locked’. This allows input into the cells even after sheet protection is enabled.
STEP 3: Next, protect the sheet by going to the ‘Review’ tab and choosing ‘Protect Sheet’. Enter a password if necessary.
STEP 4: Ensure that the option ‘Select locked cells‘ is unchecked while ‘Select unlocked cells’ is checked in the Protect Sheet dialog.
Now users can only interact with the cells you’ve unlocked, adhering to the set validation rules.
Tips and Tricks on Excel Data Validation
Excel data validation is a powerful tool, and with a few tips and tricks, you can master its potential to enhance your spreadsheets. Here are some insider tips to take your data validation to the next level:
- Use Named Ranges: Named ranges make your drop-down lists more dynamic. When the named range expands, your list automatically updates.
- Data Validation for Whole Table: Apply data validation to a Table, and as you add new rows, the validation rules automatically extend to them.
- Leverage INDIRECT Function: Use INDIRECT with drop-down lists to create dependent lists that change based on the selection in another list.
- Validate for Uniqueness: Use a custom formula like
COUNTIFto ensure that entries in a column are unique, preventing duplicates. - Input Length Restriction: To control the length of the text, use the Text Length validation. This could be useful for data like ZIP codes or phone numbers.
- Utilize Wildcards for Partial Matches: In custom validation formulas, wildcards can be used (
*,?) for partial matches, offering more flexible validation conditions. - Combine with Conditional Formatting: Pair data validation with conditional formatting to visually highlight cells with errors.
- Input Messages as Reminders: Use the input message feature to display reminders or instructions when a cell is clicked, not just for errors.
Remember to consistently update and refine your validation rules to suit the evolving needs of your data. With practice, these tips will help you handle Excel data validation with ease and efficiency.
FAQ: Sharpen Your Data Validation Knowledge
How can I quickly implement data validation in Excel?
To quickly implement data validation in Excel, select the cell or range where you want to apply the rules, go to the ‘Data’ tab, click ‘Data Validation’, and choose your criteria from the settings tab. You can create a drop-down list, restrict input to dates, numbers, or text, and even use custom formulas. Remember to add input and error messages to guide the user.
What are some creative uses for checkboxes within data validation?
Checkboxes in data validation can be used for creating interactive checklists, managing attendance or task completion, toggling settings within a model, and for quick yes/no responses in surveys or forms. They add visual engagement and ease of use.
What are the 3 types of Data Validation in Excel?
Excel offers three main types of data validation: Whole Number (Integer) Validation, Decimal Validation, and List Validation. Whole Number and Decimal Validation control numeric input, while List Validation provides a predefined set of options through a drop-down list, ensuring data accuracy and consistency.
Why is Data Validation important?
Data Validation is important because it ensures the accuracy and consistency of data entered into Excel. It prevents errors, saves time on data cleaning, and enforces specific data standards, which is crucial for reliable analysis and reporting.


John Michaloudis is a former accountant and finance analyst at General Electric, a Microsoft MVP since 2020, an Amazon #1 bestselling author of 4 Microsoft Excel books and teacher of Microsoft Excel & Office over at his flagship MyExcelOnline Academy Online Course.


