101 Advanced Excel Formulas & Functions Examples!
Key Takeaways
- Start by drafting a clear outline of all dates and events for the timeline, utilizing the “Enter” and “Tab” keys to arrange this information effectively in PowerPoint.
- To ensure clarity and understanding, choose the appropriate timeline format for your data; use PowerPoint’s native functionalities for simpler projects and consider using a professional tool like the Office Timeline add-in for more complex timelines.
- Enhance the timeline’s comprehensibility by setting distinct time reference points, including all critical events and activities, marking key milestones, and clearly indicating the start and end dates.
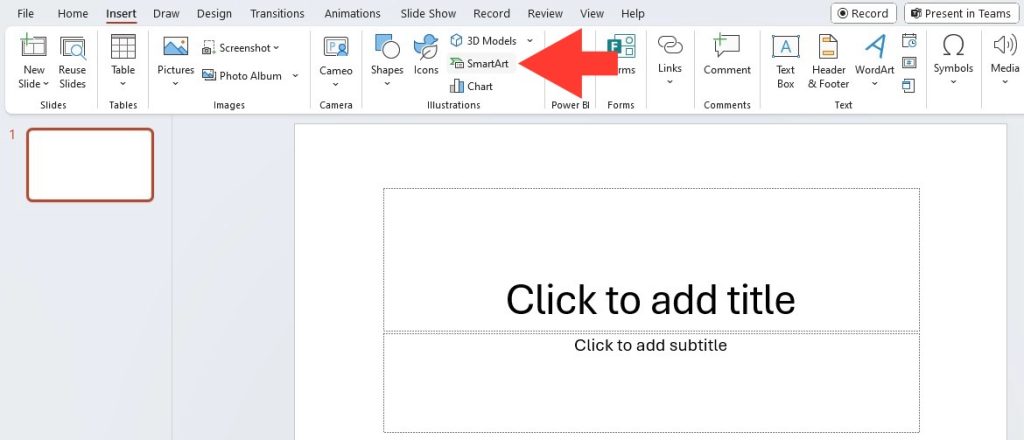
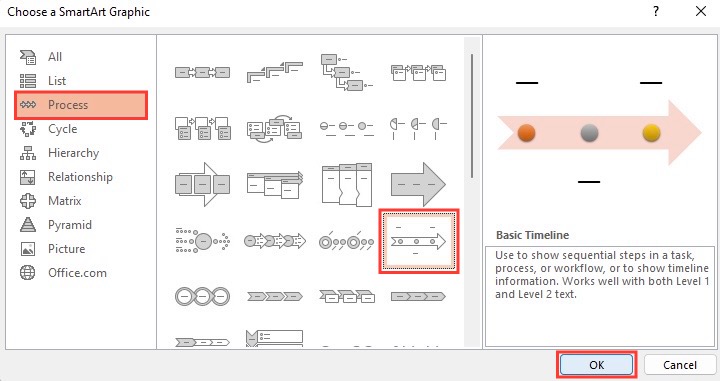
- To use SmartArt for creating a timeline in PowerPoint, select the Insert tab, click on SmartArt, choose the Process category, and pick a timeline design like Basic Timeline to input your milestones or key events.
How PowerPoint Simplifies Timeline Creation
PowerPoint has revolutionized the way you create timelines, transforming what used to be a laborious task into a simple and enjoyable process. Whether you’re a seasoned professional or new to presentations, you’ll find that PowerPoint’s interface and tools are designed with your convenience in mind. It offers a range of pre-made templates and SmartArt graphics, allowing you to turn your data into a visual timeline with just a few clicks. Moreover, the intuitive drag-and-drop functionality makes adding, removing, or adjusting timeline elements a breeze.
Table of Contents
Maximizing Usability Through SmartArt Graphics
A Step-by-Step Guide to Using PowerPoint’s SmartArt
You’ll love how PowerPoint’s SmartArt feature elevates your presentations—and creating a timeline is no exception. Here’s a quick, hassle-free guide to get you started:
STEP 1: Open PowerPoint and click on the Blank Presentation to start fresh.
STEP 2: From the ribbon, select the Insert tab, then click on SmartArt.
STEP 3: In the SmartArt Gallery, click on Process to view all timeline styles. Pick one that aligns with your content and aesthetic needs.
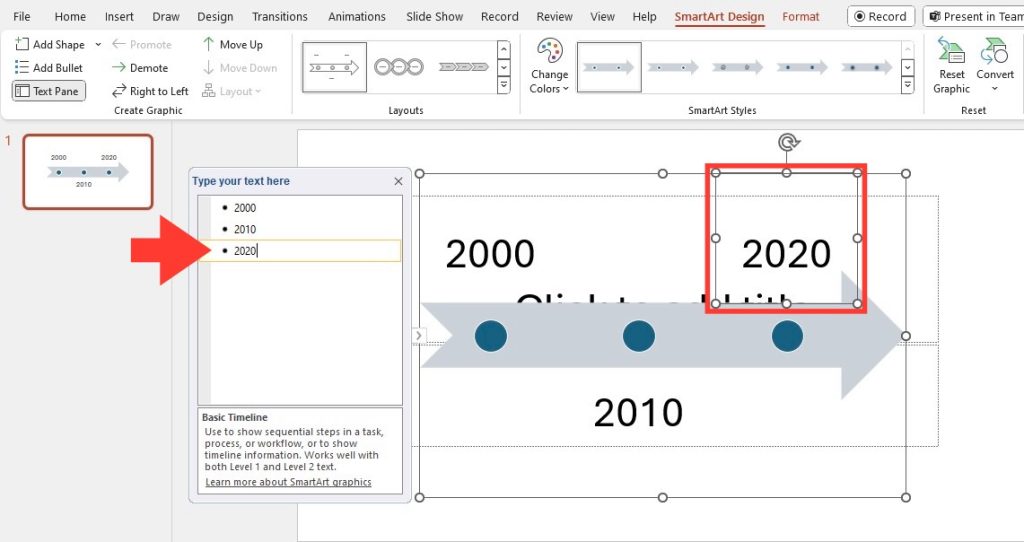
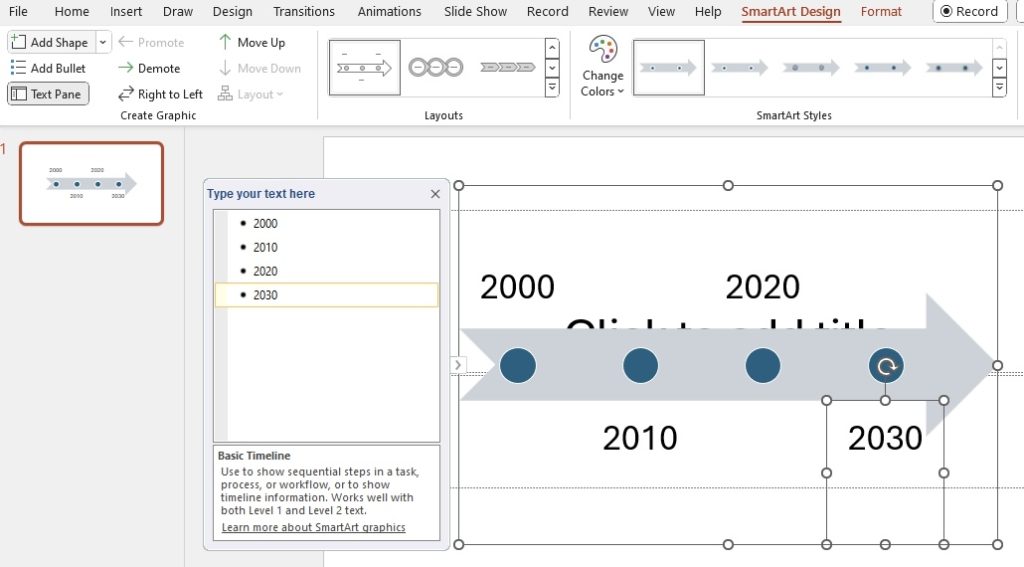
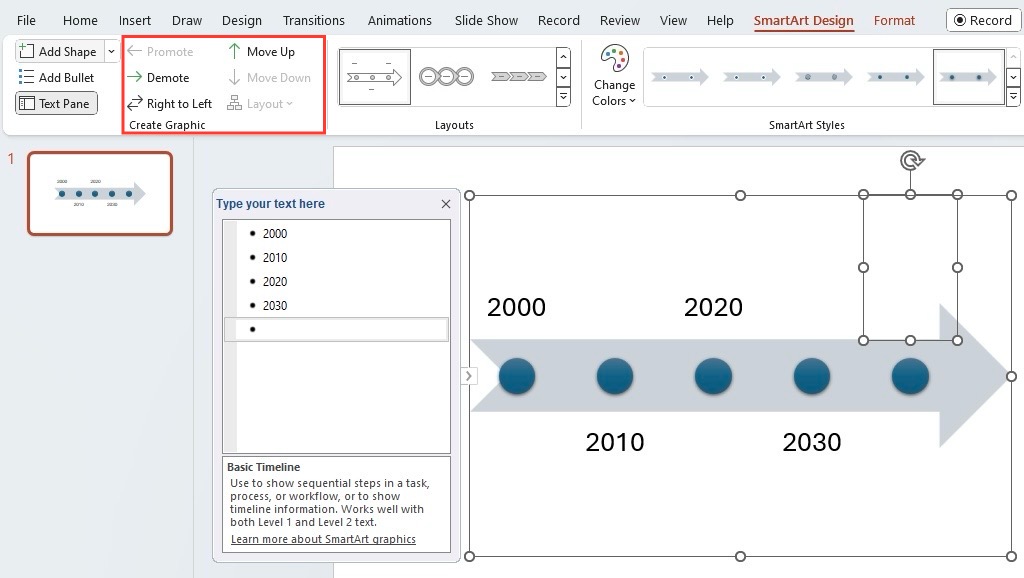
STEP 4: After clicking OK, your timeline will appear with default elements. To insert additional events, simply click Add Shape found in the SmartArt Tools Design tab.
STEP 5: For an extra touch of professionalism, apply a SmartArt Style by choosing from the gallery of effects like bevel or perspective to give your timeline a polished finish.
Remember, these steps are just the beginning! You can elaborate further by adding text, shifting elements around, and customizing the look and feel of your timeline.
Adapting Your Timeline with Easy Adjustments and Updates
If you anticipate changes or updates to your timeline, rest assured, PowerPoint makes it smooth to adapt on the fly. Adding or deleting events is as simple as right-clicking on the shapes within your SmartArt and selecting “Add Shape” or “Delete Shape.” And if dates shift or project milestones evolve, updating text is straightforward—just click and type.
Need to rearrange the sequence? Click and drag shapes to your preferred location, or use the arrow buttons in the SmartArt Tools Design tab for precise control. Scaling is also flexible; grab the corner of your timeline to resize without losing the aspect ratio.
Adjustments go beyond the structural, too. Change colors or styles to reflect the status of a project phase or to enhance readability, all within the SmartArt Tools Format tab, where creativity meets convenience.
Selecting the Perfect Template
Free vs. Premium PowerPoint Timeline Templates
Navigating the choice between free and premium PowerPoint timeline templates boils down to your project’s specifics and personal preferences. Free templates are a boon for tight budgets and they’re readily accessible, offering decent customization options for casual or internal presentations. Head to Office Timeline‘s template gallery, and you’ll unlock a wealth of no-cost options, including vibrant, creative designs.
However, if you’re aiming for a more sophisticated touch or a particular functionality, premium templates step up to the plate. They often include a wider variety of designs, advanced features, detailed customization controls, and might even come with dedicated support. Premium templates can give that polished sheen to your presentation that conveys professionalism and attention to detail, beyond what free templates typically offer.
Key Factors to Consider When Choosing a Template
Before you make a beeline for that snazzy-looking timeline template, it pays to consider a few vital aspects:
- Purpose and Audience: Is the timeline for a high-stakes business presentation, an educational seminar, or a casual team meeting? Different settings call for different styles and complexity levels.
- Branding Elements: Ensure the template accommodates your organization’s branding—colors, logos, typefaces—keeping the presentation consistent with your corporate identity.
- Customization Options: Look for templates with ample customization features that allow tweaks to align precisely with your message and data.
- Ease of Use: You want a template that saves you time rather than adds to your workload, so pick one that’s easy to work with, even if you aren’t a PowerPoint wizard.
- Compatibility: Confirm that the template works smoothly with the PowerPoint version you have. Nothing’s more frustrating than a template that doesn’t function as expected.
Considering these factors will help ensure that the template you choose not only looks good but also enhances the communication of your timeline’s content effectively.
Building Your Timeline with Precision
Adding Milestones and Critical Dates
To ace your timeline, marking milestones and critical dates is crucial—they’re beacons for your audience to navigate through your narrative or project roadmap. In PowerPoint, you can add these pivotal points by inserting shapes or icons at the relevant positions on the timeline. These visuals can be accompanied by a brief text descriptor to explain the significance of each date.
Here’s how you can do it:
STEP 1: Click on the shape or icon that represents a milestone within your timeline.
STEP 2: Drag it to the specific point on the timeline correlating with your date.
STEP 3: Enter the milestone’s name or the critical date by clicking on the shape or text box and typing your content.
Remember, clarity is key, so keep the text concise and ensure that the formatting stands out yet remains cohesive with the rest of your design.
Customizing Layouts and Styles to Communicate Clearly
Conveying your timeline’s message with clarity hinges on thoughtful customization of its layout and style. Customizing your PowerPoint timeline requires key considerations to ensure your presentation hits the mark:
- Layout: Choose a linear or comparative layout based on what you need to communicate. If you’re addressing a project’s progression, linear is the way to go. For showing parallels or contrasts, a comparative layout can be more elucidative.
- Style: Whether you opt for a minimalist design or something more elaborate, your style choice should enhance readability and not distract from the content.
- Font Size and Type: Prioritize legibility. Larger fonts for critical dates and milestones make them stand out, while a clear, professional font type maintains the formal integrity of your presentation.
- Color Scheme: Use a color palette that reflects the tone of your presentation. Color coding different phases or types of events can also aid in faster audience comprehension.
- Consistency: Apply the same design principles across all slides to give your presentation a cohesive look.
Making these conscious choices in customizing your layout and style will result in a timeline that not only looks great but also communicates your points efficiently.
Engaging Your Audience with Design Flair
Utilizing Colors and Effects to Highlight Timeline Phases
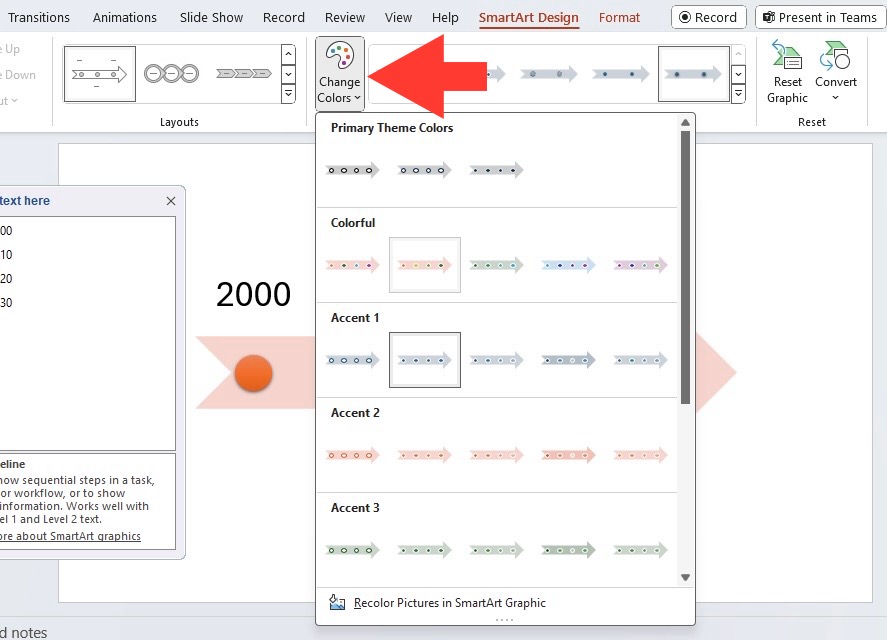
Colors aren’t just for aesthetic appeal; they’re a powerful tool to differentiate phases, indicate status, or draw attention to specific parts of your timeline. Start by selecting your timeline and then head over to the SmartArt Tools tab to explore the “Change Colors” gallery—here you can apply a fresh color scheme that aligns with your project theme or company branding.
Sprinkle in some effects as well. A subtle gradient, shadow, or gleam effect can make your timeline pop off the slide. But use them sparingly—you wouldn’t want to overwhelm your audience or detract from the information.
The beauty lies in balance. Find a color and effects combination that highlights the most crucial parts of your timeline without overshadowing the content. Remember that the goal is to facilitate understanding at a glance.
Animated Transitions and Slide Builds to Keep Attention
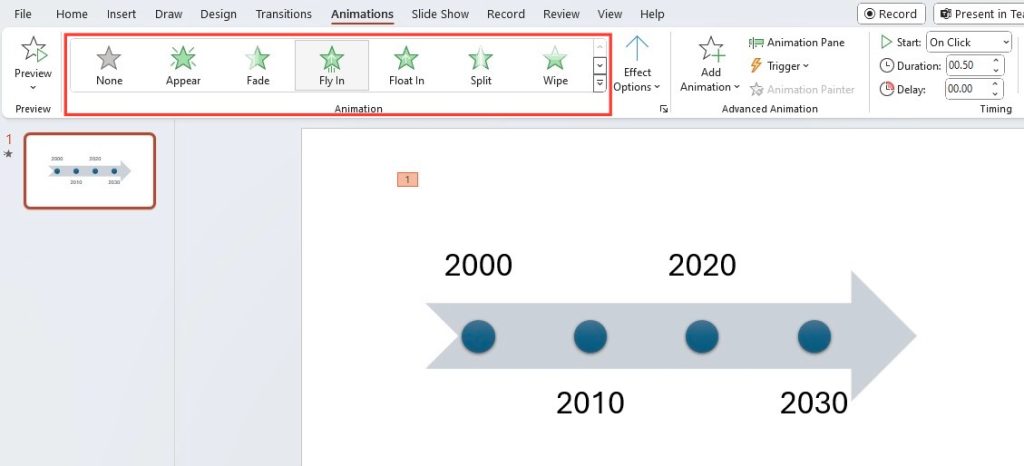
Animating your PowerPoint timeline can be like a secret sauce that keeps your audience hooked. Start by considering the pace of your presentation, then reveal each point progressively to maintain attention. But here’s a key tip from expert presenters: don’t show your entire timeline at once. Introduce the first point, discuss it, then bring in the next, using animations to create a dynamic flow.
Dabble in PowerPoint’s array of transition effects between slides for smooth sailing from one stage to the next. Also, play around with entrance and exit animation effects for individual timeline elements directly in your slide. Options like “Fly In,” “Fade,” and “Wipe” can guide your audience’s focus where you want it.
Be mindful though—animations should serve a purpose, not distract. Striking the right balance means you’ll captivate, not confuse, your audience.
FAQ: Refine Your Timeline Mastery
How do I create a timeline in PowerPoint?
To create a timeline in PowerPoint, first open a new slide. Then go to the Insert tab and select SmartArt. In the SmartArt Gallery, choose ‘Process’ to access different timeline layouts. Pick your preferred timeline style and insert it into the slide. You can then add your milestones and dates directly within the SmartArt graphic. Customizing the look of your timeline is easy with design and formatting tools.
Can I Import Data from Other Programs to Create a PowerPoint Timeline?
Absolutely! You can import data into PowerPoint to create a timeline from programs like Excel, Project, or Smartsheet. Just use Office Timeline, an add-in for PowerPoint, allowing you to turn project data into professional timelines. Begin by installing the add-in, go to File > Get Add-ins > select the Office Timeline tab in PowerPoint, click ‘New’, and choose ‘Import Data’. Follow the prompts to bring your data in and customize your timeline in PowerPoint.
What Are the Best Practices for Designing a Project Timeline?
For designing a project timeline that’s both informative and engaging, consider these best practices:
- Define the Scope: Clearly outline start and end dates, project phases, tasks, and milestones.
- Keep It Legible: Use fonts and colors that are easy to read, even from a distance.
- Highlight Milestones: Make major dates or deadlines stand out with distinctive markers or colors.
- Show Dependencies: Indicate task relationships to show how project pieces fit together.
- Stay Updated: Regularly revise your timeline to reflect any changes in the project plan.
Effective project timelines communicate complex information in a way that’s easy to understand at a glance.
How Do I Alter The Size And Shape Of Elements Within My Timeline?
Altering the size and shape of elements within your timeline in PowerPoint is straightforward. Select the element you wish to modify to see the two-headed arrow, then click and drag to resize it. For shape changes, go to the SmartArt Tools Format tab, click on Change Shape, and choose a new shape. These customization options help tailor your timeline’s look to suit your presentation’s needs perfectly.
Are There Any Free Resources for PowerPoint Timeline Templates?
Yes, there are free resources for PowerPoint timeline templates available online, which can be a game-changer for your presentations without hitting your wallet. Places like Office Timeline and various template galleries offer a range of styles and formats. They’re easily downloadable and customizable to fit your specific needs, offering a great starting point for creating professional-looking timelines.
John Michaloudis is a former accountant and finance analyst at General Electric, a Microsoft MVP since 2020, an Amazon #1 bestselling author of 4 Microsoft Excel books and teacher of Microsoft Excel & Office over at his flagship MyExcelOnline Academy Online Course.

