There were countless times when I had a list of full names, and all I needed was the First Name. It would be time-consuming to get the first names one by one. Thank goodness there are formulas for Excel extract the first name from full name to make my life easier! Let’s explore each of these methods to extract first name from full name in Excel one-by-one.
Key Takeaways:
- The Text to Columns function in Excel is a straightforward method for separating first names from last names when they are divided by a delimiter such as a comma. It involves a step-by-step process beginning with selecting the cells and ending with separated names in different columns.
- For mixed delimiter situations (e.g., comma and space), the function allows the selection of multiple delimiters to accurately split the full names into individual components, providing flexibility in handling various data formats.
- Beyond Text to Columns, Excel offers other techniques like using formulas (REPLACE) and features (Flash Fill, Power Query) to extract portions of text, such as first or last names, demonstrating Excel’s versatility in data manipulation.
Using Find and Left formula
It’s very easy to do Excel extract first name with the LEFT and FIND formula!
Here is the gameplan:
- Use the FIND formula to find the location of the space or any other delimiter that separates the First Name and the Last Name
- However, we need to deduct this numerical location by 1, so that we have the location of the end of the First Name
- With this number, we will use the LEFT formula to retrieve the First Name!
Now, it is essential to understand how these functions work to be able to use them to Excel extract first name.
The FIND Formula is used to find the position of the specified text within a cell.
The syntax of FIND formula is:
=FIND(find_text, within_text, [start_num])
- find_text: It is the text you want to find. Here, we want to find space. So, the argument will be a blank within quotes.
- within_text: It is the cell containing the text you want to find.
- start_num: It specifies the character at which you want the search to start. This is an optimal argument. If left blank, Excel will start the search from the 1st character itself.
The LEFT Formula is used to extract the specified number of characters from the start of a text string.
The syntax of the TEXT formula is:
=LEFT(text, num_chars)
- text: It is the text string from which you want to extract characters
- num_chars: It is the number of characters you want to extract.
Moving on, let’s combine these two formulas to Excel extract first name from full names.
Follow the step-by-step tutorial below on how to get first name in Excel and make sure to download the Excel workbook to follow along:
Download excel workbookExtract-First-Name-From-Full-Name-in-Excel.xlsx
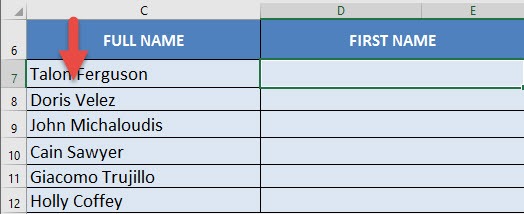
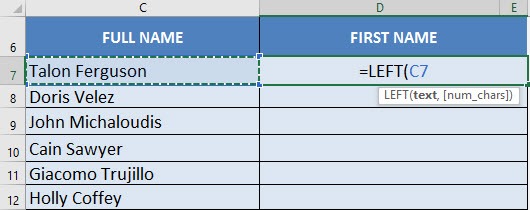
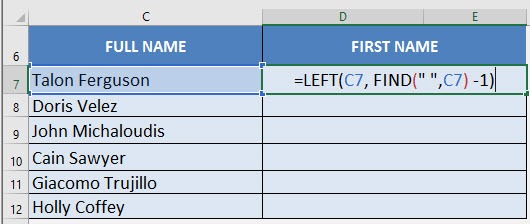
STEP 1: We need to enter the LEFT function and select the Full Name:
=LEFT(C7
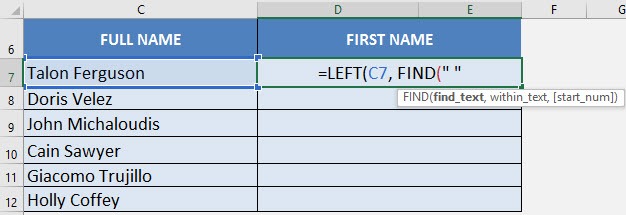
STEP 2: We need to enter the FIND formula to get the empty space located between the first and last name:
=LEFT(C7, FIND(” “
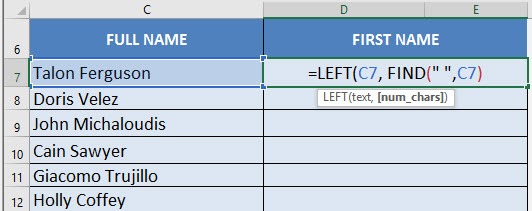
STEP 3: Select the Full Name again for the FIND formula’s 2nd argument:
=LEFT(C7, FIND(” “, C7)
STEP 4: Deduct 1 from the FIND formula so that our result will return us the text up to the last letter of the first name:
=LEFT(C7, FIND(” “, C7) -1)
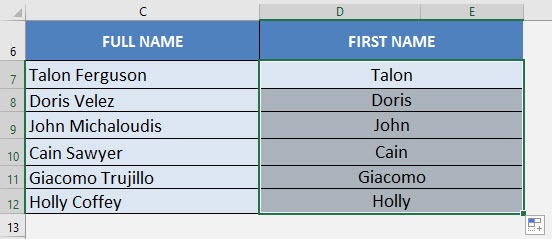
STEP 5: Do the same for the rest of the cells by dragging the formula all the way down using the left mouse button.
Now you are able to extract all the First Names from your FULL NAME using the FIND & LEFT formula in Excel!
Using Text to Column feature
A quick and easier way to Excel extract first name is to use the Text to Column function!
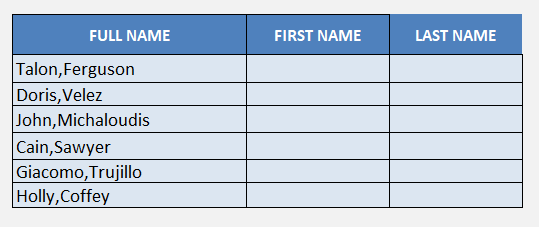
All you need to know is first the delimiter between the first and last name. Here, the first and last name is separated by a COMMA (,).
This function will get the first and last names split into two separate columns. Get this done by following the steps below:
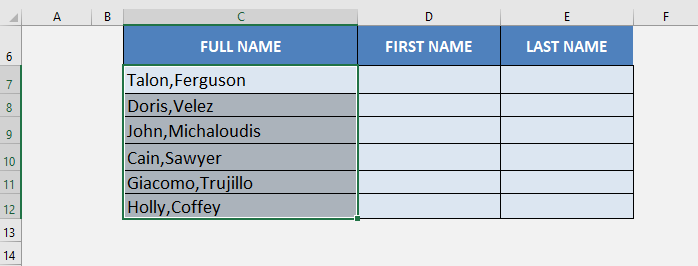
STEP 1: Select the cells containing the full names.
STEP 2: Go to Data > Text to Column.
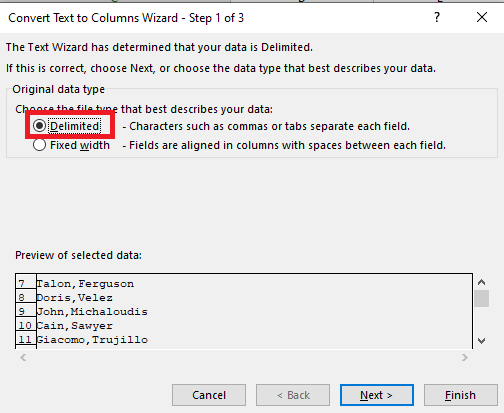
STEP 3: In the Convert Text to Columns wizard, Select Delimited Option and Click Next.
A snapshot of your selected data is displayed at the bottom of the wizard.
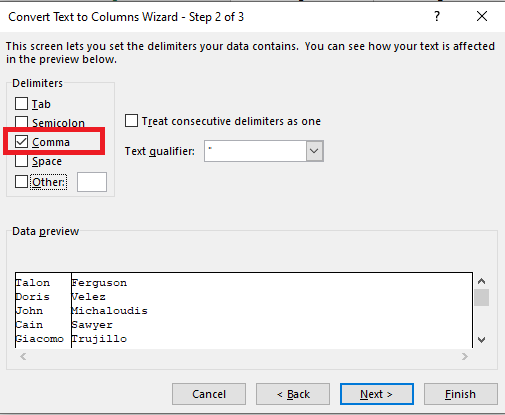
STEP 4: Select one or more delimiter applicable for your data and Click Next. Here, we need to select the delimiter – comma.
If your data contained both comma and space as a separator, you can select both!
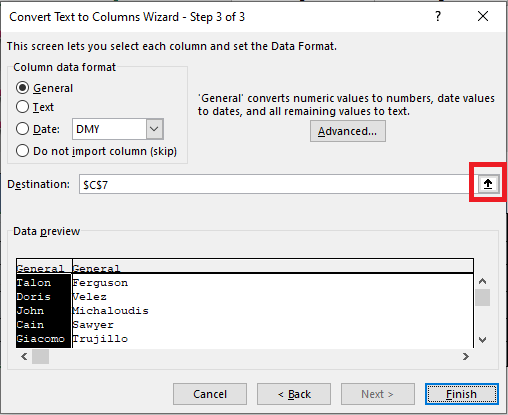
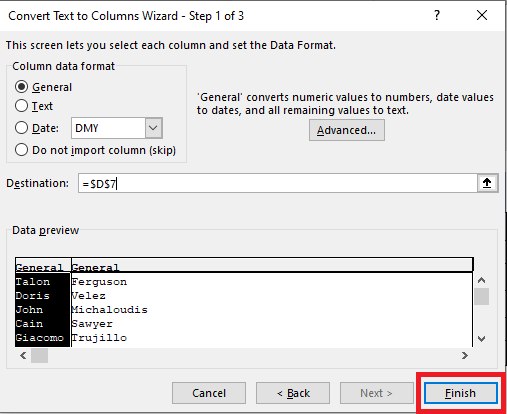
STEP 5: In this step, you can select the location where you want the output to be displayed. Click on the small arrow next to the destination to insert your destination.
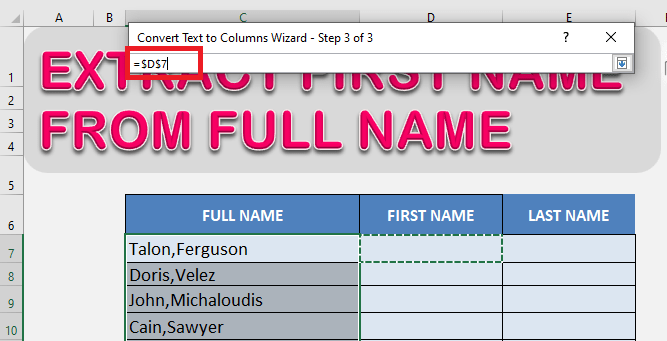
STEP 6: Select cell D7 and click on the arrow again.
STEP 7: Click Finish.
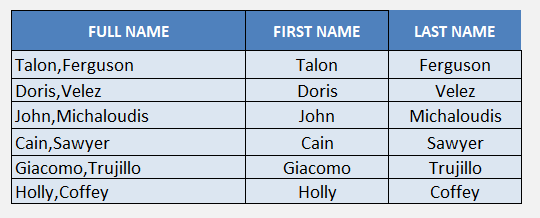
And, it’s done! The first and last names are now separated and displayed in two separate columns.
Table of Contents
Alternative Methods for Different Scenarios
The Power of Flash Fill and Text to Column Features
When you’ve got a long list of names that you need to split into first and last names, the power of Excel’s Flash Fill and Text to Column features comes into play, streamlining the task with just a few clicks.
Flash Fill is like your personal assistant, noticing the patterns in the data as you start typing in a new column. For instance, if you type a first name from a full name in the adjacent cell, Excel will automatically suggest filling the rest for you. It’s incredibly user-friendly and requires no formulas or complex steps. Ideal for quickly splitting first and last names, especially when you’re tight on time or prefer to avoid technicalities.
On the other hand, if your data calls for a more straightforward approach, Text to Columns is your go-to feature. It’s perfect for cases where names are separated by a clear delimiter, like a space or a comma. With a few simple steps, Excel will convert the full names in one column into separate columns – voilà, your names are now neatly organized.
Think of Flash Fill as the intuitive artist, while Text to Columns is the precision engineer. Flash Fill gently adapts to variations and nuances, whereas Text to Columns cuts straight through with clear boundaries.
Common Pitfalls and How to Avoid Them
Dealing with Extra Spaces and Punctuations
If spreadsheets were perfect worlds, all data would be consistent and tidy. Nonetheless, in many cases, you’ll encounter extra spaces or punctuation in names that can wreak havoc on your data processing. Before separating names into different columns, it’s critical to deal with these pesky distractions.
Excel comes to the rescue with functions like TRIM and SUBSTITUTE. The TRIM function is excellent for removing superfluous spaces that are not needed, leaving only single spaces between words and none at the start or end of the cell content. This is particularly useful if you’re trying to separate names that have inconsistent spacing.
For punctuation or additional characters that TRIM can’t handle, the SUBSTITUTE function takes the stage. You can specify which character you need to replace, such as hyphens, apostrophes, or multiple periods, and SUBSTITUTE removes or replaces them according to your directive.
Imagine prepping a list of names with no extra spaces or rogue punctuation! To help users envision the effectiveness of these clean-up tools, including a before-and-after snapshot or a table illustrating how TRIM and SUBSTITUTE work their magic on a sample dataset could be immensely engaging and instructive.
Anticipating and Managing Exceptions
In the journey of data manipulation, you may encounter exceptions that don’t play by the standard rules—and preparing for these can save you a world of trouble. Excel is robust, but it does have its limits, especially with names that defy conventional structures, like those with titles, compound last names, or cultural variations.
To anticipate and handle these exceptions, a two-pronged approach can be your salvation. First is the thorough review of your dataset. Before you dive into splitting or combining names, sift through your list to spot any outliers. Names with ‘Dr.’, ‘Mr.’, ‘Jr.’, or ‘III’ at the end need special attention. You might consider using conditional formatting to highlight cells that contain specific text, helping you to identify these exceptions quickly.
Secondly, consider creating a separate process for these exceptions. Sometimes, a hands-on approach is best for data of this nature. Having a set of steps or rules for processing these names ensures consistency and accuracy. For instance, you might use an IF formula to check for the presence of a certain character or string within a cell and treat it differently if found.
Consistency in Quality: Advanced Excel Functions
Building a Foundation with Key Functions
Mastering Excel starts with understanding the cornerstone functions that lay the groundwork for more complex operations. Functions like LEFT, RIGHT, and MID are the bread and butter for text manipulation, including extracting names. With LEFT, you can grab characters from the start of a text string—perfect for first names, provided they’re at the beginning. RIGHT does the reverse, nabbing characters from the end.
Don’t forget to acquaint yourself with the LEN function, which can identify the length of your text, and combine it with the aforementioned functions for precise control. For instances when names have middle initials or varying lengths, LEN becomes invaluable for dynamic name extraction.
These foundational functions are your reliable toolkit for tackling a myriad of data formatting and extraction tasks, paving the way to Excel proficiency.
Discover Secrets of the MID Function
Dive into the MID function, one of Excel’s hidden gems for text manipulation. It’s your go-to when you need to pluck out specific parts of a string, like a middle name. Here’s the secret: MID takes three arguments—the text, the starting position, and the number of characters to extract. This precision allows you to surgically remove any part of a text string, making it especially powerful in combination with functions like FIND or SEARCH to locate positions dynamically.
Imagine effortlessly fishing out middle initials or names regardless of their position in the string. MID gives you that edge. It’s particularly useful when dealing with inconsistent data where the exact position of the name segment you need varies.
With the MID function in your toolkit, you’re well equipped to handle Excel tasks that require a delicate touch and pinpoint accuracy. It’s a function that, once mastered, opens up new possibilities in data management and cleanup.
FAQ Section
How can I automate the process for a large dataset?
For handling large datasets, automating mundane tasks can be a lifesaver. Thankfully, with Excel, you can harness the power of macros to do just that. Macros in Excel are essentially recorded actions which can be replayed to perform repetitive tasks, like separating names, with a single click.
By using the macro recorder, you can document the steps you take to split names. Once recorded, you can run the macro to apply those same steps to other data within your spreadsheet. It’s like teaching Excel your personal tricks, enabling it to replicate them whenever needed, saving you from the tedium of manual entry.
Before you record a macro, plan out all the steps to ensure efficiency and accuracy. It’s also important to test your macro on a small set of data first to confirm it performs as expected before rolling it out on the entire dataset.
What should I do if names have middle initials?
If you encounter names with middle initials, don’t let those single letters throw a wrench in your workflow. You can tailor your formula to handle them with precision. The key is to create an additional column dedicated to the middle initial, ensuring it doesn’t get lost or mixed up with the first and last names.
Using Excel’s text functions, such as MID and FIND, you can isolate the middle initial. The formula might look complex at first, but essentially, it pinpoints the position of the first and last spaces in a name and extracts the character(s) in between.
For example, crafting a formula that looks for the space after the first name and retrieves the subsequent character will neatly pull out the middle initial. This approach takes a little trial and error to perfect, but once it’s done, your list will be cleaner and more organized than ever.

Bryan
Bryan Hong is an IT Software Developer for more than 10 years and has the following certifications: Microsoft Certified Professional Developer (MCPD): Web Developer, Microsoft Certified Technology Specialist (MCTS): Windows Applications, Microsoft Certified Systems Engineer (MCSE) and Microsoft Certified Systems Administrator (MCSA).
He is also an Amazon #1 bestselling author of 4 Microsoft Excel books and a teacher of Microsoft Excel & Office at the MyExecelOnline Academy Online Course.
