
101 Advanced Excel Formulas & Functions Examples!
Key Takeaways
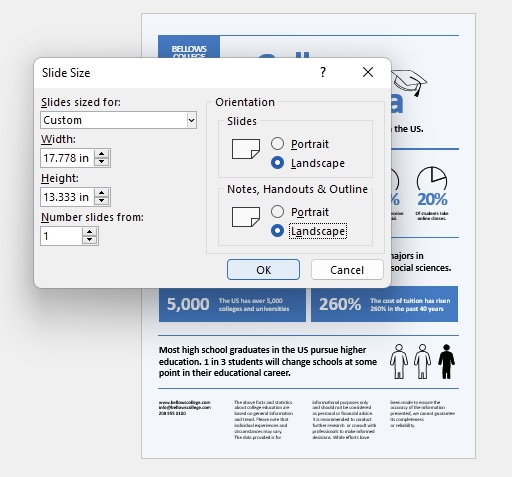
- In PowerPoint 2013 and later versions, including Office 365, changing a slide’s orientation to portrait is done by clicking the “Design” tab, selecting “Slide Size,” then “Custom Slide Size,” and choosing the vertical orientation or manually entering the desired dimensions in the “Width” and “Height” fields before confirming with “OK.”
- For older versions of PowerPoint for Windows, switch slide orientation by going to the “Design” tab, accessing the “Page Setup” group, clicking “Slide Orientation,” choosing “Portrait,” and pressing “OK” to apply the changes.
- It’s important to note that PowerPoint does not allow mixing orientations within the same presentation; the chosen orientation will apply to all slides, and content may need to be adjusted to fit the new layout properly. Choose the orientation that aligns best with your presentation content and goals.
Landscape vs. Portrait: Understanding the Basics
Landscape orientation, the default setup for PowerPoint slides, offers a broad canvas that is well-suited for most presentations. With ratios of 4:3 for Standard and 16:9 for Widescreen, it provides ample width to include various elements like text, images, and multimedia in a horizontal layout that mimics our natural field of vision, making it comfortable for audiences to scan from left to right.
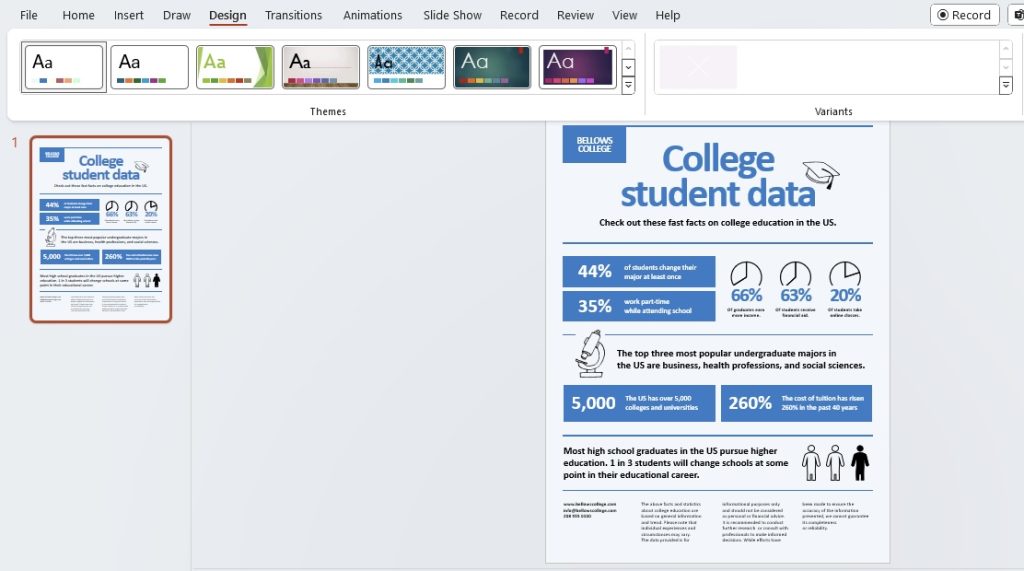
Switching the orientation from landscape to portrait in PowerPoint offers a taller and narrower view. This format is less common but extremely useful for content like infographics, long lists, or documents intended to be printed and bound, like reports or handouts. The main constraint here is that content might need to be laid out more meticulously due to the reduced width.
Table of Contents
Step-by-Step Guide to Changing Slide Orientation
Shifting to Landscape: A Quick Tutorial
If your PowerPoint slides are not already in the default landscape mode or you’ve switched to portrait and want to go back, shifting to landscape is pretty straightforward. Here’s what you need to do:
STEP 1: Open your presentation in PowerPoint.
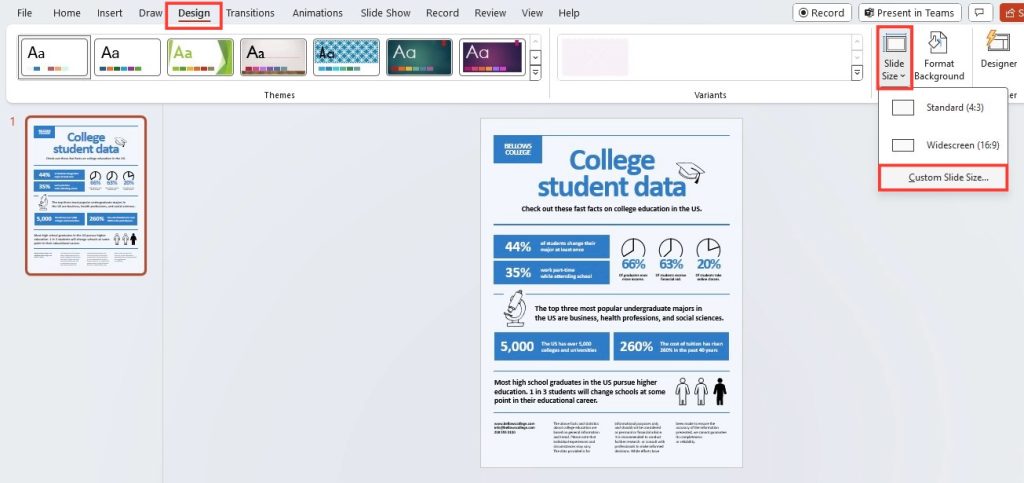
STEP 2: Go to the ‘Design’ tab located at the top menu.
STEP 3: Look for the ‘Slide Size’ button within the ‘Customize’ group.
STEP 4: Click on ‘Slide Size’ and a dropdown will appear.
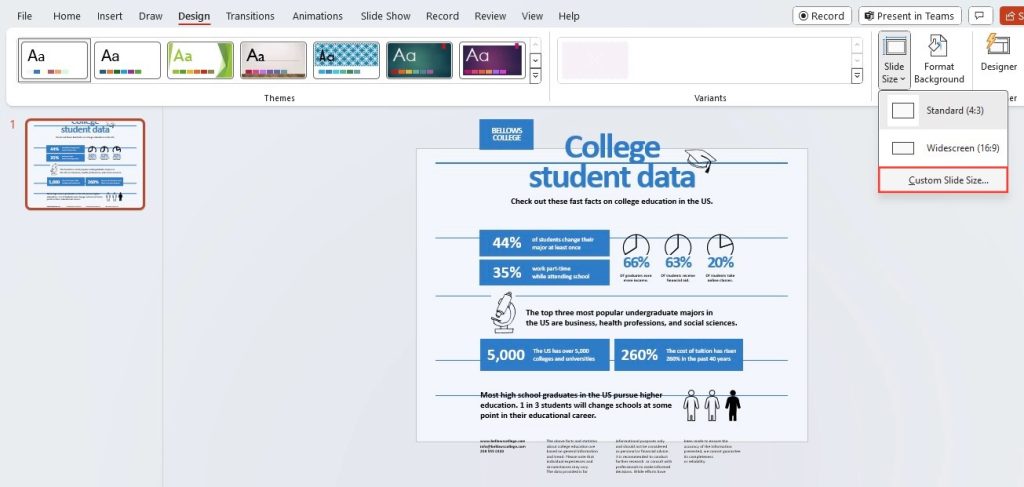
STEP 5: From the dropdown, select the ‘Standard (4:3)’ option for a traditional layout or ‘Widescreen (16:9)’ for a more modern look.
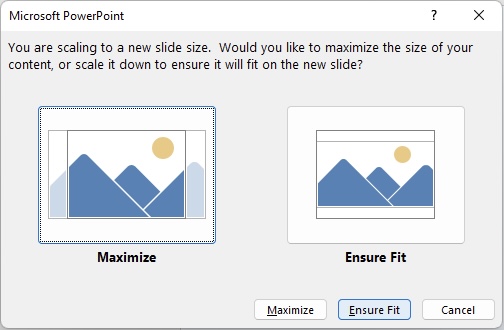
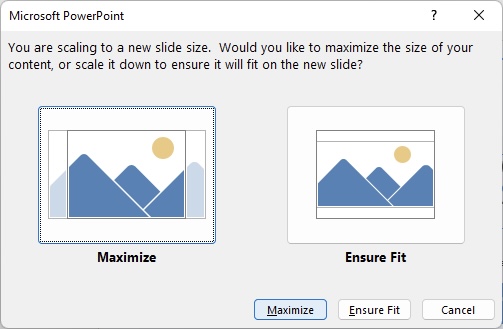
A dialog box may pop up asking if you want to maximize your content or ensure fit, depending on your existing content. Choose the option that best suits your needs.
Your slides will now be set to landscape orientation.
Remember, even though landscape is the norm, always consider what format will serve your content’s purpose most effectively.
Switching to Portrait Mode Made Simple
Switching to portrait mode in PowerPoint is just as easy as shifting to landscape, with a few similar steps. If you’re seeking to highlight content that benefits from a vertical layout, follow these simple directions:
STEP 1: Open your PowerPoint presentation and navigate to the ‘Design’ tab at the top of your screen.
STEP 2: Within the ‘Design’ tab, click on ‘Slide Size’ located in the ‘Customize’ group.
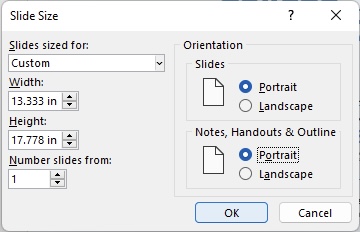
STEP 3: From the ‘Slide Size’ dropdown, choose ‘Custom Slide Size…’ to open a new dialog box.
STEP 4: In the ‘Slide Size’ dialog box, select ‘Portrait’ under the ‘Slides’ section for the orientation.
STEP 5: You will then be prompted to decide how you want to apply the changes, similar to when you switch to landscape—’Maximize’ or ‘Ensure Fit’.
Upon making your choice, all your slides will adopt a portrait orientation.
It’s as simple as that! Your content will now take on a new dimension, optimized for a vertical display.
Best Practices for Using Multiple Orientations
Combining Landscape and Portrait Slides Effectively
While PowerPoint doesn’t allow a single presentation to have mixed orientations, there is an inventive workaround should you need to combine both landscape and portrait slides. To do this effectively:
- Create two separate presentations — one in a landscape layout and the other in portrait.
- In your main presentation, typically the landscape one, identify the point where you want to switch to a portrait slide.
- Insert a hyperlink on the landscape slide that links to your secondary portrait presentation.
- When presenting, you can click the hyperlink to seamlessly transition to the portrait-oriented content.
- After discussing the portrait slide, you can hyperlink back to the primary presentation or simply alt-tab if presenting on a computer.
This approach allows for a presentation that encompasses the best of both worlds, making sure that you can tailor your presentation’s format to your content’s necessities, ensuring a compelling and well-structured delivery.
Maintaining Design Consistency Across Different Orientations
Consistency in design is key to professional-looking presentations, especially when dealing with different orientations. To maintain a coherent design, employ these strategies:
- Use a common color scheme across all slides, regardless of orientation, to create visual continuity.
- Consistent fonts and font sizes will ensure readability and a uniform look.
- Keep logos, headers, or footers in the same position on each slide to guide the audience’s eye and uphold brand identity.
- Standardize the layout of similar elements, like bullet points, text boxes, and images, across the slides to avoid confusion.
- Implementing master slides and slide templates can save time and help preserve the design’s integrity when changing orientations.
By following these tips, your audience won’t be distracted by the change in orientation but will keep their attention focused on the content that you’re presenting.
Troubleshooting Common Orientation Issues
Fixing Distorted Content After Orientation Change
When you switch the orientation of your PowerPoint slides, it’s common to encounter issues with distorted content. To fix this and make sure your slides look professional:
- Manually adjust elements by selecting them and using the corner handles to scale proportionally. This prevents distortion and maintains the original aspect ratio.
- For text boxes, check that the text alignment and line breaks are still appropriate; you may need to resize the box or adjust the text size.
- Review images and graphics to ensure they haven’t been stretched or squished; resize them as necessary.
- Reposition elements on the slide to utilize the new space effectively and maintain balance.
- Utilize the ‘Align’ tools to precisely position your content and ensure even spacing and alignment between elements.
Take a bit of extra time to fine-tune your slides after an orientation change, as this can make a significant difference in how polished your presentation looks.
Resolving Video and Text Alignment Problems
Aligning videos and text can be particularly tricky when changing PowerPoint slide orientation because they may not automatically fit within the new layout. Here’s how to resolve these common problems:
- For videos, right-click and choose ‘Size and Position’ or drag the corner handles to resize without distortion. Position the video centrally or align it based on your design preference.
- Text within shapes or placeholders may get cramped or overflow. Adjust the text size and the shape or placeholder’s dimensions to preserve readability.
- Use the ‘Align’ function under the ‘Format’ tab to align objects to the slide or to each other, ensuring everything looks neat and intentionally placed.
- For text alignment, consider the text direction. Rotating text to a vertical orientation can save space and maintain the flow of your content.
- In case of complex alignment, gridlines and guides under the ‘View’ tab can be immensely helpful in positioning your elements precisely.
By being attentive to these adjustments, you can swiftly resolve video and text alignment issues and maintain an engaging and visually appealing presentation.
Enhancing Your Presentations with Orientation Changes
Creative Uses for Vertical Text in PowerPoint
Vertical text in PowerPoint can ignite a creative flair in your presentations. Here are captivating ways to use it:
- Emphasize certain points by rotating key phrases or words, making them stand out amid horizontal content.
- Create dynamic timelines or process flows that require a top-to-bottom reading direction, which can visually map out progression or steps.
- Spice up the design of your slides with vertical headers or sidebar comments that complement the main content without overcrowding the slide.
Using vertical text can break the monotony of horizontal elements and add an element of surprise to keep your audience engaged.
Leveraging Orientation for Impactful Keynotes
Leveraging slide orientation in PowerPoint can make keynotes more impactful by aligning with the narrative and underlining critical points. Portrait orientation can deliver drama for striking visuals or statements that you want to land with impact, such as quotes, significant statistics, or full-slide images. For detailed charts, wider diagrams, or group discussions where a panoramic view is preferred, landscape orientation will serve you best.
When you adjust orientations to match the nature of the content, you not only sustain the audience’s attention, but you also guide their focus where you want it most. A thoughtful, intentional approach to slide orientation helps to create emphasis and can bring clarity and dynamism to your presentation.
PowerPoint Orientation Tips for Professionals
Setting a Default Slide Orientation for Efficiency
Setting a default slide orientation is a clever way to streamline your workflow, particularly if you often utilize the same orientation for multiple presentations. Here’s how you can do it:
STEP 1: Open a new PowerPoint presentation.
STEP 2: Go to the ‘Design’ tab and select ‘Slide Size’ to choose your preferred orientation and size as your starting point.
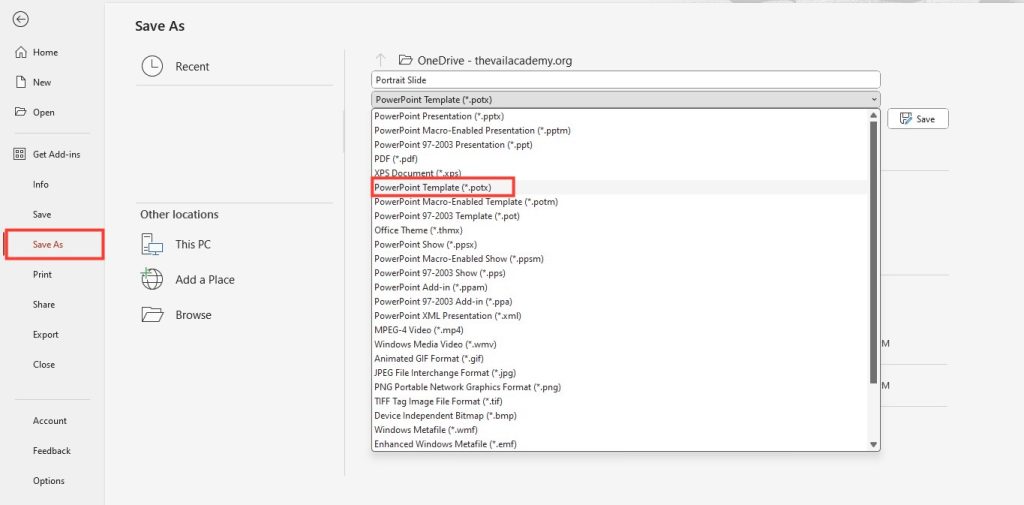
STEP 3: Once you’ve adjusted these settings, save the presentation as a template by going to ‘File’ > ‘Save As’ and selecting ‘PowerPoint Template (*.potx)’ from the ‘Save as type’ dropdown menu.
STEP 4: Name your template and save it in the designated Templates folder or a personal directory.
Next time you start a new presentation, use your custom template to kick things off with your desired orientation already in place, saving you the hassle of adjusting the settings for each new project.
Adapting Slide Orientation to Audience and Context
When adapting slide orientation, consider both your audience and the context. If you’re presenting to a virtual audience, landscape orientation often works best as it fills the typical widescreen format of computer monitors. For in-person meetings where printed handouts are provided, portrait might be better, especially if detailed text is present. Additionally, consider the setting: a portrait orientation could be utilized for digital signage or displays where the screens are set up vertically.
Ultimately, the decision should enhance the delivery of your message and cater to the ease of consumption by your audience, making your presentation not just memorable but also comfortable to follow.
FAQs About PowerPoint Orientation Changes
How Can I Make One Slide Vertical in a PowerPoint Presentation?
To make one slide vertical in a PowerPoint presentation, you’ll need a workaround as PowerPoint doesn’t support different orientations in the same file. Create a separate portrait-oriented presentation for the slide you want vertical, save it, and then hyperlink to it from your main landscape presentation. This method ensures a smooth transition during your presentation without disrupting the flow.
What Are Some Tips for Keeping Content Unaltered When Changing Slide Orientation?
To keep content unaltered when changing orientation, consider using ‘Slide Master’ to ensure global changes don’t distort individual elements. Also, adjust slide content manually rather than relying on auto-fit features to maintain control over the layout and appearance. Always preview your slides after changing orientation to check for any inconsistencies.
How to have horizontal and vertical pages in PowerPoint?
Having horizontal and vertical pages in the same PowerPoint presentation isn’t directly possible, but you can link different presentations with varying orientations. Create separate presentations for each orientation, and use action buttons or hyperlinks to switch between them during your presentation. This gives the illusion of a single presentation with multiple orientations.
How do I combine landscape and portrait in PowerPoint?
To combine landscape and portrait slides in PowerPoint, create two separate presentations, one with landscape orientation and another with portrait orientation. Then, place hyperlinks in your primary presentation that connect to specific slides in the alternate orientation. This allows you to switch between presentations seamlessly during your slideshow, giving the effect of a combined orientation presentation.
John Michaloudis is a former accountant and finance analyst at General Electric, a Microsoft MVP since 2020, an Amazon #1 bestselling author of 4 Microsoft Excel books and teacher of Microsoft Excel & Office over at his flagship MyExcelOnline Academy Online Course.

