
The Power of Hyperlinks in Engaging Your Audience
PowerPoint has long been the go-to tool for presentations, offering a visual counterpart to verbal communication. However, through the integration of hyperlinks, presentations can now become a dynamic, interactive experience. Hyperlinks allow you to connect your slides to supplementary content, giving your audience the autonomy to explore topics in real time.
Why Mastering Clickable Hyperlinks is a Game Changer
Unlocking the full potential of PowerPoint presentations doesn’t just come from slick transitions or high-quality images – it’s also about creating an interactive dialogue with your audience. Mastering clickable hyperlinks elevates your presentation from a passive delivery of information to an active exploration. It empowers you to create a non-linear journey through your content, which not only boosts engagement but can also make complex information more accessible.
Download our 141 Free Excel Templates and Spreadsheets!
Key Takeaways
- To insert clickable hyperlinks in PowerPoint for seamless navigation between slides, choose “Place in This Document” from the “Insert Hyperlinks” menu, then select the desired slide number and click OK.
- Hyperlinks can be applied not just to text but also to objects within PowerPoint slides—transforming images, shapes, and graphics into interactive elements that engage the audience and enhance the presentation’s dynamism.
- For external references, link to web pages or email addresses by formatting them as clickable hyperlinks within your presentation, allowing for a more integrated and resourceful viewer experience.
Table of Contents
Crafting Compelling Hyperlinks
Inserting Clickable Text Links
Digital literacy involves more than typing text on slides – it’s about making them interactive, and here’s how you can weave that magic with clickable text links:
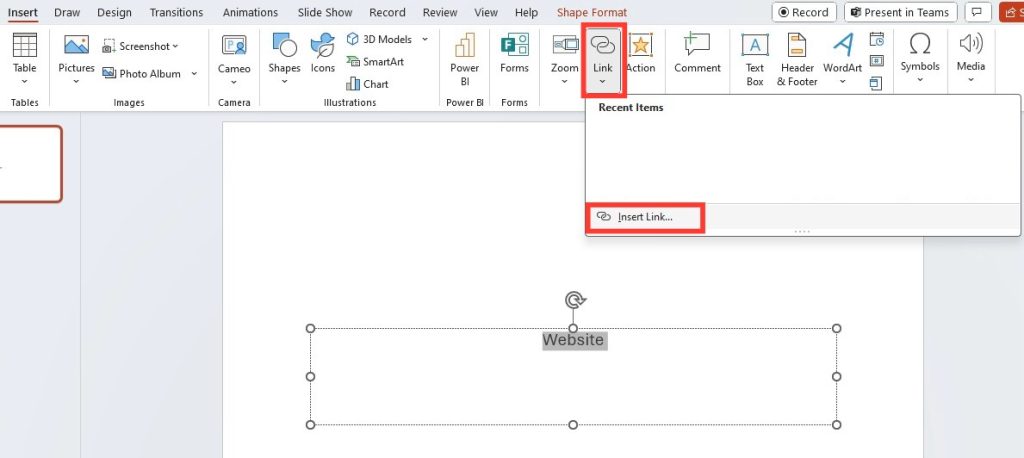
STEP 1: Highlight the text that you want to become a hyperlink.
STEP 2: Navigate to the “Insert” tab on the PowerPoint ribbon.
STEP 3: Click on “Insert Link” within the “Links” group.
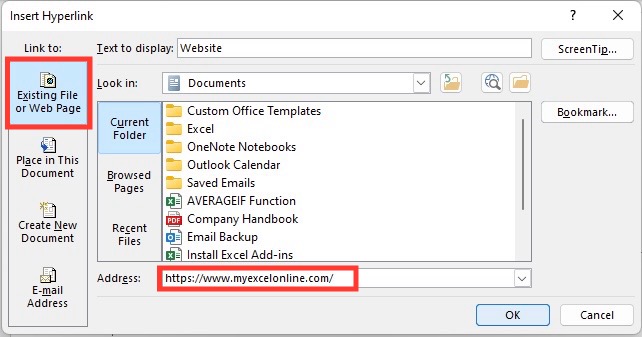
STEP 4: In the dialog box, enter the web address for an external link or choose a specific slide within your presentation.
It’s straightforward – by transforming text into links, you weave an interactive web that leads your audience to additional insights or resources seamlessly.
Remember, clickable text links should always be relevant and provide value, enhancing the audience’s understanding of the topic.
Making Objects and Images Hyperactive
Transforming static images and objects into clickable gateways opens up a whole new dimension in your presentations. Here’s how you can turn objects and images into hyperactive elements:
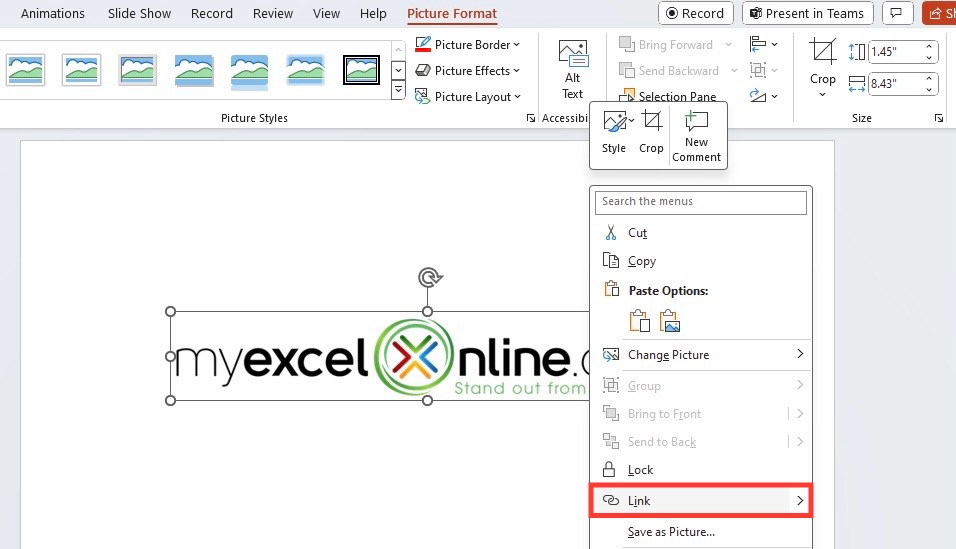
STEP 1: Click on the image or object you want to convert into a hyperlink.
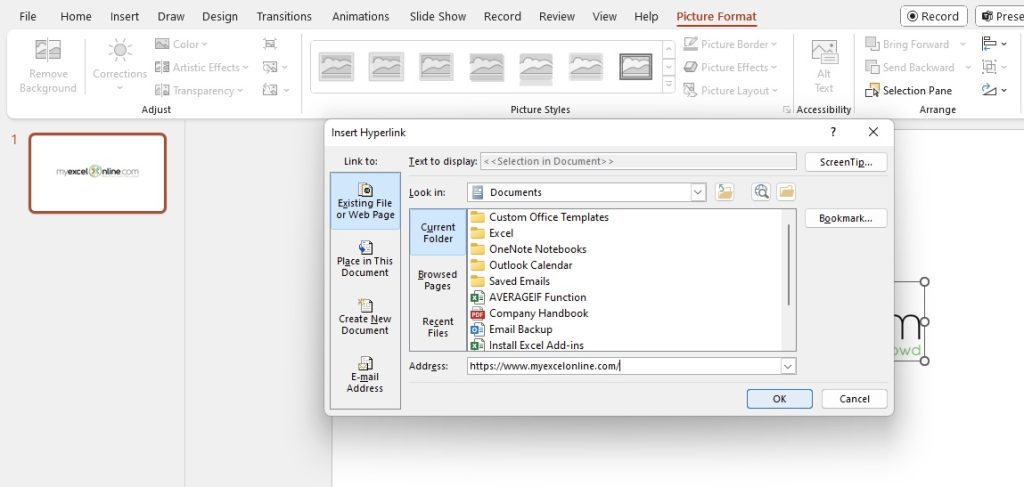
STEP 2: Right-click and select “Hyperlink,” or go to the “Insert” tab and choose “Hyperlink” from the “Links” group.
STEP 3: In the dialog box, specify the destination of the link – it could be another slide within the presentation, a document, an email address, or an external website.
When you make images or objects hyperactive, they can serve as visual cues that invite your audience to delve deeper into the content, making the presentation more interactive and memorable.
Just a quick note: When deciding which images or objects to make clickable, consider their relevance to the content and the intuitive cues they provide for your audience.
Advanced Hyperlinking Techniques
Linking to Different Slides Within Your Presentation
Fine-tuning the flow of your PowerPoint presentation can be just like directing a show, and hyperlinking between slides is your directorial debut. Here’s the step-by-step guide:
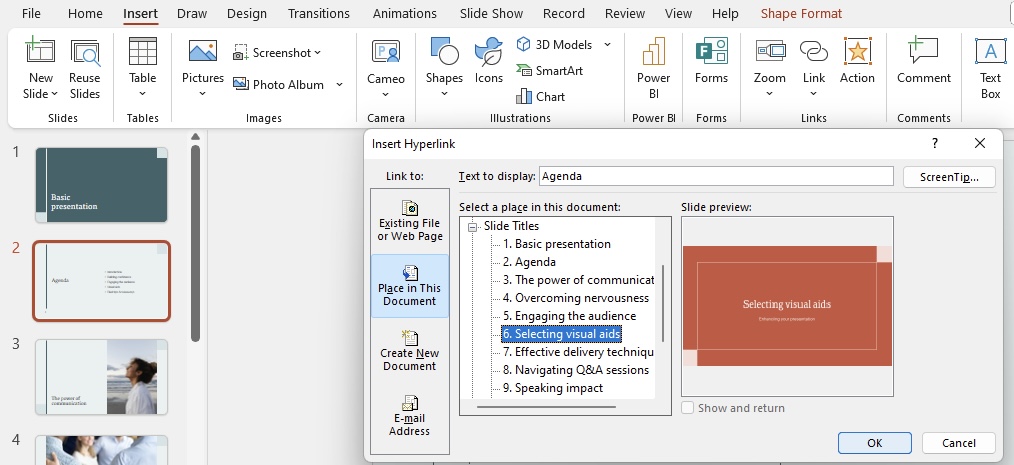
STEP 1: Select ‘Place in this document’ in the ‘Hyperlink’ menu.
STEP 2: Pick the slide you wish to jump to and click ‘OK’.
By establishing links within your presentation, you offer the audience a unique path through your narrative, bypassing slides that aren’t pertinent to the immediate discussion and creating a tailored experience.
This advanced technique ensures each presentation can adapt on-the-fly to audience feedback or questions, demonstrating not just preparedness but also a comprehensive mastery of your subject matter.
Embedding External Website Links and Email Addresses
Linking to valuable resources outside your presentation is not only insightful – it’s also incredibly functional. Here’s how you can broaden your presentation’s horizons by embedding both external website links and email addresses:
Embedding Website Links
STEP 1: Choose the text or object for the hyperlink.
STEP 2: Click “Hyperlink” from the “Insert” tab.
STEP 3: Type or paste the website’s URL into the ‘Address’ box.
Linking Email Addresses
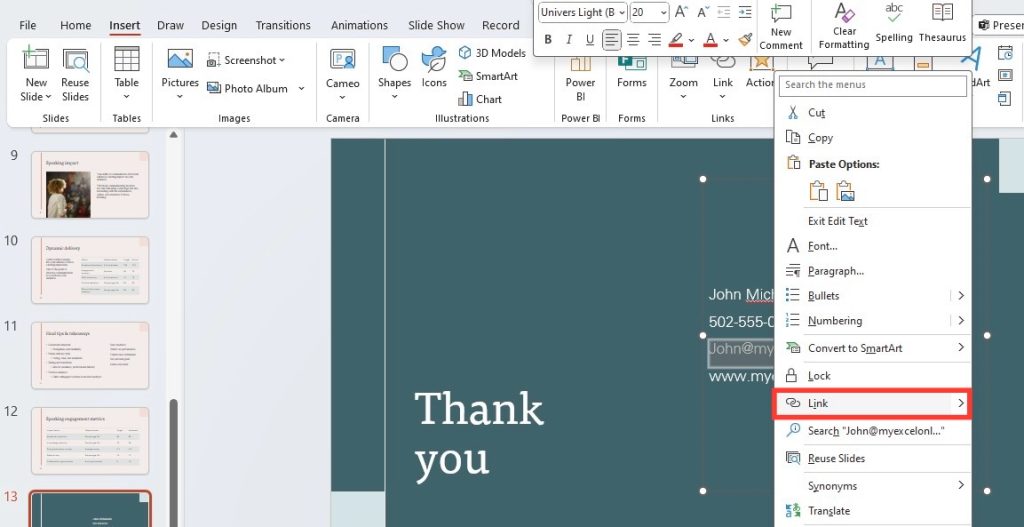
STEP 1: Select the text or object you want to link to an email.
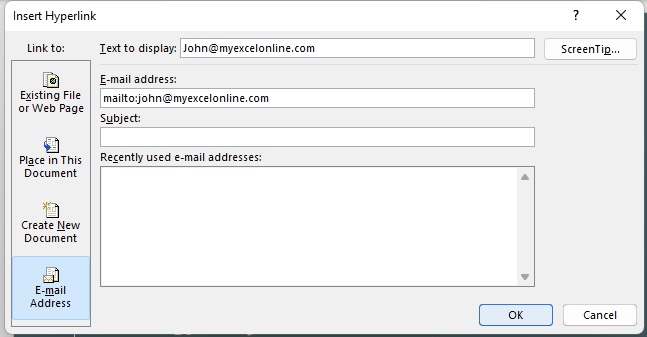
STEP 2: Click “Hyperlink”, then choose ‘Email Address’ from the options.
STEP 3: Enter the email address and an optional subject line.
By embedding website links, you extend your presentation into the vast world of the internet, providing easy access to supplementary information. Email addresses become clickable invitations for further communication, making the gap between presenter and audience as small as a simple click.
These links act as bridges, facilitating immediate engagement and continued dialogue even after the presentation concludes.
Navigating Action Buttons and ScreenTips
The Role of Action Buttons in Slide Navigation
Navigating through your PowerPoint presentation should feel intuitive and user-friendly, and this is where action buttons shine. These are the interactive buttons that lead your audience through the story you’re telling. Here’s how they can revolutionize slide navigation:
Action buttons can be set to jump to a specific slide, play a sound, or perform other predefined actions. Their intuitive visuals guide users through self-running presentations at kiosks or booths, creating an interactive experience even without a presenter.
For instance, you could add a home icon that, when clicked, returns the viewer to the introductory slide, making navigation simple and efficient. Or, you could use arrows for forward and backward movement through the slides, mimicking a hands-on experience.
Whether your audience is attending in person or viewing your slideshow remotely, action buttons can make your presentation feel more like a guided journey than a static sequence of slides.
To wrap it up, action buttons aren’t just navigation aids; they empower your audience, giving them some control over the presentation’s flow. This interactive feature can significantly enhance the overall user experience.
Enhancing Usability with ScreenTip Tooltips
A ScreenTip is that extra bit of guidance, those couple of words that pop up when you hover over a hyperlink, enhancing clarity and usability. In PowerPoint, adding ScreenTip tooltips to your hyperlinks can provide your audience with context or instruction that enriches their interactive experience. Here’s how you can add these helpful hints:
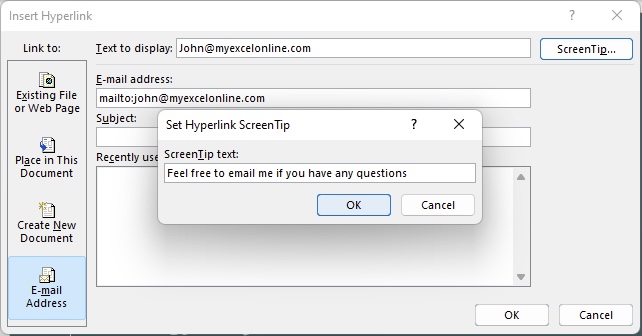
STEP 1: After clicking “Hyperlink” in the “Insert” tab, hit the “ScreenTip” button in the top-right corner of the dialogue box.
STEP 2: Type your tooltip text, which should be concise yet informative.
STEP 3: Click “OK” to save the ScreenTip, and then “OK” again to finish your hyperlink setup.
Consider ScreenTips as your silent partners in presentation, giving out brief but essential info, reminding your audience of where a link will take them, or offering additional instructions without cluttering your slide.
Using ScreenTips smartly can dramatically elevate the usability of your presentation, making it more accessible and user-friendly.
Remember, the key to an effective ScreenTip is brevity and clarity – this tooltip should be a whisper of guidance, not a shout.
Customizing the Hyperlink Experience
Changing the Visual Style of Your Hyperlinks
Dress up your hyperlinks to match the style and elegance of your presentation with a few simple steps. If the default blue and purple aren’t aligning with your aesthetic, here’s how to adjust the visual appearance of your hyperlinks to ensure they contribute to, rather than detract from, your design:
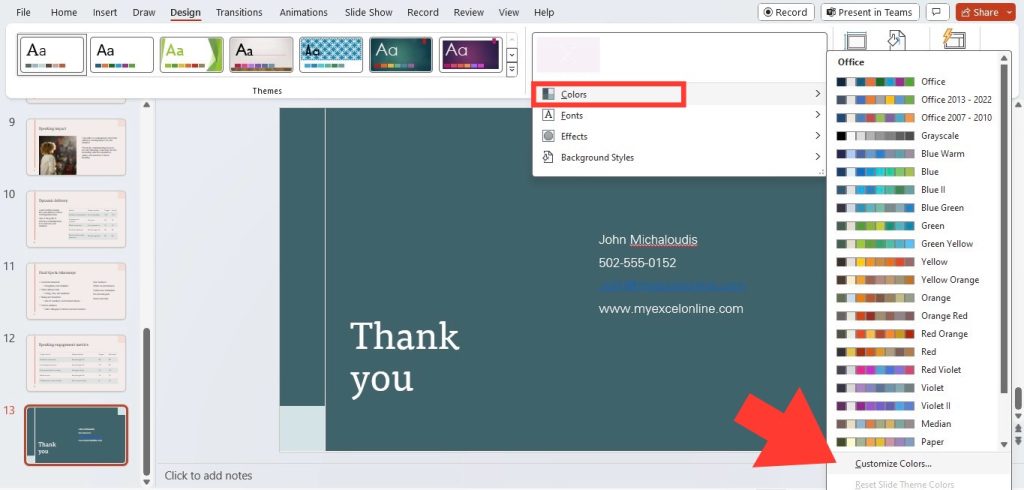
STEP 1: Click on the “Design” tab in PowerPoint’s menu.
STEP 2: In the “Variants” group, click on the drop-down menu.
STEP 3: Select “Colors” and click “Customize Colors” at the bottom of the submenu.
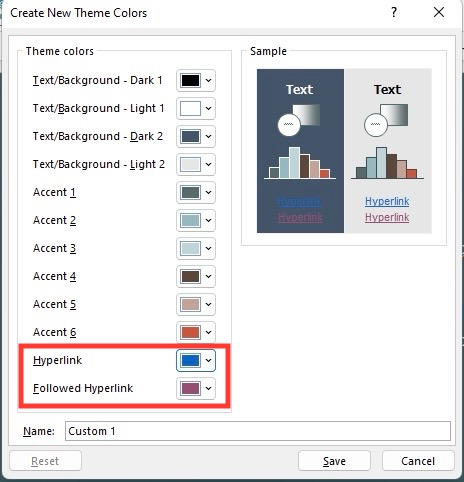
From here, you can choose new colors for “Hyperlink” and “Followed Hyperlink” – those links that have been clicked on during the presentation. This customization allows for a cohesive visual experience where the hyperlinks feel like an integral part of the design rather than a distracting, default element.
After tweaking the colors to your satisfaction, your hyperlinks will aesthetically harmonize with your presentation’s theme, enhancing the overall design coherence. This simple action can make a world of difference in terms of visual professionalism.
Remember: Hyperlink colors should offer contrast with the slide background to ensure readability while complementing the overall design palette.
Creating Transparent Hyperlink Areas for Seamless Design
Sometimes, you might need to make a hyperlink in your presentation that doesn’t interfere with your design. Transparent hyperlink areas are the perfect solution for maintaining the aesthetic while keeping your content interactive. Follow these steps to create a transparent hyperlink area:
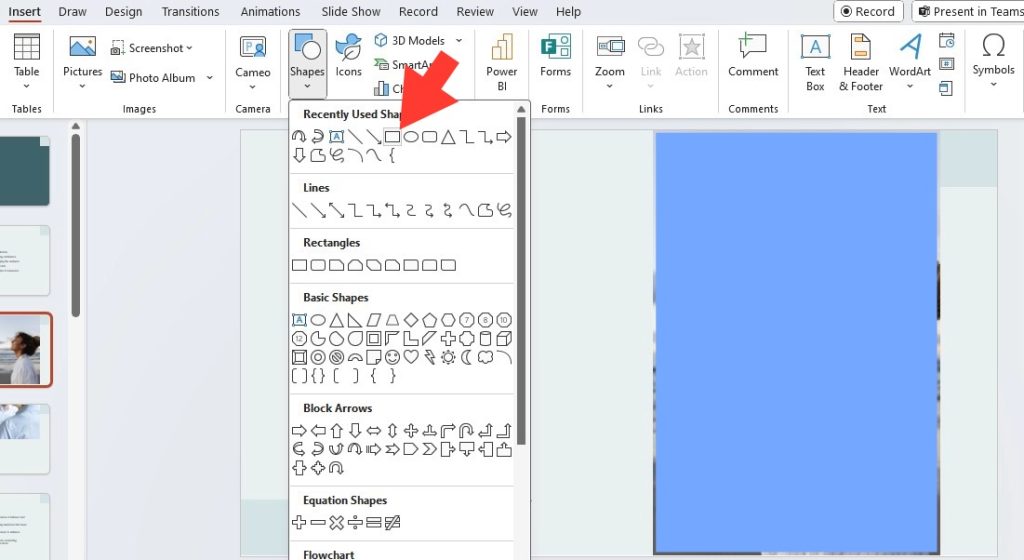
STEP 1: Go to the “Insert” tab on the PowerPoint ribbon and select “Shapes.”
STEP 2: Choose a rectangle or another shape that suits the object you want to link.
STEP 3: Draw the shape over the desired area – be it a video, SmartArt, or an image.
STEP 4: Right-click the shape, select “Link,” and then add your desired hyperlink destination.
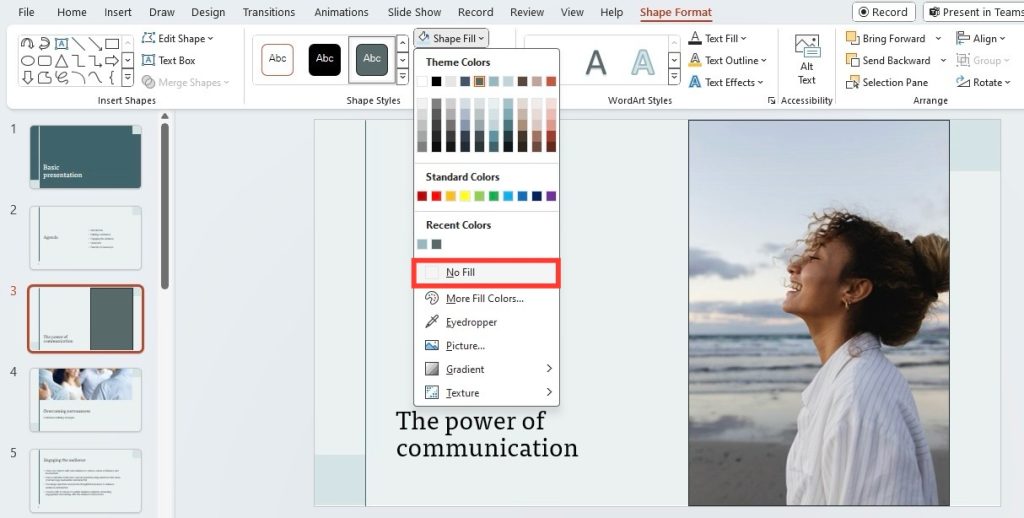
STEP 5: After setting up the link, right-click the shape again, choose “Format Shape,” and set the fill to “No Fill” and the outline to “No Outline.”
Your hyperlink is now invisible, ensuring that your design remains uncluttered while still offering interactive functionality. If you’re hyperlinking a video, remember not to cover the entire area if you need access to video controls or consider setting the video to play automatically.
With this savvy technique, your interactive elements maintain the sleek look of your PowerPoint presentation, proving that functionality and design can indeed coexist beautifully.
Please note that when creating transparent hyperlink areas, it’s crucial to consider the user experience, ensuring that it’s clear where to click without detracting from your design’s visual appeal.
Troubleshooting Common Hyperlink Issues
Ensuring Hyperlink Functionality Across Platforms
In today’s versatile tech environment, it is essential to make sure your hyperlinks work flawlessly across various platforms – from desktops to tablets, and from PowerPoint’s desktop application to its web version. To maintain hyperlink functionality no matter where your presentation is accessed, follow these tips:
- Use standard web protocols (like https://) when linking to websites to ensure compatibility.
- Keep file path links relative (not absolute) if you plan to share your presentation so that they don’t break when moved to a different device.
- Check your hyperlinks after transferring your presentation to a different operating system or between online and offline versions of PowerPoint.
Hyperlink testing across platforms is paramount to avoid technical hiccups during your presentation. If you’re embedding documents or other files, consider hosting them online and linking to the cloud location rather than embedding them directly into the presentation. This approach often leads to better accessibility across different devices.
In essence, the more universally compatible your hyperlinks, the more professional your presentation will appear to your audience, regardless of where or how they are viewing it.
Avoiding Broken or Unresponsive Links
The last thing you want during a presentation is to encounter a hyperlink that leads to nowhere. To prevent the embarrassment of broken or unresponsive links, here’s what to do:
- Regularly test all the links in your presentation to ensure they lead to the correct destination.
- Update your links if the destination URLs have changed since you first added them to your slides.
- Use reliable sources and websites when linking to external content to reduce the risk of future unavailability.
- Keep a backup plan. Have the main points or screenshots of the linked content within your presentation in case the link fails to work on presentation day.
- Store all linked files locally in the same folder as your presentation or use reliable cloud services to mitigate the risk of broken file paths.
By proactively managing and testing your hyperlinks, you can maintain the integrity and smooth flow of your presentation, instilling confidence in your audience and ensuring that technical glitches don’t trip up your delivery.
Remember, a good presenter is like a good webmaster; they ensure every link is up and running and ready to provide valuable information. Avoiding broken hyperlinks is not just about maintenance—it’s about trust and credibility.
Practical Applications for Clickable Hyperlinks
Conducting Interactive Quizzes and Educational Games
Interactive quizzes and educational games are not just for classroom fun – they can also be powerful tools for reinforcing learning in your audience. Here’s how clickable hyperlinks can turn your PowerPoint slides into an educational adventure:
- Use hyperlinks to connect questions to the corresponding answers. If correct, it can lead to the next question, while an incorrect answer can redirect to an explanation slide.
- Create a gameboard-style slide where each ‘space’ represents a different question or challenge, with hyperlinks that guide players through the game.
- Embed hidden ‘Easter Egg’ hyperlinks in images for a fun, interactive discovery element during the quiz.
This method of using hyperlinks for quizzes and games effectively maintains engagement by turning passive observers into active participants. It’s a fun way to foster interactivity and can be particularly useful in both educational settings and corporate training environments.
Interactive learning experiences empower audiences to engage with content more deeply, encouraging retention and making your presentation a memorable one. They’re not just about fun—they’re your secret weapon for impactful, effective information delivery.
Streamlining Corporate and Business Presentations
In the corporate world, time is currency, and efficiency is king. Using clickable hyperlinks in business presentations can streamline the flow of information and keep your audience focused. Here’s how:
- Create a table of contents slide with hyperlinks to each section of your presentation, allowing for a quick transition to areas of interest or concern.
- Embed links to supporting documents, reports, and spreadsheets within your slides, so stakeholders can easily access detailed data.
- Use hyperlinks to connect your presentation to real-time company dashboards or websites that attendees can review later for more in-depth analysis.
These hyperlinks act as a bridge between your presentation and a vast pool of business intelligence, ensuring that stakeholders can navigate the corporate terrain with all the tools they need at just a click away.
In the streamlined world of business presentations, clickable hyperlinks help you deliver precise and pertinent information without disruptive detours. They’re not only a nod to modernity but also a salute to the pace and pragmatism of the business environment.
Frequently Asked Questions About How to Insert Hyperlinks in PowerPoint
What PowerPoint Objects Can Be Assigned With a Hyperlink?
In PowerPoint, a variety of objects can be turned into clickable hyperlinks. You can assign hyperlinks to text, whether it’s a single word or an entire text box, shapes, images, and even SmartArt graphics. Each clickable object can lead to external websites, email addresses, different slides within your presentation, or other files. However, note that certain objects like videos or graphs are not hyperlinked directly; you would need to overlay a transparent shape to hyperlink such content.
Can I Customize the Hyperlink Color in My PowerPoint Presentation?
Yes, you can customize the color of hyperlinks in PowerPoint to match your presentation’s design. Here’s how you do it:
STEP 1: Click on the “Design” tab, then the “Variants” group’s drop-down arrow.
STEP 2: Choose “Colors” and select “Customize Colors” at the bottom.
STEP 3: In the dialog box that appears, click the button next to “Hyperlink” and “Followed Hyperlink” to choose new colors.
Modifying hyperlink colors can enhance readability against your slide background and integrate them into your presentation’s overall color scheme.
How do I change it back to the default?
To revert your PowerPoint hyperlink to its default color, you simply need to reset your presentation’s color scheme:
STEP 1: Navigate to the “Design” tab.
STEP 2: Click on the “Variants” group’s drop-down arrow and select “Colors.”
STEP 3: Choose the default color scheme, usually named after your current theme.
Alternatively, the “Clear all formatting” tool also reverts customized text back to the default format. Just highlight the hyperlink, and click the “A” with the eraser icon on the Home tab.
If neither of these options works, you could manually set the hyperlink color to the default PowerPoint blue (RGB: 0, 102, 204) and the followed hyperlink color to a darker shade of blue (RGB: 128, 128, 128).
Just like that, your hyperlinks should now reflect the original PowerPoint color settings, maintaining a uniform look throughout your presentation.


John Michaloudis is a former accountant and finance analyst at General Electric, a Microsoft MVP since 2020, an Amazon #1 bestselling author of 4 Microsoft Excel books and teacher of Microsoft Excel & Office over at his flagship MyExcelOnline Academy Online Course.


