In this interconnected world, the ability to present your ideas effectively in different languages can have a profound impact. When you create presentations in PowerPoint, ensuring that your language settings are accurate is vital to communicate your message clearly. Having correct language settings not only aids in proper spelling and grammar checks but also enhances the professionalism and polish of your presentation.
Learn about Formulas with our 101 Advanced Excel Formulas & Functions Examples!
Key Takeaways
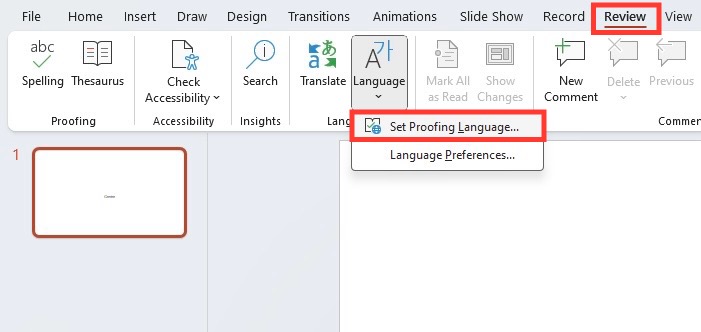
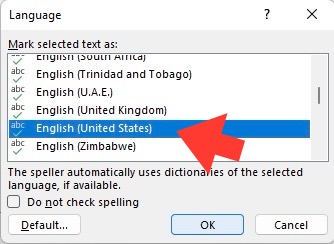
- To change the language settings for spell check in PowerPoint, you can open your presentation, select the text, then navigate to Review > Language > Set Proofing Language on the ribbon bar, choose the desired language from the list, and press “OK” to apply the changes.
- PowerPoint’s default spell check language matches your Office installation’s default language, but you can customize the language for each text element individually within your PowerPoint slides.
- If you frequently work with multiple languages, consider using a Spell Checker Language Switcher add-in, which is compatible with all PowerPoint versions from 2010 and beyond; it allows you to run spell checks in multiple languages and quickly switch between your four preferred languages.
Overview of PowerPoint’s Language Features
PowerPoint offers a suite of language features designed to help you create flawless presentations. From spell checking to grammar, and even the user interface, PowerPoint caters to the multi-linguistic demands of today’s global environment. You can select from an array of languages for proofing, which checks your spelling and grammar, and adjust the editing language, the one you type with. Also, there’s the interface language, which changes the display language of the menus and controls in PowerPoint.
Table of Contents
Navigating the Basics: Spell Check and Proofing Language
Setting the Proofing Language for Your Presentation
Changing the proofing language in PowerPoint is a breeze. First, navigate to “Review” on the ribbon, then select “Language” and click on “Set Proofing Language.” Here, you’ll be presented with a list of languages to choose from. After selecting your desired language, PowerPoint will begin to check your presentation’s text for any spelling or grammar issues in that language. You also have the option to set a default proofing language, making it the standard for future presentations. It’s as simple as that!
Common Pitfalls When Spell Checking in PowerPoint
When proofing your PowerPoint presentation, there are some common errors that you should be aware of to ensure your work is error-free. One such pitfall is neglecting to change the proofing language for different sections of text which may require it, leading to incorrect spell check results. Another is overlooking the red and green underlines that signal potential errors, or prematurely ignoring them without a thorough review. Misidentifying specialized or technical terms as errors is also common. Finally, failing to regularly update your Office dictionary may result in the program not recognizing new words or industry-specific jargon.
Simplifying Your Workflow: Quick Language Adjustments
Changing Text Language Across Multiple Slides
To streamline your editing process, PowerPoint allows for changing the text language across multiple slides swiftly. By selecting all slides in either Normal view’s Thumbnail pane or Slide Sorter view using CTRL+A, you can set the proofing language for the entire presentation in one go. Under the “Review” tab, click “Language,” then “Set Proofing Language” and pick the preferred language. But be mindful, this only applies to text in slide layouts and not to text boxes or shapes added later.
Advanced Tips for Perfect Presentations
Ensuring Consistency in Language Interface
Consistency in the language interface of your PowerPoint ensures a seamless experience when navigating menus and features. To keep the interface language consistent:
STEP 1: Click on ‘File’ and select ‘Options’.
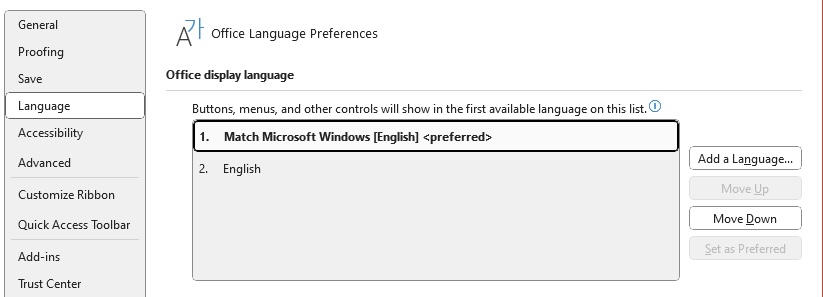
STEP 2: In the PowerPoint Options dialog box, go to the ‘Language’ tab.
STEP 3: Under “Choose Display Language,” set your preference for the “Display Language” and “Help Language.”
STEP 4: Click ‘Set as Default’ for your changes to take effect.
Remember, these changes will alter the language used across all menus, dialog boxes, and help topics.
Dealing with Special Cases and Unique Scenarios
There will be times when you face unique scenarios such as switching between complex language scripts, like logographic (e.g., Chinese) and alphabetic (e.g., English). In such cases, the standard fixes might not apply. For these special cases, ensure that each textbox or placeholder on your slides is set to the correct language to allow for the appropriate spell check. You might also need to manually switch between languages if working within a single textbox with multiple languages. This can be done via the “Language” option on the Review tab for selected text.
Integrating Global Language Settings in PowerPoint
Impact of Windows Language Settings on PowerPoint
Your Windows language settings significantly influence PowerPoint. If your system language is set to English, for example, PowerPoint will default to English for the text in menus, buttons, and for spell checking. However, if you frequently work with different languages, you have the option to change these defaults. Adjusting the Windows language influences the default typing and proofing languages in PowerPoint, making your job easier if you’re creating multilingual presentations regularly.
Visual Aids and Resources
Instructional Videos for Language Adjustment Techniques
To further assist in mastering PowerPoint’s language settings, we recommend seeking out instructional videos. These videos can visually guide you step-by-step through the process of adjusting language settings for text, proofing, and interfaces. They often provide insights and tips that can help you to avoid common mistakes and make the process much simpler. A quick search will provide various tutorials, including the official Microsoft Support videos, to get you started.
Helpful Links to Expand Your PowerPoint Mastery
Diving deeper into PowerPoint’s capabilities can unlock new levels of presentation sophistication. Helpful resources include the Office support website and dedicated PowerPoint forums, which provide answers to specific queries. Furthermore, blogs and websites with PowerPoint tutorials offer insights into advanced techniques and time-saving tricks. Bookmarking these can be a valuable reference as you continue to refine your PowerPoint skills.
FAQs: Mastering Language Change in PowerPoint
How do I set a default proofing language for all new PowerPoint presentations?
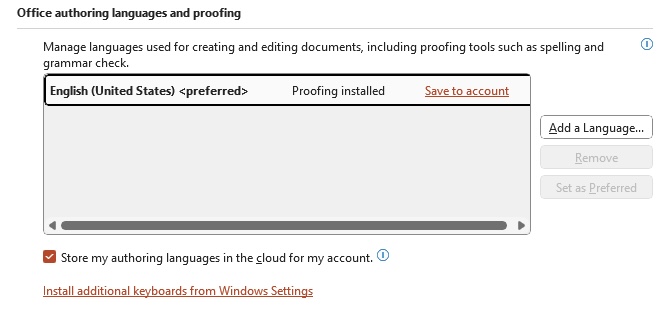
To set a default proofing language for all new presentations in PowerPoint, go to ‘File’ > ‘Options’ > ‘Language’, under “Office Authoring Languages and Proofing,” choose the language you want, and click ‘Set as Default. This will make the selected language the default proofing language for all future presentations.
Can I turn off the spell check feature for specific slides or text boxes?
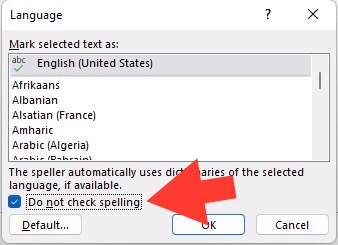
Yes, you can turn off the spell check feature for specific slides or text boxes in PowerPoint. Just select the text box or the contents within it, right-click, pick “Set Proofing Language,” and then check the box for “Don’t check spelling or grammar.” This will disable spell check for the selected text.
What language is used in PowerPoint?
PowerPoint primarily uses the language set in your Windows regional settings, influencing editing language, proofing tools, and interface display. However, you have the freedom to customize these settings within PowerPoint according to your presentation’s needs.
John Michaloudis is a former accountant and finance analyst at General Electric, a Microsoft MVP since 2020, an Amazon #1 bestselling author of 4 Microsoft Excel books and teacher of Microsoft Excel & Office over at his flagship MyExcelOnline Academy Online Course.

